To install a bathroom fan roof vent, start by measuring the location, cutting a hole in the roof, securing the vent, and sealing it properly. This ensures efficient airflow and the removal of odors and moisture from the bathroom.
A properly installed roof vent will help prevent mold, mildew, and other damage caused by excessive moisture. It is important to follow specific guidelines and local building codes to ensure a safe and effective installation. Taking the time to install a bathroom fan roof vent correctly will improve indoor air quality and protect the structural integrity of your home.
Choosing The Right Bathroom Fan Roof Vent
When it comes to installing a bathroom fan roof vent, choosing the right one is crucial. Proper ventilation is essential in a bathroom to remove excess moisture and ensure a healthy living environment. In this section, we will explore the importance of proper ventilation in the bathroom, the types of bathroom fan roof vents available, and the factors to consider when selecting the right vent.
Importance of proper ventilation in the bathroom
Proper ventilation in the bathroom is not just a matter of comfort but also a matter of health and safety. Bathrooms are prone to high levels of humidity due to showers, baths, and sinks, which can lead to mold and mildew growth. Excess moisture can also damage paint, wallpaper, and even the structure of your home. By installing a bathroom fan roof vent, you can effectively remove the moist air, preventing these problems and creating a more pleasant atmosphere in the bathroom.
Types of bathroom fan roof vents available
There are several types of bathroom fan roof vents available, each with its own unique features and advantages. Here are some common types:
| Vent Type | Description |
|---|---|
| Roof Vent Caps | A roof vent cap is a simple, cost-effective option that attaches to the roof. It allows the air to escape while preventing water and debris from entering the vent. |
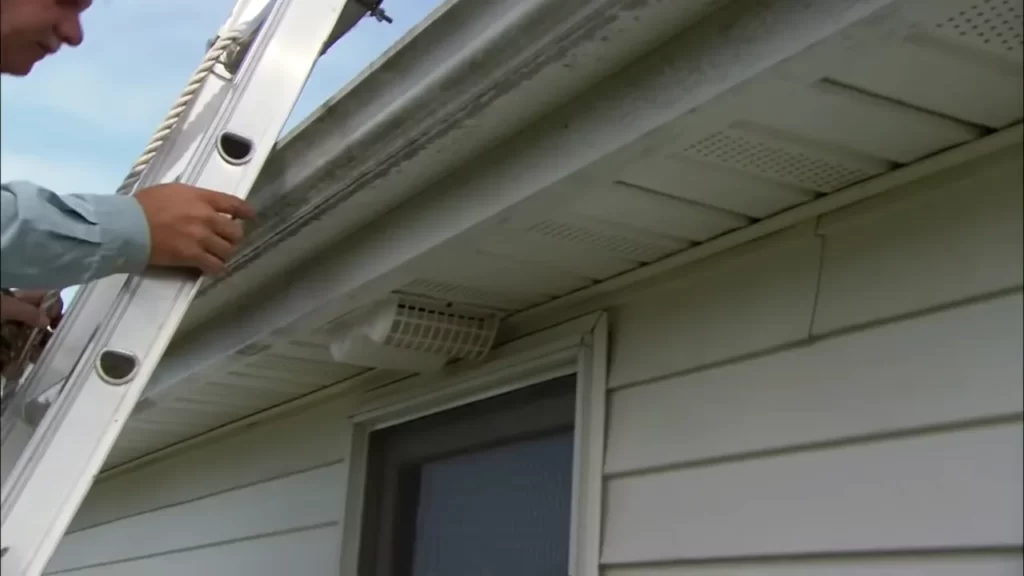
| Soffit Vents | Soffit vents are installed on the underside of the eaves, allowing air to circulate and escape through the soffit ventilation. They are ideal for bathrooms with limited roof access. |
| Wall-Mounted Vents | If the bathroom is located on the ground floor, a wall-mounted vent may be a suitable option. This type of vent is installed directly on an exterior wall and expels the moist air outside. |
| Combination Vents | Combination vents offer dual functionality by combining a bathroom fan vent with a light fixture. They are a convenient choice for bathrooms where space is limited. |
Factors to consider when selecting the right vent
Choosing the right vent for your bathroom fan roof vent installation is crucial for optimal performance. Here are some factors to consider:
- Size: Ensure that the vent is appropriately sized to accommodate the airflow requirements of your bathroom.
- Noise Level: Consider the noise level of the vent to ensure a quiet and peaceful bathroom environment.
- Ducting: Determine if the vent requires additional ducting to connect it to the fan and roof. Ensure the ducting is of the appropriate material and size.
- Energy Efficiency: Look for vents that are energy-efficient to minimize the impact on your energy bills.
- Installation: Consider the ease of installation and whether you have the necessary skills and tools to complete the installation process.
- Brand Reputation: Choose a reputable brand known for producing reliable and durable bathroom fan roof vents.
- Cost: Lastly, consider your budget and choose a vent that offers the best value for money.
By carefully considering these factors, you can select the right bathroom fan roof vent that suits your specific requirements and ensures optimal ventilation in your bathroom.

Preparing For Installation
Before you start the installation process for your bathroom fan roof vent, it’s essential to prepare yourself by evaluating the existing ventilation system, gathering the necessary tools and materials, and taking safety precautions. By doing so, you’ll ensure a smooth and successful installation that will improve the air quality in your bathroom and prevent mold and mildew growth.
Evaluating the existing ventilation system
Before installing a bathroom fan roof vent, it’s crucial to evaluate your existing ventilation system. This step will help you determine if your current setup is effective or if any modifications need to be made. Begin by inspecting the ductwork, checking for any signs of damage or blockages. You should also measure the diameter of your existing duct to ensure compatibility with the new fan. By evaluating your current system, you’ll have a better understanding of what needs to be done during the installation process.
Gathering necessary tools and materials
Preparing for the installation also involves gathering the necessary tools and materials. To complete the project, you’ll need a ladder, a power drill, screwdrivers, duct tape, roofing nails, caulking, and a new bathroom fan roof vent. Additionally, ensure you have appropriate safety gear such as gloves and safety glasses. By having all the required tools and materials at hand, you’ll avoid delays and make the installation process go more smoothly.
Safety precautions before starting the installation
Prior to starting the installation, it’s essential to take certain safety precautions. This will ensure your well-being and prevent any accidents during the process. Firstly, ensure that the power supply to the bathroom is turned off to avoid any electrical mishaps. Secondly, wear appropriate safety gear, including gloves and safety glasses, to protect yourself from any potential hazards. Lastly, always exercise caution when working on a roof and make sure the weather conditions are suitable for installation. By adhering to these safety precautions, you can ensure a secure and accident-free installation process.
Removing The Old Ventilation System
Removing the Old Ventilation System
When it comes to bathroom renovations, one crucial step is removing the old ventilation system. This is necessary to ensure proper installation and functioning of your new bathroom fan roof vent. In this article, we will guide you through the process of removing the existing ventilation system from your bathroom roof. By following these steps, you can easily and safely remove the old vent and make way for a new and efficient system.
Shutting off the power supply to the bathroom fan
The first step in removing the old ventilation system is to shut off the power supply to the bathroom fan. This is imperative for your safety. Locate the circuit breaker or fuse box in your home and turn off the power to the bathroom. By doing so, you can prevent any accidents while working on the ventilation system. Make sure to notify other members of your household about the power shutdown and avoid any contact with electrical components during the removal process.
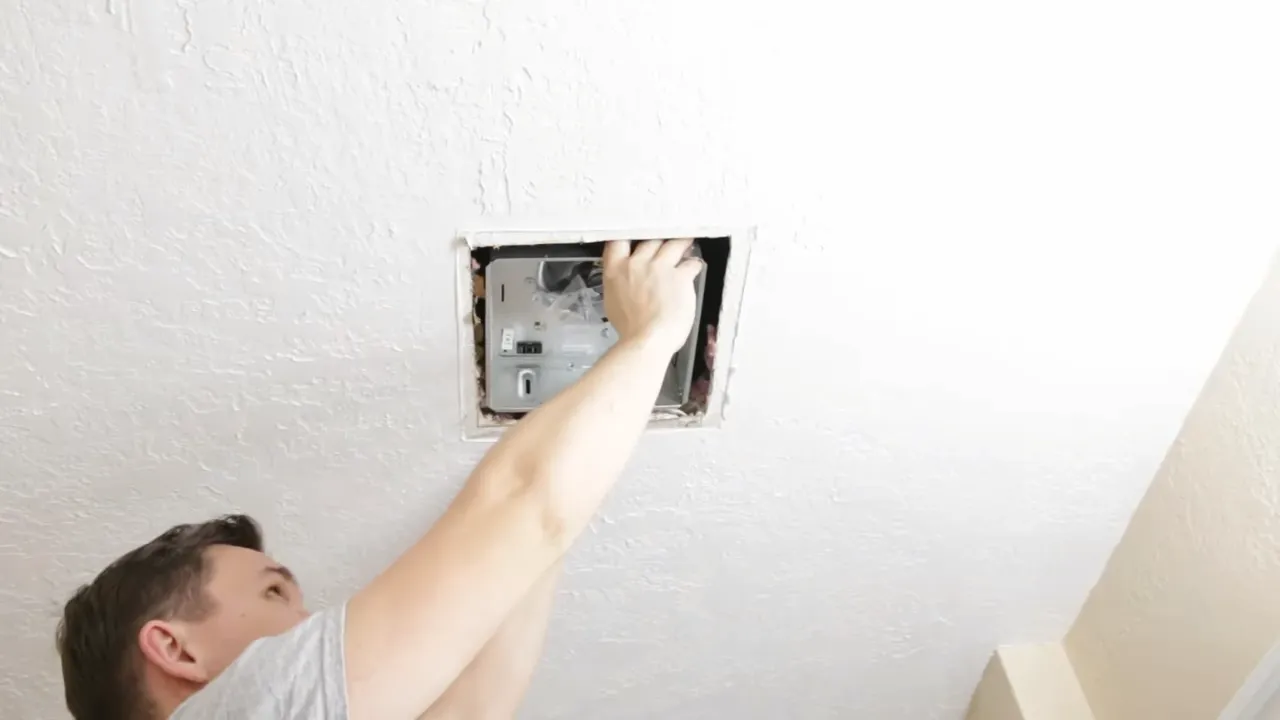
Assessing and disconnecting the existing vent
Once the power supply is turned off, it’s time to assess the existing vent and disconnect it from the bathroom fan. First, visually inspect the vent to check for any signs of damage or deterioration. Use a flashlight if necessary to examine the vent more closely. Next, carefully disconnect the vent from the fan. This may require removing screws or clamps holding the vent in place. Take caution while handling sharp objects and ensure proper safety measures are taken to avoid injuries.
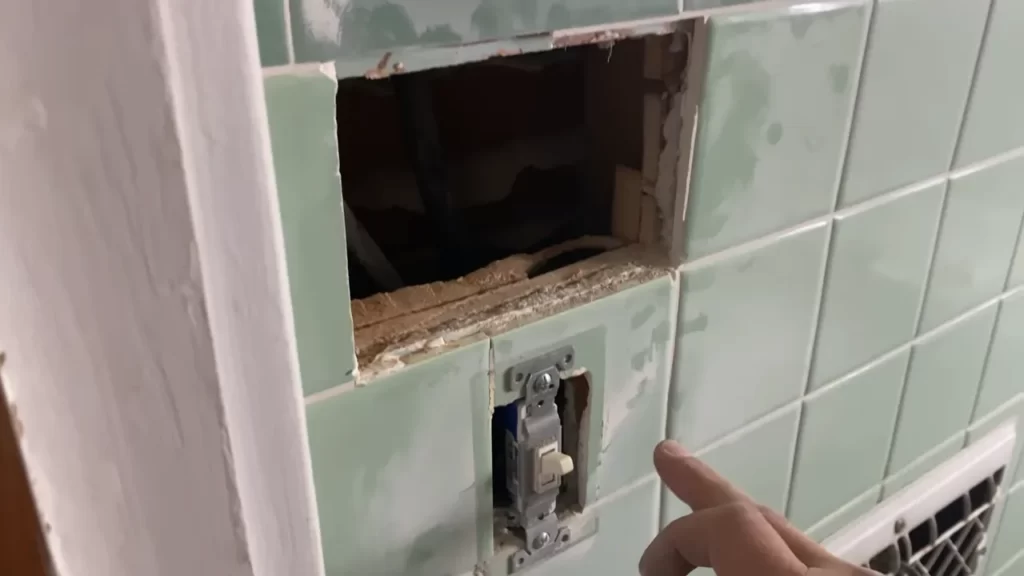
Removing any debris or obstructions
Before removing the old vent completely, it’s important to clear out any debris or obstructions that may have accumulated inside. Debris such as dust, lint, or leaves can hinder the efficiency of your new ventilation system. Use a soft brush or vacuum cleaner to remove any visible dirt or obstructions. Ensure that the entire pathway is clear, allowing better airflow once the new vent is installed. This step will help optimize the performance of your bathroom fan roof vent and extend its lifespan.
By following these steps and adhering to safety measures, you can successfully remove the old ventilation system from your bathroom roof. Remember to exercise caution and wear suitable protective gear throughout the process. With the old vent removed, you are now ready to install your new bathroom fan roof vent, providing better air circulation and eliminating moisture from your bathroom efficiently.
Measuring And Positioning The New Roof Vent
One crucial step in installing a bathroom fan roof vent is measuring and positioning the new vent. To ensure optimal functionality and efficient ventilation, it’s important to determine the optimal location for the vent, measure and mark the roof area for the opening, and then cut the opening for the new vent. Follow these steps to get started:
Determining the optimal location for the vent
When determining the optimal location for your bathroom fan roof vent, there are a few factors to consider. First, you’ll want to ensure that the vent is positioned away from any potential obstructions such as roof trusses or rafters. This will help to avoid unnecessary complications during the installation process. Additionally, choosing a location close to the bathroom fan itself will help to minimize the length of ductwork needed, ultimately improving the airflow efficiency of your ventilation system.
Measuring and marking the roof area for the opening
Once you’ve determined the optimal location for the vent, it’s time to measure and mark the roof area where the opening for the vent will be cut. Start by measuring the diameter of the vent itself. You will use this measurement to mark the center point of the vent opening on the roof. Ensure that the marked center point aligns with the optimal location determined earlier. Using a measuring tape, measure the distance from the nearest roof edge to the center point, and make a note of this measurement.
Next, use a pencil or marker to mark the outline of the vent opening on the roof. To do this, you can trace around the vent itself or use the dimensions provided in the manufacturer’s instructions. Make sure the outline is clearly visible and accurately representing the size of the opening needed for the vent.
Cutting the opening for the new vent
Now that you have the area for the opening marked on the roof, it’s time to cut the opening for the new vent. Before proceeding, be sure to wear appropriate safety gear such as gloves and goggles to protect yourself. Using a reciprocating saw or a circular saw with a metal-cutting blade, carefully cut along the marked outline of the vent opening. Take your time and make precise cuts to ensure the opening is clean and accurately matches the dimensions required for the new vent.
Once the opening is cut, remove any debris and ensure the area is clean and ready for the installation of the new vent. Take care not to damage any surrounding shingles or roofing material during this process.
With the measuring and positioning of the new roof vent complete, you’re ready to move on to the next step of the installation process. Stay tuned for our next blog post on connecting the ductwork and securing the vent in place.
Installing The Bathroom Fan Roof Vent
Installing the bathroom fan roof vent is an important step in keeping your bathroom well-ventilated and free from excess moisture. A properly installed vent helps to prevent mold and mildew growth while also improving the air quality in your bathroom. In this section, we will guide you through the process of installing the bathroom fan roof vent, including assembling the vent components, securing the vent to the roof, and installing the flashing for waterproofing.
Assembling the vent components
The first step in installing the bathroom fan roof vent is to assemble the vent components. Check the manufacturer’s instructions to ensure you have all the necessary pieces. Typically, the vent will consist of a vent cap, a duct, and connectors. Make sure all the components fit together properly before proceeding with the installation.
Securing the vent to the roof
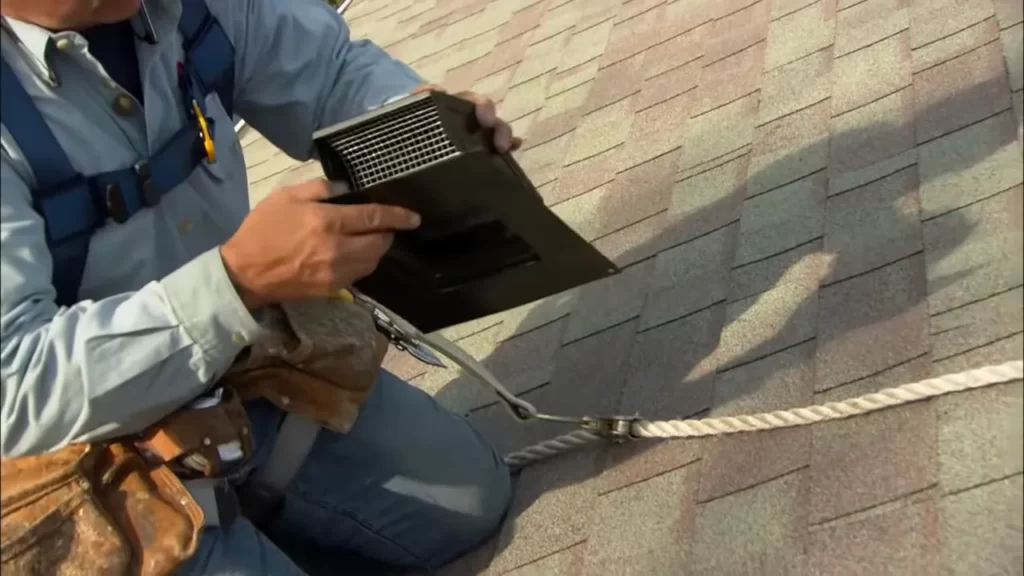
Once you have assembled the vent components, the next step is to secure the vent to the roof. Start by identifying the ideal location for the vent on the roof. It should be positioned near the bathroom fan for efficient venting. Use a drill to create a pilot hole and then cut a larger hole that matches the size of the vent cap. Place the vent cap over the hole and secure it in place using roofing nails or screws.
Installing the flashing for waterproofing
After securing the vent cap, it is crucial to install flashing for waterproofing. Flashing serves as a protective barrier against water infiltration. Start by applying roofing cement around the edges of the hole to create a watertight seal. Then, position the flashing over the hole and press it firmly into the roofing cement. Secure the flashing with roofing nails or screws, making sure it is flush with the roof surface.
Finally, apply roofing cement around the edges of the flashing to ensure a tight seal. This will prevent any water from seeping into your roof through the vent opening. Take extra care to seal any gaps or seams to provide maximum waterproofing protection.
Installing the bathroom fan roof vent may seem like a daunting task, but with the right tools and instructions, it can be a simple and rewarding project. By assembling the vent components correctly, securing the vent to the roof, and installing the flashing for waterproofing, you can enjoy a well-ventilated and moisture-free bathroom. Follow these steps carefully to ensure a successful installation and to maintain the longevity of your bathroom ventilation system.
Connecting The Fan To The New Ventilation System
Wiring the Bathroom Fan to the Electrical Supply
Once you have successfully installed the roof vent for your bathroom fan, the next step is to connect the fan to the new ventilation system. This involves wiring the fan to the electrical supply and ensuring its proper functionality. Follow these steps to get started:
- Turn off the power: Before you begin, make sure to turn off the power supply to the bathroom to avoid any electrical accidents. Locate the circuit breaker for the bathroom and switch it off.
- Find the electrical wiring: Next, identify the electrical wiring in the vicinity of the bathroom fan. This usually includes a black wire (hot), a white wire (neutral), and a green or copper wire (ground).
- Prepare the fan housing: Open the fan housing and locate the wiring compartment. This is where you will connect the fan to the electrical supply.
- Connect the wires: Using wire connectors, connect the black wire from the fan to the black wire from the electrical supply. Similarly, connect the white wires together and the ground wires together. Make sure the connections are secure.
- Secure the connections: Once the connections are made, carefully tuck the wires into the wiring compartment and close it securely. This will ensure that the connections stay in place and are protected.
Now that you have successfully wired the fan to the electrical supply, it’s time to move on to the next step of attaching the fan housing to the roof vent.
Attaching the Fan Housing to the Vent
To ensure proper ventilation in your bathroom, it’s essential to securely attach the fan housing to the roof vent. Follow these steps to complete this process:
- Access the roof: Safely climb up to the area where the roof vent is installed. Take necessary precautions and use a stable ladder to reach the roof.
- Locate the fan housing: Once you’re on the roof, locate the fan housing that you previously installed. It should be located near the roof vent.
- Align the housing: Carefully align the fan housing with the opening of the roof vent. Ensure that the housing fits snugly with the vent and there are no gaps.
- Secure the housing: Use screws or nails to secure the fan housing to the roof vent. Make sure the screws or nails are long enough to penetrate both the housing and the vent, providing a secure joint.
With the fan housing now securely attached to the roof vent, it’s time to move on to the final step: testing the fan for proper functionality.
Testing the Fan for Proper Functionality
Testing your bathroom fan after installation is crucial to ensure that it is working correctly and providing adequate ventilation. Follow these steps to test the fan:
- Restore power: Once all the connections are securely made, restore power to the bathroom by turning the circuit breaker back on.
- Turn on the fan: Use the fan control switch or the wall switch to turn on the bathroom fan.
- Check for airflow: Stand near the vent opening and feel for any airflow. You should be able to feel the air being drawn out or pushed in by the fan. This indicates that the fan is functioning properly.
- Listen for noise: While the fan is running, listen for any unusual or excessive noise. A quiet fan is a good sign of proper functionality.
If you notice any issues such as lack of airflow or unusual noise, double-check the connections and troubleshoot the problem. It’s important to address any issues promptly to ensure efficient ventilation in your bathroom.
With the fan successfully connected to the new ventilation system and its proper functionality confirmed, you can now enjoy improved air quality and reduced moisture in your bathroom.
Ensuring Proper Insulation And Weatherproofing
When it comes to installing a bathroom fan roof vent, ensuring proper insulation and weatherproofing is crucial. Without adequate insulation and protection against the elements, your roof vent could be prone to leaks, drafts, and potential damage.
Adding insulation around the vent pipe
One of the important steps in ensuring proper insulation is adding insulation around the vent pipe. This helps to prevent heat loss during the colder months and restricts the entry of cold air from outside. Inadequate insulation can lead to energy inefficiency and potentially uncomfortable bathroom conditions. To accomplish this, follow these steps:
- Measure the length of the vent pipe.
- Choose an appropriate insulation material, such as insulation sleeves or fiberglass batts.
- Cut the insulation material according to the measured length of the vent pipe.
- Wrap the insulation material around the vent pipe, ensuring a snug fit.
- Secure the insulation with adhesive tape or insulation hangers.
Sealing any gaps or openings with caulk or weatherstripping
To further enhance insulation and weatherproofing, it is essential to seal any gaps or openings around the roof vent with caulk or weatherstripping. This step helps to prevent air leakage, moisture intrusion, and the entry of pests. Follow these simple steps to seal any gaps or openings:
Protecting the roof vent from potential leaks
It is crucial to protect the roof vent from potential leaks to ensure its longevity and functionality. A leaking roof vent can cause water damage, mold growth, and compromise the overall integrity of your bathroom. Follow these steps to protect the roof vent:
- Inspect the roof vent for any signs of damage or wear.
- Apply a layer of roofing cement around the base of the vent, ensuring a watertight seal.
- Check for any cracks or gaps in the flashing and apply additional roofing cement if necessary.
- Inspect the surrounding shingles for any damage or missing pieces and replace them if needed.
By properly insulating, sealing gaps, and protecting your bathroom fan roof vent, you can ensure its optimal performance and longevity. These steps will not only save you money on energy bills but also provide a comfortable and well-ventilated bathroom environment.
Maintaining And Troubleshooting The Bathroom Fan Roof Vent
Maintaining and Troubleshooting the Bathroom Fan Roof Vent
Regular cleaning and maintenance for optimal performance
To ensure the optimal performance of your bathroom fan roof vent, regular cleaning and maintenance are crucial. Here are some steps you can follow to keep your vent in top shape:
1. Clean the fan blades: Over time, the fan blades can accumulate dust and debris, which can affect its efficiency. Use a soft cloth or brush to gently clean the blades, making sure to remove any build-up.
2. Clear the ducts: The ducts of your bathroom fan roof vent can get clogged with lint, dust, and other particles. Regularly check and clean the ducts to prevent blockage and maintain proper airflow. Use a vacuum or a brush to remove any obstructions.
3. Check the motor: The motor is the heart of your bathroom fan roof vent. Regularly inspect and clean the motor to ensure its longevity. Remove any dust or debris from the motor using a soft cloth or a small brush.
4. Lubricate moving parts: To keep the moving parts of your vent operating smoothly, apply a small amount of lubricant to the bearings or other accessible parts. This will reduce friction and prolong the life of your vent.
Common issues and troubleshooting tips
Even with regular maintenance, you may still encounter some common issues with your bathroom fan roof vent. Here are a few troubleshooting tips to help you resolve these problems:
1. Loud noises: If your vent starts making unusual noises, it could be due to a loose fan blade or debris stuck in the housing. Inspect the fan blades and housing for any obstructions and tighten any loose screws. If the problem persists, it may be time to replace the fan motor.
2. Poor airflow: If you notice reduced airflow from your vent, check the ducts for any blockages. Clear any debris or obstructions and ensure the ducts are properly connected. Additionally, check if the fan blades are clean and functioning properly. If the issue persists, you may need to replace the fan motor.
3. Fan not working: If your bathroom fan roof vent is not turning on, check the power supply and make sure it is properly connected. Inspect the wiring for any damages or loose connections. If everything looks fine, the issue may lie with the motor or the fan blades, and it is advisable to seek professional assistance.
When to seek professional assistance
While regular cleaning and troubleshooting can resolve minor issues, there are situations where professional assistance may be necessary. Consider seeking professional help if:
1. You are unsure about the electrical wiring and connection.
2. The fan motor or blades need to be replaced.
3. The vent is causing significant noise or malfunctions persistently.
4. You are unable to resolve the issue through troubleshooting.
Remember, proper maintenance and timely troubleshooting can extend the lifespan of your bathroom fan roof vent and ensure optimal performance. By following these tips and seeking professional assistance when needed, you can enjoy a well-ventilated and comfortable bathroom environment.
Frequently Asked Questions
Can You Vent A Bathroom Fan Through A Roof Vent?
Yes, you can vent a bathroom fan through a roof vent. It’s a common method of directing the air outside to remove excess moisture and odors. The fan is connected to a duct, which is then routed through the attic and terminates at a roof vent.
How Much Does It Cost To Vent A Bathroom Fan Through The Roof?
The cost of venting a bathroom fan through the roof varies depending on various factors such as materials used, labor costs, and the complexity of the installation. It is best to consult with a professional contractor for an accurate estimate.
What Is The Proper Way To Vent A Bathroom Fan?
To properly vent a bathroom fan, you should install a vent duct leading outside your home. Ensure the duct is insulated, straight, and as short as possible with minimal bends. Use a roof or wall cap to prevent outside elements from entering.
Regularly clean and maintain the vent to ensure proper airflow.
Is It Hard To Install A Bathroom Vent Fan?
Installing a bathroom vent fan is not difficult. With some basic DIY skills, you can do it easily. It helps to improve air circulation and reduce moisture in the bathroom. Just follow the instructions provided in the fan’s installation manual, and you’ll have it up and running in no time.
Conclusion
Installing a bathroom fan roof vent is a crucial step in maintaining good indoor air quality and preventing mold growth. By following the correct steps, you can ensure proper ventilation in your bathroom, effectively removing excess moisture and odors. Remember to choose the right type of roof vent and properly seal it to prevent any leaks.
Regular maintenance and cleaning will also help prolong the lifespan of your bathroom fan and roof vent. Happy venting!