To install a bath faucet, first, turn off the water supply. Then, use a wrench to disconnect the old faucet and clean the area before attaching the new faucet and securing it tightly.
Essential Tools For Faucet Installation
When it comes to installing a bath faucet, having the right tools is crucial for a successful and efficient installation process. Having the right tools not only ensures that the job is done correctly, but it also saves you time and effort.
Wrench
A wrench is an essential tool for faucet installation. It allows you to tighten or loosen bolts and nuts with ease. When choosing a wrench, opt for an adjustable one that can fit different sizes of nuts and bolts. This way, you’ll have the versatility to work on various faucet types.
Screwdriver
A screwdriver is another vital tool you’ll need for faucet installation. It helps in removing or tightening screws that hold the faucet components together. Depending on the type of screws you encounter, you may need both a flathead and a Phillips head screwdriver.
Adjustable Pliers
Having a pair of adjustable pliers is essential when it comes to faucet installation. Pliers provide a strong grip and allow you to turn or twist different types of connections. Whether you need to tighten a pipe or secure a nut, pliers will come in handy.
Pipe Cutter (if needed)
If you’re working with copper pipes and need to make any modifications or replacements, a pipe cutter is crucial. A pipe cutter allows you to cut the pipes to the desired length easily. This tool ensures that the new faucet connects seamlessly with the existing plumbing system.
Faucet Installation Kit
In addition to the individual tools mentioned above, it’s highly recommended to have a faucet installation kit on hand. This kit usually includes washers, O-rings, screws, and other small components that are commonly needed during faucet installation. Having a kit saves you from making multiple trips to the store for missing parts.
Now that you know the essential tools needed for faucet installation, you can confidently tackle this DIY project. Make sure you have all the necessary tools ready before you start the installation process for a smooth and successful experience.
Important Materials
When it comes to installing a bath faucet, there are a few important materials you’ll need to have on hand. These materials will ensure a smooth and successful installation process. Let’s take a look at each of these materials in detail:
New faucet
The most essential material you’ll need is a new faucet. Whether you’re replacing an old faucet or installing one for the first time, it’s important to choose a high-quality faucet that fits your bathroom decor and meets your functional needs. Make sure to read the manufacturer’s instructions carefully to ensure proper installation.
Plumber’s tape
Plumber’s tape, also known as Teflon tape, is a thin white tape that is used to create a watertight seal on threaded pipe fittings. Before connecting your new faucet, you’ll want to wrap plumber’s tape around the threaded ends of the pipes. This will help prevent leaks and ensure a secure connection.
Silicone caulk
Silicone caulk is a waterproof sealant that is used to fill gaps and provide a tight seal around the base of the faucet. Applying a thin bead of silicone caulk between the faucet and the sink or countertop will help prevent water from seeping into the installation area and causing damage.
Teflon tape
Teflon tape, also known as plumber’s tape, is a thin white tape that is used to create a watertight seal on threaded pipe fittings. Before connecting your new faucet, you’ll want to wrap Teflon tape around the threaded ends of the pipes. This will help prevent leaks and ensure a secure connection.
Additionally, it’s important to have a bucket or towel on hand to catch any water that may spill during the installation process. This will help prevent damage to your bathroom floor or surrounding areas.
In conclusion, having the right materials is essential for a successful bath faucet installation. Make sure to have a new faucet, plumber’s tape, silicone caulk, Teflon tape, and a bucket or towel for water catchment. These materials will help ensure a secure and watertight installation, providing you with a functional and stylish faucet for your bathroom.
Locate The Main Water Shut-Off Valve
Find the valve in the basement or under the sink
When it comes to installing a bath faucet, one of the essential first steps is to locate the main water shut-off valve. This valve is responsible for controlling the flow of water to your entire plumbing system, making it crucial to know its exact location. Typically, you can find the shut-off valve either in the basement or under the sink, depending on the layout of your home.
If your basement has exposed pipes, locating the shut-off valve should be a straightforward process. Look for a brass or metal valve handle attached to a large pipe leading from the main water line. In some cases, the valve may be labeled, making it even easier to identify. Once you’ve located the valve, be sure to familiarize yourself with how it operates, as you may need to shut it off in the event of an emergency or repair.
Alternatively, if you don’t have a basement, you can try finding the shut-off valve under the sink. In many homes, the valve is located directly below the sink, usually on the wall or cabinet. Look for a small valve handle that you can turn clockwise to shut off the water supply.
Ensure each H3 heading adheres to HTML syntax
When marking up your headings in HTML, it’s essential to adhere to the correct syntax. The H3 heading tag is used to designate a subheading within your content. To properly mark a subheading as H3 in HTML, you would use the following code:
<h3>Find the valve in the basement or under the sink</h3>By enclosing the heading text within the <h3> and </h3> tags, you tell the browser that this text should be rendered as an H3 subheading. Adhering to HTML syntax helps ensure proper rendering across different browsers and devices, improving the accessibility and readability of your blog post.

Turn Off The Water Supply
If you’re looking to freshen up your bathroom, installing a new faucet can make a big difference. However, before you get started, it’s important to turn off the water supply. This ensures a smooth installation process without any unexpected water leaks. In this guide, we’ll walk you through the steps of turning off the water supply and installing your new bath faucet.
Close the valve to stop the water flow
The first step to turning off the water supply is closing the valve to stop the water flow. Here’s how you can do it:
- Locate the water shut-off valves. These are typically located under the sink.
- Turn the valve clockwise to close it. This will stop the water flow to the faucet.
- Open the faucet to relieve any remaining water pressure. This will also let you know if the valve is closed properly.
By closing the valve, you ensure that there’s no water flowing to the faucet while you’re installing the new one. This prevents any accidental water leaks and makes the installation process much smoother.
Now that you’ve successfully turned off the water supply, you’re ready to move on to the next steps of installing your new bath faucet. Stay tuned for our upcoming guides on removing the old faucet, preparing the area for the new one, and installing the new faucet.
Release Remaining Water Pressure
Open faucets to drain any remaining water
Before installing a new bath faucet, it is crucial to release any remaining water pressure in the existing system. This step ensures that you won’t have any unexpected surprises or leaks during the installation process. Here’s how to open faucets to drain any remaining water:
- Start by locating the main water shut-off valve for your bathroom. Depending on your home’s plumbing system, this valve can typically be found near your water meter or in the basement.
- Turn the valve to the off position, shutting off the water supply to your bathroom. This will prevent any new water from entering the system while you work.
- Next, move to your bathtub and open both the hot and cold water faucets. By turning the handles counterclockwise, you’ll allow any remaining water in the system to drain out.
- Let the water run for a few minutes until it stops flowing. This indicates that the remaining water pressure has been released.
- While the water is draining, take the opportunity to gather the necessary tools and materials for installing the new bath faucet. Having everything ready in advance will make the installation process smoother and more efficient.
By following these steps to release remaining water pressure, you’ll be well-prepared to begin the installation of your new bath faucet. Taking the time to properly drain the system ensures a clean and hassle-free installation, giving you peace of mind knowing that you’ve completed this crucial step.
Disconnect The Supply Lines
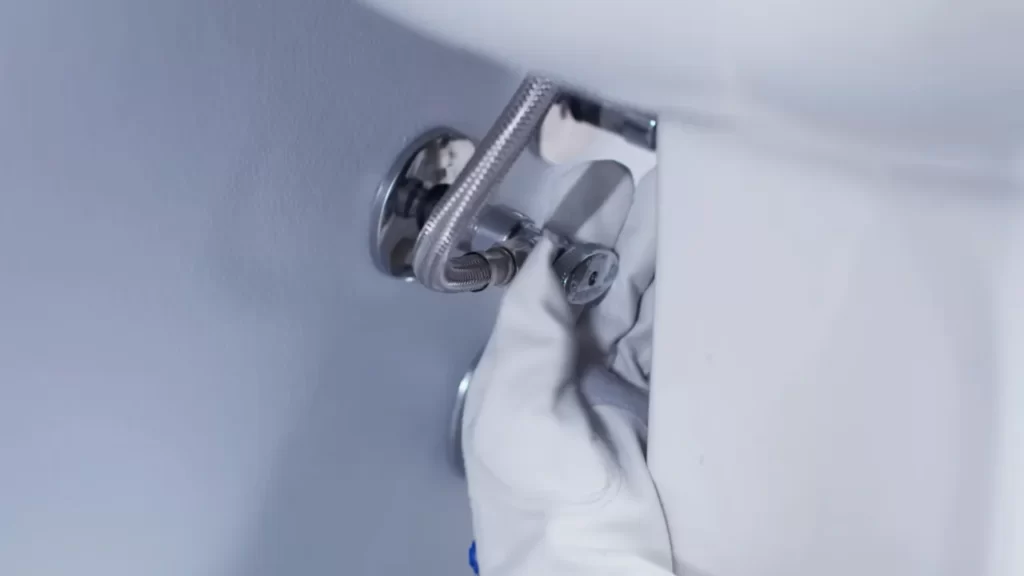
Use a wrench to loosen and disconnect the supply lines
Disconnecting the supply lines is an essential step when installing a new bath faucet. By doing so, you will ensure a smooth and hassle-free installation process. To disconnect the supply lines, you will need a wrench. This will help you loosen and detach the lines from both the faucet and the shut-off valve.
To begin, locate the supply lines connected to your existing faucet. These lines are typically made of flexible materials such as braided stainless steel or reinforced rubber. They are responsible for delivering the hot and cold water to your faucet, so it’s crucial to handle them with care.
Once you have identified the supply lines, grab your wrench and make sure it is the correct size for the connectors. Using the wrench, turn the nuts counterclockwise to loosen them. Be cautious not to apply excessive force, as this may result in damage to the fittings or pipes.
After loosening the nuts, continue using the wrench to disconnect the supply lines from both the faucet and the shut-off valve. Start with the faucet end – hold the supply line nut securely while turning the connector counterclockwise. This will detach the line from the faucet. Repeat the process for each supply line.
Next, move on to disconnecting the lines from the shut-off valves. The shut-off valves are usually located in the vicinity of the faucet, either inside a cabinet or in the basement. Just like with the faucet end, hold the nut of the supply line and turn the connector counterclockwise to disconnect it from the shut-off valve. Repeat for each supply line.
Make sure to keep a cloth or bucket handy during this process, as there may be residual water in the supply lines. Placing the cloth or bucket beneath the connections will help prevent any water from spilling onto the floor or surrounding areas.
Once you have successfully disconnected the supply lines, you are ready to proceed with the next steps of your bath faucet installation. Whether you are replacing an old faucet or installing a brand new one, taking the time to disconnect the supply lines properly will ensure a seamless and efficient installation process.
Remove The Old Faucet
Removing the old faucet is the first step in installing a new bath faucet. It is important to do this carefully to avoid damaging the plumbing or fixtures. Here are the steps to remove the old faucet:
Unscrew and remove the nuts securing the faucet
The first step in removing the old faucet is to locate the nuts that are securing it. These nuts are typically located under the sink and secure the faucet to the countertop. To remove the nuts, you will need a wrench that fits the size of the nuts.
Follow these steps to unscrew and remove the nuts:
- First, turn off the water supply to the faucet. This can usually be done by turning the valves located under the sink clockwise.
- Next, use the wrench to loosen and remove the nuts that are holding the faucet in place. It may be necessary to use some force to break the seal.
- Once the nuts are loose, carefully lift the faucet up and off the countertop. Set aside any screws or washers that may have come loose during the process.
This process may vary depending on the type of faucet you are removing. Some faucets may have additional components or require different tools to remove. It is always a good idea to consult the manufacturer’s instructions or seek professional help if you are unsure.
Once the old faucet has been removed, you can proceed with installing the new bath faucet. Stay tuned for our next blog post on how to install a bath faucet!
Clean The Area
Before installing a bath faucet, it’s vital to ensure that the area is clean and free from any excess caulk or debris. Taking the time to properly clean the area will not only improve the appearance of your new faucet but also ensure a secure and leak-free installation. Here’s a step-by-step guide on how to clean the area before installing your bath faucet:
Wipe away any excess caulk or debris
The first step in cleaning the area is to wipe away any excess caulk or debris that may have accumulated around the existing faucet. To do this, you can use a damp cloth or sponge to gently scrub the area. Make sure to remove any loose caulk or residue that may prevent the new faucet from seating properly.
If the caulk is stubborn and difficult to remove, you can also use a caulk removal tool or a putty knife to scrape away any stubborn residue. Be careful not to scratch or damage the surface of your bathtub or sink while doing this.
Ensure a snug fit
Once you have cleaned the area and removed any excess caulk or debris, it’s important to ensure a snug fit for your new bath faucet. This will help prevent leaks and ensure that the faucet is properly secured.
To ensure a snug fit, you can use a level to check if the surface is even. If it’s not, you may need to make some adjustments or use shims to level the surface before installing the faucet.
In addition to leveling the surface, you should also make sure that the holes in your bathtub or sink are the right size for the new faucet. Measure the diameter of the faucet holes and compare them to the specifications provided by the manufacturer. If the holes are too small, you may need to enlarge them using a hole saw or a drill bit.
By taking the time to clean the area and ensure a snug fit, you can ensure a successful and hassle-free installation of your new bath faucet. Remember to double-check all connections and follow the manufacturer’s instructions for the best results.
Check The Sink Configuration
Installing a bath faucet can give your bathroom a fresh new look and improve the functionality of your sink. However, before you dive into the installation process, it is important to check the sink configuration. This step ensures that the new faucet matches the layout of your sink, preventing any unexpected issues along the way.
Ensure the new faucet matches the sink layout
Checking the sink configuration is crucial to ensure a seamless installation. Before purchasing a new faucet, take a closer look at your current sink setup. Consider the following factors:
| Sink Configuration | Description |
|---|---|
| Number of Holes | Determine how many holes are present in your sink. This will help you select a compatible faucet. Common setups include single-hole, three-hole, and four-hole configurations. |
| Handle Style | Decide on the type of handles you prefer – single-handle or double-handle. Ensure the new faucet matches the handle style you desire. |
| Spout Placement | Observe where the current spout is positioned. It can be wall-mounted or deck-mounted. Choose a faucet with the appropriate spout placement. |
By carefully considering your sink’s configuration, you can prevent compatibility issues and make the installation process much smoother. Once you have determined the desired faucet specifications, you can confidently move forward with the installation process.
Now that you understand the importance of checking the sink configuration when installing a bath faucet, you can proceed to the next steps with confidence. Whether you’re upgrading your faucet for aesthetic reasons or to improve functionality, this essential step ensures a successful installation.
Apply Plumber’S Tape
Wrap plumber’s tape around the threads of the water supply connections
Now that you have gathered all the necessary tools and your new bath faucet is ready, it’s time to move on to the next step: applying plumber’s tape. Plumber’s tape, also known as thread seal tape, is a crucial component for ensuring a watertight seal between the faucet and the water supply connections. By properly applying plumber’s tape, you can prevent any leaks or water damage in the future.
To start, let’s understand why plumber’s tape is important. The threads on water supply connections can be a potential source of leakage if not sealed properly. Plumber’s tape acts as a sealant, creating a barrier between the threads and preventing any water from seeping through. It is easy to apply and provides a reliable and cost-effective solution to avoid any future plumbing concerns.
To apply plumber’s tape, follow these simple steps:
- Prepare the area: Before you start, make sure the threads on the water supply connections are clean and free from any debris or old tape. A clean surface ensures a better grip and effectiveness of the plumber’s tape.
- Hold the spool of plumber’s tape: Take the spool of plumber’s tape and hold it in your hand.
- Position the end of the tape: Find the end of the tape and position it at the starting point of the threads on the water supply connections. Ensure that the tape is facing the correct direction, which is usually indicated by an arrow on the spool.
- Wrap the tape clockwise: With a firm grip on the spool, start wrapping the plumber’s tape around the threads in a clockwise direction. Make sure to apply gentle pressure to stretch the tape slightly as you wrap it around. This helps to create a tight seal. Continue wrapping the tape until you have covered the entire threads evenly.
- Secure the end of the tape: Once you have completed wrapping the threads, tear off or cut the tape from the spool. Press the end of the tape firmly against the threads to secure it in place.
It is essential to wrap the plumber’s tape tightly and evenly without leaving any gaps or overlapping sections. This ensures a proper seal and eliminates the risk of leaks. Remember to use a suitable amount of tension while wrapping, as excessive force can cause the tape to break or tear.
Applying plumber’s tape is a straightforward process, but it plays a crucial role in preventing potential water damage and leaks. By following the steps outlined above, you can ensure an effective and watertight installation of your bath faucet. So, get ready to move on to the next step of the installation process with confidence, knowing that you have taken the necessary precautions.
Position The New Faucet
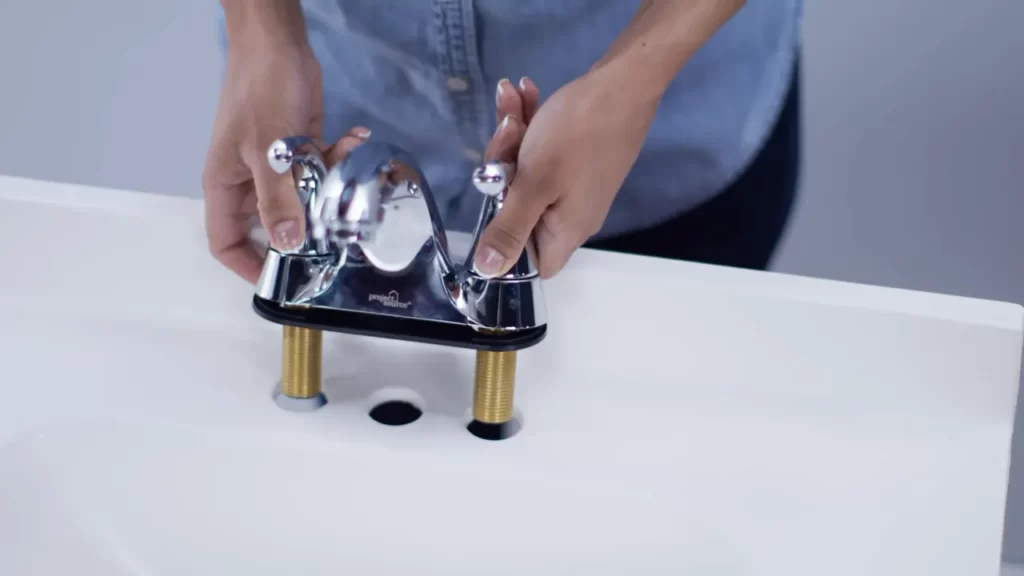
Align the new faucet with the mounting holes in the sink
When it comes to installing a bath faucet, correctly positioning the new faucet is essential for a secure and functional installation. By aligning the new faucet with the mounting holes in the sink, you can ensure a seamless fit that not only enhances the overall look of your bathroom but also prevents leaks and other potential issues down the line.
To position the new faucet, follow these steps:
Step 1: Prepare the sink
Before you begin, ensure that the sink surface is clean and free from debris. Use a cloth or sponge to wipe away any dirt or grime, ensuring a smooth and even surface for installation.
Step 2: Identify the mounting holes
Take a closer look at your sink to identify the mounting holes where the faucet will be installed. These holes are typically located towards the rear of the sink, near the center, but the exact placement may vary depending on the design and type of faucet you have chosen.
Step 3: Place the faucet
Gently position the new faucet above the mounting holes, aligning it carefully with their positions. This step may require some adjustments to ensure a perfect fit, so take your time and make any necessary changes before proceeding.
Step 4: Secure the faucet
Once the faucet is aligned with the mounting holes, use the provided hardware and a wrench to secure it in place. Tighten the nuts underneath the sink, being careful not to overtighten as this can cause damage to the faucet or the sink itself.
Step 5: Test for stability
After securing the faucet, test its stability to ensure it is properly installed. Gently wiggle the faucet to check for any movement or looseness. If there is any instability, check the nuts underneath the sink and tighten them further if necessary.
By following these steps and carefully aligning the new faucet with the mounting holes in the sink, you can ensure a secure and reliable installation that will stand the test of time. Plus, with a well-positioned faucet, you can enjoy a beautiful and functional bathroom space that truly meets your needs.
Secure The Faucet
In the previous section, we discussed the important steps to prepare for the installation of a bath faucet. Now, it’s time to secure the faucet into place. Once you have positioned the faucet correctly, you need to ensure that it is firmly secured to prevent any leaks or movement. In this section, we will cover the necessary steps to tighten the nuts and secure the faucet in place.
Tighten the nuts to secure the faucet in place
The nuts play a crucial role in holding the faucet securely in place. It’s important to tighten them properly to avoid any potential issues later on. Here’s what you need to do:
- Locate the nuts underneath the sink. These are typically located directly below the faucet.
- Using a basin wrench or adjustable wrench, start tightening the nuts in a clockwise direction.
- Make sure not to overtighten, as this can damage the faucet or cause leaks.
- Check for any movement in the faucet. If you notice any, continue tightening the nuts until the faucet feels secure and doesn’t move.
- Once you are satisfied with the tightness, double check for any leaks. Turn on the water supply and observe the faucet closely for any signs of water dripping or spraying.
By following these steps, you can ensure that your bath faucet is securely attached and ready to use. Properly tightening the nuts will not only prevent leaks but also provide stability to the faucet, giving you peace of mind.
Connect The Supply Lines
Once you have successfully mounted the new bath faucet on your sink, the next step is to connect the supply lines. This process involves attaching the water supply lines to the faucet using a wrench. Follow the step-by-step instructions below:
Attach the water supply lines to the faucet using a wrench
- Locate the two water supply lines. These are usually flexible tubes made of either stainless steel or braided nylon.
- Identify the hot and cold water supply lines. The hot water supply line is typically marked with a red indicator or letter “H,” while the cold water supply line has a blue indicator or letter “C.”
- Position yourself under the sink, ensuring you have enough space to work comfortably.
- Make sure both water supply valves are turned off. You can usually find these valves beneath the sink.
- Take the hot water supply line and connect it to the corresponding hot water supply valve. Use a wrench to tighten the connection, ensuring it is snug but not overtightened to avoid damaging the fittings.
- Repeat the previous step for the cold water supply line, connecting it to the cold water supply valve.
- Double-check both connections to ensure they are securely attached and leak-free.
- If you notice any leaks, tighten the connections slightly with the wrench until the leaks stop.
- Now it’s time to turn on the water supply valves. Slowly open them to allow water to flow into the faucet and check for any additional leaks.
By following these steps, you should be able to connect the supply lines of your bath faucet with ease. Remember to always double-check for leaks and make any necessary adjustments to ensure a secure connection. With the supply lines properly connected, you are one step closer to enjoying your newly installed bath faucet!
Check For Leaks
Open the water supply and check for any leaks
Once you have successfully installed your new bath faucet, it’s important to check for any leaks before you can consider the job complete. Checking for leaks not only ensures optimal functionality but also prevents any potential water damage to your bathroom.
To begin, open the water supply valves slowly. This will allow water to flow through the faucet and pipes. Keeping a keen eye on the connections, pay close attention to any signs of dripping or water seepage. Leaks can occur at various points, including the handle, spout, or even the supply lines.
Inspect the area around the base of the faucet as well. Look for any water pooling or dampness, as this could be a sign of a leak. It’s crucial to address these issues promptly to prevent further damage and costly repairs.
If you observe any leaks, don’t panic. Most leaks can be easily fixed with a few adjustments. Start by ensuring the connections are tightened properly using a wrench or pliers. Be careful not to overtighten, as this can also lead to leaks. Double-check all connections to ensure they are secure.
If the leaks persist, you may need to replace faulty or damaged parts. This could include worn-out O-rings, damaged washers, or even a defective cartridge. It’s always a good idea to consult the manufacturer’s instructions or seek professional assistance if you are unsure about the specific parts and their replacement procedure.
Remember, a leak-free bath faucet not only provides convenience and comfort but also contributes to water conservation efforts. Fixing leaks promptly saves water, reduces your utility bills, and helps protect the environment.
Apply Caulk Around The Base Of The Faucet
Use a caulk gun to apply a bead of silicone caulk
Applying caulk around the base of your bath faucet is an important step to ensure a watertight seal and prevent any potential leaks. To complete this task, you will need a caulk gun and silicone caulk. The caulk gun allows for controlled application of the caulk, ensuring a neat and professional finish. Silicone caulk is the ideal type to use for this project as it is waterproof, flexible, and resistant to mold and mildew. Here’s a step-by-step guide on how to apply caulk around the base of the faucet using a caulk gun:
- Start by preparing the caulk gun. Remove the tube of silicone caulk from its packaging and cut off the tip at a 45-degree angle using a utility knife. The size of the opening will depend on the size of the bead you want to apply. A smaller opening will result in a thinner bead, while a larger one will create a thicker bead.
- Insert the tube into the caulk gun, ensuring that the nozzle is facing forward and that the plunger is at the back. Press the plunger all the way in to secure the tube in place.
- Prior to applying the caulk, it’s important to clean the base of the faucet thoroughly. Use a mild detergent and warm water to remove any dirt, debris, or old caulk. Allow the area to dry completely before proceeding.
- Hold the caulk gun at a 45-degree angle, positioning the nozzle directly at the joint between the faucet base and the surrounding surface. Gently squeeze the trigger to start the flow of caulk. Move the caulk gun along the joint in a smooth motion, applying a steady bead of caulk. Be sure to cover the entire circumference of the faucet base while maintaining a consistent bead thickness.
- Once you have applied the caulk, use your finger or a caulk finishing tool to smooth out the bead. This helps to create a uniform appearance and ensures that the caulk is securely adhered to the surface. Wipe away any excess caulk with a damp cloth.
- Allow the caulk to dry and cure as per the manufacturer’s instructions. This typically takes 24-48 hours, but the time may vary depending on the brand and environmental conditions.
By following these steps and applying caulk around the base of your bath faucet, you can ensure a tight seal that protects against leaks and prolongs the lifespan of your faucet. This simple task can be done by DIY enthusiasts and adds a professional touch to your bathroom.
Smooth And Remove Excess Caulk
🔸🔹🔸
Once you’ve installed your bath faucet and secured it in place, it’s time to give the finishing touch by smoothing the caulk and removing any excess. This step not only improves the appearance of your faucet but also prevents water from seeping into the gaps and causing potential damage.
Use a Damp Cloth or Your Finger to Smooth the Caulk
Start by using a damp cloth or your finger to smooth the caulk around the edges of the faucet. This simple technique helps to create a neat and clean finish, ensuring that your faucet seamlessly blends with the surrounding surface. Smoothly rub the damp cloth or your finger along the caulk, applying gentle pressure to even out any irregularities.
Remove Excess Caulk
After smoothing the caulk, it’s important to remove any excess to achieve a professional-looking result. Excess caulk not only looks unsightly, but it can also trap dirt and debris over time, making it harder to clean. To remove the excess caulk, you can use a caulk removal tool or a utility knife.
If using a caulk removal tool, gently slide it along the edge of the caulk, taking care not to damage the surrounding surfaces. The tool will help to loosen and lift any excess caulk, making it easier to remove. Afterward, wipe away the excess caulk with a clean cloth or sponge.
If you prefer using a utility knife, carefully score along the edges of the excess caulk, creating a guide. Be cautious not to scratch the faucet or the surface. Once scored, gently lift the excess caulk with the utility knife and dispose of it. Clean the area with a damp cloth or sponge to remove any remaining residue.
Remember to take your time during this step, as precision is key to achieving a professional installation. By following these steps to smooth and remove excess caulk, you’ll be one step closer to enjoying your new bath faucet and a beautifully finished bathroom.
🔹🔸🔹
Let The Caulk Dry
Once you have finished applying caulk around the edges of the bath faucet, it is important to let it dry properly. Allowing the caulk to dry is an essential step in the installation process, as it ensures a tight seal and prevents water from leaking behind the faucet. Here are some important points to keep in mind when letting the caulk dry:
Allow the caulk to dry according to the manufacturer’s instructions
Each brand of caulk may have different drying times, so it’s critical to read and follow the manufacturer’s instructions. These instructions will provide specific guidelines on how long you should wait before using or exposing the caulk to water. By adhering to these instructions, you can ensure the caulk cures properly, extending its lifespan and effectiveness.
Check the drying time for different caulk types
The drying time for caulk can vary depending on its composition. Some common types of caulk include silicone, latex, and acrylic. It’s important to determine which type of caulk you are using and how long it typically takes to dry. For instance, silicone caulk may take longer to dry compared to acrylic caulk. Consulting the product label or conducting a quick online search can provide you with the necessary information.
Provide ample time for the caulk to fully dry
Even if the manufacturer’s instructions state a specific drying time, it’s advisable to give the caulk extra time to cure fully. This extra time ensures that the caulk has hardened and formed a strong seal between the faucet and the wall. Rushing the drying process can result in compromised adhesion and potential leaks.
Keep the area well-ventilated
Proper air circulation aids in the drying of caulk. Ensure that the bathroom is adequately ventilated by opening windows or turning on exhaust fans. This helps to speed up the drying process and prevents the accumulation of moisture, which could hinder the caulk’s ability to dry completely.
Avoid using the faucet or disturbing the caulk
During the drying period, it’s crucial to avoid using the faucet or placing any weight on it. These actions could disrupt the caulk’s curing process and compromise its effectiveness. Be patient and wait until the caulk is fully dried before using the faucet for any water-related activities.
By following these guidelines and allowing the caulk to dry properly, you can ensure a successful and long-lasting installation of your bath faucet. Taking the time to let the caulk cure will provide you with a water-tight seal that will withstand everyday use in your bathroom.
Turn On The Water Supply
Gradually open the main water shut-off valve
Now that you have successfully installed your bath faucet, it’s time to turn on the water supply. This final step is crucial to ensure that your newly installed faucet is functioning properly and ready to use. To turn on the water supply, you’ll need to locate and gradually open the main water shut-off valve.
The main water shut-off valve is usually located near the water meter or inside a utility room. It’s important to familiarize yourself with the location of your shut-off valve before beginning the installation process.
Once you have located the shut-off valve, follow these steps:
- Make sure the faucet handle is in the “off” position.
- Locate the main water shut-off valve.
- Slowly turn the valve clockwise to open it. This gradual process will prevent any sudden surges of water flow, which can cause damage to the plumbing system.
- Continue to turn the valve until it is fully open.
By gradually opening the main water shut-off valve, you are allowing water to flow through the pipes and reach your newly installed bath faucet. This gradual process helps to prevent any potential water hammer, which is a loud banging noise caused by sudden water pressure changes.
Note: If you experience any leaks or abnormalities in water flow after turning on the water supply, it may indicate a problem with your installation. In such cases, it’s recommended to turn off the water supply and seek professional assistance to address the issue.
Congratulations! You have successfully installed and turned on your bath faucet. It’s time to enjoy the refreshing flow of water and the enhanced aesthetics it brings to your bathroom. Remember to check for any leaks periodically and tighten any loose connections as needed to ensure the longevity of your bath faucet.
Check For Proper Water Flow
Turn on the faucet and ensure water flows smoothly
Once you have successfully installed your bath faucet, the next step is to check for proper water flow. Taking the time to test the water flow will ensure that your faucet is functioning correctly and will prevent any potential issues down the line. To check for proper water flow, follow the steps below.
Step 1: Remove any debris or aerator
Before turning on the faucet, it is essential to remove any debris or aerator that might cause a disruption in the water flow. Often, during the installation process, debris can accumulate, blocking the flow of water. To remove debris, simply unscrew the aerator using a wrench or pliers and rinse it thoroughly with water. Once clean, reattach the aerator to the faucet.
Step 2: Turn on the faucet and observe the water flow
With the aerator back in place, it’s time to turn on the faucet and observe the water flow. Slowly turn the handle or lever to the on position, and pay close attention to how the water flows. It should come out smoothly without any abrupt changes in pressure. If you notice any spluttering or disruptions in the flow, there might be an underlying issue that needs to be addressed.
Step 3: Check for any leaks or drips
While the water is running, thoroughly inspect the faucet and its connections for any signs of leaks or drips. Pay close attention to areas where the faucet is connected to the plumbing pipes or where any seals or gaskets are present. Even the smallest leak or drip can indicate a problem that needs to be fixed to ensure proper water flow.
Step 4: Test hot and cold water separately
To ensure that both hot and cold water are flowing correctly, test each separately. Start by turning on the cold water and observing its flow. Then, turn off the cold water and repeat the process with the hot water. This step will help identify if there are any specific issues with either the hot or cold water supply.
Step 5: Adjust the water flow if necessary
If you find that the water flow is not optimal, you may need to adjust the faucet’s settings or consult a professional plumber. Some faucets have adjustable flow restrictors or other settings that can be tweaked to improve water flow. However, it’s important to check the manufacturer’s instructions or consult a professional before making any adjustments to ensure you don’t damage the faucet or void any warranties.
By following these steps and checking for proper water flow, you can ensure that your newly installed bath faucet is working efficiently and without any issues. Remember, regular maintenance and addressing any problems promptly can help prolong the lifespan of your faucet and prevent costly repairs in the future.
Tighten Any Loose Connections
If there are any leaks or loose connections, tighten them.
Installation of a bath faucet may seem like a daunting task, but with proper guidance, it can be a breeze. Once you have successfully connected all the necessary components, it is crucial to ensure that there are no leaks or loose connections. Even the tiniest of leaks can lead to water damage or decreased functionality of your faucet. To prevent any potential issues, here are a few steps to follow when tightening connections:
1. Inspect for leaks
Before tightening any connections, it is important to give your faucet a thorough inspection. Check for any signs of leaks, such as puddles of water or drips. Leaks can occur at various points, including the base of the faucet, the handles, or around the water supply lines. Identifying any leaks early on will allow you to address them promptly.
2. Tighten the connections
Once you have identified any leaks or loose connections, it’s time to take action. Carefully tighten the connections using adjustable pliers. Start by checking the connections at the base of the faucet, followed by the handles and the water supply lines. Make sure not to overtighten, as it can damage the components. Use gentle, steady pressure to secure the connections.
3. Use plumber’s tape
If you notice leaks around the threaded connections, applying plumber’s tape can provide an extra layer of protection. Simply wrap the tape clockwise around the threads and reassemble the components. This tape creates a watertight seal, preventing any potential leaks from occurring.
4. Test for leaks
After tightening all the connections, it’s time to test your work. Turn on the water and carefully observe each connection for any signs of leaks. If you notice any leaks or drips, you may need to retighten the connections or consider replacing any faulty components.
Conclusion
Tightening any loose connections is a crucial step in ensuring a successful bath faucet installation. By following these steps and carefully inspecting and addressing any leaks, you can enjoy a well-functioning and leak-free faucet. Remember to take your time and be thorough with your inspection and tightening process to avoid any future issues. Now you can confidently complete your bath faucet installation and enjoy your newly renovated bathroom.
Dispose Of The Old Faucet Properly
Dispose of the old faucet properly
When it comes to installing a new bath faucet, disposing of the old one properly is essential. Not only does it help to protect the environment, but it also ensures that you comply with local regulations and guidelines. Here, we will guide you on how to dispose of your old faucet responsibly.
Follow local guidelines for disposing of old faucets
Disposing of old faucets should be done according to the regulations and guidelines set forth by your local authorities. Different regions may have specific requirements for the disposal of plumbing fixtures such as faucets. To avoid any fines or penalties, it’s crucial to follow these guidelines carefully.
Simple steps for proper disposal
If you are unsure about the specific instructions provided by your local authorities, you can follow these general steps for proper disposal:
- Shut off the water supply: Before starting the disposal process, make sure to shut off the water supply to your bathroom.
- Remove the faucet: Carefully remove the old faucet from the sink or countertop. Use a wrench or pliers to loosen and disconnect the water supply lines.
- Inspect for any recyclable materials: Check if any components of the old faucet, such as metal parts, can be recycled. Separate these materials from the non-recyclable ones.
- Check local recycling facilities: Research and locate the nearest recycling facilities in your area that accept plumbing fixtures. They may have specific instructions or requirements for accepting faucets.
- Dispose of non-recyclable parts: If there are non-recyclable parts in the old faucet, such as plastic or rubber washers, check with your local waste management authorities for the appropriate way to dispose of them.
- Hire professional disposal services: If you find the disposal process cumbersome or if your local guidelines recommend professional disposal services, consider hiring a professional disposal company to handle the old faucet.
By following these steps and adhering to your local guidelines, you can dispose of your old bath faucet responsibly. Remember, proper disposal not only benefits the environment but also contributes to a cleaner and safer community.
Frequently Asked Questions
Can I Install Bathroom Faucet Myself?
Yes, you can install a bathroom faucet by yourself. It’s a simple process that requires basic tools and some DIY skills. Just make sure to follow the instructions carefully and take necessary safety precautions. Additionally, you may need to shut off the water supply before starting the installation.
How Long Does It Take To Install A Bath Faucet?
Installing a bath faucet typically takes around 1-2 hours. The exact time can vary based on factors like the complexity of the faucet and the experience of the installer. It’s best to consult a professional or follow the manufacturer’s instructions for step-by-step guidance.
How Do You Install A Single Hole Bathroom Faucet?
To install a single hole bathroom faucet, follow these steps: 1. Shut off the water supply. 2. Remove the old faucet. 3. Clean the sink surface. 4. Insert the new faucet through the mounting hole. 5. Secure the faucet with the provided hardware and connect the water lines.
How Do You Caulk A Bathroom Faucet?
To caulk a bathroom faucet: 1. Clean the area around the faucet to remove any dirt or old caulk. 2. Apply a thin line of caulk around the base of the faucet, making sure to cover any gaps. 3. Smooth the caulk with a caulk smoothing tool or your finger.
4. Let the caulk dry completely before using the faucet. 5. Regularly check and reapply caulk as needed.
Conclusion
Installing a bath faucet can seem daunting, but with these simple steps, you can do it yourself. Remember to gather all the necessary tools and materials before starting. The key is to follow the instructions carefully and take your time.
By following the steps outlined in this guide, you’ll have a shiny new bath faucet in no time. Happy installing!