
To install an anti-siphon valve, turn off the water supply and unscrew the existing hose bib. Replace it with the anti-siphon valve, making sure to use Teflon tape on the threads for a secure fit.
Installing an anti-siphon valve is an important step in protecting your water supply from contamination. This valve prevents water from flowing back into the drinking water system, keeping it safe from pollutants and pesticides. We will guide you through the simple process of installing an anti-siphon valve, ensuring that you follow the necessary steps for a proper installation.
By the end, you’ll have a better understanding of why an anti-siphon valve is crucial and how to install one correctly. So let’s dive in and learn how to safeguard your water supply with this essential device.
What Is An Anti Siphon Valve And Why Is It Important?
Brief introduction to Anti Siphon Valve
An anti siphon valve is an essential component in plumbing systems that helps prevent the reverse flow of water. It is designed to safeguard against backflow, which can occur when there is a loss of pressure in the water supply. The valve works by allowing water to flow in one direction, but preventing it from flowing backwards in the opposite direction.
Explanation of the importance of Anti Siphon Valve in plumbing systems
The anti siphon valve plays a crucial role in maintaining the integrity of a plumbing system. It helps ensure the safety of the water supply by preventing contaminants from entering the clean water lines. Without an anti siphon valve, there is a risk of cross-contamination, where non-potable water flows back into the drinking water supply.
Here are a few key reasons why the anti siphon valve is important:
- Protection against backflow: The primary function of an anti siphon valve is to protect against backflow, which occurs when there is a change in pressure. This backflow can bring harmful substances or bacteria from non-potable water sources into the clean and safe drinking water supply of a building or home. The anti siphon valve acts as a barrier, preventing the reverse flow of water and ensuring that only clean water enters the plumbing system.
- Compliance with plumbing code: Many plumbing codes and regulations require the installation of anti siphon valves in specific situations. This is because they are an effective means of preventing potential health hazards associated with backflow. By installing an anti siphon valve, you demonstrate your commitment to adhering to the standards set forth by plumbing authorities.
- Prevention of water waste: In addition to protecting the water supply from contamination, anti siphon valves also help conserve water. They prevent wastage by ensuring that water does not flow in the wrong direction. This can be particularly helpful in situations where the supply pressure is low or fluctuating.
In conclusion, an anti siphon valve is an important component in plumbing systems for preventing the reverse flow of water and protecting the safety and quality of the water supply. By understanding its function and significance, you can ensure that your plumbing system is equipped with this vital device.

List Of Tools Needed For Installing An Anti Siphon Valve
When it comes to installing an anti siphon valve, having the right tools on hand is crucial for ensuring a smooth and successful installation. Below, we have compiled a list of essential tools that you will need to complete the job properly. Make sure to gather these before you begin the installation process.
1. Wrench:
A wrench is an indispensable tool for loosening and tightening various fittings during the installation process. Opt for an adjustable wrench that can accommodate different sizes to make your work easier. Having a wrench handy will enable you to securely attach the valve to the pipes with minimal effort.
2. Pipe Cutter:
A pipe cutter is essential for cutting through the water supply pipes to create openings for the installation of the anti siphon valve. Make sure to choose a pipe cutter that is suited for the type and size of the pipe you are working with. By using a pipe cutter, you can achieve clean and precise cuts, ensuring a leak-free installation.
3. Tape Measure:
A tape measure is a necessary tool for accurately measuring the dimensions of the pipes and other components involved in the installation process. This will help you ensure that everything fits together properly and that the valve is installed in the correct position. A tape measure will also aid in determining the length of pipe you need to cut, allowing for precise and efficient pipe installation.
4. Screwdriver:
A screwdriver will come in handy for the installation of any screws, bolts, or fasteners required during the process. Opt for a size and type that matches the screw heads you encounter. By having a screwdriver available, you can easily tighten and secure any loose or adjustable parts of the anti siphon valve.
5. Teflon Tape:
Teflon tape, also known as plumber’s tape, is a thin, white tape used to create a watertight seal on pipe threads. It is an essential tool for preventing leaks at threaded connections. Apply the tape in a clockwise direction to the threads of the pipes and fittings before joining them together. The tape will provide an additional layer of protection against leaks.
Now that you have a comprehensive list of the tools needed for installing an anti siphon valve, you are ready to begin the installation process. Having these tools on hand will save you time, effort, and potential frustration as you work towards protecting your home’s water supply system.
Preparing For Installation
When it comes to installing an anti-siphon valve, proper preparation is key to ensure a successful and efficient installation. Preparing for installation involves a few important steps that will help you set the foundation for a seamless process. In this section, we will discuss three crucial steps: shutting off the water supply, removing the old valve (if applicable), and inspecting the pipes for any damages. Let’s dive in!
Shutting off the water supply
To begin the installation process, it’s essential to shut off the water supply. This step is crucial to avoid any mishaps or water leaks during the installation. Here’s how you can achieve this:
- Locate the main water supply valve.
- Turn the valve clockwise until it is fully closed, cutting off the water supply to the area where the anti-siphon valve will be installed.
By shutting off the water supply, you ensure a safe environment to work in and prevent any unnecessary water damage.
Removing the old valve (if applicable)
If you’re replacing an existing anti-siphon valve, you’ll need to remove the old valve before proceeding with the installation. Follow these steps to remove the old valve:
- Using a pipe wrench, carefully unscrew the connections between the old valve and the pipes.
- Once all connections are loose, remove the old valve from the pipes.
- Inspect the connections and pipes for any signs of damage or erosion. If any issues are found, it’s crucial to address them before installing the new valve.
By removing the old valve and inspecting the pipes for damages, you ensure a clean and problem-free installation of the new anti-siphon valve.
Inspecting the pipes for any damages
Prior to installing the new anti-siphon valve, it’s important to inspect the pipes for any damages or issues. This step ensures that the new valve is connected to a secure and well-maintained plumbing system. Here’s how you can inspect the pipes:
- Visually examine the pipes for any signs of corrosion, leaks, or cracks.
- Check the pipe connections for tightness and security.
- If any damages or issues are detected, consult a professional plumber to address and fix them before proceeding with the installation.
Inspecting the pipes for damages helps maintain the integrity of your plumbing system and ensures the proper functioning of the anti-siphon valve.
Installing The Anti Siphon Valve
Installing the Anti Siphon Valve
When it comes to the proper installation of an anti siphon valve, it is important to follow the correct steps to ensure its effectiveness and optimal functionality. In this section, we will guide you through the process of installing an anti siphon valve, using the following H3 headings: Positioning the valve, Connecting the valve, and Securing the valve in place.
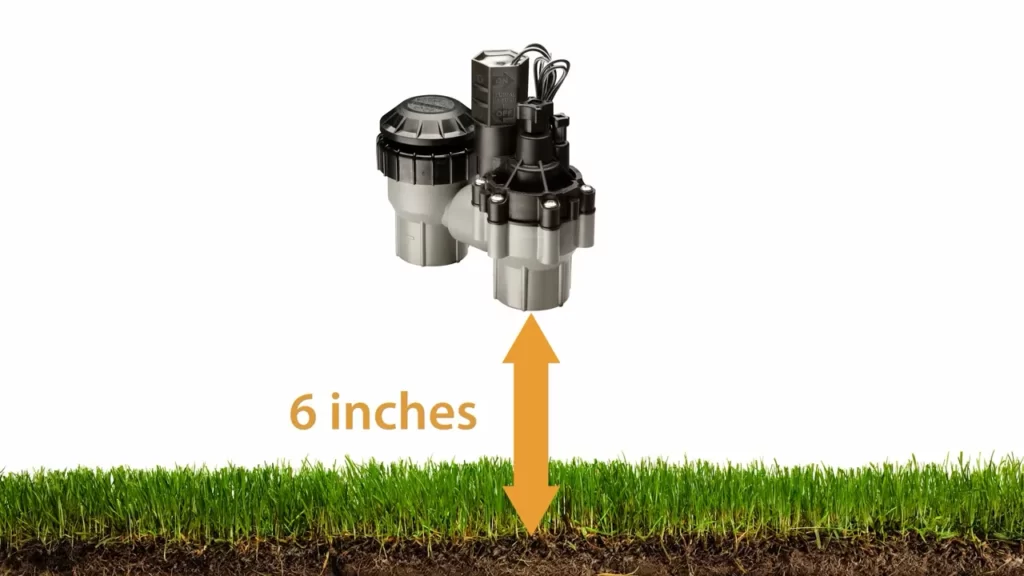
Positioning the valve:
Before installing the anti siphon valve, identify the ideal location where the valve should be positioned. The valve needs to be installed above the highest sprinkler head or irrigation outlet in the system. This will prevent any potential backflow contamination from occurring. Ideally, the valve should be placed at least 6 inches above the highest point of the sprinkler heads or irrigation outlets.
Connecting the valve:
To connect the anti siphon valve to the water supply line, follow the steps below:
1. Shut off the main water supply to the irrigation system.
2. Cut the water supply line using a pipe cutter or hacksaw. Make sure to leave enough space to accommodate the valve and fittings.
3. Prepare the ends of the cut pipe by removing any burrs or rough edges. This can be done using a file or sandpaper.
4. Attach the male threaded end of the valve to one end of the pipe using a suitable PVC cement and primer. Apply the primer to the outside of the pipe and the inside of the valve, then apply the cement and firmly push the two pieces together. Hold them in place for a few seconds to allow the cement to set.
5. Repeat the process for the other end of the valve, connecting it to the remaining section of the pipe.
Securing the valve in place:
Once the valve is connected to the water supply line, it needs to be securely fastened in place. Follow these steps for proper installation:
1. Position the valve in the desired location along the water supply line.
2. Secure the valve to the wall or structure using appropriate mounting brackets or straps. Make sure the valve is level and tightly secured to prevent any movement.
3. Once the valve is securely fastened, check all connections for any signs of leaks. If necessary, tighten the fittings or joints to eliminate any leaks.
In conclusion, installing an anti siphon valve is a crucial step in protecting your irrigation system from potential backflow contamination. By following these steps – positioning the valve, connecting it to the water supply line, and securing it in place – you can ensure the proper installation and functionality of the anti siphon valve, providing peace of mind and safeguarding your water supply.
Testing And Finishing
Once you have successfully installed the anti-siphon valve, it is crucial to perform some tests and make necessary adjustments to ensure its proper functioning. In this section, we will guide you through the essential steps of testing and finishing the installation process.
Turning on the water supply
Now it’s time to turn on the water supply and see if everything works as expected. Locate the main water valve and turn it on slowly. By doing this gradually, you can avoid any water pressure surges that might damage the newly installed valve.
Check the valve and surrounding pipes for any leaks as the water starts flowing through. Ideally, you won’t see any water dripping or spraying from the joints or the valve itself. In case you notice any leaks, proceed to the next step for a thorough inspection.
Checking for leaks
To ensure the integrity of the anti-siphon valve, carefully inspect all connections and joints for any signs of leaks. Here’s a step-by-step process to follow:
- Visually examine the valve, check for moisture or water buildup around the connections.
- Feel around the joints with your hands to see if there are any signs of water leakage.
- Use a dry cloth or tissue to wipe the connections and joints, checking for any dampness or water residue.
If you detect any leaks, tighten the connections carefully using a suitable wrench. Be cautious not to overtighten as it may cause damage or further leakage. Once the necessary adjustments have been made, proceed to the next step of adjusting the valve if needed.
Adjusting the valve if necessary
In certain cases, it might be necessary to adjust the anti-siphon valve to achieve optimum performance. To do this, follow these steps:
- First, identify the adjustment mechanism on the valve. It could be a dial, screw, or similar feature.
- Carefully read the manufacturer’s instructions regarding the appropriate adjustments to be made.
- Using the recommended tool, make the necessary adjustments to the valve based on the instructions provided.
Remember, improper adjustments can affect the valve’s function and compromise its effectiveness. It’s always best to consult the manufacturer’s guidelines or contact a professional if you are unsure about the adjustment process.
Finalizing the installation
With the valve properly adjusted and any leaks fixed, it’s time to finalize the installation. Here are a few additional steps to ensure everything is in order:
- Clean any debris or dirt around the valve and the surrounding area.
- Inspect the valve one last time to guarantee there are no signs of leaks or damages.
- Ensure that the surrounding soil or mulch is in place and covering the valve adequately.
By taking these extra precautions, you are safeguarding the anti-siphon valve from potential damage and ensuring its long-term effectiveness. Following these steps will help you complete the installation process successfully and provide you with reliable protection against backflow in your irrigation system.
Regular Maintenance Of The Anti Siphon Valve
Regular maintenance is crucial to keep your anti siphon valve functioning properly and to extend its lifespan. By carrying out simple maintenance tasks, you can ensure that your valve is always in top condition, preventing any potential issues and maximizing its efficiency. In this section, we will discuss the important aspects of regular maintenance for your anti siphon valve: cleaning the valve, checking for any blockages or debris, and inspecting for any signs of wear and tear.
Cleaning the valve
To maintain the optimal performance of your anti siphon valve, regular cleaning is essential. Over time, dirt, debris, and sediment can accumulate in the valve, affecting its functionality. To clean the valve:
- Turn off the water supply to the valve to prevent any accidental spraying or leaks.
- Remove the bonnet cap by unscrewing it counterclockwise.
- Using a soft brush or cloth, gently clean the inside of the valve body and all its components.
- Rinse the valve with clean water to remove any leftover debris.
- Reassemble the valve by screwing the bonnet cap back on clockwise.
- Turn on the water supply and check for any leaks.
Checking for any blockages or debris
Blockages or debris can disrupt the flow of water through your anti siphon valve, causing reduced pressure or even complete valve failure. It is important to regularly check and remove any obstructions. Here’s how you can do it:
- Turn off the water supply to the valve.
- Inspect the valve inlet and outlet for any visible blockages or debris.
- If you notice any obstructions, use a small wire or brush to carefully remove them.
- Rinse the valve to ensure all debris has been cleared.
- Turn on the water supply and check for proper water flow through the valve.
Inspecting for any signs of wear and tear
Regularly inspecting your anti siphon valve for signs of wear and tear is crucial to prevent any potential leaks or malfunctions. Here’s how you can perform a thorough inspection:
- Turn off the water supply to the valve.
- Visually examine the valve body and components for any cracks, rust, or damage.
- If you notice any signs of wear and tear, consider replacing the damaged parts or the entire valve.
- Check that all seals and gaskets are intact and in good condition.
- Ensure that all connections are tight and secure.
- Turn on the water supply and check for any leaks.
By performing these regular maintenance tasks, you can ensure that your anti siphon valve operates efficiently and effectively, protecting your irrigation system and preventing potential water contamination. Implementing a regular maintenance schedule will not only save you from costly repairs but also provide peace of mind knowing that your valve is always in top-notch condition.
Troubleshooting Common Issues With The Anti Siphon Valve
Low Water Pressure
One common issue that you may face when installing an anti siphon valve is low water pressure. This can be quite frustrating as it can affect the performance of the valve and your overall irrigation system. Fortunately, there are a few troubleshooting steps you can take to address this problem.
Firstly, check that the water supply to the valve is fully open. Sometimes, the valve may not be receiving enough water due to partially closed supply lines. Ensure that the valve’s inlet and outlet are free from any debris or obstructions that may be restricting the flow of water.
If low water pressure persists, it may be worth considering installing a pressure regulator. This device can help regulate the water pressure coming into the valve, ensuring it operates optimally. Be sure to consult a professional for assistance with installing and adjusting the pressure regulator.
Leaks or Drips
Another common issue that you may encounter with an anti siphon valve is leaks or drips. These can be wasteful and lead to water loss if left unattended. There are a few steps you can take to troubleshoot and resolve this problem.
First, visually inspect the valve for any signs of leaking or dripping. Check all the fittings and connections to ensure they are tight and secure. Tighten any loose connections as needed, being careful not to overtighten and cause damage.
If leaks or drips persist, it may indicate a faulty valve seal. In this case, you may need to replace the seal or the entire valve if necessary. Consult the manufacturer’s instructions or seek professional help for guidance on replacing the valve components.
Malfunction of the Valve
In some cases, you may experience a malfunction of the anti siphon valve. This can manifest in various ways, such as the valve not shutting off completely, not turning on at all, or erratic water flow. Here are a few troubleshooting steps to help address these issues.
Start by checking the valve’s solenoid. Ensure that it is properly connected and receiving power. A loose or disconnected solenoid can cause the valve to malfunction. Inspect the wiring for any signs of damage and make sure it is securely connected to the valve and the controller.
If the solenoid and wiring are in good condition, consider checking the diaphragm for any wear or damage. A worn-out diaphragm can result in improper valve operation. Replace the diaphragm if necessary, following the manufacturer’s instructions.
If these troubleshooting steps do not resolve the issue, it may be necessary to replace the entire valve. Consult the manufacturer’s instructions or seek professional assistance for further guidance on replacing the valve.
Recap Of The Importance And Steps To Install An Anti Siphon Valve
Brief summary of the article’s key points
In this blog post, we will recap the importance of proper installation and maintenance of an Anti Siphon Valve. This valve plays a crucial role in preventing backflow of water and contaminants into the main water supply, ensuring clean and safe water for your household or outdoor irrigation system. We will also discuss the step-by-step process of installing an Anti Siphon Valve correctly to ensure its effectiveness.
Emphasize the significance of proper installation and maintenance of the valve
The Anti Siphon Valve is an essential component of any plumbing system, whether it is for your irrigation system or your home’s water supply. Its main purpose is to prevent the backflow of water from the irrigation system or any other source into the main water supply. This is crucial because backflow can contaminate the drinking water, posing health risks to you and your family.
Proper installation is vital to ensure the valve functions correctly and effectively. This involves positioning the valve at the highest point in the irrigation system or downstream from any potential contamination source. It is also essential to maintain the valve regularly, conducting inspections and cleaning to prevent any debris or clogging that could affect its functionality.
Steps to install an Anti Siphon Valve
- Dig a hole: Start by digging a hole deep enough to accommodate the valve and provide enough space for the plumbing connections.
- Prepare the valve: Make sure to remove the cap from the Anti Siphon Valve and attach a threaded adapter or union to the valve’s inlet.
- Connect the plumbing: Use solvent cement or Teflon tape to connect the PVC pipes to the threaded adapter or union. Ensure the connections are secure and leak-free.
- Mount the valve: Place the Anti Siphon Valve in the hole you dug, ensuring it is level and straight. Backfill the hole with soil or concrete to secure the valve in place.
- Connect to the water supply: Connect the valve’s outlet to the irrigation system or main water supply using PVC pipes and fittings. Again, check for any leaks and ensure a secure connection.
- Test the valve: Once the installation is complete, turn on the water supply and test the valve for proper operation. Make sure water flows through the valve without any leaks and that it prevents backflow effectively.
By following these steps and regularly maintaining your Anti Siphon Valve, you can ensure the safety of your water supply and the longevity of your plumbing system. Remember, proper installation is crucial for the valve to function effectively and protect against backflow.
Frequently Asked Questions
Where Should I Install Anti-Siphon Valve?
Install the anti-siphon valve at the highest point in your irrigation system, ideally above ground level. This ensures that water cannot flow backward into the main water supply, preventing contamination.
Do I Need An Anti-Siphon Valve On Outdoor Faucet?
Yes, it is recommended to have an anti-siphon valve on your outdoor faucet. This valve helps prevent water contamination by preventing water from flowing back into the water supply system. It is an important safety measure to protect your drinking water.
How Do You Replace An Anti-Siphon Valve On An Outdoor Faucet?
To replace an anti-siphon valve on an outdoor faucet: 1. Turn off the water supply and unscrew the old valve from the faucet. 2. Clean the threads and apply plumber’s tape. 3. Attach the new valve, tightening it securely. 4.
Turn on the water supply to check for any leaks. 5. Adjust the valve’s pressure if necessary.
Can You Run A Boat Without An Anti-Siphon Valve?
Yes, it is possible to run a boat without an anti-siphon valve. However, it is not recommended as an anti-siphon valve prevents water from siphoning back into the engine, reducing the risk of engine damage and potential hazards. Therefore, it is advisable to have an anti-siphon valve installed for safe boat operation.
Conclusion
In short, installing an anti-siphon valve is crucial for the proper functioning and safety of your plumbing system. Following the step-by-step instructions provided in this guide, you can easily and effectively install this valve. By preventing backflow and protecting the potable water supply from contamination, the anti-siphon valve ensures a healthy and functional plumbing system.
So don’t hesitate, take the necessary steps to install this essential device and enjoy peace of mind in knowing your water is safe.