To install an overflow drain on a tub, start by locating the drain opening and removing the drain cover. Then, insert the overflow gasket into the drain opening and secure it with the provided screws.
Why Installing An Overflow Drain Is Important
Importance of an overflow drain in a bathtub
Installing an overflow drain in a bathtub is crucial for several reasons. It not only prevents water damage and flooding but also ensures safety and comfort during bathing. Let’s delve into each of these benefits in detail:
Preventing water damage and flooding
Water damage and flooding can wreak havoc on your bathroom, leading to expensive repairs and inconvenience. But with an overflow drain in place, these risks are significantly minimized.
So how does an overflow drain prevent water damage and flooding? Well, when you accidentally leave the faucet on or forget to turn off the shower, excess water starts accumulating in the bathtub. But instead of overflowing onto the floor, the overflow drain provides an escape route for the water.
Imagine a scenario without an overflow drain – the water would overflow, causing damage to your bathroom floors, walls, and even seeping into adjacent rooms. With an overflow drain installed, you can have peace of mind knowing that any excess water will be safely drained away, preventing costly water damage and the need for extensive repairs.
Ensuring safety and comfort during bathing
Bathing should be a relaxing and enjoyable experience, free from worry or discomfort. An overflow drain is essential in achieving this by enhancing safety and comfort.
First and foremost, an overflow drain helps maintain the water level within a safe range. If you accidentally leave the faucet on and the water level starts rising, the overflow drain ensures it remains at a manageable level, preventing any potential accidents resulting from an overflowed tub.
Additionally, an overflow drain allows you to enjoy a deeper soak without the fear of water overflowing onto the floor. By controlling the water level, it creates a comfortable and stress-free bathing experience, allowing you to unwind and relax to the fullest.
In conclusion, the importance of installing an overflow drain in a bathtub cannot be underestimated. It not only protects your bathroom from water damage and flooding but also ensures your safety and comfort during bathing. So, whether you are remodeling your bathroom or building a new one, make sure to include an overflow drain to reap these essential benefits.

Gathering The Necessary Tools And Materials
Before you dive into installing an overflow drain on your tub, it’s important to gather all the necessary tools and materials. This will ensure that you have everything you need before starting the project, allowing for a smooth and efficient installation process. In this section, we will provide you with a list of the tools required for the installation, as well as the required materials.
List of tools required for the installation
When it comes to installing an overflow drain on a tub, having the right tools is crucial for a successful outcome. Here is a comprehensive list of tools you will need:
- Adjustable wrench: This tool will be used to tighten and loosen nuts and bolts during the installation process.
- Hacksaw: You will need a hacksaw to cut through pipes and other materials if necessary.
- Screwdriver set: A set of screwdrivers, both flathead and Phillips, will come in handy for various parts of the installation.
- Plunger: A plunger can be used to create suction and provide a tight seal while installing the overflow drain.
- Plumber’s putty: Plumber’s putty is a sealing compound that will ensure a watertight connection between different components of the overflow drain.
- Teflon tape: Teflon tape is used to provide an additional layer of seal and prevent leaks in threaded connections.
- Measuring tape: This tool will help you accurately measure the dimensions required for the installation.
- Pencil: You will need a pencil to mark reference points and measurements on the tub.
Required materials for the project
In addition to the tools mentioned above, you will also need the following materials for the installation:
- Overflow drain kit: This kit will include all the necessary components, such as the overflow cover, gaskets, screws, and drain pipe.
- Tub drain assembly: You may need a new tub drain assembly if the existing one is not compatible with the overflow drain kit.
- Plumber’s glue: Plumber’s glue is used to create a strong and permanent bond between plastic components.
- Silicone caulk: Silicone caulk is essential for sealing gaps and preventing water leakage around the edges of the overflow cover.
- Bucket: A bucket will be useful for catching any water that may spill out during the installation process.
By ensuring you have all the necessary tools and materials before beginning the installation, you can minimize any potential delays or interruptions during the process. This will make the installation smoother and reduce the chances of encountering any surprises along the way.
Preparing The Bathtub For Installation
Before installing an overflow drain on your tub, it’s important to properly prepare the bathtub. This ensures that the installation process goes smoothly and allows for efficient drainage. Preparing the bathtub involves several steps, including draining the tub, removing any debris, cleaning the area where the overflow drain will be installed, and measuring and marking the appropriate location for the drain installation.
Draining the Tub and Removing Any Debris
The first step in preparing the bathtub for installation is to drain the tub and remove any debris. This ensures that there is no standing water or obstruction in the tub that could hinder the installation process. To drain the tub, follow these steps:
- Locate the drain plug or stopper in your tub.
- Remove the drain plug or lift the stopper to allow the water to drain.
- Once the tub is drained, use a sponge, towel, or drain snake to remove any debris or clogs that may be present in the drain.
Cleaning the Area Where the Overflow Drain Will be Installed
After draining the tub and removing any debris, it’s important to clean the area where the overflow drain will be installed. This ensures that there is no dirt, grime, or residue that could affect the installation process or the functionality of the overflow drain. To clean the area, follow these steps:
- Prepare a solution of warm water and mild detergent.
- Using a sponge or cloth, gently scrub the area where the overflow drain will be installed to remove any dirt or debris.
- Rinse the area with clean water and dry it thoroughly.
Measuring and Marking the Appropriate Location for the Drain Installation
Once the tub is drained and the area is cleaned, the next step is to measure and mark the appropriate location for the drain installation. This ensures that the overflow drain is installed in the correct position for optimal functionality. To measure and mark the location, follow these steps:
- Using a measuring tape, measure the distance from the tub surface to the desired height of the overflow drain.
- Make a mark on the tub surface at the measured distance. This will serve as a reference point for the drain installation.
- Ensure that the mark is centered and aligned with the overflow drain opening on the tub.
By following these steps and properly preparing the bathtub for installation, you can ensure a smooth and successful installation of an overflow drain on your tub. This will not only enhance the functionality of your tub but also prevent potential water damage and overflow.
Removing The Old Overflow Drain (If Applicable)
If you’re planning to install a new overflow drain on your tub, the first step is to remove the existing one (if there is already one installed). This might seem like a daunting task, but with the right tools and a little patience, you can easily remove the old overflow drain and get started on your new installation. In this section, we’ll walk you through the steps for removing the existing overflow drain using appropriate tools and techniques.
Steps for removing the existing overflow drain, if it is already installed
- Ensure you have the necessary tools on hand:
- Plumbing wrench
- Adjustable pliers
- Screwdriver (if applicable)
- Plumber’s putty knife (if applicable)
- Access the overflow drain:
- Disconnect the drainpipe:
- Remove the drain cover:
- Detach the drain cylinder:
- Clean the area:
Locate the access panel on the side of your tub or access the area behind the tub wall where the overflow drain is installed. Depending on the construction of your tub, you may need to remove a panel or access the area from below the tub.
Using your plumbing wrench or adjustable pliers, carefully loosen the nut that connects the overflow pipe to the main drainpipe. Turn the wrench counterclockwise to loosen the nut and separate the pipes. Be cautious not to apply excessive force that may damage the pipes or surrounding plumbing.
If your overflow drain has a removable cover, use a screwdriver to remove the screws holding it in place. Gently lift the cover and set it aside.
Inspect the overflow drain cylinder for any additional screws or fasteners that may be securing it to the tub. Use a screwdriver to remove these fasteners and carefully detach the cylinder from the tub.
Once the old overflow drain is removed, use a plumber’s putty knife to scrape off any residue or old putty from the tub surface. Ensure that the area is clean and free from debris before proceeding with the installation of the new overflow drain.
By following these steps and using the appropriate tools, you’ll be able to successfully remove the old overflow drain from your tub. Remember to exercise caution and take your time to avoid causing any damage. With the old drain removed, you’re now ready to move on to the next step in the installation process.
Installing The New Overflow Drain
Attaching the overflow drain assembly to the tub
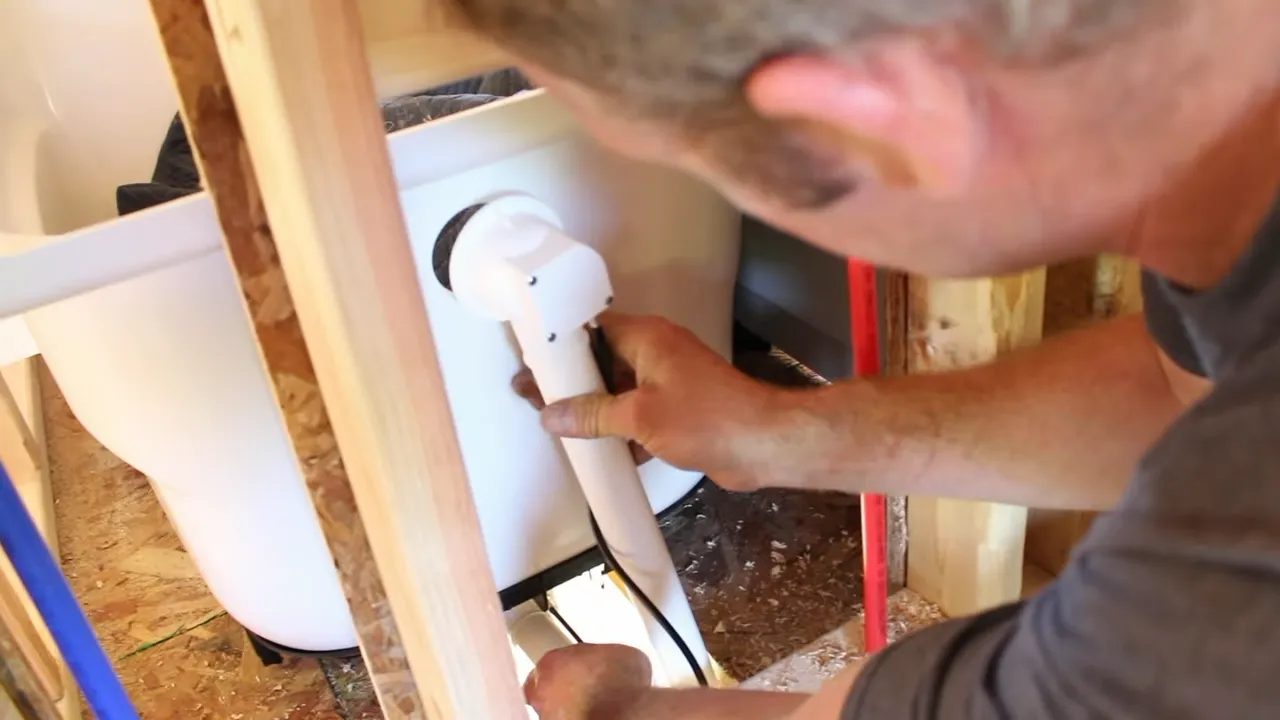
When it comes to installing a new overflow drain on a tub, it is important to ensure a proper attachment of the drain assembly to the tub. This step requires careful attention to detail to prevent any leaks or damage in the future.
To begin, gather the necessary tools such as a wrench, screwdriver, and plumber’s tape. The overflow drain assembly typically consists of a cover plate, gasket, and overflow pipe.
1. Start by placing the gasket onto the overflow drain opening on the tub. This will create a watertight seal between the tub and the drain assembly.
Make sure the gasket is centered and positioned correctly, as this will affect the alignment of the drain assembly.
2. Next, attach the cover plate over the gasket and align it with the overflow drain opening. The cover plate serves as a decorative piece and also helps to hold the drain assembly securely in place.
Use a screwdriver or the appropriate tool to screw the cover plate onto the tub. Ensure that it is tightened properly but be careful not to overtighten, as this can cause damage.
Ensuring proper alignment and tight connection
Proper alignment and a tight connection are crucial for the functionality and longevity of the new overflow drain. Here’s how to ensure you achieve both.
1. Use a level or straightedge to ensure that the cover plate is aligned correctly with the tub surface. This will prevent any water from pooling or leaking around the edges of the drain assembly.
Make any necessary adjustments to achieve a level position before proceeding.
2. After aligning the cover plate, use a wrench to tighten the overflow pipe onto the drain assembly. Apply gentle pressure while turning the wrench in a clockwise direction.
Be cautious not to overtighten, as this can cause damage to the threads or the drain assembly.
3. To further ensure a tight connection, apply plumber’s tape around the threads of the overflow pipe. This tape acts as a sealant, helping to prevent any water from leaking through the connection.
Securing the drain with the appropriate hardware
Securing the drain with the appropriate hardware is essential to prevent any movement or instability. Ensuring a secure connection will avoid any potential leaks or damage to the drain assembly.
1. Check the manufacturer’s instructions for any specific hardware requirements. Typically, a locknut or compression nut is used to secure the drain assembly in place.
Make sure you have the appropriate size and type of nut for your specific drain assembly.
2. Place the locknut or compression nut onto the overflow pipe and hand tighten it onto the drain assembly. Then, use a wrench or pliers to further tighten the nut until it is snug.
Do not overtighten, as this can damage the drain assembly or cause leaks.
3. Once the drain assembly is securely fastened, test for any potential leaks by filling the tub with water. Allow the water to sit for a few minutes, checking the area around the drain assembly for any signs of water leakage.
If there are no leaks, you can proceed with the remaining steps of your tub installation process.
Remember, proper installation of the overflow drain is essential for the functionality and longevity of your tub. Take the time to ensure proper alignment, tight connections, and secure hardware to avoid any future problems.
Connecting The Overflow Drain To The Plumbing System
Installing an overflow drain on a tub is an essential step to prevent water from overflowing and causing damage. Connecting the overflow drain to the plumbing system involves determining the location of the main drain pipe, cutting and connecting the overflow pipe to the main drain, and properly sealing the connection to prevent leaks. Follow these steps to ensure a successful installation.
Determining the location of the main drain pipe
Before connecting the overflow drain, you need to locate the main drain pipe. This pipe is typically located near the bottom of the tub and connects to the plumbing system. To find the main drain pipe, you can:
- Inspect the underside of the tub to see if the main drain pipe is visible.
- Measure the distance between the overflow opening and the main drain location on the inside of the tub.
- Consult the manufacturer’s instructions or contact a professional plumber for assistance.
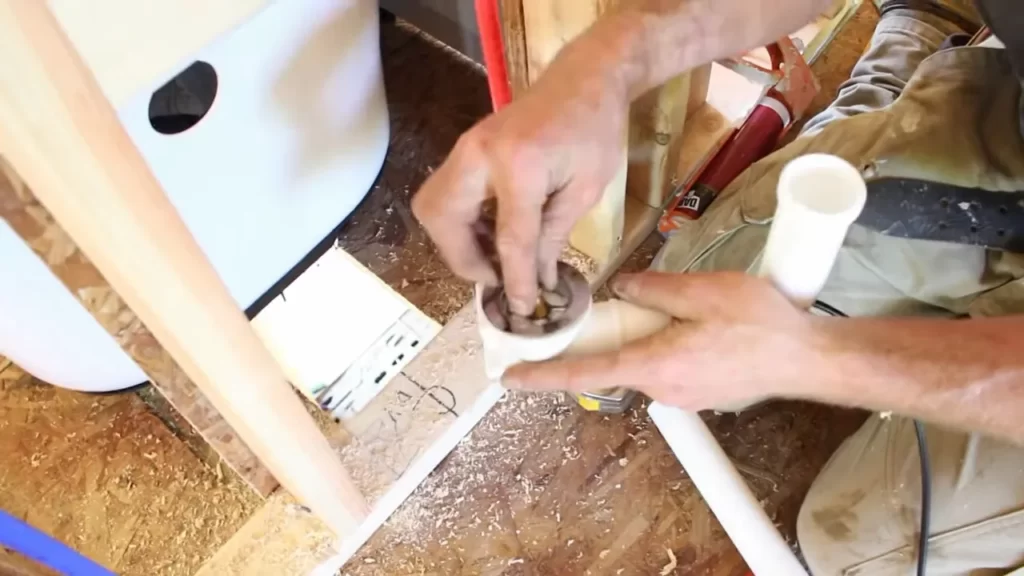
Cutting and connecting the overflow pipe to the main drain
Once you have determined the location of the main drain pipe, you can proceed with cutting and connecting the overflow pipe. Follow these steps:
- Measure the distance between the main drain and the overflow opening on the outside of the tub.
- Cut a piece of PVC pipe to the appropriate length using a hacksaw or a PVC pipe cutter. Make sure the pipe fits properly between the main drain and the overflow opening.
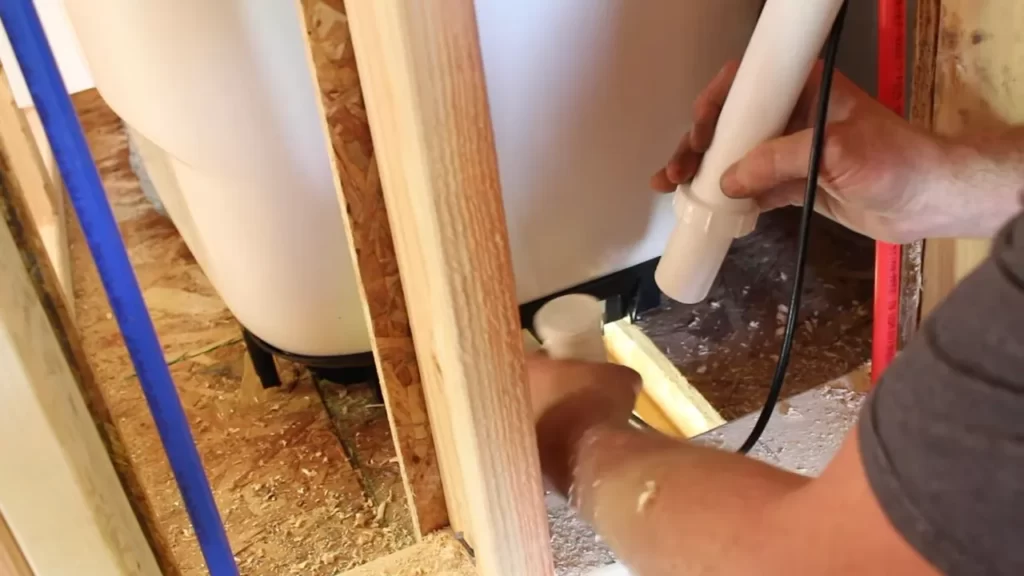
- Attach the cut PVC pipe to the main drain and the overflow opening using PVC pipe fittings. These fittings should be secured tightly for a leak-free connection.
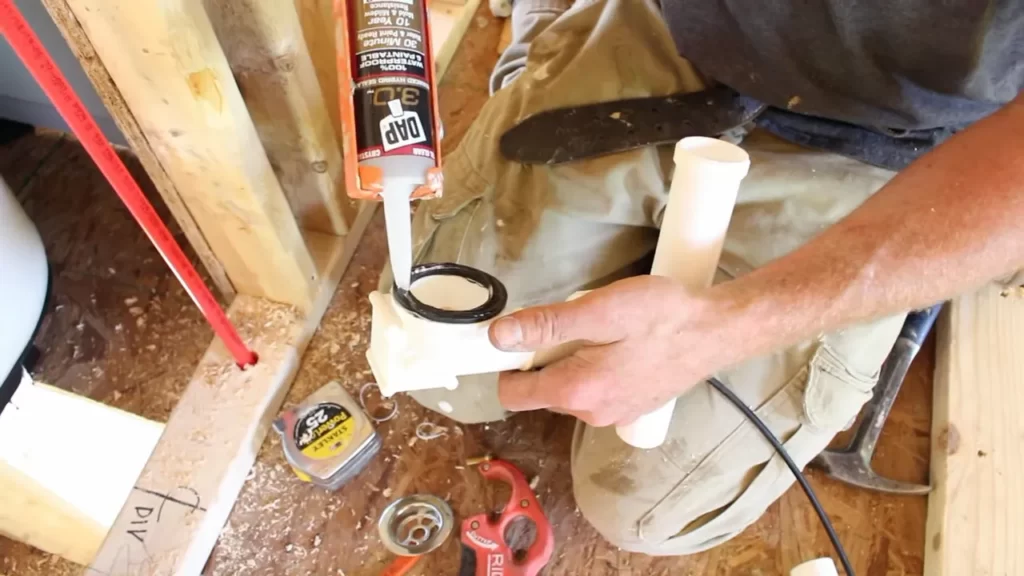
Properly sealing the connection to prevent leaks
After connecting the overflow pipe to the main drain, it is crucial to properly seal the connection to prevent any potential leaks. Here’s what you need to do:
- Apply plumber’s putty or silicone caulk around the threads of the PVC pipe fittings before screwing them together. This creates a watertight seal.
- Use a wrench or pliers to tighten the PVC pipe fittings securely. Be careful not to overtighten, as it may cause damage to the fittings.
- Wipe away any excess putty or caulk to ensure a clean and tidy finish.
By following these steps, you can successfully connect the overflow drain to the plumbing system of your tub. It is essential to ensure a proper and secure connection to prevent any water damage or leaks. If you are unsure about any steps, it is always recommended to seek assistance from a professional plumber.
Testing And Troubleshooting The Installation
During the installation of an overflow drain on a tub, it is crucial to thoroughly test and troubleshoot the setup to ensure its functionality and prevent any leaks. Testing and troubleshooting the installation will help you identify and address any issues promptly, allowing you to enjoy your tub without any concerns. In this section, we will discuss how to fill the tub with water to check for leaks, ensuring proper drainage and functionality of the overflow drain, and troubleshooting common issues.
Filling the tub with water to check for leaks
Filling the tub with water is an essential step in assessing the installation for any potential leaks. Follow these steps to perform this test:
- Close the drain and stopper of the tub.
- Fill the tub with water, ensuring it reaches an appropriate level.
- Observe the overflow drain area closely for any signs of water leakage. Pay attention to the connection points between the tub and the overflow drain pipes.
- If you notice any leaks, you must waterproof the connection points with an appropriate sealant or consult a professional plumber to rectify the issue.
Ensuring proper drainage and functionality of the overflow drain
To ensure that the overflow drain is functioning correctly and providing efficient drainage, follow these guidelines:
- Test the operation of the overflow drain by allowing water to reach the overflow level. The excess water should flow smoothly through the drain, preventing any overflow.
- Regularly clean the overflow drain to remove any accumulated debris that could hinder its functionality. Use a pipe brush or a similar tool to clear out any obstructions.
- If you notice slow or inadequate drainage, check for any clogs in the overflow drain. Use a plunger or a drain snake to clear any blockages and ensure proper water flow.
Troubleshooting common issues and addressing them effectively
While installing an overflow drain, it’s essential to be aware of common issues that may arise. Here are some troubleshooting tips to address these problems:
| Issue | Troubleshooting Solution |
|---|---|
| Weak Water Flow | Check for any debris or blockages in the overflow pipe. Clear them using a plunger or drain snake. |
| Leaking Connections | Ensure all connections between the tub and the overflow drain pipes are tightly sealed using an appropriate waterproof sealant. |
| Inadequate Drainage | Inspect the overflow drain for any obstructions or clogs. Clear them using a pipe brush or a similar tool. |
By following these testing and troubleshooting steps, you can ensure that the overflow drain on your tub is installed correctly and functions properly. Regular maintenance and prompt addressing of any issues will help you maintain the efficiency and longevity of your tub’s overflow drain system.
Final Touches And Cleanup
Once you have successfully installed the overflow drain on your tub, it’s time to put the final touches and clean up any mess created during the installation process. By following these steps, you can ensure that your tub is not only functioning properly, but also looks neat and tidy.
Reassembling any components removed during the installation process
If you had to remove any components from your tub during the installation of the overflow drain, now is the time to reassemble them. Refer to the manufacturer’s instructions or your notes from earlier to make sure you put everything back in its place correctly.
Cleaning up any debris or mess created during the installation
Installing an overflow drain can sometimes be a messy process, with debris and leftover materials scattered around. To tidy up your work area, grab a broom or vacuum cleaner to remove any loose dirt or dust. Wipe down your tub’s surface with a damp cloth to remove any smudges or fingerprints.
If you used any sealants or adhesives during the installation process, be sure to clean up any excess. Carefully scrape away any dried sealant with a putty knife or similar tool, taking care not to scratch the tub’s surface. Use an appropriate cleaning solution to remove any residue, following the manufacturer’s instructions.
Remember, a clean and well-maintained tub not only improves aesthetics but also ensures longevity. By properly cleaning up after the installation, you can prevent any potential damage or issues in the future.
Enjoying the benefits of a properly installed overflow drain
Now that the installation is complete and the cleanup is finished, it’s time to sit back and enjoy the benefits of your newly installed overflow drain. No more worrying about water overflowing and causing damage to your bathroom or the floor below. With a properly installed overflow drain, you can indulge in a relaxing bath without any concerns.
Make sure to inspect the overflow drain periodically for any signs of wear or damage. Regular maintenance and cleaning will keep your tub in optimal condition, allowing you to enjoy its benefits for years to come.
Frequently Asked Questions
How Do You Replace A Bathtub Overflow Drain?
To replace a bathtub overflow drain, first, remove the screws or bolts securing the old drain cover. Then, disconnect the linkage or stopper mechanism inside the overflow pipe. Next, unscrew the old drain from the tub and clean the area.
Finally, install the new drain and cover, securing them tightly.
Do Bathtubs Need An Overflow Drain?
Yes, bathtubs need an overflow drain. The overflow drain helps prevent water from overflowing when the bathtub is filled. It is an essential feature that allows excess water to drain out, ensuring the bathtub does not overflow and cause water damage.
Where Does Bathtub Overflow Drain Go?
The bathtub overflow drain connects to the main drain pipe, carrying the excess water away.
How Does A Tub Overflow Connect?
A tub overflow connects to a drain pipe, ensuring that excess water flows out of the tub to prevent it from overflowing. This connection prevents water damage and flooding in the bathroom.
Conclusion
Installing an overflow drain on a bathtub may seem daunting at first, but with the right tools and step-by-step instructions, it can be a manageable DIY project. By following the steps outlined in this guide, you can ensure that your tub functions properly while minimizing the risk of water damage.
Remember to take your time, double-check your measurements, and seek professional help if needed. With a little patience and skill, you’ll have your new overflow drain installed and ready to go in no time! So go ahead and give it a try.
Your bathtub will thank you.