To install an acrylic bathtub, start by preparing the area, connecting the drain, placing the bathtub, and securing it with brackets and screws. Installing an acrylic bathtub can be a simple and effective way to upgrade your bathroom and enhance its overall appearance.
Whether you’re renovating an old space or starting from scratch, a new bathtub can add both style and functionality to your bathroom. Acrylic bathtubs are a popular choice due to their durability, affordability, and versatility in terms of design. With the right tools and a step-by-step approach, you can easily install an acrylic bathtub in your home.
This guide will provide you with clear instructions on how to properly install an acrylic bathtub, ensuring a successful and professional-looking result. So, let’s get started and transform your bathroom into a cozy and relaxing retreat.
Getting Started
Installing an acrylic bathtub can be a rewarding project that adds both beauty and functionality to your bathroom. Before you begin, it’s important to get started on the right foot with proper preparation and planning. In this guide, we’ll walk you through the essential steps to take when getting started on your acrylic bathtub installation.
Preparing the Space
Before you start installing your acrylic bathtub, it’s crucial to ensure that the space is ready for it. Here are the key steps involved in preparing the space:
- Clear the area: Remove any obstacles or items that might hinder the installation process. This includes removing old fixtures, such as the previous bathtub or shower stall, and any debris or clutter in the area.
- Clean thoroughly: Give the area a good cleaning to remove any dirt, grime, or mold. Use a suitable cleaning solution and ensure the surface is dry before proceeding.
- Inspect the plumbing and electrical: Check the plumbing and electrical connections to ensure they are in good condition. If any repairs or upgrades are needed, it’s best to do them before installing the new bathtub.
- Address any necessary modifications: If you’re planning on making any modifications to the plumbing or electrical setup, such as relocating the bathtub drain or adding additional lighting, now is the time to do it.
Measuring and Selecting the Right Bathtub Size
Accurate measurements are essential when it comes to selecting the right size acrylic bathtub for your space. Follow these steps to ensure you choose the perfect fit:
- Measure the available space: Use a measuring tape to determine the length, width, and height of the space where the bathtub will be installed. Take into account any restrictions, such as walls, slopes, or architectural features.
- Consider comfort and functionality: Determine the ideal size and shape of the bathtub based on your needs and preferences. Consider factors like the number of users, the desired depth, and any additional features such as built-in seats or armrests.
- Consult manufacturer guidelines: Check the manufacturer’s specifications and recommendations for the recommended minimum and maximum sizes for the acrylic bathtub model you have in mind.
- Select the appropriate size: Based on the measurements and guidelines, choose a bathtub that fits well within the available space and meets your requirements for comfort and functionality.
Gathering the Necessary Tools and Materials
Having the right tools and materials on hand before you start the installation will save you time and ensure a smooth process. Here’s a list of what you’ll typically need:
| Tools | Materials |
|---|---|
| Adjustable wrench | Acrylic bathtub |
| Pipe cutter or hacksaw | Plumber’s putty or silicone adhesive |
| Tape measure | Plumbing fittings and connectors |
| Level | Overflow drain kit |
| Drill and appropriate bits | Waterproofing membrane |
| Pencil or marker | |
| Rubber mallet |
Make sure to gather all the tools and materials listed above, and any additional ones specific to your installation, before you begin the project. This way, you’ll have everything readily available and won’t have to interrupt the installation process to go searching for missing items.
By properly preparing the space, measuring and selecting the right bathtub size, and gathering the necessary tools and materials, you’ll be well-equipped to start the installation process. Stay tuned for the next section of this guide, where we’ll walk you through the step-by-step instructions for installing your acrylic bathtub.

Removing The Old Bathtub
When it’s time to update your bathroom, installing a new acrylic bathtub can bring a fresh, modern look to your space. But before you can enjoy your new bathtub, you’ll need to remove the old one. This process may seem daunting at first, but with the right tools and a little know-how, you can successfully remove your old bathtub, making way for the new one. In this guide, we’ll walk you through the step-by-step process of removing an old bathtub, starting with disconnecting the plumbing fixtures and detaching the bathtub from the walls.
Disconnecting the plumbing fixtures
The first step in removing your old bathtub is to disconnect the plumbing fixtures. This includes turning off the water supply to the bathtub and disconnecting the water lines, as well as disconnecting the drain pipe. Here’s a step-by-step guide on how to disconnect the plumbing fixtures:
- Locate the shutoff valves for the water supply lines and turn them off. These valves are typically located near the bathtub or in the basement.
- Once the water supply is turned off, use a wrench to disconnect the water lines from the bathtub. Be sure to have a bucket or towel handy to catch any remaining water in the lines.
- Next, use a wrench to disconnect the drain pipe from the bathtub. Again, have a bucket or towel ready to catch any water that may be in the pipe.
Detaching the bathtub from the walls
After disconnecting the plumbing fixtures, the next step is to detach the bathtub from the walls. This may involve removing any screws or brackets that are holding the bathtub in place. Here’s how you can detach the bathtub from the walls:
- Inspect the walls surrounding the bathtub for any visible screws or brackets. These are commonly found near the corners of the bathtub.
- Using a screwdriver or wrench, remove the screws or brackets that are securing the bathtub to the walls. Set them aside for later use or disposal.
- Once all screws or brackets are removed, carefully lift the bathtub away from the walls. It’s important to have someone assist you with this step, as bathtubs can be heavy.
Removing the old bathtub
With the plumbing fixtures disconnected and the bathtub detached from the walls, it’s time to remove the old bathtub from your bathroom. Follow these steps to successfully remove the old bathtub:
- Clear the area around the bathtub, removing any items that may obstruct the removal process.
- Position yourself and any assisting individuals at the edges of the bathtub.
- Using caution and proper lifting techniques, lift the old bathtub and carefully carry it out of the bathroom.
- Dispose of the old bathtub responsibly, following your local regulations for disposal of large items.
Once the old bathtub is removed, you’re one step closer to installing your new acrylic bathtub. Stay tuned for the next section of this guide, where we’ll walk you through the process of preparing the space and installing your new bathtub.

Preparing The Installation Area
Before you can install your new acrylic bathtub, it’s important to properly prepare the installation area. This involves cleaning the area and ensuring it is level, as well as repairing or replacing any damaged subflooring. Additionally, you’ll need to install a bathtub support frame to provide stability and support for your new bathtub. Follow these steps to ensure a successful installation.
Cleaning the Area and Ensuring It Is Level
The first step in preparing the installation area for your acrylic bathtub is to clean the space thoroughly. Remove any debris, dust, or old caulking from the area using a vacuum cleaner or broom, ensuring a clean surface for installation.
Next, use a spirit level to check the levelness of the floor. This is crucial to ensure proper drainage and a stable installation. Place the spirit level in various locations across the floor, both lengthwise and widthwise. Any areas that are not level may need to be corrected before proceeding with the installation.
Repairing or Replacing any Damaged Subflooring
If you notice any damaged or rotting subflooring during the cleaning and leveling process, it’s crucial to repair or replace it before proceeding. Damaged subflooring can compromise the stability of the bathtub and lead to costly issues in the future.
To repair damaged subflooring, carefully remove the damaged area, and replace it with new plywood or particleboard. Be sure to secure it properly to ensure a sturdy base for your acrylic bathtub.
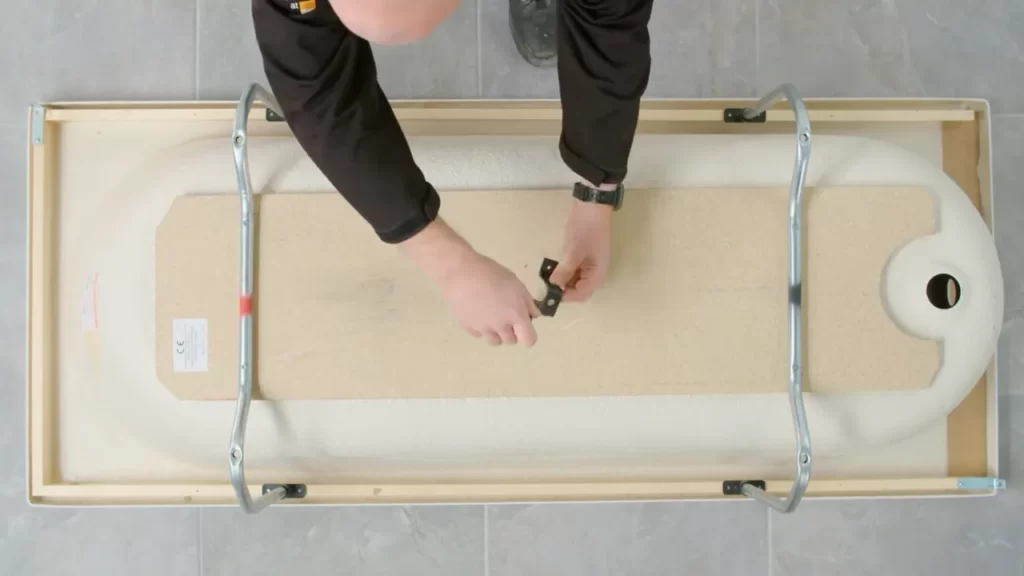
Installing the Bathtub Support Frame
Once you’ve cleaned the area and repaired any damaged subflooring, it’s time to install the bathtub support frame. The support frame provides additional stability and support for your bathtub, ensuring it doesn’t flex or sag over time.
Begin by measuring and cutting the lumber to the appropriate lengths for your bathtub. The frame should be slightly smaller than the dimensions of the bathtub to allow for proper installation. Use a power drill and screws to assemble the frame, ensuring all joints are secure.
Place the assembled support frame in the desired location, ensuring it is level and centered. Use shims if needed to level the frame. Once the frame is positioned correctly, secure it to the subfloor using screws or nails.
By following these steps and properly preparing the installation area for your acrylic bathtub, you’ll ensure a secure and stable installation. Now that the area is prepped and ready, you can move on to the bathtub installation itself.
Installing The Drain Assembly
Determining the location of the drain
Before installing the drain assembly of your acrylic bathtub, you need to determine the correct location for the drain. This is a crucial step to ensure proper functionality of the bathtub and to prevent any potential water leakage issues in the future.
To determine the location of the drain, follow these steps:
- Place the bathtub in its desired location and mark the position of the drain on the floor.
- Measure the distance between the sidewalls of the bathtub and the position of the drain. This will help you determine the correct alignment for installing the drain assembly.
- Ensure that the drain will be accessible for future maintenance or repairs.
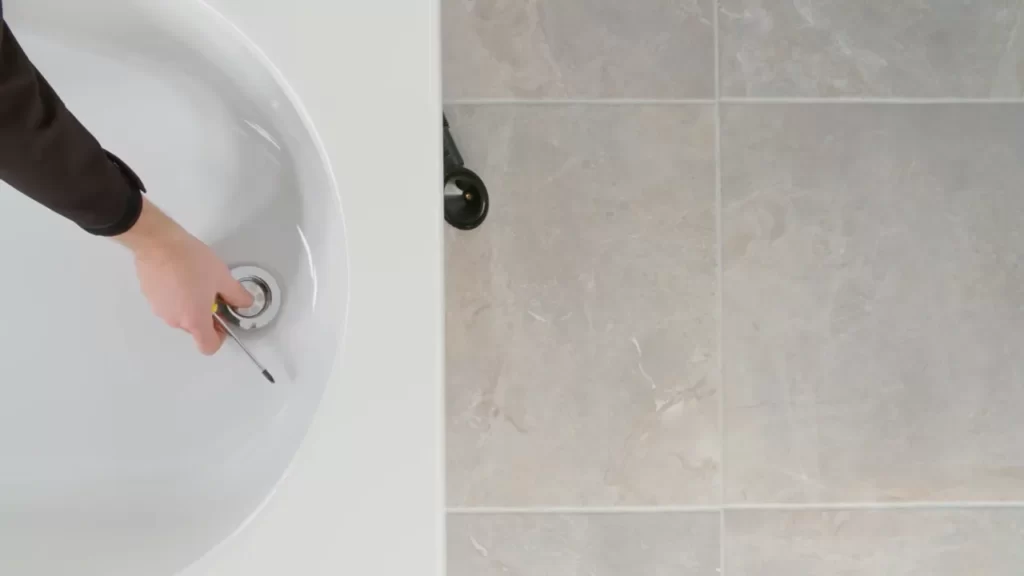
Installing the drain flange and gasket
The drain flange and gasket are essential components of the drain assembly that provide a watertight seal and secure the drain in place. Here are the steps to install them:
- Apply a thin layer of plumber’s putty or silicone adhesive around the bottom lip of the drain flange.
- Insert the drain flange into the drain hole and press it firmly to create a seal.
- From underneath the bathtub, insert the rubber gasket onto the drain flange and position it evenly.
- Tighten the locknut onto the drain flange to secure it in place. Use a drain wrench or pliers to achieve a snug fit, being careful not to overtighten and damage the flange or gasket.
- Wipe off any excess putty or adhesive that oozes out around the drain flange.
Connecting the drain pipe
After installing the drain flange and gasket, it’s time to connect the drain pipe to complete the drain assembly. Follow these steps:
- Apply a layer of plumber’s tape to the threads of the drain pipe to create a tight seal.
- Using a wrench, screw the drain pipe onto the drain flange, ensuring a secure connection.
- Measure and cut the additional drain pipe length if needed, ensuring proper alignment and clearance.
- If your bathtub has an overflow drain, connect the overflow pipe according to the manufacturer’s instructions.
- Make sure all connections are tight and secure, without any leaks.
By following these step-by-step instructions, you can safely and effectively install the drain assembly of your acrylic bathtub. Remember to always refer to the manufacturer’s guidelines and consult a professional if you encounter any difficulties.
Placing And Securing The Bathtub
When it comes to installing an acrylic bathtub, one crucial step is placing and securing the bathtub properly. This ensures that the bathtub is stable, level, and securely attached to the support frame and walls. In this section, we will guide you through the essential steps required to lift and carefully place the bathtub, ensure it is level, and secure it effectively.
Lifting and carefully placing the acrylic bathtub
To start the installation process, you need to carefully lift the acrylic bathtub and place it in its designated location. It is essential to follow the manufacturer’s guidelines and recommendations for lifting the bathtub, as it can be quite heavy and bulky.
Here’s a simple step-by-step guide to help you lift and place the bathtub:
- Ensure you have a few helpers to assist you in lifting the bathtub.
- Wear protective gloves to ensure a firm grip on the bathtub during the lifting process.
- Position yourself and your helpers on each side of the bathtub.
- Using a firm grip, carefully lift and move the bathtub towards its designated location.
- Ensure you have enough clearance to move the bathtub without causing any damage to the surroundings.
- Slowly lower the bathtub into its final position, ensuring it aligns with the plumbing fixtures and wall openings.
- Take your time to make any necessary adjustments to ensure a perfect fit.
- Once the bathtub is in place, ensure it is resting evenly on the floor and not rocking or tilting.
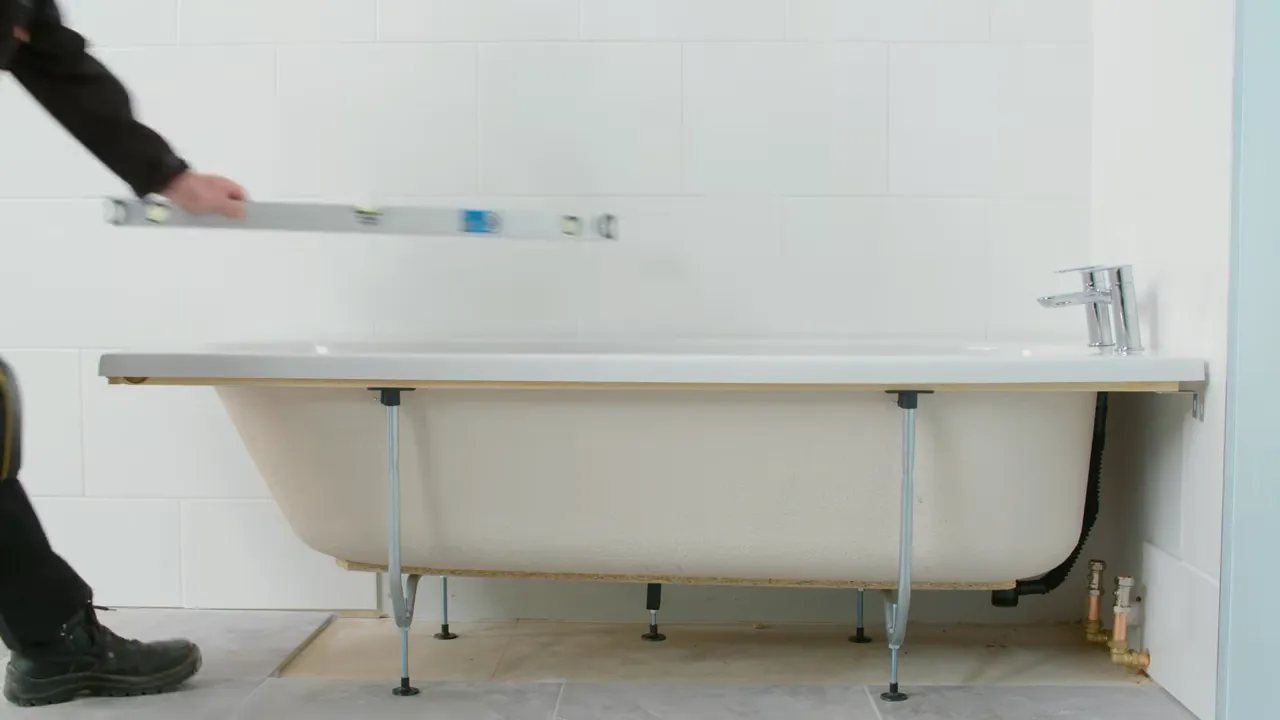
Ensuring the bathtub is level
After placing the bathtub, it is crucial to ensure that it is level to prevent any water leakage or instability issues. Follow these steps to ensure your bathtub is level:
- Using a spirit level, place it on the edges of the bathtub and check for any inclinations.
- If the bathtub is not level, use shims or adjustable feet to make necessary adjustments.
- Place the shims or adjust the feet under the low side of the bathtub until it is level.
- Check the levelness from multiple angles to ensure accuracy.
Securing the bathtub to the support frame and walls
Once the bathtub is level, it is crucial to secure it properly to the support frame and walls. This ensures that the bathtub remains stable and does not shift or move over time.
Follow these steps to secure the acrylic bathtub:
- Identify the attachment points on the support frame as specified by the manufacturer.
- Securely fasten the bathtub to the support frame using the recommended screws and brackets.
- Attach the bathtub flange to the wall studs using screws or nails.
- Ensure that the flange is tightly sealed to prevent any water leakage behind the walls.
- Check all the attachment points to ensure they are secure and stable.
By carefully following these steps, you can ensure your acrylic bathtub is properly placed, level, and securely attached. This not only enhances the aesthetics of your bathroom but also ensures a sturdy and long-lasting installation.
Connecting The Plumbing Fixtures
Once you have successfully installed your new acrylic bathtub, the next step in the process is connecting the plumbing fixtures. This includes attaching the water supply lines, connecting the bathtub overflow drain, and installing the bathtub faucet. By following these steps, you can ensure that your plumbing is properly connected and ready for use.
Attaching the water supply lines
Begin by locating the water supply lines in your bathroom. These are typically located behind the bathtub or in the wall. Before you begin, make sure the water supply is turned off.
To attach the water supply lines, follow these steps:
- Connect the hot and cold water supply lines to the corresponding water outlets on the back of the bathtub. Use a wrench to tighten the connections, ensuring a secure fit.
- Once the connections are secure, turn on the water supply and check for any leaks. If there are any leaks, tighten the connections further.
Connecting the bathtub overflow drain
The bathtub overflow drain is an important component that prevents the water from overflowing. To connect the bathtub overflow drain, follow these steps:
- Insert the overflow drain pipe into the designated opening on the side of the bathtub.
- Secure the overflow drain plate to the bathtub using the provided screws. Make sure it is tightly secured to prevent any leaks.
- Connect the overflow drain pipe to the main drain pipe using a PVC connector. Ensure a tight fit to prevent any water leakage.
Installing the bathtub faucet
The bathtub faucet is the final plumbing fixture to be connected. Follow these steps to install the bathtub faucet:
- Place the rubber gasket onto the faucet base.
- Insert the faucet base through the designated opening on the bathtub.
- Secure the faucet base to the bathtub using the provided mounting nuts. Tighten the nuts using a wrench to ensure a secure fit.
- Attach the hot and cold water supply lines to the corresponding outlets on the bottom of the faucet. Use a wrench to tighten the connections.
- Once everything is connected, turn on the water supply and test the faucet for any leaks. If there are any leaks, tighten the connections further.
By following these steps, you can successfully connect the plumbing fixtures of your acrylic bathtub. Ensure that all connections are tight and secure to prevent any water leakage. Once the plumbing is connected, you can enjoy your new bathtub and the relaxing baths that come with it.
Sealing And Finishing
Sealing and finishing the installation of an acrylic bathtub is a crucial step to ensure its durability and prevent any leakages. In this section, we will guide you through the necessary steps to complete this process seamlessly. Follow these H3 headings to ensure a successful sealing and finishing of your acrylic bathtub installation:
Applying a silicone sealant around the edges of the bathtub
Applying a silicone sealant around the edges of your acrylic bathtub is essential to create a watertight seal. This will prevent any water leakage and potential damage to the underlying structure. To apply the silicone sealant:
- Clean the edges of the bathtub thoroughly to remove any dirt, grease, or residue.
- Cut the nozzle of the silicone sealant at a 45-degree angle for a controlled application.
- Apply a continuous bead of silicone along the entire edge of the bathtub, ensuring full coverage.
- Smooth the silicone sealant using a caulk smoothing tool or your finger, creating a neat and even finish.
- Allow the silicone sealant to dry and cure according to the manufacturer’s instructions before using the bathtub.
Installing the bathtub surround or tiles
Installing a bathtub surround or tiles around your acrylic bathtub not only enhances its visual appeal but also provides additional protection against water damage. Follow these steps for a successful installation:
- Measure and cut the bathtub surround or tiles to fit the dimensions of your acrylic bathtub, ensuring precise cuts.
- Apply an appropriate adhesive or mortar to the back of the surround or tiles.
- Position the surround or tiles carefully, aligning them with the edges of the bathtub.
- Use a level to ensure the surround or tiles are straight and plumb.
- Apply even pressure to ensure a strong bond between the surround or tiles and the bathtub surface.
- Allow the adhesive or mortar to dry completely as per the manufacturer’s instructions.
Checking for any leaks and making necessary adjustments
After sealing and installing the bathtub surround or tiles, it’s crucial to check for any leaks to ensure the integrity of the installation. Follow these steps to detect and fix any potential issues:
- Fill the bathtub with water, ensuring it reaches a sufficient level.
- Observe the edges, corners, and the surrounding area for any signs of water leakage.
- If any leaks are detected, identify the source and make appropriate adjustments.
- Tighten any loose fittings or connections and reapply silicone sealant if necessary.
- Repeat the leak-checking process until no further leakage is detected.
- Once satisfied with the leakage prevention, clean any excess water and let the bathtub dry completely.
By following these steps, you can ensure a proper sealing and finishing of your acrylic bathtub installation. It is important to take your time and pay attention to detail to achieve a long-lasting and leak-free bathtub that will provide you with years of bathing comfort.
Testing And Inspecting
Testing and inspecting the installation of your acrylic bathtub is crucial to ensure its functionality and longevity. This step allows you to identify any potential leaks, verify proper drainage, and address any remaining issues. By following these steps, you can confidently evaluate the quality of your bathtub installation.
Filling the bathtub with water and checking for leaks
The first step in testing your acrylic bathtub installation is to fill it with water and closely inspect for any signs of leaks. Make sure the bathtub is securely attached to the walls and the drain seal is properly installed. Slowly fill the tub with water while keeping a close eye on all the joints, connections, and fixtures.
Here’s how you can perform a leak test:
- Inspect the drain and overflow connections to ensure they are tightly sealed. Any visible gaps should be immediately addressed by applying caulk or plumber’s tape.
- Check the faucet and handles for any water leakage when the water is turned on. Ensure that the water flows smoothly into the bathtub without any dribbling or spraying.
- Examine the area around the drain for any signs of water seepage. If you notice any leaks, apply a proper sealant to prevent further leakage.
- Keep the filled tub for at least 24 hours and regularly check for any decrease in water level. Any significant drop in water indicates a potential leak that needs immediate attention.
Ensuring proper drainage
Proper drainage is crucial for maintaining the functionality of your acrylic bathtub and preventing any potential water damage. Follow these steps to ensure efficient water drainage:
- Check the drainpipe to ensure it is clear of any debris or obstructions. Remove any visible dirt or blockages for uninterrupted water flow.
- Fill the tub and let the water drain out. Observe the speed at which the water empties. If it drains too slowly, there may be a blockage in the drainpipe that requires clearing.
- Inspect the overflow drain to ensure it is functioning correctly. Pour water into the overflow drain and check if it drains properly without any backup or overflow.
Inspecting the installation for any remaining issues
After performing the leak test and ensuring proper drainage, it’s essential to conduct a thorough inspection of the overall installation. This final step helps identify any remaining issues that may affect the bathtub’s performance:
- Check for any gaps or uneven areas between the edges of the bathtub and the walls. Fill any gaps with a suitable sealant to prevent water from leaking behind the tub.
- Inspect the caulking around the bathtub edges for any cracks or gaps. Replace any deteriorated caulking to maintain a watertight seal.
- Test the stability of the bathtub by applying gentle pressure on different areas. It should feel firm and secure without any movement or wobbling.
- Examine the external surface of the bathtub for any manufacturing defects, scratches, or blemishes. Address these issues with the manufacturer or retailer to ensure full satisfaction with your new acrylic bathtub.
By carefully following these steps, you can ensure a successful installation of your acrylic bathtub and enjoy a reliable and pleasing bathing experience for years to come.
Cleaning And Maintenance Tips
Regular cleaning methods for acrylic bathtubs
Keeping your acrylic bathtub clean is essential to maintain its beauty and longevity. Fortunately, regular cleaning can be done easily using simple household items. Here are some effective cleaning methods:
- Start by filling the tub with warm water and adding a small amount of mild dish soap.
- Gently scrub the bathtub’s surface using a soft sponge or cloth.
- Rinse the bathtub thoroughly with warm water to remove any soap residue.
- Dry the tub with a clean and soft towel to prevent water spots or streaks.
- For stubborn stains or soap scum, you can make a paste using baking soda and water. Apply the paste to the stain and let it sit for a few minutes before scrubbing it off.
- Remember to clean the bathtub regularly to prevent the buildup of dirt or grime.
Avoiding harsh chemicals and abrasive cleaning tools
While acrylic bathtubs are durable, they can be scratched or damaged if harsh chemicals or abrasive cleaning tools are used. To protect your bathtub and keep it looking pristine, follow these tips:
- Avoid using abrasive scrub brushes or scouring pads that can scratch the acrylic surface.
- Steer clear of harsh chemicals such as bleach, ammonia, or acetone, as they can cause discoloration or damage to the acrylic material.
- Instead, opt for mild, non-abrasive cleaners specifically designed for acrylic surfaces.
- Always read the labels of cleaning products to ensure they are safe to use on acrylic bathtubs.
- Consider using natural cleaning solutions, like vinegar or lemon juice diluted in water, as an eco-friendly alternative.
Tips for preventing and removing stains
Stains can be an eyesore on your acrylic bathtub, but with the right techniques, they can be prevented and removed. Here are some tips to keep your bathtub stain-free:
- Wipe down your bathtub after each use to remove any soap or shampoo residue.
- Avoid leaving items like razors, hair dyes, or colored bath products in direct contact with the acrylic surface.
- If a stain does occur, act quickly by applying a mixture of hydrogen peroxide and baking soda directly to the affected area. Let it sit for a few minutes and then gently scrub with a soft cloth.
- For tough stains, make a paste using cream of tartar and lemon juice. Apply the paste to the stain and let it sit for an hour before rinsing it off.
- Regularly check your bathtub for any signs of mold or mildew and promptly address the issue to prevent staining.
Following these cleaning and maintenance tips will help you keep your acrylic bathtub looking clean and pristine for years to come. Remember to always be gentle with your cleaning methods and avoid using harsh chemicals or abrasive tools to protect the delicate surface of your bathtub.
Frequently Asked Questions
Do You Have To Support An Acrylic Tub?
Yes, it is necessary to support an acrylic tub. Supporting an acrylic tub ensures its stability and prevents any damage or warping. Proper support helps distribute the weight evenly and ensures the tub remains level and securely in place.
What Do You Put Under A Bathtub For Support?
Bathtubs should be supported by a solid and level surface made of mortar or a heavy-duty bath support system. This allows for stability and prevents any damage or cracking to the tub.
Should Acrylic Tubs Be Set In Mortar?
Acrylic tubs should be set in mortar for stability and support. The mortar helps to prevent flexing and cracking of the tub during use. It also helps to distribute the weight evenly and provides a solid base. Setting the tub in mortar is recommended for a secure and long-lasting installation.
Does An Acrylic Bath Need A Frame?
No, an acrylic bath does not need a frame. Acrylic baths are designed to be self-supporting and do not require additional framing for installation. They are lightweight, durable, and easy to clean, making them a popular choice for many homeowners.
Conclusion
Installing an acrylic bathtub can be a straightforward process if you follow the right steps. From checking for any damage to properly sealing the tub, the installation requires attention to detail. By using this guide, you can ensure a successful and hassle-free installation of your acrylic bathtub.
So, go ahead and transform your bathroom into a haven of relaxation and comfort with your newly installed acrylic bathtub!