To install an American Standard toilet, remove the old toilet, clean the area, install the wax ring and toilet flange, place the new toilet bowl on the flange, secure it with bolts, and attach the tank.
Choosing The Right American Standard Toilet Model
When it comes to installing a new toilet, choosing the right model is crucial for both functionality and aesthetics. American Standard offers a wide range of toilet models to suit different needs and preferences. In this section, we will explore the factors to consider when selecting a toilet model, understand the different types of American Standard toilets available, and evaluate the specifications and features of each model. By the end of this guide, you will be equipped with the knowledge you need to make an informed decision.
Factors to Consider When Selecting a Toilet Model
Before purchasing an American Standard toilet, it’s important to consider several factors that will influence your choice. The following are key considerations to keep in mind:
- Size: The size of the toilet should be compatible with the available space in your bathroom. Measure the rough-in dimension, which is the distance between the wall and the center of the toilet flange, to ensure a proper fit.
- Flush Type: American Standard toilets offer different flush types, such as gravity-fed, pressure-assisted, or dual-flush. Each type has its own advantages and performance characteristics, so choose the one that best suits your needs and water conservation goals.
- Bowl Shape: American Standard toilets come in various bowl shapes, including elongated and round. Elongated bowls provide added comfort, while round bowls are better suited for smaller bathrooms with limited space.
- Height: Consider the height of the toilet, as it can greatly impact user comfort. Standard height toilets are around 15 inches from the floor to the bowl rim, while comfort height toilets are taller, typically around 17 or 19 inches.
- Style and Design: American Standard offers a range of styles and designs to match different bathroom aesthetics. Determine the look you want to achieve and choose a toilet model that complements your overall bathroom décor.
- Budget: Set a budget that aligns with your financial considerations. American Standard toilets come at different price points, so you can find a model that meets your requirements without breaking the bank.
Understanding the Different Types of American Standard Toilets
American Standard toilets are available in several different types, each with its own unique features and benefits. Familiarize yourself with the following types to make an informed decision:
| Type | Description |
|---|---|
| Gravity-fed Toilets | These toilets rely on the force of gravity to flush waste. They are efficient and suitable for most residential applications. |
| Pressure-assisted Toilets | Pressure-assisted toilets use compressed air to enhance flush performance. They are ideal for commercial settings or households with higher traffic. |
| Dual-flush Toilets | These toilets offer two flush options: a full flush for solid waste and a reduced flush for liquid waste. They are designed to conserve water without compromising performance. |
Evaluating the Specifications and Features of Each Model
Now that you have an understanding of the factors to consider and types of American Standard toilets available, it’s time to evaluate the specifications and features of each model. Pay attention to the following:
- Gallons Per Flush (GPF): The GPF indicates the amount of water used per flush. Lower GPF toilets are more water-efficient and environmentally friendly.
- Flushing Power: Evaluate the flushing power of each model to ensure effective waste removal and prevent clogs.
- Additional Features: American Standard toilets may come with added features such as built-in bidets, antimicrobial surfaces, or overflow prevention mechanisms. Consider these extras based on your personal preferences and needs.
By considering these factors, understanding the different types of American Standard toilets, and evaluating the specifications and features of each model, you can confidently choose the right toilet model for your bathroom. A well-informed decision will result in a toilet that not only performs optimally but also enhances the overall look of your space.
How To Measure And Prepare The Bathroom Space
When it comes to installing an American Standard toilet, it is important to measure and prepare the bathroom space properly. This ensures a smooth and hassle-free installation process, and allows for optimal performance and functionality of the toilet. In this section, we will guide you through the steps of measuring the rough-in distance, checking water supply and drainage connections, as well as removing the old toilet and preparing the bathroom floor.
Measuring the rough-in distance for proper toilet installation
Before you begin installing your American Standard toilet, it is crucial to measure the rough-in distance. This distance refers to the space between the wall behind the toilet and the center of the toilet’s waste outlet. To accurately measure the rough-in distance, follow these steps:
- Locate the center of the toilet’s waste outlet by measuring the distance between the two bolts at the base of the toilet.
- Measure the distance from this center point to the finished wall behind the toilet. This measurement will determine the rough-in distance.
- Ensure that the rough-in distance matches the specifications of the American Standard toilet you are installing. Different models may have different requirements, so refer to the manufacturer’s instructions for the recommended rough-in distance.
Checking the water supply and drainage connections
Once you have determined the correct rough-in distance, it is essential to check the water supply and drainage connections before proceeding with the installation. Here’s what you need to do:
- Inspect the water supply valve located near the floor or on the wall behind the toilet. Ensure that the valve is in good condition and not leaking.
- Check the water shutoff valve for the toilet. Make sure it can be easily accessed and is working properly.
- Inspect the drainage pipe to ensure it is clear of any obstructions or blockages.
- Confirm that the sewer line is properly connected and does not have any leaks.
Removing the old toilet and preparing the bathroom floor
Prior to installing the new American Standard toilet, you will need to remove the old toilet and prepare the bathroom floor. Follow these steps:
- Turn off the water supply to the toilet by closing the water shutoff valve.
- Flush the toilet to empty the tank and remove any remaining water using a sponge or towel.
- Disconnect the water supply line from the toilet tank using an adjustable wrench.
- Remove the nuts securing the toilet to the floor using a wrench. Carefully lift the toilet bowl from the floor and place it on a protective covering.
- Scrape off any wax residue from the toilet flange on the floor using a putty knife. Ensure that the flange is clean and free of any debris.
- Inspect the bathroom floor for any damage or unevenness. If needed, make necessary repairs or adjustments before proceeding with the installation.
By following these steps to measure and prepare the bathroom space, you will be well on your way to successfully installing your new American Standard toilet. Taking the time to ensure accurate measurements and proper preparation will result in a toilet that functions efficiently and meets your needs for years to come.

Step-By-Step Instructions For Installing The American Standard Toilet
Installing a new toilet can seem like a daunting task, but with the right tools and a little know-how, you can easily install an American Standard toilet in your bathroom. In this guide, we will walk you through the step-by-step process of installing the toilet, from gathering the necessary tools and materials to adjusting the flush mechanism for proper functioning.
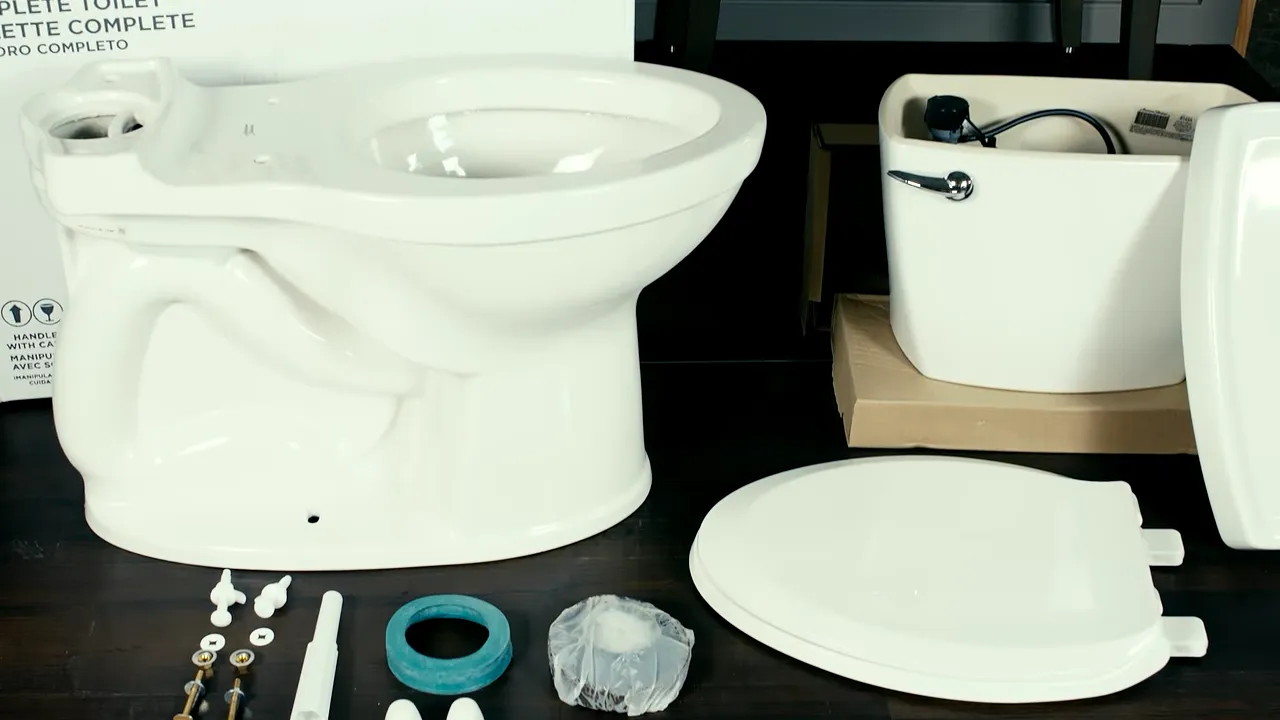
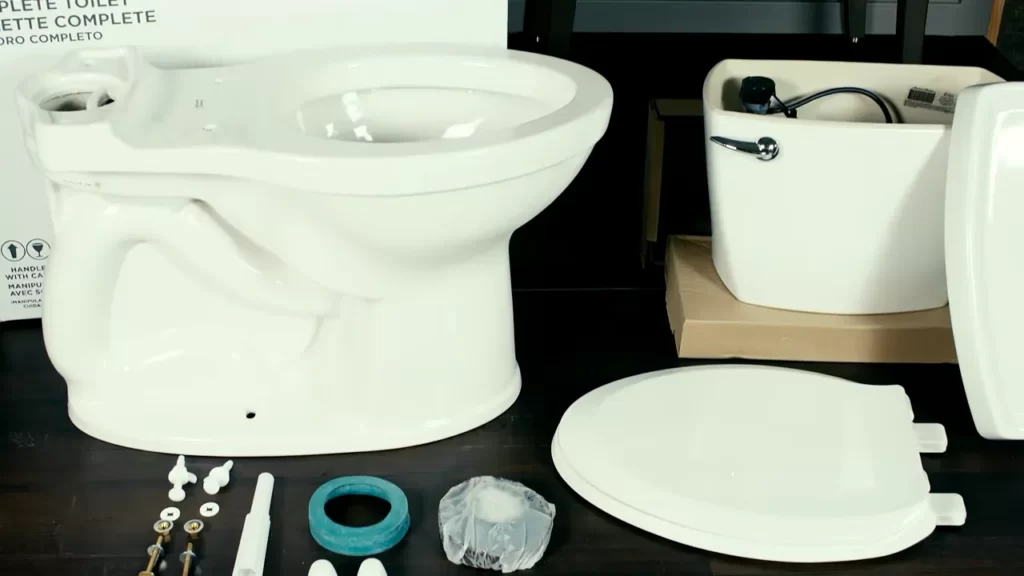
Gathering the necessary tools and materials
Before you begin the installation process, it’s important to gather all the necessary tools and materials. Here’s a list of what you’ll need:
| Tools | Materials |
| – Adjustable wrench | – American Standard toilet |
| – Screwdriver | – Wax ring |
| – Level | – Closet bolts |
| – Bucket | – Water supply line |
Installing the wax ring and closet bolts
The first step in installing the American Standard toilet is to install the wax ring and closet bolts. Follow these steps:
- Remove the old wax ring and clean the flange.
- Place the new wax ring onto the flange, ensuring it is centered.
- Insert the closet bolts into the slots on the flange, making sure they are aligned with the bolt holes on the toilet base.
Placing the toilet bowl onto the wax ring and securing it
Now that the wax ring and closet bolts are in place, it’s time to install the toilet bowl. Here’s how:
- Carefully lower the toilet bowl onto the wax ring, ensuring that the closet bolts pass through the mounting holes.
- Press down firmly on the toilet bowl to compress the wax ring and create a watertight seal.
- Tighten the nuts onto the closet bolts to secure the toilet bowl in place. Be careful not to overtighten, as this can crack the toilet.
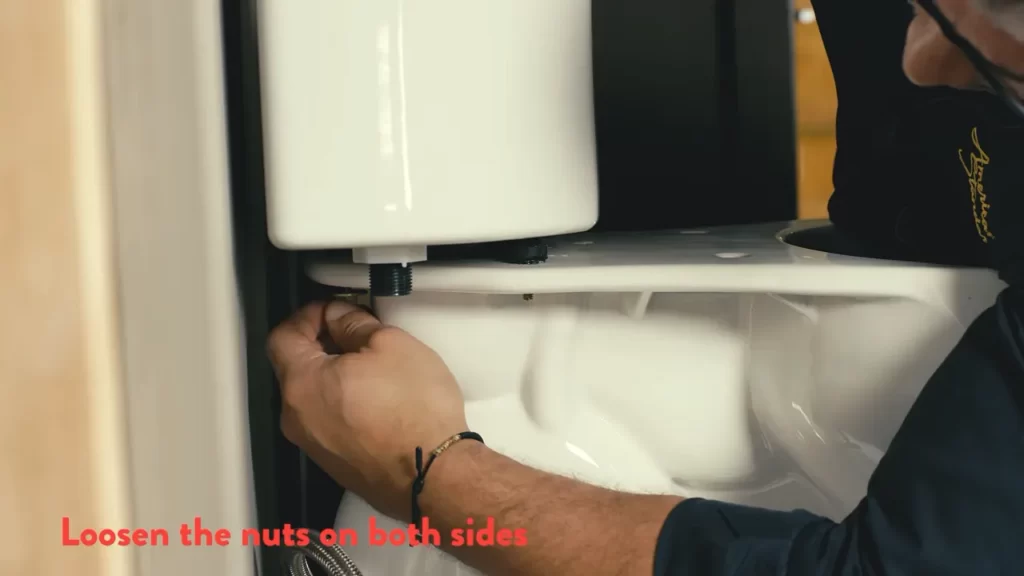
Attaching the tank and connecting the water supply
With the toilet bowl securely in place, it’s time to attach the tank and connect the water supply. Follow these steps:
- Place the tank onto the bowl, aligning the mounting holes.
- Insert the tank bolts and tighten the nuts to secure the tank to the bowl.
- Connect the water supply line to the fill valve on the bottom of the tank.
- Tighten the nut on the water supply line to ensure a secure connection.
Adjusting the flush mechanism and ensuring proper functioning
Once the tank is securely attached and the water supply is connected, it’s time to adjust the flush mechanism and ensure proper functioning. Follow these steps:
- Check the level of the tank and adjust as needed using the provided adjustment screws.
- Make sure the flapper is properly seated on the flush valve and adjust the chain if necessary.
- Flush the toilet several times to ensure proper flushing and refill.
- Check for any leaks around the base of the toilet and tighten the nuts if needed.
By following these step-by-step instructions, you can easily install an American Standard toilet in your bathroom. Remember to double-check all connections and ensure proper functioning before using the toilet. Happy installing!
Additional Tips And Tricks For A Successful Installation
When it comes to installing an American Standard toilet, there are a few additional tips and tricks that can help ensure a successful and hassle-free installation process. From properly leveling the toilet to troubleshooting common installation issues, these tips will guide you through the process and help you achieve optimal performance.
Properly leveling the toilet for optimal performance
One of the most important steps in installing a toilet is to properly level it. A toilet that is not level can cause leaks, unstable seating, and even flushing problems. To level your American Standard toilet, follow these steps:
- Step 1: Start by placing the wax ring onto the flange, ensuring it is centered and secure.
- Step 2: Lower the toilet bowl onto the wax ring, aligning it with the bolts on the flange.
- Step 3: Once the toilet bowl is in place, sit on it to compress the wax ring and create a watertight seal.
- Step 4: Using a level, check the toilet bowl for both side-to-side and front-to-back leveling. Adjust as necessary by placing shims under the base of the toilet until it is level.
- Step 5: Tighten the nuts on the bolts, ensuring the toilet remains level as you do so. Be careful not to overtighten, as this can crack the toilet bowl.
Applying caulk or sealant for a clean and watertight installation
To achieve a clean and watertight installation of your American Standard toilet, it is recommended to apply caulk or sealant around the base of the toilet. This will not only provide a finished appearance but also prevent water from seeping underneath the toilet and causing damage. Follow these steps to apply the caulk or sealant:
- Step 1: Once the toilet is properly leveled and secured, allow the wax ring to set for a few minutes.
- Step 2: Using a caulk gun, apply a bead of caulk or sealant around the base of the toilet, ensuring complete coverage.
- Step 3: Gently smooth the caulk or sealant using a wet finger or a caulk smoothing tool.
- Step 4: Wipe away any excess caulk or sealant with a damp cloth or sponge.
Troubleshooting common installation issues and solutions
Even with careful installation, you may encounter some common issues that can be easily resolved. Here are a few troubleshooting tips for common installation problems:
| Issue | Solution |
|---|---|
| The toilet wobbles or rocks after installation. | Check if the toilet is properly leveled and adjust as necessary. Ensure that all nuts and bolts are securely tightened. |
| The toilet flushes slowly or inefficiently. | Check the water supply valve to make sure it is fully open. Check the water level in the tank and adjust if necessary. If the problem persists, consider consulting a professional plumber. |
| Water leaks from the base of the toilet. | Check if the wax ring is properly seated and secure. If not, remove the toilet, replace the wax ring, and reinstall the toilet following the proper procedures. |
By following these additional tips and tricks, you can ensure a successful and problem-free installation of your American Standard toilet. Leveling the toilet properly, applying caulk or sealant, and troubleshooting common issues will help you achieve optimal performance and a watertight installation.

Benefits Of Choosing An American Standard Toilet
When it comes to choosing a toilet for your home or office, there are plenty of options available in the market. However, an American Standard toilet stands out from the rest due to its exceptional features, superior quality, and unmatched performance. Let’s explore the key benefits that make American Standard toilets the perfect choice for your bathroom.
Energy-efficient features and water-saving technologies
American Standard toilets are designed to be energy-efficient and environmentally friendly. They incorporate innovative technologies that reduce water consumption without compromising on performance. With water scarcity being a global concern, choosing an American Standard toilet ensures you are doing your part in conserving water. These toilets are equipped with efficient flushing systems that use less water per flush, making them ideal for both residential and commercial use.
Durability and reliability of American Standard products
When investing in a toilet, durability and reliability are crucial factors to consider. American Standard toilets are built to last, using high-quality materials and advanced manufacturing processes. These toilets undergo stringent quality checks to ensure they meet the highest industry standards. With an American Standard toilet, you can be confident that it will withstand the test of time and provide long-lasting performance for years to come. Say goodbye to frequent repairs and replacements!
Enhanced comfort and hygiene factors in American Standard toilets
American Standard takes comfort and hygiene seriously when designing their toilets. These toilets are equipped with features that enhance user comfort, such as ergonomic seat designs, comfortable seating heights, and efficient flushing systems that prevent clogs and reduce the need for manual cleaning. Moreover, American Standard toilets come with advanced hygiene features like EverClean surface that inhibits the growth of bacteria, mold, and mildew, ensuring a cleaner and healthier toilet environment.
Make the wise choice by selecting an American Standard toilet for your bathroom. These toilets not only offer energy-efficient operations and water-saving technologies but also provide unmatched durability, reliability, comfort, and hygiene. Invest in an American Standard toilet today and enjoy the benefits of superior quality and performance!
Frequently Asked Questions
How Do You Install An American Standard One Piece Toilet?
To install an American Standard one piece toilet, follow these steps: 1. Begin by removing the old toilet and cleaning the area thoroughly. 2. Position the new toilet over the drain flange and align it properly. 3. Secure the toilet in place using the provided mounting hardware.
4. Connect the water supply line to the fill valve. 5. Finally, test the toilet for any leaks and make necessary adjustments.
What Is The Proper Way To Install A Toilet?
To properly install a toilet, follow these steps: 1. Shut off the water supply and remove the old toilet. 2. Install the new wax ring and toilet flange. 3. Carefully place the toilet onto the flange and secure it with bolts.
4. Connect the water supply line and check for leaks. 5. Test the flush and ensure proper seal between the toilet and floor.
How To Install American Standard Quick Release Toilet Seat?
To install an American Standard quick release toilet seat, first, raise the toilet seat and cover. Locate the release buttons on the hinges and press them simultaneously. Slide the seat forward and lift it off the hinges. Position the new seat on the toilet and align the hinges with the mounting holes.
Push the seat down until it clicks into place.
How Do You Install An American Standard Dual Flush Valve?
To install an American Standard dual flush valve, start by turning off the water supply. Remove the old flush valve and clean the area around the toilet tank. Install the new dual flush valve according to the manufacturer’s instructions. Once installed, turn the water supply back on and test the flush.
Conclusion
Installing an American Standard Toilet may seem like a daunting task, but with the right knowledge and tools, it can be a straightforward process. By following the step-by-step instructions in this blog post, you’ll be able to successfully install your new toilet with ease.
Remember to familiarize yourself with the necessary tools, shut off the water supply, and carefully align and secure the toilet in place. With a little patience and attention to detail, you’ll have a fully functional and stylish American Standard Toilet in no time.
Happy installing!