
To install an acrylic bathtub, first, ensure the area is clean and free of debris. Next, position the tub in the desired location and secure it in place with appropriate fasteners.
An acrylic bathtub is a popular option for homeowners due to its affordability, durability, and versatility in design. Whether you’re remodeling your bathroom or simply replacing an old tub, installing an acrylic bathtub can be a straightforward process. By following a few simple steps, you can have a new bathtub ready for use in no time.
We will guide you through the installation process, ensuring a successful and long-lasting result. So, let’s dive in and learn how to install an acrylic bathtub.
Factors To Consider Before Purchasing An Acrylic Bathtub
Installing a new acrylic bathtub can add both functionality and style to your bathroom. However, before making a purchase, there are several factors that you need to consider to ensure that the bathtub you choose is the perfect fit for your needs. In this section, we will discuss the key factors to keep in mind before purchasing an acrylic bathtub.
Size and Dimensions
One of the most important considerations when purchasing an acrylic bathtub is the size and dimensions. You need to take into account the available space in your bathroom and the layout of your plumbing fixtures. Measure the area where you plan to install the bathtub, including the length, width, and height. This will help you determine what size and shape of bathtub will fit best in your bathroom.
When it comes to choosing the size of your acrylic bathtub, keep in mind the following:
- The bathtub should be large enough to comfortably accommodate the tallest person in your household.
- Consider the doorways and hallways leading to your bathroom to ensure that the bathtub can be brought in without any issues.
- Take note of any existing plumbing connections, such as drains and water supply lines, and make sure they align with the bathtub’s position.
Style and Design Options
The style and design of your acrylic bathtub can greatly enhance the overall look and feel of your bathroom. When choosing the style and design, keep in mind the following:
- Consider the overall theme and aesthetic of your bathroom. Choose a bathtub that complements the existing décor and fixtures.
- Think about the color options available for acrylic bathtubs. Consider whether you want a bold, eye-catching color or a more neutral tone that blends seamlessly with the rest of the bathroom.
- Pay attention to the bathtub’s shape and contours. Some acrylic bathtubs offer ergonomic designs that provide additional comfort during bathing.
Installation Requirements
Installing an acrylic bathtub requires careful planning and consideration of the installation requirements. Here are some factors to keep in mind:
- Check the weight capacity of your bathroom floor to ensure it can support the weight of the bathtub when filled with water.
- Review the installation instructions provided by the manufacturer. Ensure that you have the necessary tools and materials, and if needed, consult a professional plumber to help with the installation.
- Consider any additional components that may be required, such as showerheads, faucets, and bath accessories, and ensure that they are compatible with the acrylic bathtub you choose.
By considering these factors before purchasing an acrylic bathtub, you can make an informed decision that will result in a beautiful and functional addition to your bathroom. Remember, take accurate measurements, choose a style that suits your bathroom’s aesthetic, and ensure you have the necessary requirements for installation.

Measuring And Preparing The Bathroom Space
When it comes to installing an acrylic bathtub, measuring and preparing the bathroom space is a crucial step to ensure a successful installation. Accurate measurements and proper clearance are essential to ensure a seamless fit and prevent any issues down the line. Additionally, removing any obstacles or existing fixtures will create a clean canvas for the installation process to proceed smoothly. In this section, we will explore the necessary steps in detail, including accurate measurement techniques, ensuring proper clearance, and removing any obstacles or existing fixtures.
Accurate Measurement Techniques
Accurate measurements are the foundation of a successful acrylic bathtub installation. To begin, gather the necessary tools such as a tape measure, level, and pencil. Start by measuring the length and width of the bathroom space where the bathtub will be installed. Double-check your measurements to ensure accuracy. Additionally, measure the height of the walls to determine the appropriate size of the bathtub. Keep in mind any obstructions such as windowsills or baseboards that may affect the measurements. In this stage, precision is key, so take your time and measure multiple times to ensure accuracy.
Ensuring Proper Clearance for Installation
Proper clearance is important to ensure that the acrylic bathtub fits seamlessly into the bathroom space. Measure the doorway width to guarantee that the bathtub can be maneuvered into the bathroom without any issues. Consider the height and width of the bathtub, as well as any additional features such as handrails or fixtures. Allow sufficient clearance for comfortable movement around the tub and easy access for maintenance or repairs. Ensuring proper clearance will not only facilitate a smooth installation process but also enhance the functionality and aesthetics of your bathroom.
Removing Any Obstacles or Existing Fixtures
Before installing the acrylic bathtub, it is essential to remove any obstacles or existing fixtures that may hinder the installation process. Remove any cabinets, shelves, or wall-mounted accessories that are in the way of the bathtub’s intended location. Take extra care to disconnect and cap off any plumbing fixtures or electrical connections to avoid accidents. Clear the area around the installation site to create ample space for maneuvering and working. By removing these obstructions and existing fixtures, you will create a clean and unobstructed space that is ready for the new acrylic bathtub.
Gathering The Necessary Tools And Materials
Before you begin the installation process for your new acrylic bathtub, it’s important to gather all the necessary tools and materials. Having everything on hand will ensure a smooth and efficient installation. In this section, we will provide you with a list of required tools, recommended materials, and safety equipment that you should have.
List of required tools
Here is a list of the essential tools you will need for installing your acrylic bathtub:
- Adjustable wrench
- Screwdriver set
- Tape measure
- Level
- Drill
- Hacksaw
- Utility knife
- Plumber’s putty
- Plumbing tape
Recommended materials for installation
Aside from the tools, there are also some recommended materials that will help make the installation process easier and more efficient:
- Acrylic bathtub kit
- Plumbing fittings
- Silicone caulk
- Plumbing adhesive
- Tub surround kit
- Drain assembly
- Pipes and connectors
Safety equipment to have on hand
Ensuring your safety during the installation is crucial. Having the following safety equipment on hand will help protect you from any potential hazards:
- Safety goggles
- Protective gloves
- Dust mask
- Knee pads
Before you start installing your acrylic bathtub, make sure you have all the necessary tools, materials, and safety equipment mentioned above. This will help streamline the installation process and ensure that you have everything you need within reach.
Removing The Old Bathtub (Optional)
Before installing your new acrylic bathtub, you may need to remove the old one. While this step is optional, there are several reasons why you might consider removing the old bathtub.
Reasons for removing the old bathtub
There are a few different reasons why you might want to remove the old bathtub. Here are some common scenarios:
- The old bathtub is damaged or worn out, and installing a new one will improve the overall appearance and functionality of your bathroom.
- You are remodeling your bathroom and want to upgrade to a newer, more modern bathtub.
- You are experiencing plumbing issues, such as leaks or clogs, and removing the old bathtub will allow you to access and repair the underlying plumbing.
Proper removal techniques and precautions
Proper removal techniques and precautions are essential to ensure a smooth process and avoid any damage or injuries. Here are some steps to consider when removing an old bathtub:
- Start by turning off the water supply to the bathtub. This can usually be done by closing the shut-off valves located near the tub or by shutting off the main water supply to your home.
- Remove any fixtures or hardware attached to the bathtub, such as faucets, drains, and overflow plates. Use the appropriate tools, such as a wrench or screwdriver, to carefully detach these items.
- Next, disconnect the bathtub from the plumbing. This may involve cutting or unscrewing pipes, depending on the plumbing setup. Ensure that you have the necessary tools and take precautions to avoid any water or sewage spills.
- Once the plumbing is disconnected, you can proceed to remove the bathtub itself. Make sure to enlist the help of another person, as bathtubs can be heavy and difficult to maneuver.
- Take care not to damage any surrounding tiles, walls, or flooring during the removal process. Use padding or protective covers to prevent scratches or dents.
Disposing of the old bathtub responsibly
After successfully removing the old bathtub, it’s important to dispose of it responsibly. Here are a few options for proper disposal:
- Contact your local sanitation department or waste management facility to inquire about specific guidelines for disposing of large items like bathtubs. They may offer pickup services or provide you with information on drop-off locations.
- If the old bathtub is in good condition, consider donating it to a charitable organization or local community center. Someone in need could potentially use it for their own remodeling project.
- If you’re feeling crafty or environmentally conscious, you could repurpose the old bathtub in creative ways. For instance, it could be transformed into a planter for your garden or used for DIY projects.
By adhering to proper removal techniques and disposing of the old bathtub responsibly, you can ensure a smooth process and minimize any negative impact on the environment.
Preparing The Bathroom Floor And Walls
Before starting the installation process for your acrylic bathtub, it is crucial to properly prepare the bathroom floor and walls. This not only ensures that the installation is smooth and secure, but also helps to prevent any future issues that may arise. In this section, we will discuss three important steps for preparing the bathroom floor and walls: ensuring a stable and level floor surface, repairing any damaged walls or flooring, and waterproofing the area around the bathtub.
Ensuring stable and level floor surface
A stable and level floor surface is essential for a secure and long-lasting bathtub installation. Before proceeding, it is important to check the levelness of the floor using a spirit level. If you notice any uneven areas or slopes, it is recommended to address them before installing the acrylic bathtub.
Here are a few steps to ensure a stable and level floor surface:
- Identify any high or low spots on the floor using the spirit level.
- If you find any high spots, sand them down until they are level with the rest of the floor.
- For low spots, you can use self-leveling compound to even out the surface. Make sure to follow the manufacturer’s instructions while using the compound.
- Allow the compound to dry completely before proceeding with the installation.
- Once the floor is level, sweep or vacuum the area to remove any debris or dust.
Repairing any damaged walls or flooring
Prior to installing the acrylic bathtub, it is essential to repair any damaged walls or flooring in the bathroom. This ensures a clean and stable foundation for the bathtub and prevents any future issues that may arise due to existing damage.
Follow these steps to repair any damaged walls or flooring:
- Inspect the walls and flooring for any cracks, holes, or damage.
- If you find any cracks or holes, fill them with a suitable patching compound using a putty knife.
- Smooth out the patched areas and ensure they are level with the surrounding surface.
- Allow the compound to dry completely before proceeding.
- Once the repairs are done, sand the patched areas lightly to create a smooth surface.
- Clean the walls and flooring thoroughly to remove any dust or debris.
Waterproofing the area around the bathtub
Waterproofing is a crucial step to protect the bathroom walls and flooring from potential water damage. By properly waterproofing the area around the acrylic bathtub, you can prevent leaks and ensure the longevity of your bathroom.
Here are the necessary steps for waterproofing the area around the bathtub:
- Apply a waterproofing membrane or primer to the walls and flooring around the bathtub area. This helps to create a barrier against moisture.
- Ensure that the waterproofing product is applied evenly and covers all the required areas.
- Pay special attention to seams, corners, and joints as they are more prone to water leakage.
- Allow the waterproofing membrane or primer to dry completely as per the manufacturer’s instructions.
- Perform a water test to check for any potential leaks before proceeding with the installation.
By following these steps to prepare the bathroom floor and walls, you can ensure a stable, secure, and waterproof installation of your acrylic bathtub. This not only enhances the appearance of your bathroom but also provides you with a comfortable and worry-free bathing experience.
Installing The Acrylic Bathtub
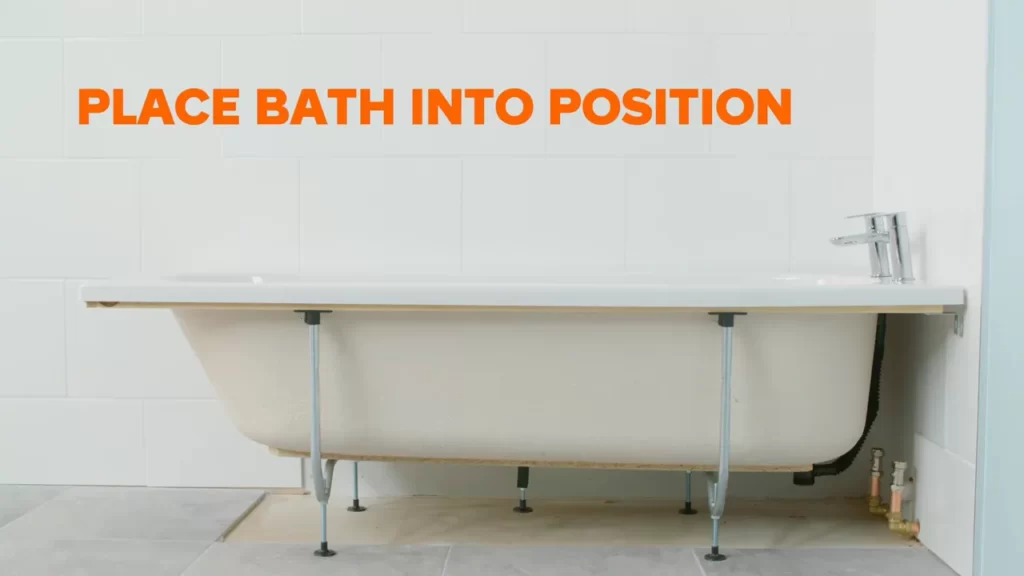
Installing an acrylic bathtub can be a rewarding DIY project that can enhance the look and functionality of your bathroom. Whether you are replacing an old bathtub or installing a new one, it’s important to follow the right steps to ensure a secure and long-lasting installation. In this guide, we will walk you through the process of installing an acrylic bathtub, covering the key aspects such as positioning the bathtub correctly, connecting the drainage system, and securing the bathtub to the walls or flooring.
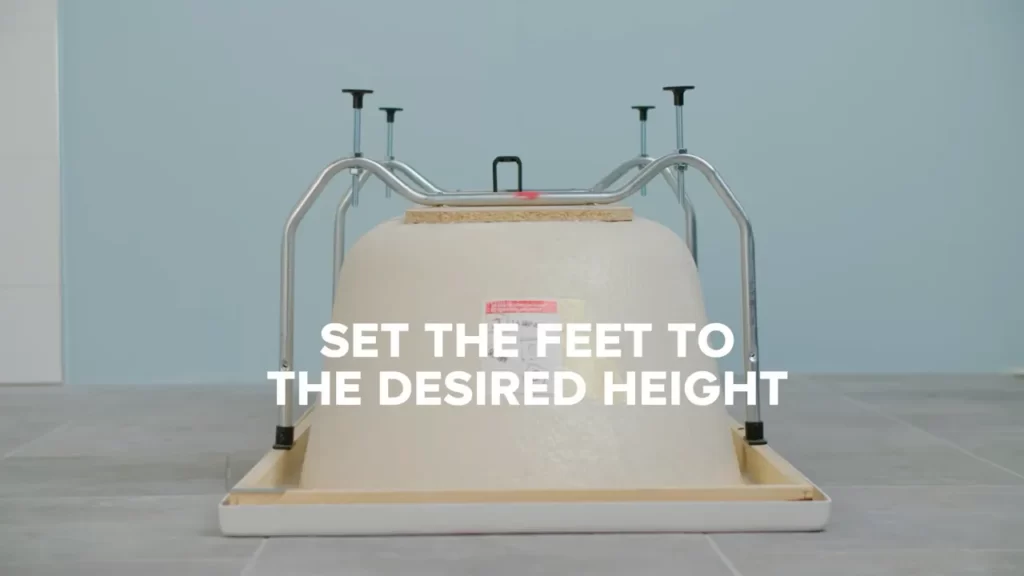
Positioning the Bathtub Correctly
Proper positioning of the acrylic bathtub is critical to ensure a comfortable and functional bathing experience. Here are the steps to position the bathtub correctly:
- Meticulously measure the available space in your bathroom to determine the exact placement of the bathtub.
- Clear the area and ensure it is clean and level.
- Place a level on top of the bathtub to ensure it is perfectly level. Adjust the position if needed.
- Check for any obstructions or obstacles that may interfere with the installation process, such as electrical wires or plumbing pipes. Make sure they are repositioned or removed if necessary.
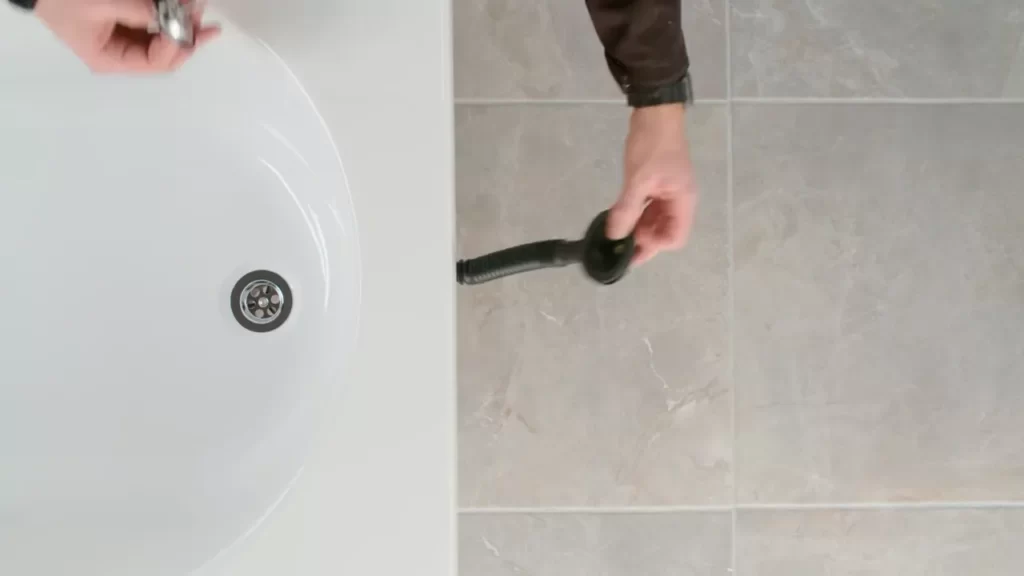
Connecting the Drainage System
Properly connecting the drainage system is crucial to ensure the efficient removal of water from the bathtub. Follow these steps to connect the drainage system:
- Read the manufacturer’s instructions regarding the specific type of drain assembly and connection required for your acrylic bathtub.
- Prepare the drain assembly by attaching the necessary components according to the instructions.
- Apply plumber’s putty or silicone sealant to create a watertight seal between the drain assembly and the bathtub.
- Insert the drain assembly into the designated opening on the bathtub, ensuring a snug fit.
- Connect the overflow drain to the bathtub, following the manufacturer’s instructions.
- Finally, connect the drainage pipe to the drain assembly and secure it tightly using a wrench or pliers.
Securing the Bathtub to the Walls or Flooring
Securing the acrylic bathtub to the walls or flooring is crucial to ensure stability and prevent any movement during use. Follow these steps to secure the bathtub:
- Determine the appropriate method for securing the bathtub based on the manufacturer’s instructions and your bathroom’s structural requirements.
- For wall-mounted bathtubs, use a stud finder to locate the wall studs. Mark their positions on the wall.
- Install the appropriate brackets or support frames to attach the bathtub securely to the wall studs.
- For floor-mounted bathtubs, use anchors or brackets to secure the bathtub to the flooring, ensuring it is level.
- Once the bathtub is properly positioned and secured, make sure to test it for stability by applying pressure and checking for any movement.
By following these steps, you can successfully install an acrylic bathtub in your bathroom. It’s important to take your time, follow the manufacturer’s instructions, and ensure all connections are secure and watertight for a safe and long-lasting installation.
Sealing And Caulking The Bathtub Edges
Properly sealing and caulking the edges of your acrylic bathtub is essential to ensure a water-tight and long-lasting installation. This step not only helps to prevent water damage and leaks but also adds a polished finish to your bathroom. In this section, we will discuss the importance of proper sealing and caulking, recommended products, and techniques to make your acrylic bathtub installation a success.
Importance of Proper Sealing and Caulking
When it comes to installing an acrylic bathtub, proper sealing and caulking play a crucial role. The edges where the bathtub meets the walls and floor are vulnerable areas that can let water seep through if not adequately protected. By sealing and caulking these edges, you create a watertight barrier that prevents water penetration, minimizing the risk of mold, mildew, and structural damage.
Additionally, proper sealing and caulking enhance the aesthetics of your bathroom. A neatly caulked bathtub not only looks more visually appealing but also adds a professional touch to the overall installation.
Recommended Products and Techniques
Choosing the right products and techniques for sealing and caulking your acrylic bathtub is crucial to achieve optimal results. Here are some recommendations:
- Silicone Caulk: Silicone caulk is highly durable and flexible, making it an ideal choice for sealing acrylic bathtubs. Look for a high-quality silicone caulk that is explicitly designed for bathroom applications. It should be mold and mildew resistant to ensure long-lasting performance.
- Caulking Gun: A caulking gun allows for precise and even application of the caulk. Make sure to use a high-quality caulking gun to ensure smooth operation and achieve a professional-looking finish.
- Caulk Smoother: A caulk smoother is a handy tool that helps achieve a clean and smooth caulking line. It ensures that excess caulk is properly removed and creates a polished appearance.
Here is a step-by-step technique you can follow to seal and caulk your acrylic bathtub:
- Thoroughly clean the edges of the bathtub, ensuring there is no soap scum, dirt, or debris. Use a mild cleaning agent and rinse it off with water.
- Allow the edges to dry completely before applying the caulk.
- Load the silicone caulk into the caulking gun and cut the tip at a 45-degree angle.
- Start at one corner of the bathtub and apply a thin, even line of caulk along the joint where the bathtub meets the wall or floor.
- Use the caulk smoother to smooth out the caulk line, removing any excess caulk and creating a seamless finish.
- Repeat this process for all edges of the bathtub.
Allowing Sufficient Drying Time
After sealing and caulking your acrylic bathtub, it is crucial to allow sufficient drying time before using the tub or exposing it to water. This will ensure that the caulk fully cures and forms a strong bond. Follow the manufacturer’s instructions for the recommended drying time, which is typically around 24-48 hours.
By following these tips and techniques, you can seal and caulk your acrylic bathtub effectively, creating a watertight and visually appealing installation. Don’t underestimate the importance of proper sealing and caulking, as it is a critical step in ensuring the longevity and functionality of your bathtub.
Testing For Leaks And Proper Functionality
Checking for any water leaks
After installing the acrylic bathtub, it is crucial to test it for leaks to ensure that the installation has been done correctly. Checking for leaks not only ensures the proper functionality of the bathtub but also prevents any water damage that could occur in the future. Here’s how you can check for any water leaks:
- Fill the bathtub with water up to the overflow drain level. Make sure the drain plug is securely closed.
- Inspect the surrounding areas of the bathtub, including the edges, corners, and joints, for any signs of water leakage.
- Use your hand to feel the underside of the bathtub for any water dripping or seepage.
- If you notice any leaks, carefully dry the affected area and try to identify the source of the leak.
- Apply a waterproof sealant or caulking to the identified leak source to repair it and prevent further leaks.
- Repeat the water filling and leak checking process to ensure that the repairs have been successful.
Examining the drainage system
The proper functionality of the bathtub relies not only on the absence of leaks but also on a well-functioning drainage system. Here’s how you can examine the drainage system:
- Remove the drain plug and observe the speed at which the water drains from the bathtub. It should be a steady and prompt flow.
- If you notice any slow or clogged drainage, the system may require cleaning or unclogging. Use a plunger or a drain snake to clear any obstructions.
- Inspect the bathtub’s overflow drain to ensure it is not blocked or obstructed by any debris.
- Check the bathtub’s P-trap, which is the curved pipe beneath the drain, for any signs of blockage or leakage.
- If you identify any issues with the drainage system, address them promptly to ensure a proper and efficient water flow.
Adjusting and addressing any issues
During the testing phase, it is crucial to be thorough and detect any issues with the acrylic bathtub’s installation. Here’s what you need to do:
- Check the alignment and stability of the bathtub. Ensure it is properly leveled and does not wobble when pressure is applied.
- If you notice any gaps or uneven edges between the bathtub and the surrounding walls, use a waterproof sealant or caulking to fill them.
- Inspect the faucets and handles for proper functionality. Ensure there are no leaks or drips when running water through them.
- Test the bathtub’s hot and cold water supply to verify that they are functioning correctly and adjusting to the desired temperature.
- If any issues or adjustments are identified during the testing process, make the necessary adjustments or consult a professional for further assistance.
By following these steps and thoroughly testing the acrylic bathtub for leaks and proper functionality, you can ensure a successful installation that will provide you with a durable and enjoyable bathing experience.
Cleaning And Maintaining The Acrylic Bathtub
Keeping your acrylic bathtub clean and well-maintained not only enhances its appearance but also prolongs its lifespan. Acrylic bathtubs are known for their durability and ease of cleaning. In this section, we will explore the best practices for cleaning the bathtub surface, avoiding harsh chemicals or abrasive tools, and regular maintenance tips for ensuring longevity.
Best Practices for Cleaning the Bathtub Surface
Regular cleaning is essential to prevent the buildup of soap scum, grime, and stains on the acrylic surface. Follow these best practices when cleaning your acrylic bathtub:
- Start by rinsing the tub with warm water to remove any loose debris. This will make the cleaning process easier.
- Use a mild, non-abrasive cleaner specifically designed for acrylic surfaces. Avoid harsh chemicals, as they can damage the acrylic and cause it to lose its shine.
- Gently scrub the surface using a soft sponge or cloth. Do not use rough abrasive tools such as steel wool or abrasive brushes, as they can scratch the acrylic.
- Rinse the bathtub thoroughly with warm water to remove any remaining cleaner residue.
- Dry the surface with a clean, soft cloth to prevent water spots or streaks.
By following these best practices, you can maintain the cleanliness and shine of your acrylic bathtub without causing any damage.
Avoiding Harsh Chemicals or Abrasive Tools
When it comes to cleaning acrylic bathtubs, it’s important to avoid using harsh chemicals or abrasive tools that can harm the surface. Here are some examples of what to avoid:
- Avoid using bleach, ammonia, or any strong acid-based cleaners, as they can discolor or damage the acrylic.
- Avoid using sharp or abrasive tools like steel wool, harsh scrub brushes, or scouring pads, as they can leave scratches on the acrylic surface.
- Avoid using solvents, acetone, or nail polish remover, as they can cause the acrylic to crack or warp.
Instead, stick to gentle, non-abrasive cleaners that are specifically formulated for acrylic surfaces. These cleaners are designed to effectively remove dirt and grime without causing any harm.
Regular Maintenance Tips for Longevity
To ensure the longevity of your acrylic bathtub, it’s important to follow regular maintenance practices. Here are some tips:
- After each use, rinse the bathtub with warm water and wipe it dry with a clean cloth. This helps prevent water spots and buildup.
- Avoid placing sharp objects directly on the acrylic surface, as they can cause scratches. Always use a protective mat or cloth if necessary.
- Avoid prolonged exposure to direct sunlight, as it can cause fading or discoloration of the acrylic.
- Regularly inspect the bathtub for any signs of damage or cracks. If you notice any issues, contact a professional for repair.
By incorporating these regular maintenance tips into your routine, you can keep your acrylic bathtub in excellent condition for years to come.
Frequently Asked Questions
What Do You Put Under A Bathtub For Support?
A bathtub needs support, so you can use a mortar bed or a wooden frame to provide stability. A mortar bed is made by mixing sand, cement, and water to create a solid base for the tub. A wooden frame, like a platform or subfloor, can also be used to support the bathtub.
Do You Have To Support An Acrylic Tub?
Yes, you must support an acrylic tub. Supporting an acrylic tub is important to ensure its stability and prevent any damage or cracking. Proper support helps distribute the weight evenly and maintains the tub’s structural integrity. Make sure to follow the manufacturer’s guidelines for installation to ensure the tub is adequately supported.
Should Acrylic Tubs Be Set In Mortar?
Acrylic tubs should be set in mortar for stability and to prevent flexing. The mortar provides a solid base and helps distribute weight evenly, ensuring durability and longevity for the tub.
How Do You Secure An Acrylic Tub To The Floor?
Secure an acrylic tub to the floor by following these steps: 1. Prepare the floor surface for installation. 2. Apply a waterproof adhesive or silicone caulk between the tub and the floor, ensuring a secure seal. 3. Use construction adhesive to attach a 2×4 wooden support frame beneath the tub for added stability.
4. Position the tub onto the support frame and press down firmly to secure it in place. 5. Allow the adhesive to dry completely before using the tub.
Conclusion
To conclude, installing an acrylic bathtub can be a simple and rewarding project if you have the right tools and follow the correct steps. By ensuring a level floor, measuring and preparing properly, and using the appropriate adhesives, you can achieve a professional and durable installation.
Remember to properly clean and care for your acrylic bathtub to maintain its beauty and functionality for years to come. Happy bathing!