To install a walk-in bathtub, you need to carefully follow these steps.
Why Choose A Walk-In Bathtub?
Walk-in bathtubs are an excellent choice for individuals who want to enhance their bathing experience and improve overall safety and accessibility in their bathroom. Whether you are a senior citizen, have limited mobility, or suffer from chronic pain, walk-in bathtubs offer numerous benefits that make them the perfect addition to any home. In this article, we will explore two key aspects that make walk-in bathtubs a preferred choice for many individuals.
Safety and Accessibility
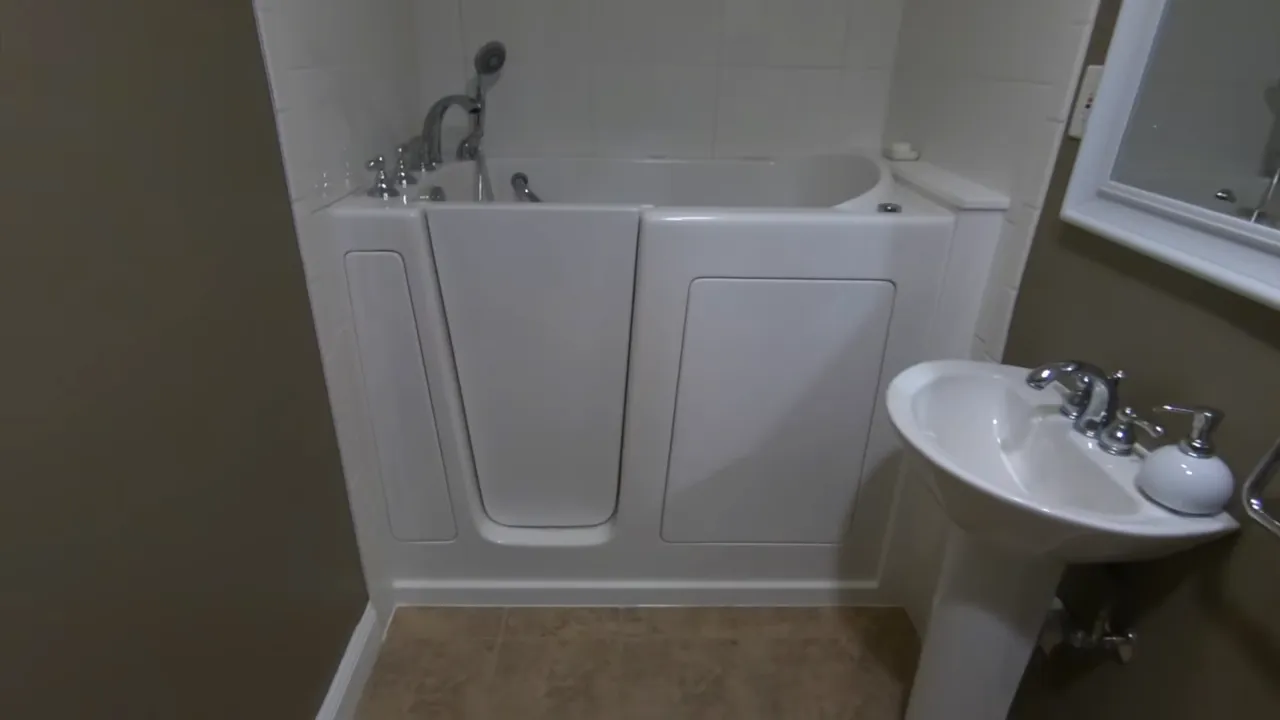
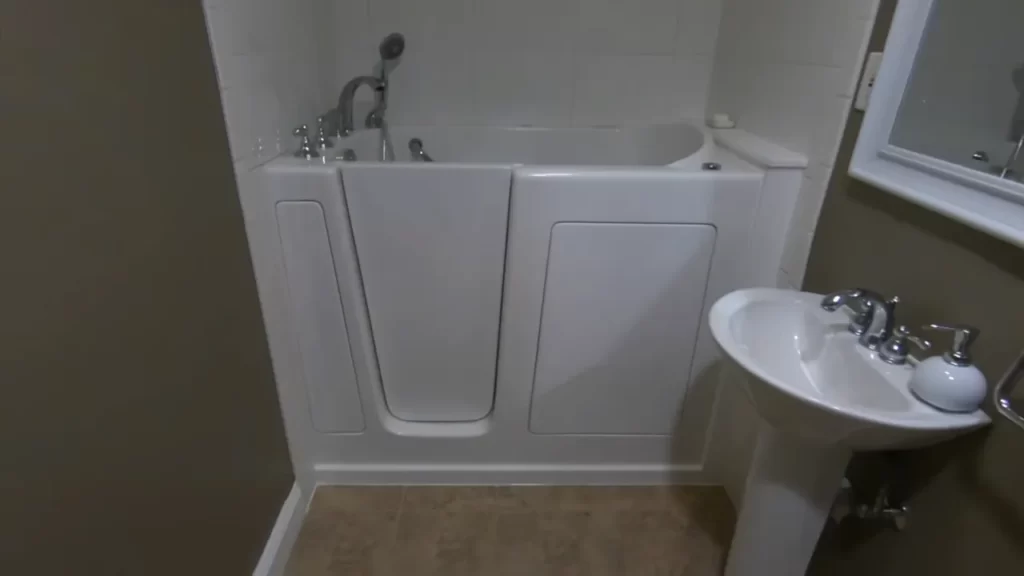
One of the primary reasons why people choose walk-in bathtubs is because of the safety and accessibility features they offer. Traditional bathtubs can be challenging to get in and out of, especially for individuals with limited mobility or balance issues. Walk-in bathtubs, on the other hand, come equipped with a built-in door that allows you to enter and exit the tub without having to step over a high threshold. This eliminates the risk of slipping and falling, providing a safer bathing experience.
Moreover, walk-in bathtubs usually have grab bars strategically placed to provide additional support and stability. These grab bars offer a much-needed helping hand, allowing you to steady yourself while entering, exiting, or moving around in the bathtub. Along with the built-in seat, these safety features offer peace of mind and independence to individuals with mobility challenges.
Health Benefits for Arthritis and Joint Pain
Another compelling reason to choose a walk-in bathtub is the health benefits they provide, specifically for individuals suffering from arthritis and joint pain. The warm water and hydrotherapy jets in walk-in bathtubs offer therapeutic pain relief, promoting relaxation and aiding in the reduction of muscle tension.
Arthritis and joint pain sufferers find great relief from soaking in warm water, as it helps to improve blood circulation and ease the stiffness in their joints. The hydrotherapy jets in walk-in bathtubs provide targeted massage and hydrostatic pressure, which can help to alleviate pain and inflammation in muscles and joints.
Furthermore, the buoyancy of water reduces stress on joints, relieving pressure and allowing for better movement and flexibility. The combination of warm water, hydrotherapy jets, and the ergonomic design of walk-in bathtubs can significantly enhance the overall well-being and quality of life for individuals with arthritis and joint pain.
In summary, walk-in bathtubs offer both safety and accessibility features, making them an excellent choice for individuals with mobility challenges. Additionally, their health benefits, particularly for arthritis and joint pain, provide a soothing and therapeutic bathing experience. By choosing a walk-in bathtub, you are investing in your safety, well-being, and overall comfort, making it a valuable addition to any bathroom.
Evaluate Bathroom Space
Before you begin the installation process for your new walk-in bathtub, it’s important to evaluate your bathroom space to ensure a proper fit. Taking careful measurements and considering the necessary plumbing and electrical connections will help to streamline the installation process and avoid any potential issues down the line.
<h3 id=”measure-dimensions-for-the-bathtub”>Measure dimensions for the bathtub</h3>
The first step in evaluating your bathroom space is to measure the dimensions for the walk-in bathtub. Start by noting the length, width, and depth of the area where the bathtub will be installed. This will help you determine the size and style of walk-in bathtub that will best fit your space. Be sure to account for any existing fixtures or obstructions that may affect the placement of the bathtub.
Once you have the measurements, you can compare them to the specifications provided by the manufacturer to ensure a proper fit. Keep in mind that walk-in bathtubs come in various sizes and shapes, so it’s important to choose one that not only fits your bathroom but also meets your specific needs and preferences.
<h3 id=”ensure-proper-plumbing-and-electrical-connections”>Ensure proper plumbing and electrical connections</h3>
Another crucial aspect to consider when evaluating your bathroom space is the availability of proper plumbing and electrical connections. Walk-in bathtubs often require specific plumbing arrangements, such as dedicated hot and cold water lines, as well as a drainage system that can handle the increased volume of water.
It’s important to consult with a professional plumber or a licensed contractor who specializes in walk-in bathtub installations to ensure that your bathroom meets the necessary plumbing requirements. They can help determine if any modifications or upgrades are needed to accommodate the walk-in bathtub, and ensure that the installation is up to code.
In addition to plumbing, walk-in bathtubs may also require electrical connections for features like built-in jets, lights, and heating systems. Ensuring that your bathroom has the adequate electrical capacity to support these features is essential. Make sure to consult an electrician to evaluate the electrical wiring and make any necessary adjustments or upgrades.
By carefully evaluating your bathroom space, measuring the dimensions for the bathtub, and ensuring proper plumbing and electrical connections, you can set the stage for a successful installation of your new walk-in bathtub. This will not only provide you with a safe and enjoyable bathing experience but also add value and accessibility to your home.
Determine The Type Of Walk-In Bathtub
If you are considering installing a walk-in bathtub in your bathroom, one of the first steps you need to take is determining the type of walk-in bathtub that will best suit your needs. With various designs and features available in the market, it’s important to consider your preferences and requirements to make an informed decision.
Consider various designs and features
When it comes to walk-in bathtubs, there are numerous design options and features to choose from. One of the key factors to consider is the door style. Walk-in bathtubs typically come with either inward-opening or outward-opening doors. Inward-opening doors are great for bathrooms with limited space, while outward-opening doors provide easier access for individuals with mobility issues.
Another important feature to consider is the seating option. Walk-in bathtubs often offer different types of seating, such as built-in seats, contoured benches, or even wheelchair-accessible designs. Analyzing your specific needs and comfort requirements will help you select the most suitable seating option for your walk-in bathtub.
Identify the right size and configuration for your needs
Determining the right size and configuration of the walk-in bathtub is crucial for a successful installation. You need to ensure that the chosen bathtub fits perfectly into your bathroom space. Measure the dimensions of your bathroom and take into account any obstacles or constraints that may affect the installation process.
Additionally, you should consider the configuration of the walk-in bathtub. This includes the placement of faucets, controls, and other accessories. Carefully evaluate your existing plumbing setup and choose a walk-in bathtub configuration that aligns with it, avoiding the need for extensive modifications and additional expenses.
By considering various designs and features, as well as identifying the right size and configuration, you can confidently determine the type of walk-in bathtub that suits your needs best. Taking the time to make these important decisions upfront will ensure a seamless installation process and a bathing experience that meets your expectations.
Gather Necessary Tools And Materials
Before you embark on the installation process for your new walk-in bathtub, it’s important to gather all the necessary tools and materials. Having everything you need at the beginning will make the installation smoother and more efficient.
<h3>List of Tools Needed</h3>
Here is a comprehensive list of the tools you will need:
1. Adjustable wrench: This will come in handy for loosening and tightening nuts and bolts.
2. Screwdriver set: A set that includes both flathead and Phillips screwdrivers will cover all your bases.
3. Pipe wrench: You’ll need this to tighten or remove pipe fittings during the plumbing installation.
4. Hack saw: This will be useful for cutting through pipes or other materials if necessary.
5. Measuring tape: Accurate measurements are key to ensure a proper fit, so don’t forget this essential tool.
6. Level: To ensure that your walk-in bathtub is installed evenly and securely, a level will be necessary.
7. Caulk gun: You’ll need this to apply silicone caulking around the edges of the bathtub to prevent leaks.
8. Safety goggles and gloves: Safety should always be a top priority, so make sure you have the proper protective gear.
<h3>Required Plumbing and Electrical Components</h3>
In addition to the tools mentioned above, you will also need specific plumbing and electrical components for the installation. These include:
Plumbing Components:
1. Water supply lines: You’ll need to connect the walk-in bathtub to your existing water supply lines.
2. Drain pipes: Proper draining is crucial, so make sure you have the necessary pipes and fittings.
3. Shut-off valves: These are important for controlling the water flow to and from the walk-in bathtub.
4. P-trap: The P-trap is a curved pipe that prevents sewer gases from entering your bathroom.
Electrical Components:
1. GFCI outlet: You’ll need to have a ground fault circuit interrupter (GFCI) outlet installed near your walk-in tub.
2. Wiring: Depending on the specific features of your walk-in bathtub, you may need to run electrical wiring for lights, jets, or other electrical components.
It’s essential to have all these plumbing and electrical components ready before starting the installation process. Make sure to comply with local building codes and consult with a professional electrician and plumber if needed to ensure a safe and proper installation.
Clearing The Area
Before you can install a walk-in bathtub in your bathroom, it is important to clear the area and make sure you have a clean and open space to work in. This involves removing any existing fixtures and preparing the bathroom floor for installation.
Remove existing bathtub or other fixtures
The first step in clearing the area is to remove the existing bathtub or any other fixtures that may be in the way. This could include shower enclosures, vanity cabinets, or any other items that are obstructing the space where the walk-in bathtub will be installed.
To remove the bathtub, you will need the following tools:
- Clawfoot hammer
- Wrench
- Screwdriver
First, turn off the water supply to the bathtub by shutting off the main water valve, usually located near the water meter. Next, use the wrench to disconnect the water supply lines from the faucet. Then, use the screwdriver to unscrew the screws that hold the bathtub in place.
Prepare the bathroom floor for installation
Once the existing bathtub or fixtures are removed, it is important to prepare the bathroom floor for the installation of the walk-in bathtub. This involves ensuring the floor is level and free from any debris or damage.
To prepare the bathroom floor, follow these steps:
- Start by cleaning the floor thoroughly, removing any dirt, dust, or debris.
- Check the floor for any signs of damage, such as cracks or uneven areas. If necessary, repair or replace the damaged flooring.
- Use a level to ensure the floor is even and adjust as needed. This is essential to ensure the walk-in bathtub will sit properly and function correctly.
- If the floor is uneven, you may need to use a self-leveling compound to create a smooth and level surface.
By clearing the area and preparing the bathroom floor, you are laying the foundation for a successful walk-in bathtub installation. With a clean and level space, you can move forward with confidence, knowing that your new bathtub will be installed safely and securely.
Positioning The Bathtub
Properly positioning a walk-in bathtub is essential for ensuring a safe and comfortable bathing experience. In this section, we will discuss how to ensure proper alignment and levelness of your walk-in bathtub and how to secure it to prevent any movement.
Ensure Proper Alignment and Levelness
Before you start installing your walk-in tub, take the time to ensure that it is properly aligned and level. This will help to prevent any future problems such as leaks or structural issues. Here’s how to do it:
- Measure the space where the bathtub will be installed to ensure it fits properly. Make sure to consider any structural obstacles such as pipes or wiring.
- Use a level to check the floor for any unevenness. If the floor is not level, you may need to make adjustments before proceeding with the installation.
- Position the walk-in bathtub in the desired location, making sure it is aligned with any existing plumbing fixtures such as drains and faucets.
- Double-check the alignment and levelness of the bathtub using the level. Adjust as necessary to achieve a perfectly level position.
Secure the Bathtub to Prevent Movement
Once the walk-in bathtub is properly aligned and level, it’s important to secure it to prevent any movement that may occur during use. This will ensure stability and safety in the long run. Here are the steps to follow:
- Refer to the manufacturer’s instructions for recommended installation methods and materials.
- Use an appropriate adhesive or sealant to attach the walk-in bathtub to the floor. This will create a strong bond and prevent any shifting or movement.
- If specified by the manufacturer, use screws or brackets to secure the bathtub to the wall. This will provide additional support and stability.
- Inspect all connections and fastenings to ensure they are tight and secure.
By ensuring proper alignment and levelness and securely attaching your walk-in bathtub, you can enjoy a worry-free bathing experience for years to come.
Connecting Plumbing And Electrical Systems
Install necessary pipes and fittings
Before connecting the plumbing and electrical systems for your walk-in bathtub, it is important to install the necessary pipes and fittings. This ensures that the water flows smoothly and the drainage system works efficiently. Begin by measuring and cutting the pipes to the appropriate lengths, ensuring that they reach the required locations.
Once the pipes are cut, use fittings, such as T-joints and elbows, to connect them together. Apply plumber’s tape to the threaded ends of the pipes to ensure a secure seal. Tighten the fittings using a wrench, being careful not to overtighten and cause damage. Check for any leaks by turning on the water supply briefly and inspecting the connections. If there are any leaks, tighten the fittings further or reapply plumber’s tape as needed.
Connect water supply and drainage systems
To connect the water supply and drainage systems for your walk-in bathtub, begin by attaching the appropriate valves to the water supply pipes. These valves allow you to control the flow of water into the bathtub. Make sure to secure the valves tightly using a wrench.
Next, connect the water supply pipes to the valves using compression fittings. These fittings are easy to install and provide a secure connection. Again, apply plumber’s tape to the threaded ends of the pipes before attaching them to the fittings. Check for leaks by turning on the water supply and inspecting the connections.
For the drainage system, attach the bathtub drain to the existing plumbing drain pipe using a drain connector. Apply plumber’s putty to create a watertight seal. Secure the connection by tightening the nuts with a wrench. Test the drainage system by filling the tub with water and ensuring it drains properly.
Electrical connections for any additional features (e.g. jets, lights)
If your walk-in bathtub includes additional features, such as jets or lights, you will need to make electrical connections. Start by locating the electrical panel and cutting off power to the bathroom. This ensures your safety during the installation process.
Consult the manufacturer’s instructions for the specific electrical requirements of your walk-in bathtub’s additional features. This will include information on the voltage, wiring, and installation of any control panels or switches.
Follow the manufacturer’s guidelines to connect the electrical wiring for the additional features. This may involve wiring the jets, lights, or any other electrical components. Ensure that all connections are secure and properly insulated to prevent any electrical hazards.
Once the electrical connections are made, restore power to the bathroom and test the additional features of your walk-in bathtub to ensure they are functioning properly.
Remember to always prioritize safety when connecting the plumbing and electrical systems of your walk-in bathtub. If you are uncertain about any part of the installation process, it is recommended to consult a professional plumber or electrician to ensure everything is done correctly.
Testing And Adjustments
Check for leaks or any issues with the installation
Once you have successfully installed your walk-in bathtub, it’s important to test it thoroughly to ensure that there are no leaks or any other issues with the installation. Testing for leaks is crucial as it can help you identify and resolve any potential problems before they cause further damage.
To check for leaks, start by filling the bathtub with water and let it sit for a few minutes. Inspect all the connections, including the faucets, drain, and any additional accessories. Look for any signs of water leakage or drips. Pay close attention to the areas around the seals and joints as these are common areas where leaks can occur.
If you notice any leaks or drips, it’s important to address them immediately. Tighten any loose connections and ensure that all the seals are properly in place. If the issue persists, you may need to consider seeking professional assistance to rectify the problem.
Adjust the bathtub to ensure proper function and comfort
Once you have confirmed that there are no leaks or issues with the installation, the next step is to adjust the walk-in bathtub to ensure proper function and comfort. This step is essential as it allows you to customize the bathtub to meet your specific needs and preferences.
Start by adjusting the water temperature. Test the hot and cold water supply to ensure that the temperature is to your liking. Adjust the temperature valve accordingly until you find the perfect balance.
Next, focus on the water pressure. Turn on the water jets and adjust the pressure to your desired level. This will ensure a relaxing and therapeutic bathing experience.
Additionally, check the bathtub’s seating and backrest positions. Make sure they are comfortable and provide adequate support for your body. You may need to adjust the height or tilt of the seating for optimal comfort.
Lastly, test the accessibility features of the walk-in bathtub. Make sure that the door, handrails, and other safety features are functioning properly and easy to use. These features are designed to enhance your bathing experience and ensure your safety.
By performing thorough testing and adjustments, you can ensure that your walk-in bathtub is installed correctly and meets your specific needs. Taking the time to address any issues and customize the bathtub to your comfort will allow you to enjoy a relaxing and safe bathing experience for years to come.
Installing Handrails And Grab Bars
HTML Syntax for H3 Headings:
Determine Suitable Locations for Handrails
Securely Install Them for Stability and Support
Installing Handrails and Grab Bars
When it comes to installing a walk-in bathtub, it is crucial to prioritize safety and accessibility. One essential aspect is the installation of handrails and grab bars. Handrails provide additional support and stability, making it easier to enter and exit the bathtub. In this section, we will discuss the process of determining suitable locations for handrails and securely installing them for stability and support.
Determine Suitable Locations for Handrails
Determining the suitable locations for handrails is critical to ensure maximum usability and safety. When selecting the positions for handrails, consider the following factors:
1. Accessibility: Handrails should be easily reachable for users of all heights. They should be within arm’s reach and strategically placed to assist users in maintaining balance while entering or exiting the walk-in bathtub.
2. Stability: Handrails should be installed in areas that provide optimal stability. Look for areas where the wall structure is sturdy and can support the weight and pressure. This may include vertical studs or reinforced walls. Avoid installing handrails in areas with weak or compromised surfaces.
3. User Convenience: Assess the user’s needs and preferences. Installing handrails in locations where they can be easily grasped and used effectively is crucial. Consider the user’s hand placement during entering and exiting the tub, as well as sitting and standing positions.
4. Compliance with Guidelines: Ensure that the handrail placement adheres to local safety guidelines and regulations. These guidelines may specify the minimum height, distance from the tub, and recommended installation methods for handrails in walk-in bathtubs.
Securely Install Them for Stability and Support
Once you have identified the suitable locations for handrails, it is imperative to secure them properly to ensure stability and support. Consider the following steps for secure installation:
1. Preparation: Begin by gathering the necessary tools, including a drill, appropriate drill bits, screws, anchors, and a level. Double-check that you have measured and marked the desired locations accurately.
2. Marking and Drilling Holes: Use a level to mark the precise positions where the handrails will be installed. Ensure the handrails are level and aligned properly. With the appropriate drill bit, create holes in the designated areas following the recommended spacing and depth.
3. Installing Anchors: For added stability, insert anchors into the drilled holes. Anchors provide a solid foundation for supporting the weight and pressure applied to the handrails. Make sure the anchors are flush with the wall surface.
4. Attaching Handrails: With the anchors in place, attach the handrails securely to the wall using screws. Ensure the screws are tightened properly and that the handrails do not wobble or move when pressure is applied. Double-check the stability and alignment before proceeding.
By determining suitable locations for handrails and securely installing them, you can enhance the safety and usability of your walk-in bathtub. These measures provide stability and support, allowing users to feel confident and independent during the bathing process. Remember to consult local safety guidelines and recommendations to ensure the installation meets all necessary requirements.
Non-Slip Flooring And Surfaces
When it comes to installing a walk-in bathtub, one of the crucial aspects to consider is non-slip flooring and surfaces. As the safety of the user is of utmost importance, it becomes imperative to take preventive measures to avoid any accidents or slips. By implementing non-slip coatings or mats in the bathtub and surrounding areas and installing a non-slip seat or bench, if necessary, you can significantly enhance the security and comfort of using the walk-in bathtub.
Apply non-slip coatings or mats in the bathtub and surrounding areas
To prevent slipping inside the walk-in bathtub, applying non-slip coatings or mats can make a notable difference. These coatings or mats are designed to provide a textured surface, which increases traction and reduces the risk of accidents. When choosing a non-slip coating, consider the material it is made of and whether it is compatible with the tub’s surface. Additionally, ensure that the coating adheres well and does not peel off easily. Alternatively, non-slip mats can be placed in strategic areas inside the bathtub to offer the same anti-slip benefits. Remember to choose mats with strong suction cups to keep them securely in place.
Install a non-slip seat or bench, if necessary
In cases where the user may require additional support while bathing, installing a non-slip seat or bench can be helpful. These seats or benches are designed to provide stability and comfort, allowing the user to sit securely while enjoying a relaxing bath. When installing the seat or bench, ensure that it is securely fastened to the floor of the tub or the surrounding area. This will prevent any accidental movement or slipping, guaranteeing a safer bathing experience.
By prioritizing the installation of non-slip flooring and surfaces in a walk-in bathtub, you can provide a secure bathing experience for users of all ages. Whether it’s applying non-slip coatings, placing non-slip mats, or installing a seat or bench, these measures can significantly reduce the risk of accidents and ensure optimal safety for individuals with limited mobility.
Waterproofing And Sealing
Proper waterproofing and sealing are crucial steps when installing a walk-in bathtub. These measures help to prevent water leaks, potential damage to your bathroom floor, and the growth of mold and mildew. If done correctly, waterproofing and sealing can ensure a long-lasting and leak-free installation. Here are some essential steps to follow:
Ensure all joints and seams are properly sealed
One of the first steps in waterproofing your walk-in bathtub is to carefully inspect and seal all joints and seams. This includes areas where the bathtub meets the walls, the drainpipe, and any other connections. Any gaps or openings need to be filled in to prevent water from seeping through. Use a high-quality waterproof sealant or caulk that is specifically designed for use in wet areas. Applying the sealant in a continuous and even manner will create a solid and watertight bond.
Apply waterproof coatings or caulking as needed
In addition to sealing the joints and seams, it is important to apply additional layers of waterproof coatings or caulk as needed. These coatings act as an extra barrier against moisture and provide an added layer of protection. Before applying any coatings, ensure the surface is clean, dry, and free from any debris. Follow the manufacturer’s instructions for the specific waterproofing product you are using. Applying the coating evenly and thoroughly will help create a strong seal that will withstand the test of time.
Remember, proper waterproofing and sealing are essential to the installation of a walk-in bathtub. These measures safeguard against potential water damage and ensure a safe and comfortable bathing experience. Follow these steps to ensure a successful and leak-free installation.
Cleaning And Maintenance Tips
Regular cleaning and maintenance of your walk-in bathtub is essential to keep it looking like new and functioning properly for years to come. In this section, we will discuss the guidelines for cleaning the bathtub and its components, as well as regular maintenance tasks that will help prolong the lifespan of your walk-in bathtub.
Guidelines for cleaning the bathtub and its components
The cleaning process for your walk-in bathtub will vary depending on the material it is made of. Here are some general guidelines to follow:
1. Acrylic bathtubs:
- Use a mild, non-abrasive cleaner specifically designed for acrylic surfaces.
- Avoid using harsh chemicals or abrasive scrub brushes that can scratch the surface.
- Wipe the bathtub with a soft cloth or sponge, and rinse thoroughly with warm water.
- Dry the surface with a clean, soft towel to prevent water spots.
2. Fiberglass bathtubs:
- Similar to acrylic bathtubs, use a mild, non-abrasive cleaner suitable for fiberglass surfaces.
- Gently scrub the bathtub using a soft cloth or sponge, focusing on any stained areas.
- Rinse the bathtub thoroughly with warm water to remove any remaining cleaner.
- Dry the surface with a clean towel to prevent water spots and improve the shine.
3. Metal or porcelain-coated bathtubs:
- These bathtubs are more durable and can withstand harsher cleaners.
- Use a cleaner that is safe for metal or porcelain surfaces, and follow the manufacturer’s instructions.
- Scrub the bathtub gently using a non-abrasive cloth or sponge.
- Rinse the bathtub thoroughly with warm water to remove any residue.
- Dry the surface with a clean towel to prevent water spots and maintain the shine.
Regular maintenance to prolong the lifespan of the walk-in bathtub
In addition to regular cleaning, there are some maintenance tasks you should perform to keep your walk-in bathtub in optimal condition:
1. Check for leaks:
Periodically inspect the bathtub for any signs of leaks, such as damp spots on the floor or walls. If you notice any leaks, address them immediately to prevent further damage.
2. Clean the jets and drains:
If your walk-in bathtub has jets or a drain, it’s important to clean them regularly to remove any buildup or debris. Refer to the manufacturer’s instructions for specific cleaning guidelines.
3. Lubricate moving parts:
If your walk-in bathtub has any moving parts, such as a door seal or hinges, lubricate them regularly to ensure smooth operation. Use a lubricant recommended by the manufacturer.
4. Test safety features:
Regularly test the safety features of your walk-in bathtub, such as the grab bars and non-slip surfaces. If any of these features are damaged or worn out, replace them immediately to prevent accidents.
By following these cleaning and maintenance tips, you can enjoy a clean, well-functioning walk-in bathtub for many years to come.
Frequently Asked Questions
Will A Walk-In Tub Fit In A Regular Tub Space?
Yes, a walk-in tub can fit in a regular tub space without any major modifications. The dimensions of walk-in tubs are designed to fit most standard tub spaces.
What Is The Real Cost Of A Walk-In Tub?
The real cost of a walk-in tub varies depending on several factors such as the size, features, and installation requirements. On average, walk-in tub prices range from $2,500 to $10,000. It’s best to consult with a professional to get an accurate cost estimate.
How Long Does It Take To Install A Walk In Bathtub?
The time it takes to install a walk-in bathtub can vary depending on factors like the complexity of the installation and the existing plumbing setup. Generally, the installation process can be completed in a few days to a week.
What Are The Electrical Requirements For A Walk-In Tub?
The electrical requirements for a walk-in tub vary, but typically, they operate on a standard 120-volt outlet. It’s important to have a dedicated circuit with a ground fault circuit interrupter (GFCI) to ensure safety. Professional installation is recommended to meet local electrical codes and ensure compatibility with your home’s electrical system.
Conclusion
Installing a walk-in bathtub can be a simple and beneficial process for enhancing safety and accessibility in your bathroom. By following the steps outlined in this guide, you can successfully complete the installation on your own. Remember to consider factors such as space, plumbing requirements, and safety features when selecting a walk-in bathtub.
With proper research and planning, you can transform your bathroom into a more accessible and enjoyable space.