
To install a vessel sink drain with overflow, first, assemble the drain components according to the manufacturer’s instructions. Then, insert the assembled drain into the sink’s drain hole, ensuring a tight fit.
Use pliers to tighten the nut and rubber gasket underneath the sink until secure. Lastly, connect the drain pipe to the bottom of the drain and tighten the connections.
Factors To Consider When Selecting A Vessel Sink Drain With Overflow
Installing a vessel sink drain with overflow is an essential step in achieving a functional and visually appealing bathroom. With several options available in the market, selecting the right drain can seem overwhelming. However, by considering a few key factors, you can make an informed decision and ensure a successful installation. The material and color of the drain, its compatibility with the sink and faucet, and its size and dimensions are crucial aspects to evaluate. Let’s explore each factor in detail.
Material and Color
The material and color of the vessel sink drain play a significant role in the overall aesthetic of your bathroom. It is essential to choose a material that not only complements the sink but also offers durability and longevity. Common materials used for sink drains include brass, stainless steel, and plastic. Brass is a popular choice due to its strength and corrosion resistance, while stainless steel offers a sleek and modern look. Additionally, plastic drains are often budget-friendly options. When it comes to color, selecting a drain in a finish that matches or coordinates with your sink and faucet can help create a cohesive and visually appealing design.
Compatibility with Sink and Faucet
Ensuring the compatibility of the vessel sink drain with both the sink and faucet is vital for a proper installation. Start by checking the sink’s specifications provided by the manufacturer. Take note of the drain hole size and shape, as well as any specific recommendations for drain compatibility. Additionally, consider the type of faucet you plan to install, as this can affect the height and clearance needed for the drain. Some sink drains come with compatibility guidelines to help you choose the right option. Make sure to compare these guidelines with your sink and faucet specifications to ensure a seamless fit.
Size and Dimensions
The size and dimensions of the vessel sink drain must align with the sink’s requirements. Measure the diameter and depth of the drain hole in your sink to determine the appropriate size of the drain. It’s crucial to choose a drain with the same or slightly larger diameter to ensure a snug fit. Additionally, consider the length and depth of the drain to ensure it provides adequate clearance for proper water flow and waste disposal. Taking precise measurements and comparing them with the drain dimensions will help you select the ideal size for your vessel sink.

Understanding The Importance Of An Overflow In A Vessel Sink Drain
Understanding the Importance of an Overflow in a Vessel Sink Drain
A vessel sink adds a touch of elegance and modernity to any bathroom. However, it is crucial to consider the functionality of the sink beyond its aesthetic appeal. When it comes to installing a vessel sink drain, one of the key aspects to take into account is the presence of an overflow. In this section, we will delve into the importance of an overflow in a vessel sink drain and why it is essential for the overall functionality and maintenance of the sink.
Preventing Water Overflows
One of the primary reasons why an overflow is important in a vessel sink drain is to prevent water overflows. Unlike traditional sinks where water from a faucet can easily drain directly into the basin, vessel sinks are elevated and have a shallow basin. This design makes it easier for water to accumulate in the sink, increasing the risk of overflowing.
An overflow acts as a safety measure that helps redirect excess water to the drainage system, preventing potential flooding and water damage. It ensures that even if the sink basin fills up, the excess water can safely flow through the overflow opening, keeping the sink from overflowing onto the countertop or floor.
Moreover, the presence of an overflow is particularly beneficial in households with children or individuals who may forget to turn off the faucet. In such situations, the overflow acts as a safeguard against potential disasters, giving you peace of mind.
Maintaining the Sink’s Aesthetic Appeal
While the primary function of an overflow in a vessel sink drain is to prevent water overflows, it also plays a significant role in maintaining the sink’s aesthetic appeal. Vessel sinks are often chosen for their stylish and unique designs, and an overflow can be seamlessly integrated into the overall look of the sink.
Manufacturers offer a wide range of overflow designs and finishes that can complement the sink’s style, ensuring a cohesive and visually pleasing appearance. Crafted with attention to detail, these overflow openings can be an elegant addition to the sink, enhancing its overall attractiveness.
Additionally, the presence of an overflow allows for easier cleaning and maintenance of the sink. It provides an alternative route for water to exit the basin, preventing any standing water from lingering in the sink after use. This not only helps maintain the sink’s hygiene but also prolongs its lifespan by minimizing the risk of stains, watermarks, and potential damage caused by prolonged exposure to moisture.
In conclusion, understanding the importance of an overflow in a vessel sink drain is crucial for both functionality and aesthetics. The overflow helps prevent water overflows, protecting your bathroom from potential damage. Simultaneously, it maintains the sink’s visual appeal by offering a seamless integration into the overall design and assisting in its maintenance. So, when installing a vessel sink drain, make sure to prioritize the inclusion of an overflow for a complete and functional bathroom ensemble.

Essential Tools For Installing A Vessel Sink Drain With Overflow
When it comes to installing a vessel sink drain with overflow, having the right tools on hand can make the process much smoother. With a few essential tools, you’ll be well-prepared to tackle this DIY project. In this blog post, we’ll walk you through the necessary tools you’ll need for the installation.
1. Wrench
The first tool you’ll need is a wrench. A wrench is essential for loosening and tightening various fittings and connections during the installation process. It provides the necessary torque to ensure a secure and leak-free installation. Make sure to choose a wrench that is the correct size for the fittings you’ll be working with.
2. Plumber’s Putty
Plumber’s putty is a versatile and must-have tool for installing a vessel sink drain with overflow. This sticky, moldable substance is used to create a watertight seal between the sink and the drain assembly. It helps prevent leaks and keeps the sink securely in place. Apply a thin layer of plumber’s putty around the base of the drain assembly before inserting it into the sink.
3. Plumbers Tape
To ensure a secure and leak-free connection, plumbers tape is essential. Also known as thread seal tape, this thin, PTFE (polytetrafluoroethylene) tape is wrapped around the threaded connections to create a tight seal. Simply wrap a few layers of plumbers tape around the threads in a clockwise direction before screwing the fittings together.
4. Adjustable Pliers
Adjustable pliers are a versatile tool that comes in handy for various steps of the installation process. These pliers allow you to grip and hold onto various parts securely, making it easier to tighten or loosen fittings. Choose pliers that have a comfortable grip and can be adjusted to fit different sizes.
5. Screwdriver
A screwdriver is a basic but essential tool when it comes to installing a vessel sink drain with overflow. This tool is used to secure screws, nuts, or other fasteners during the installation process. Make sure to choose a screwdriver with the appropriate size and type of head to fit the screws you’ll be working with.
In conclusion, when installing a vessel sink drain with overflow, having the right tools is key. A wrench, plumber’s putty, plumbers tape, adjustable pliers, and a screwdriver are the essential tools that will help you complete this project successfully and ensure a secure and leak-free installation.

Materials Needed For The Installation Process
Before you start installing a vessel sink drain with overflow, it’s essential to gather all the necessary materials. Having these items ready will ensure a smooth and efficient installation process. Here are the materials you’ll need:
Vessel Sink Drain With Overflow Kit
A vessel sink drain with overflow kit is the heart of your sink’s drainage system. This kit usually includes all the components required for a successful installation. It typically contains a drain assembly, rubber gaskets, and other necessary fittings and fixtures. Ensure that the kit you choose matches the specifications of your vessel sink.
Silicone Sealant
To ensure a watertight seal, you’ll need silicone sealant. Silicone sealant is a flexible material that creates a waterproof barrier between the drain assembly and the sink. It prevents water leakage and helps maintain the integrity of your sink’s installation. Make sure to choose a high-quality silicone sealant suitable for bathroom applications.
Pipe Cleaner
A pipe cleaner is another vital tool you’ll need during the installation process. It helps in removing any debris or dirt that may have accumulated inside the drain pipe. A clean pipe ensures smooth water flow and prevents clogs. Use a pipe cleaner specifically designed for bathroom drains to achieve the best results.
Clean Cloth or Towel
Having a clean cloth or towel handy is important to keep your work area neat and dry. You can use it to wipe away excess sealant, clean any spills, or dry your hands during the installation. Keeping your work area clean and dry will ensure a professional-looking installation and prevent any accidents due to slippery surfaces.
Step 1: Prepare The Sink And Drain Assembly
Before you start installing a vessel sink drain with overflow, it’s essential to prepare the sink and drain assembly properly. This involves emptying and cleaning the sink, as well as detaching any existing drain assembly if applicable. By following these steps, you’ll ensure a smooth installation process.
Empty and Clean the Sink
Begin by emptying the sink of any water or debris. This can be done by pouring out the existing water and removing any objects that may be blocking the drain. Taking the time to clean the sink thoroughly will ensure that the installation is carried out on a clean surface, minimizing the risk of leaks or clogs in the future.
Detach Existing Drain Assembly (if applicable)
If you are replacing an existing drain assembly, you’ll need to detach it before proceeding with the installation. To do this, start by locating the locknut situated underneath the sink. Use a wrench to loosen and remove the locknut along with any other connecting parts, such as the tailpiece or gasket. Once the existing drain assembly is detached, you can proceed with installing the new vessel sink drain.
In summary, preparing the sink and drain assembly is the first step in installing a vessel sink drain with overflow. Emptying and cleaning the sink ensures a clean surface for installation, while detaching any existing drain assembly allows for a seamless replacement. By following these steps, you’ll be well on your way to completing the installation successfully.
Step 2: Apply Plumbers Putty And Install Drain Assembly
Once you have prepared your vessel sink for installation, the next step is to apply plumbers putty and install the drain assembly. This crucial step ensures a tight and secure connection for your vessel sink drain with overflow. Follow the steps below to complete this process:
Apply Plumbers Putty to the Flange
To begin, apply plumbers putty around the flange of the drain assembly. Plumbers putty is a pliable, waterproof material that helps create a watertight seal. It prevents leaks and ensures the drain assembly remains securely attached to the sink. Take a small amount of plumbers putty and roll it between your hands to form a rope-like shape.
Then, apply the putty around the underside of the flange, making sure to cover the entire circumference. Ensure the putty extends slightly beyond the edge of the flange to create a complete seal.
Insert and Tighten the Drain Assembly
Once the plumbers putty is applied, it’s time to insert the drain assembly into the sink’s drain hole. Position the drain assembly so that the flange sits flush against the sink’s surface. Gently press down to create a tight seal with the putty.
Next, locate the rubber gasket that came with the drain assembly. Slide the gasket onto the threads of the drain assembly from the underside of the sink. Ensure the gasket sits snugly against the sink’s surface.
Finally, screw the nut onto the drain assembly threads. Use your hand to tighten the nut initially, and then use pliers to give it an extra turn. Avoid overtightening, as this can damage the sink or drain assembly. Check for any visible gaps or leaks around the flange. If necessary, give the nut another slight turn to ensure a secure fit.
And just like that, you have successfully applied plumbers putty and installed the drain assembly for your vessel sink with overflow. In the next step, we will focus on connecting the drain assembly to the rest of the plumbing system.
Step 3: Connect The Overflow Drain
Once you have successfully attached the drain assembly to the vessel sink, the next step is to connect the overflow drain. The overflow drain helps prevent water from overflowing and causing damage to your bathroom. Follow the simple steps below to efficiently connect the overflow drain to the drain assembly.
Attach the Overflow Drain to the Drain Assembly
To begin, locate the overflow drain opening on the vessel sink. This is typically located near the top edge of the sink, opposite the faucet. Take your overflow drain pipe and line it up with the opening.
Insert the overflow drain pipe into the opening and ensure that it fits securely. You may need to apply gentle pressure to make sure it is properly aligned. Once aligned, press the overflow drain pipe into the opening until it is fully inserted.
Secure the Connection with Plumbers Tape
To ensure a tight and leak-free connection, it is recommended to use plumbers tape. Plumbers tape, also known as Teflon tape, helps create a watertight seal between threaded connections.
To secure the connection, wrap a few layers of plumbers tape around the threads of the overflow drain pipe. Make sure to wrap it in a clockwise direction to prevent the tape from unraveling when you tighten the connection.
Once you have applied the plumbers tape, carefully screw the threaded end of the overflow drain pipe onto the drain assembly. Use a wrench or pliers to tighten the connection, but be careful not to overtighten, as this can lead to damage.
Check for Leaks
Once you have securely connected the overflow drain to the drain assembly, it is important to check for any leaks. Turn on the water supply and let the water flow into the vessel sink. Observe the connection points and ensure that there are no visible leaks.
If you notice any leaks, you may need to tighten the connection further or reapply plumbers tape. It is important to address any leaks promptly to avoid water damage.
By following these simple steps, you can successfully connect the overflow drain to the drain assembly of your vessel sink. This will help maintain the functionality of your sink and prevent any potential water damage.
Step 4: Install The Tailpiece And P-Trap
Now that you have successfully connected the vessel sink drain assembly, it’s time to move on to the next important step – installing the tailpiece and P-trap. These components are crucial for creating a secure and functional drainage system in your bathroom. In this guide, we will walk you through the process of connecting the tailpiece to the drain assembly and attaching the P-trap to the tailpiece.
Connect the Tailpiece to the Drain Assembly
The tailpiece is a straight pipe that connects the bottom of the drain assembly to the P-trap. Before starting this step, ensure that all the necessary parts are ready, including the rubber washer and the locknut. Here’s how you can connect the tailpiece:
- Insert the tailpiece into the bottom of the drain assembly.
- Slide the rubber washer over the tailpiece and position it onto the drain assembly.
- Tighten the locknut onto the tailpiece to secure it in place. Use a wrench to ensure a tight connection, without over-tightening which may cause damage.
Attach the P-Trap to the Tailpiece
The P-trap is a curved pipe that allows wastewater to flow out while creating a water seal to prevent sewer gases from entering your bathroom. To attach the P-trap to the tailpiece, follow these steps:
- Apply plumber’s tape to the threaded end of the tailpiece.
- Connect one end of the P-trap to the tailpiece by screwing it on clockwise. Ensure it is securely tightened, but avoid excessive force.
- Connect the other end of the P-trap to the wall drain pipe. Again, use plumber’s tape and ensure a tight connection.
- Adjust the P-trap’s position if necessary to align with the wall drain pipe.
- Double-check all the connections to make sure they are secure and leak-free.
Congratulations! You have successfully installed the tailpiece and P-trap for your vessel sink drain with overflow. Ensure that all connections are tight and there are no leaks before moving on to the next steps. In the upcoming section, we will cover the crucial process of sealing the drain assembly and test the sink to ensure everything is functioning properly.
Step 5: Test For Leaks And Make Adjustments
Congratulations! You’re almost done with the installation process of your vessel sink drain with overflow. Now it’s time to ensure everything is working properly by testing for leaks and making any necessary adjustments. Follow the steps below to complete this final stage of the installation with ease.
Turn on the Water Supply
First, locate the shut-off valves underneath the sink and turn them on by rotating the handles clockwise. This will allow the water to flow through the pipes and into the vessel sink. Slowly increase the water pressure by gradually opening the valves.
Check for Leaks and Tighten Connections if Needed
Next, carefully inspect all the connections and joints of the drain system. Look for any signs of water leakage, such as drips or puddles. It’s essential to address any leaks immediately to prevent water damage.
If you spot a leak, start by tightening the connection causing the issue. You can use a wrench or pliers to gently tighten the nut, ensuring not to overtighten it as this can lead to damage. Test the connection again to see if the leak persists.
However, if tightening the connection doesn’t resolve the issue, you may need to disassemble the area where the leak is occurring. Inspect the rubber gasket or O-ring for any visible signs of wear or damage. If necessary, replace the faulty gasket or O-ring with a new one before reassembling the connection.
After addressing any leaks and making adjustments, test the entire drain system once more by running water into the sink and observing for any further leaks. It’s important to thoroughly check all connections, especially those near the tailpiece and drain pipes.
Remember, a properly installed and sealed vessel sink drain system should not have any leaks. Taking the time to test for leaks and make necessary adjustments now will save you from future headaches and potential water damage.
In conclusion, with the water supply turned on, carefully check for leaks throughout the entire drain system, tightening connections as needed. Address any leaks promptly by examining the gaskets or O-rings and replacing them if necessary. Once you have confirmed that the vessel sink drain with overflow is leak-free, you can confidently enjoy your newly installed sink without any worries.
Regular Cleaning And Clearing Of Debris
Regular Cleaning and Clearing of Debris
Ensuring proper maintenance and regular cleaning of your vessel sink drain with overflow is crucial for its efficient functioning and longevity. Over time, debris such as hair, soap scum, and other particles can accumulate and cause clogs or unpleasant odors. By incorporating simple cleaning and clearing techniques into your routine, you can prevent these issues and keep your vessel sink drain with overflow running smoothly.
Use a Pipe Cleaner to Clear the Drain
One effective method to clear debris from your vessel sink drain with overflow is by using a pipe cleaner. Pipe cleaners are flexible tools that can easily reach deep into the drain pipe, dislodging any accumulated particles. Follow these simple steps:
- Start by removing the drain stopper or cover.
- Insert the pipe cleaner into the drain and gently push it down as far as it can go.
- Move the pipe cleaner in a circular motion to loosen any debris.
- Slowly pull the pipe cleaner out of the drain, allowing it to collect and trap any particles along the way.
- Dispose of the collected debris in a waste bin.
Regularly using this method can prevent buildup and ensure that your vessel sink drain with overflow remains free of obstructions.
Clean the Overflow Drain Opening
It’s also important to clean the overflow drain opening, as debris can accumulate here as well. To accomplish this:
- Mix a solution of warm water and mild detergent.
- Take a soft-bristle brush or an old toothbrush and dip it into the soapy solution.
- Gently scrub the overflow drain opening, paying attention to any visible debris or residue.
- Rinse the area thoroughly with warm water to remove any remaining soap or particles.
- Dry the overflow drain opening with a clean cloth or towel.
Performing this cleaning routine regularly will keep the overflow drain opening clear and prevent any blockages from occurring.
Remember, regular cleaning and clearing of debris from your vessel sink drain with overflow is essential for maintaining its functionality and preventing potential issues. By incorporating these simple practices into your cleaning routine, you can enjoy a hassle-free and efficient vessel sink drain for years to come.
Avoiding Harsh Chemicals And Abrasives
When it comes to installing a vessel sink drain with overflow, it’s important to not only focus on the technical aspects but also on the cleaning and maintenance of your new fixture. One key aspect of maintaining your vessel sink drain is to avoid using harsh chemicals and abrasives. Here are some key tips to keep in mind:
Use Mild Cleaning Solutions
When cleaning your vessel sink drain, it’s best to stick to mild cleaning solutions that are non-abrasive and gentle on the surface. Harsh chemicals can cause damage to the finish and may even lead to discoloration over time. Instead, opt for natural or homemade cleaning solutions that are safe and effective.
One popular option is to use a mixture of vinegar and water. Vinegar is a natural disinfectant and can effectively remove stains and odors. Simply mix equal parts vinegar and water in a spray bottle, spray it on the surface, and wipe it clean with a soft cloth or sponge. This gentle solution is not only safe for your vessel sink drain but also for the environment.
| Ingredients | Instructions |
|---|---|
| Equal parts vinegar and water | 1. Mix the vinegar and water in a spray bottle 2. Spray the mixture onto the surface of the vessel sink drain 3. Wipe clean with a soft cloth or sponge |
Avoid Heavy Scrubbing or Chemicals
While it may be tempting to use heavy scrubbing or strong chemicals to remove tough stains or build-up, it’s important to resist the urge. These abrasive methods can cause scratches, damage, or even remove the finish altogether. Instead, try using a soft cloth or sponge along with the mild cleaning solution mentioned earlier.
If you encounter stubborn stains or mineral deposits, you can also try using a paste made from baking soda and water. This gentle abrasive paste can help loosen and remove stubborn stains without causing damage to the surface. Simply mix a small amount of baking soda with water until you achieve a paste-like consistency. Apply the paste to the stained area, let it sit for a few minutes, then gently scrub with a soft cloth or sponge. Rinse thoroughly afterwards.
In conclusion, when it comes to maintaining your vessel sink drain with overflow, it’s important to avoid harsh chemicals and abrasives. Stick to mild cleaning solutions, such as vinegar and water, and be gentle when cleaning to avoid damage. By following these simple tips, you can keep your vessel sink drain looking clean and pristine for years to come.
Checking And Replacing Damaged Parts
One important aspect of maintaining your vessel sink drain with overflow is regularly checking and replacing any damaged parts. Over time, the components of the drain assembly might wear out or become damaged due to constant usage or other factors. Identifying and addressing these issues promptly can help prevent potential leaks or malfunctions.
Inspect the Drain Assembly and Components Regularly
To ensure the proper functioning of your vessel sink drain with overflow, it is essential to routinely inspect the drain assembly and its various components. Here are some key components to pay attention to:
| Component | Indicators of Damage |
|---|---|
| Drain Plug or Stopper | Cracks, chips, or excessive wear |
| Overflow Cap | Broken or missing pieces |
| Drain Flange | Corrosion, leaks, or loose fittings |
| Trap | Rust, leaks, or clogs |
Regular inspection of these components will help you identify any signs of damage or wear. It is important to address any issues promptly to avoid potential water damage and ensure the longevity of your vessel sink drain.
Replace Any Damaged or Worn-out Parts
If you notice any damaged or worn-out parts during the inspection, it is crucial to replace them promptly. Replacement parts can be easily found at your local hardware store or online. Here are the steps to follow when replacing damaged or worn-out components:
- Remove the old or damaged part carefully.
- Clean the area where the replacement will be installed.
- Install the new part according to the manufacturer’s instructions.
- Tighten any fittings or screws securely.
- Test the newly replaced component by running water through the drain to ensure proper functionality.
By replacing any damaged or worn-out parts, you can restore the efficiency and functionality of your vessel sink drain. This will help prevent future issues and ensure the smooth operation of your sink.
Regular inspection and replacement of damaged parts are essential maintenance steps for a vessel sink drain with overflow. By checking for damage and promptly replacing any worn-out components, you can avoid potential leaks or malfunctions, ensuring the optimal performance and longevity of your sink.
Frequently Asked Questions
Can You Use Overflow Drain In Vessel Sink?
Yes, you can use an overflow drain in a vessel sink. It helps prevent overflowing by allowing excess water to drain out.
How Do You Install A Drain In A Vessel Sink?
To install a drain in a vessel sink, follow these steps: 1. Turn off the water supply. 2. Place the rubber gasket on the bottom of the drain assembly. 3. Insert the drain assembly into the sink’s drain hole. 4. Tighten the locknut from underneath the sink.
5. Connect the P-trap to the drain pipe using a compression fitting.
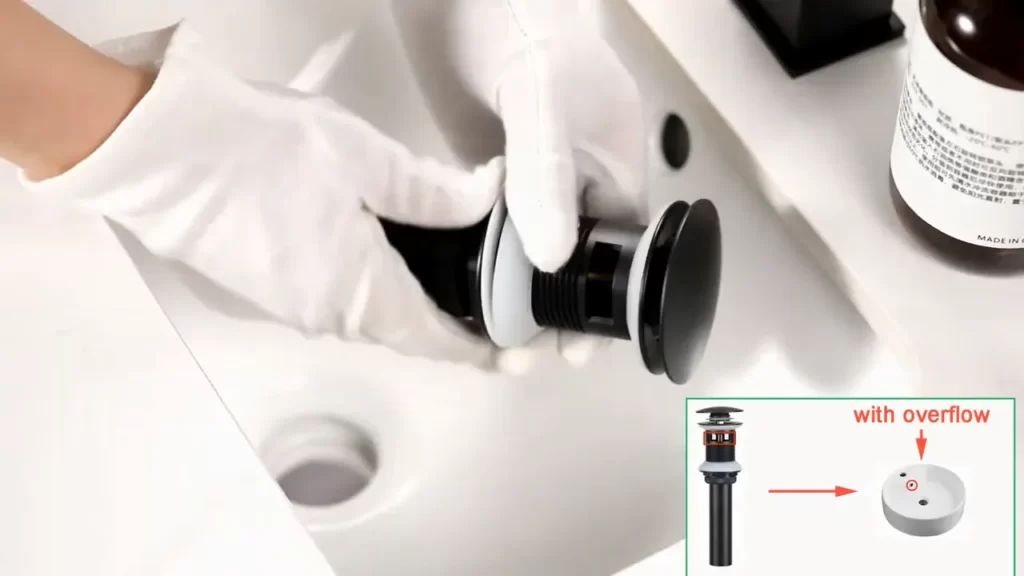
How Do You Install A Push Pop Up Drain With Overflow?
To install a push pop up drain with overflow, follow these steps: 1. Remove the old drain by unscrewing it. 2. Apply plumber’s putty to the new drain. 3. Insert the drain into the sink and tighten the nut underneath.
4. Connect the overflow pipe to the drain. 5. Test the drain by running water to ensure it’s working properly.
Do Vessel Sinks Need A Special Drain?
No, vessel sinks do not require a special drain. They can be installed with a standard drain that is compatible with the sink’s size and shape.
Conclusion
To sum it up, installing a vessel sink drain with an overflow may seem like a daunting task, but with the right tools and guidance, it can be done smoothly. Remember to carefully follow the step-by-step instructions, ensuring a proper seal and secure connection.
By successfully completing this DIY project, you’ll not only enhance the functionality of your vessel sink, but also add a touch of elegance to your bathroom. Happy plumbing!