To install a Tushy Bidet, follow these steps: Position the bidet under your toilet seat, connect the water supply, and secure the bidet in place using the provided mounting bracket. Nowadays, bidets have gained popularity as a sustainable and more hygienic alternative to toilet paper.
The Tushy Bidet, in particular, offers a convenient and easy-to-install option for those interested in upgrading their bathroom experience. By following a few simple steps, you can have a bidet installed in no time. We will guide you through the process of installing a Tushy Bidet, from positioning the bidet under your toilet seat to connecting the water supply and securing the bidet in place.
Bidet installation has never been easier, so keep reading to learn how to enjoy the benefits of a Tushy Bidet in your own home.
Benefits Of Using A Bidet
Installing a bidet in your bathroom can offer a multitude of benefits, ranging from enhanced cleanliness and hygiene, reduced toilet paper usage, to improved comfort and a soothing effect. By upgrading your bathroom with a Tushy bidet, you can experience these advantages and enjoy a new level of personal cleanliness and comfort.
Enhanced cleanliness and hygiene
A bidet provides a superior level of cleanliness compared to using toilet paper alone. The strong stream of water from the bidet effectively cleanses your intimate areas, ensuring a thorough and hygienic clean every time. Unlike toilet paper, which can leave behind residue and bacteria, a bidet uses water to remove all traces of waste, leaving you feeling fresh and clean.
Reduced toilet paper usage
Did you know that the average American uses around 100 rolls of toilet paper per year? By incorporating a bidet into your bathroom routine, you can significantly reduce your reliance on toilet paper. Bidets use water to clean, eliminating the need for excessive paper usage. Not only does this benefit the environment by reducing paper waste, but it also saves you money in the long run.
Improved comfort and soothing effect
Using a bidet can provide a gentle and soothing experience, especially for individuals with sensitive skin or certain medical conditions. The warm water from the bidet can provide relief and comfort, reducing potential irritation caused by excessive wiping. This added comfort can make your bathroom experience more enjoyable and contribute to your overall well-being.
Installing a Tushy bidet in your bathroom not only offers enhanced cleanliness and hygiene, reduced toilet paper usage, and improved comfort but also gives you the convenience of multiple water pressure options and easy-to-use controls. Embrace the benefits of using a bidet and elevate your bathroom experience to a new level of cleanliness and comfort today!

Required Tools And Materials
Tushy Bidet Kit
Before you begin installing your Tushy bidet, it’s important to gather all the necessary tools and materials. The first item on your list is the Tushy Bidet Kit itself. This kit will come with all the essential components needed for installation, such as the bidet attachment, hoses, and connectors. Make sure to check that all the parts are included and in good condition before you start.
Adjustable Wrench
An adjustable wrench is an indispensable tool when it comes to bidet installation. It allows you to tighten and loosen nuts and bolts of various sizes. You’ll need it to secure the bidet attachment to your toilet’s water supply line. Make sure to choose a wrench that fits comfortably in your hand and can adjust to different sizes.
Screwdriver
A screwdriver is another essential tool for bidet installation. It will be used to remove the existing seat from your toilet, as well as to secure the bidet attachment. Depending on the type of screws used in your toilet, you may need a flathead or Phillips-head screwdriver. If you’re unsure, it’s always a good idea to have both on hand.
Teflon Tape
Teflon tape, also known as plumber’s tape, is a thin white tape that is commonly used to seal pipe connections. It creates a watertight seal and helps prevent leaks. In bidet installation, you’ll use Teflon tape to wrap around the threads of the water supply line to ensure a tight and secure connection. Make sure to apply the tape in a clockwise direction.
Towel or Cloth
You’ll also need a towel or cloth to have nearby during the installation process. This will come in handy for wiping away any water or debris that may be present. It’s important to have a clean and dry surface before installing the bidet attachment to ensure a proper seal. Keep the towel or cloth within reach to minimize any mess or water splashing.
Understanding Your Plumbing System
If you’ve decided to take the plunge into the world of bidets, congratulations! You’re about to experience a new level of cleanliness and comfort in your bathroom routine. Before you can start enjoying the benefits of a Tushy bidet, it’s important to understand your plumbing system and make sure it’s compatible with the installation.
Assessing your existing toilet setup
Before installing a Tushy bidet, you need to assess your existing toilet setup to ensure it’s compatible with the bidet attachment. Check the shape and size of your toilet bowl to determine if it will accommodate the bidet attachment. Most standard toilets will work with the Tushy bidet, but it’s always a good idea to confirm.
Additionally, you’ll need to check if your toilet has a standard water supply line or a flexible hose. The Tushy bidet comes with adapters to fit both types, so rest assured that you’ll be covered regardless of your toilet’s configuration.
Determining the availability of a water source and electrical outlet
Another important consideration when installing a Tushy bidet is the availability of a water source and an electrical outlet. The bidet attachment requires a water supply for operation, so ensure that there is a water line near your toilet that can be easily accessed.
Furthermore, some Tushy bidet models come with additional features, such as a warm water option. If you opt for a bidet with this feature, you’ll need to have access to an electrical outlet in order to power the bidet.
Take a moment to check the proximity of your toilet to a water source and electrical outlet. If they are not within reach, you may need to make some adjustments or consult a professional plumber to assist with the installation process.
Now that you have a better understanding of your plumbing system and have assessed the compatibility of your toilet setup, you’re ready to move on to the exciting part – installing your Tushy bidet!

Shutting Off The Water Supply
Before installing your Tushy bidet, it is important to shut off the water supply to your toilet to avoid any leaks or water damage. This step-by-step guide will walk you through the process of locating the shut-off valve and turning off the water supply easily.
Locating the shut-off valve
The shut-off valve is typically located behind the toilet, near the floor or wall. It is essential to know the exact location of the valve before proceeding with shutting off the water supply. Here’s how you can locate it:
- Take a close look behind your toilet, near the base. The shut-off valve is usually a small, round or oval-shaped handle connected to a metal or flexible pipe.
- Check both sides of the toilet – the left and right – to determine the position of the shut-off valve. It can be on either side, depending on your plumbing setup.
- If you are having trouble locating the shut-off valve behind the toilet, you can also trace the water line from the toilet tank to find it.
Turning off the water supply to the toilet
Once you’ve located the shut-off valve, follow these simple steps to turn off the water supply:
- Turn the shut-off valve in a clockwise direction until it is fully closed. This will cut off the water supply to the toilet.
- Check if the water has stopped flowing to the toilet by flushing it once or twice. If no water is filling the tank, you have successfully shut off the water supply.
- It is advisable to flush the toilet one more time after shutting off the water supply to empty the tank completely.
Shutting off the water supply is a crucial step before installing your Tushy bidet. By locating the shut-off valve and turning off the water supply, you can ensure a hassle-free installation process without any potential water leaks or damage. Now that you’ve successfully shut off the water supply, it’s time to move on to the next step in installing your Tushy bidet.
Removing The Existing Toilet Seat
Unscrewing the bolts securing the seat
Before installing your new Tushy bidet, you’ll need to remove the existing toilet seat. This first step is essential for a seamless installation process. The existing seat is typically secured to the toilet bowl by two bolts, and unscrewing these bolts is the key to removing the seat.
To begin, locate the two bolts at the back of the toilet seat. These bolts are usually covered by plastic caps or decorative covers, which you will need to remove before accessing the bolts. Once the caps are off, take a wrench or a screwdriver (depending on the bolt type) and turn counterclockwise to loosen the bolts. Keep in mind that the bolts may be tight, so applying some force or using a bit of lubricant might be necessary.
Removing the old seat and thoroughly cleaning the area
With the bolts unscrewed, you can now remove the old toilet seat. Carefully lift the seat upward, making sure to hold it steady to prevent any unwanted mess or damage. Once the seat is off, give the area a thorough cleaning. This step is crucial to remove any residue or grime that may have accumulated over time.
Start by using a disinfectant cleaner or a mild soap mixed with water. Wipe down the toilet bowl surface, paying close attention to the area where the seat was attached. Make sure to clean both the top and underside of the bowl, as well as the bolts that were previously secured to the seat. This will ensure a sanitary base for your new Tushy bidet installation.
After cleaning, dry the area thoroughly with a clean cloth or paper towel. Moisture can hinder the adhesive properties of the bidet attachments, so ensuring a dry surface is essential for a secure installation.
Pro tip: If you’re experiencing any difficulty in removing stubborn residue, a mixture of vinegar and water can help dissolve buildup and make the cleaning process easier.
Installing The Bidet Attachment Bracket
Attaching the bracket to the toilet bowl using provided screws
Now that you have gathered all the necessary tools and components, it’s time to install the bidet attachment bracket. This crucial step will ensure the stability and proper alignment of your Tushy Bidet.
First, locate the bracket that came with your Tushy Bidet. It should be a sturdy metal piece with pre-drilled holes for screws. The bracket is designed to fit securely under your toilet seat, providing a stable foundation for the bidet attachment.
When positioning the bracket, make sure it is centered and aligned with the front of the toilet bowl. The alignment is essential for your comfort during use and proper functioning of the bidet. To achieve the perfect alignment, you may want to measure the distance between the front of the toilet bowl and the bolt holes. This will help you center the bracket and make any adjustments as needed.
To attach the bracket to the toilet bowl, grab the provided screws and securely fasten them into the pre-drilled holes. Make sure to tighten the screws firmly, but avoid over-tightening, as it may damage the toilet bowl or the bracket. Remember, the goal is to create a stable foundation that can withstand regular daily use.
Here’s a quick step-by-step guide on attaching the bracket to the toilet bowl:
- Center the bracket and align it with the front of the toilet bowl
- Measure the distance between the front of the toilet bowl and the bolt holes for precise alignment
- Use the provided screws to fasten the bracket securely to the toilet bowl
- Tighten the screws firmly, but avoid over-tightening
By following these instructions, you’ll ensure that the bidet attachment bracket is properly attached to your toilet bowl, providing stability and alignment for your Tushy Bidet. With the bracket securely in place, you’re one step closer to experiencing the unique benefits and comfort of your new bidet. Keep reading to learn about the next steps in the installation process.
Connecting The Water Supply
Once you have successfully installed your Tushy bidet, it’s time to connect it to the water supply. This step is crucial for ensuring a steady flow of clean water to your bidet attachment. In the following sections, we will guide you through the process, from applying Teflon tape to connecting the supply hose.
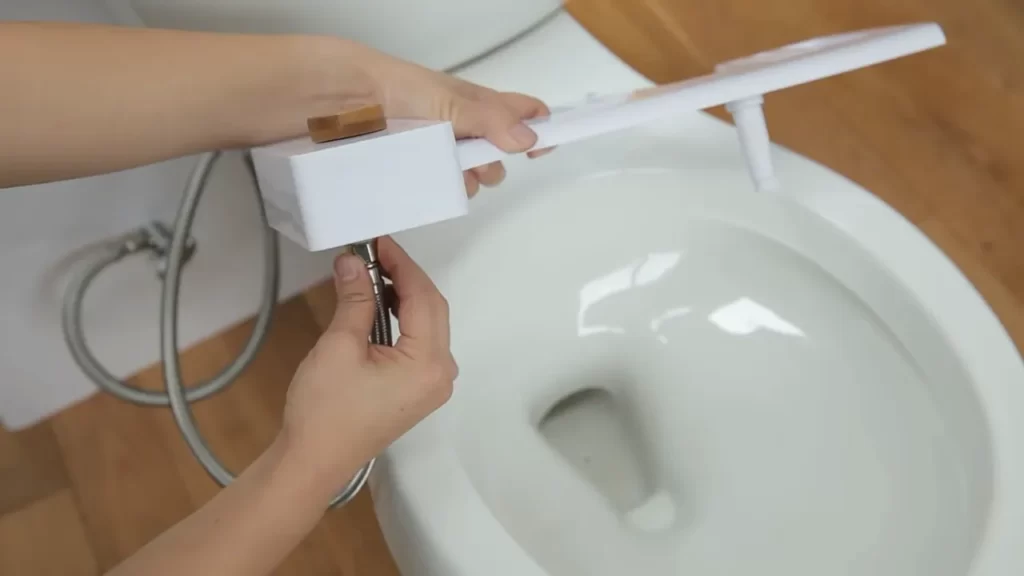
Applying Teflon tape to the threaded end of the supply hose
Before connecting the supply hose to your Tushy bidet attachment and the shut-off valve, it’s important to apply Teflon tape to ensure a tight and leak-free connection. Teflon tape, also known as plumber’s tape, is a thin white tape made of Teflon that provides a seal to prevent leaks at threaded connections.
To apply Teflon tape, follow these simple steps:
- Start by cleaning the threaded end of the supply hose to remove any dirt or debris that could interfere with the seal.
- Hold the supply hose firmly and wrap the Teflon tape clockwise around the threaded end. Make sure to overlap the tape layers and cover the entire threaded section.
- Apply enough tension to embed the tape into the threads but be careful not to over-tighten and stretch the tape.
- Once you have wrapped the tape around the threaded end, tear it off and press the end of the tape against the threads to secure it.
By applying Teflon tape, you create a watertight seal that prevents leaks and ensures a secure connection between the supply hose and the bidet attachment. This simple yet effective step is essential for the proper functioning of your Tushy bidet.
Connecting the supply hose to the bidet attachment and the shut-off valve
Now that you have applied Teflon tape to the threaded end of the supply hose, you can proceed to connect it to both the bidet attachment and the shut-off valve. This step completes the water supply connection and allows for the flow of clean water to your bidet.
To connect the supply hose, follow these straightforward steps:
- Identify the end of the supply hose that has been wrapped with Teflon tape. This is the end that will be connected to the bidet attachment.
- Align the threaded end of the supply hose with the corresponding threaded connection on the bidet attachment.
- Once aligned, hand-tighten the connection by turning the supply hose clockwise until it is snugly fitted. Avoid over-tightening to prevent damage to the threads.
- Next, locate the shut-off valve that controls the water supply to your toilet. The shut-off valve is usually located near the base of the toilet.
- Align the other end of the supply hose with the shut-off valve’s threaded connection.
- Hand-tighten this connection as well, ensuring a secure and leak-free seal.
By following these steps, you will successfully connect the water supply to your Tushy bidet attachment. Always double-check the connections to make sure they are tight enough but not overly tightened, as this can cause leaks or damage.
Once the water supply is connected, you can now move on to testing your bidet’s functionality and enjoying the refreshing and hygienic benefits it provides.
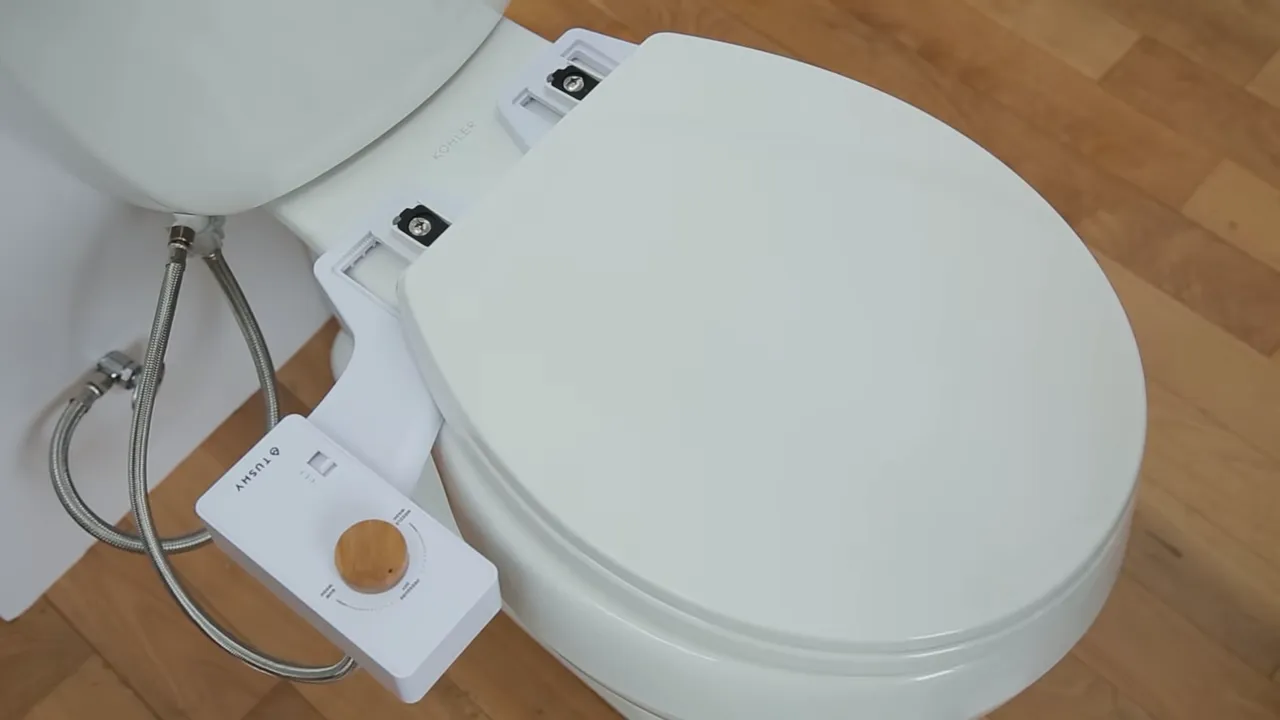
Installing The Bidet Attachment
Installing the bidet attachment is a straightforward process that can be easily done in a few simple steps. To ensure a proper installation, it is important to align the bidet attachment with the bracket and securely tighten the screws. In this section, we will guide you through the process of installing the bidet attachment with ease and precision.
Aligning the bidet attachment with the bracket and sliding it into place
Once you have unpacked your Tushy bidet attachment, locate the bracket that comes with it. The bracket is designed to securely hold the bidet attachment in place. Place the bidet attachment on a flat surface adjacent to the toilet bowl.
Next, align the slots on the bracket with the grooves on the back of the bidet attachment. Gently slide the bidet attachment onto the bracket ensuring a snug fit. Make sure that the bidet attachment is positioned at a comfortable height for easy access.
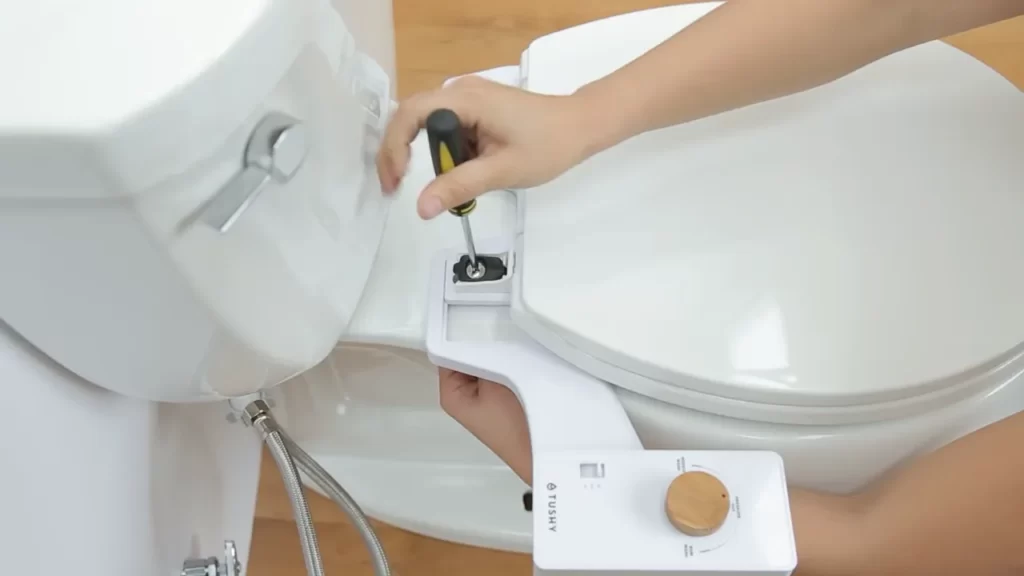
Tightening the screws to secure the bidet attachment
With the bidet attachment in place, it’s time to secure it by tightening the screws. Take the provided screws and attach them to the holes on the bracket. Use a screwdriver to tighten the screws firmly, ensuring that the bidet attachment is securely fastened to the bracket.
It is important to note that overtightening the screws may cause damage, so be cautious not to apply too much force. Once the bidet attachment feels secure, give it a gentle wiggle to check for any movement. If it stays in place, you have successfully installed the bidet attachment.
Installing a Tushy bidet attachment is a quick and simple process that can be completed in a matter of minutes. By aligning the bidet attachment with the bracket and securely tightening the screws, you can enjoy the convenience and cleanliness that this innovative device brings to your bathroom routine.
Adjusting The Spray Nozzle Position
Adjusting the Nozzle Position for Optimal Cleaning
One of the key features of installing a Tushy Bidet is the ability to adjust the spray nozzle position for optimal cleaning. This allows you to customize your bidet experience, ensuring that you get the most thorough and comfortable clean possible. In this section, we will walk you through the steps of adjusting the spray nozzle position and testing the spray direction.
Testing the Spray Direction and Adjusting as Necessary
After you have successfully installed your Tushy Bidet, it is important to test the spray direction and make any necessary adjustments. To do this, follow these simple steps:
- Take a seat on your toilet and activate the bidet by turning the control knob.
- Observe the direction of the spray. Is it hitting the right areas? Is it too high or too low? If you’re not satisfied with the spray direction, you will need to adjust the nozzle position.
- To adjust the nozzle position, locate the adjustable nozzle on your Tushy Bidet. This is usually located on the back or side of the bidet.
- Carefully turn the nozzle in the desired direction. Start with small adjustments to ensure you get the perfect angle.
- Once you have made the adjustment, test the spray direction again by activating the bidet. Repeat this step until you are satisfied with the spray direction.
It is important to note that the spray direction may vary from person to person, depending on your body shape and size. Take the time to find the position that works best for you.
Pro tip: If you are unsure of the ideal spray direction for your body, try looking for a gentle water flow that covers the desired areas without causing any discomfort.
In Conclusion
Adjusting the spray nozzle position of your Tushy Bidet is a simple and crucial step in ensuring you get the most effective and comfortable clean. By following the steps outlined in this section, you can easily customize the spray direction to suit your needs. Remember to test and make small adjustments until you find the perfect angle. Enjoy the benefits of a properly adjusted bidet and say goodbye to old-fashioned toilet paper!
Testing And Finalizing The Installation
Once you have successfully completed the installation of your Tushy bidet, it is important to test the system and ensure everything is working properly. This final step will not only give you peace of mind but also help you make any necessary adjustments to achieve the perfect bidet experience. In this section, we will guide you through the testing process and provide instructions on how to check for leaks or drips, turn on the water supply, and test the bidet function.
Turning on the Water Supply
To begin, it is crucial to turn on the water supply for your Tushy bidet. This step will allow the bidet to receive the water it requires to function. Locate the water shut-off valve near the toilet and ensure it is fully open. This valve is typically located on the wall or floor behind the toilet. Turn the valve counter-clockwise until it stops, allowing the water to flow smoothly.
Checking for any Leaks or Drips
Once the water supply is turned on, carefully inspect the installation area for any signs of leaks or drips. Start by examining the hoses and connections, ensuring they are all tightly secured. Look for any water droplets or moisture along the water lines, connecting valves, or the bidet unit itself.
If you notice any leaks or drips, you may need to tighten the connections further or use Teflon tape to create a watertight seal. It is important to address these issues before proceeding, as any leaks can affect the performance of your bidet and potentially cause water damage.
Testing the Bidet Function and Adjusting Settings if Needed
Now it’s time to put your Tushy bidet to the test! Take a seat on the toilet and activate the bidet function by using the control panel or the remote control, depending on your bidet model. Allow the water to flow and ensure it reaches the desired temperature and pressure levels.
Note: It is recommended to start with the lowest pressure setting and gradually increase it until you find the most comfortable level for your needs.
While testing the bidet function, pay attention to any unusual sounds or vibrations. Ideally, the bidet should work quietly and smoothly without any disturbances. If you notice any irregularities, make sure all connections are properly secured and address the issue accordingly.
Once you are satisfied with the bidet’s performance, take a moment to familiarize yourself with the different settings and features available. Experiment with the temperature control, nozzle position adjustment, and any additional options your Tushy bidet offers.
Summary:
- Turn on the water supply by fully opening the water shut-off valve located near the toilet.
- Inspect the installation area for any leaks or drips, ensuring all connections are tightly secured.
- Test the bidet function by activating it and gradually adjusting the temperature and pressure settings.
- Familiarize yourself with the different settings and features of your Tushy bidet for a customized experience.
With the testing and finalizing steps complete, you are now ready to fully enjoy the benefits of your Tushy bidet. Sit back, relax, and let the bidet provide you with a refreshing and hygienic experience every time you visit the bathroom.
Dealing With Water Leakage
Checking connections and tightening if necessary
If you notice water leakage after installing your Tushy Bidet, don’t worry! It’s a common issue that can be easily resolved. The first step is to check all the connections and make sure they are properly tightened. Start by inspecting the connection between the bidet and the water supply valve.
Take a close look at the connection point, ensuring that there are no visible leaks or loose fittings. If you notice water dripping or seeping out, it’s likely that the connection needs to be tightened. Using a wrench, gently tighten the fitting until it is snug. Be careful not to overtighten, as this can lead to further damage.
Reapplying Teflon tape to ensure a watertight seal
If the connection between the bidet and the water supply valve is secure but you still experience water leakage, the next step is to reapply Teflon tape. This thin, white tape is commonly used to create a watertight seal between threaded connections.
| Steps to Reapply Teflon Tape |
|---|
| 1. Turn off the water supply valve to prevent any accidental leaks. |
| 2. Carefully unscrew the existing fitting, making sure not to damage the threads. |
| 3. Apply a few layers of Teflon tape to the threaded end of the fitting, wrapping it clockwise. |
| 4. Reattach the fitting and tighten it securely with a wrench. |
| 5. Turn on the water supply valve and check for any signs of leakage. If necessary, repeat the process with additional layers of Teflon tape until the connection is completely sealed. |
By reapplying Teflon tape, you can create a reliable barrier against water leakage, ensuring a tight seal between the bidet and the water supply valve.
Handling Spray Nozzle Misalignment
Spray nozzle misalignment is a common issue that can occur when installing a Tushy Bidet. It can lead to water spray being directed in the wrong direction, resulting in less effective cleaning and potential discomfort for the user. Ensuring proper alignment of the nozzle is crucial to maximize the benefits of your bidet experience. In this section, we will discuss the steps to adjust the nozzle position and angle, as well as ensuring proper alignment with your body.
Adjusting the Nozzle Position and Angle
Properly adjusting the nozzle position and angle is essential to ensure optimal cleaning and comfort. Below are the steps to follow:
- Locate the nozzle adjustment dial on your Tushy Bidet. It is usually situated on the side or back of the bidet unit.
- Twist the nozzle adjustment dial counterclockwise to loosen it.
- Position yourself on the toilet seat in your usual sitting position.
- Activate the bidet by turning the water pressure knob, usually located on the side of the bidet unit.
- Observe the direction of the water spray and note any misalignment.
- With gentle movements, use your hand to adjust the nozzle position and angle until the water spray is aimed precisely where desired. Ensure the nozzle is neither too high nor too low and that it is facing the appropriate direction.
- Once you are satisfied with the nozzle alignment, tighten the nozzle adjustment dial by twisting it clockwise. Ensure it is snugly secured to prevent any accidental movement during use.
By following these steps, you can easily adjust the nozzle position and angle to your preference, enhancing the effectiveness and comfort of your bidet experience.
Ensuring Proper Alignment with the User’s Body
In addition to adjusting the nozzle position and angle, proper alignment with your body is crucial for optimal bidet use. Here are a few tips to ensure proper alignment:
- Sit comfortably on the toilet seat, positioning yourself centrally.
- Ensure your body is positioned close enough to the bidet unit so that the water spray can reach the desired areas effectively.
- Adjust your body position as necessary to align yourself with the nozzle.
- Remember to relax while using the bidet to allow the water to clean thoroughly.
By following these tips, you can ensure that the spray nozzle is aligned properly with your body, allowing for a comfortable and efficient bidet experience.
Troubleshooting Electrical Functions (If Applicable)
One of the most convenient features of a Tushy bidet is its electrical functionality, which allows for advanced settings and customization. However, like any electrical device, there may be times when you encounter issues with the bidet’s power source. In this section, we’ll go over some troubleshooting steps to help you identify and resolve any potential electrical problems.
Verifying the bidet’s power source
The first step in troubleshooting the electrical functions of your Tushy bidet is to ensure that it is properly connected to a power source. Start by checking the power cord to make sure it is securely plugged into both the bidet and a functioning electrical outlet.
If the bidet is connected to a GFCI (Ground Fault Circuit Interrupter) outlet, make sure that the reset button on the outlet hasn’t been tripped. In case of a tripped GFCI outlet, simply press the reset button to restore power to the bidet.
Checking fuse box or circuit breaker for any issues
If you have verified the bidet’s power source and it still doesn’t function, the next step is to inspect your home’s fuse box or circuit breaker. This is important because a blown fuse or a tripped circuit breaker can cause the bidet to lose power.
To check the fuse box:
- Locate your home’s fuse box or electrical panel.
- Open the fuse box cover or panel door to reveal the fuses or circuit breakers.
- Inspect the fuses or circuit breakers to see if any have been tripped or blown.
- Replace any blown fuses or reset any tripped circuit breakers according to the instructions provided.
Note: If you are uncertain about handling electrical components, it is always recommended to seek assistance from a qualified electrician.
Once you have addressed any issues with the power source or fuse box, you can test the bidet again to see if the electrical functions are working properly. In most cases, resolving these basic troubleshooting steps will restore power and allow you to enjoy all the features and benefits of your Tushy bidet.
If you continue to experience electrical issues despite these troubleshooting steps, it is advisable to contact Tushy customer support for further assistance or consider consulting a professional electrician.
Regular Cleaning And Disinfection
Cleaning the bidet attachment with mild soap and water
Regular cleaning of your Tushy bidet attachment is important to maintain its functionality and hygiene. To clean the bidet attachment, you will need mild soap and water. Follow these simple steps:
- First, turn off the water supply to the bidet by twisting the shut-off valve clockwise.
- Next, detach the bidet attachment from the toilet seat by loosening the mounting screws or clips.
- Using a soft cloth or sponge, dampen it with mild soap and water.
- Gently wipe the surface of the bidet attachment, paying extra attention to any hard-to-reach areas.
- Rinse the cloth or sponge with clean water and wipe away any soap residue from the bidet attachment.
- Finally, reattach the bidet attachment to the toilet seat and turn on the water supply.
By regularly cleaning your bidet attachment with mild soap and water, you can ensure that it remains clean and free from dirt and grime.
Disinfecting the spray nozzle with a vinegar solution
In addition to regular cleaning, it is important to disinfect the spray nozzle of your Tushy bidet attachment to eliminate bacteria and other harmful germs. Vinegar is a natural disinfectant that can effectively kill bacteria.
- Mix equal parts of white vinegar and water in a spray bottle.
- Taking care not to spray any electronics or electrical components, generously spray the vinegar solution onto the spray nozzle.
- Allow the vinegar solution to sit on the nozzle for a few minutes to kill off any bacteria.
- Afterward, use a clean cloth or sponge to wipe away the vinegar solution and any loosened dirt or grime.
- Rinse the cloth or sponge with clean water and wipe the spray nozzle one more time to ensure all traces of vinegar are removed.
- Once you have finished disinfecting the spray nozzle, reattach the bidet attachment to the toilet seat.
Regularly disinfecting the spray nozzle with a vinegar solution will help to keep your Tushy bidet attachment clean, fresh, and free from harmful bacteria.
Preventive Maintenance
Inspecting connections and tightening if necessary
To ensure that your Tushy bidet continues to function optimally, regular preventive maintenance is key. One of the important steps in maintaining your bidet is to inspect the connections and tighten them if needed.
Over time, the connections of your Tushy bidet may loosen due to repeated usage or vibrations. Loose connections can lead to leaks or inefficient performance. To prevent any potential issues, it is recommended to inspect the connections periodically.
Here’s how to inspect and tighten the connections:
- Start by turning off the water supply to the bidet.
- Using a wrench or pliers, gently tighten all the connections, ensuring they are secure.
- Check for any signs of leakage. If you notice any leaks, use a wrench to tighten the connection further.
- After tightening the connections, turn on the water supply and check for any leakage again.
By regularly inspecting and tightening the connections, you can prevent any potential leaks and ensure that your bidet operates smoothly.
Checking for any signs of wear and tear, and replacing parts as needed
Another important aspect of preventive maintenance is checking for any signs of wear and tear on your Tushy bidet and replacing parts as necessary. Over time, certain components may start to deteriorate, affecting the bidet’s performance.
Follow these steps to check for wear and tear and replace parts:
- Inspect the hoses, valves, and nozzles for any cracks, damages, or signs of wear.
- If you notice any worn-out parts, it’s essential to replace them promptly to avoid further damage.
- Contact the Tushy customer support or refer to the user manual to identify the specific replacement parts needed.
- Once you have the necessary replacement parts, carefully follow the instructions provided to replace them.
Regularly checking for wear and tear and replacing parts as needed ensures the longevity and optimal performance of your Tushy bidet.
Frequently Asked Questions
How Do You Attach A Tushy Bidet?
To attach a Tushy bidet, follow these steps: 1. Shut off the water supply valve. 2. Disconnect the toilet seat from the bowl. 3. Place the bidet attachment between the toilet seat and the bowl. 4. Reattach the seat over the bidet attachment.
5. Turn the water supply back on. Enjoy the benefits of a bidet!
Is Tushy Hard To Install?
Installing Tushy is not difficult. It is a straightforward process that can be done easily.
Can Tushy Be Installed On Any Toilet?
Yes, Tushy can be installed on any toilet.
How Do You Install A Bidet Step By Step?
To install a bidet, follow these simple steps: 1. Turn off the water supply. 2. Remove the toilet seat and attach the bidet seat. 3. Connect the bidet’s water supply hose to the water valve. 4. Adjust the bidet’s positioning and tighten the fittings.
5. Turn on the water supply and check for leaks. Enjoy your new bidet!
Conclusion
Installing a Tushy bidet may seem daunting, but with the right steps, it’s a breeze. By following this step-by-step guide, you can transform your bathroom routine and embrace the hygienic benefits of bidets. Remember to gather the necessary tools and take your time during installation.
With persistence, you’ll soon enjoy the luxurious comfort and cleanliness of a Tushy bidet in your own home. So, don’t wait any longer and start enhancing your bathroom experience today.