To install a tub surround over an existing tub, measure the dimensions, prepare the wall surface, apply adhesive, and position the surround. A tub surround is a practical and visually appealing solution to update the look of your existing tub.
Whether you want to freshen up the bathroom or cover old tile, installing a tub surround can be a straightforward DIY project. By following a few simple steps, you can easily achieve a professional-looking result without the need for extensive remodeling.
This guide will walk you through the process of installing a tub surround over an existing tub, providing you with the necessary information and tips.
Factors To Consider When Selecting A Tub Surround
Factors to Consider When Selecting a Tub Surround
When it comes to choosing a tub surround for your bathroom, there are several factors that you need to take into consideration. This will ensure that you select a tub surround that not only meets your aesthetic preferences but also provides durability and is compatible with the installation requirements. Let’s delve into these factors in more detail:
Durability:
When selecting a tub surround, it is important to choose a material that is durable and long-lasting. After all, you want your tub surround to withstand daily use and stay in good condition for years to come. There are various materials available in the market, each offering different levels of durability. Some popular options include acrylic, fiberglass, and PVC.
Design and Style:
Apart from durability, the design and style of your tub surround are also crucial considerations. Your tub surround should complement the overall aesthetic of your bathroom and create a cohesive look. Consider factors such as color, texture, and pattern options when selecting a tub surround. This will enable you to choose a product that aligns with your personal style and enhances the visual appeal of your bathroom.
Installation Requirements:
Installing a tub surround requires careful consideration of the installation requirements. Different tub surrounds may have specific installation instructions that need to be followed for proper installation. Some tub surrounds may require professional installation, while others may be suitable for DIY installation. It is important to evaluate your own skill level and understanding of the installation process before making a decision.
To make your selection process easier, here is a table summarizing the main factors to consider when selecting a tub surround:
| Factors to Consider | Summary |
|---|---|
| Durability | Choose a material that is durable and long-lasting. |
| Design and Style | Select a tub surround that complements your bathroom’s aesthetic. |
| Installation Requirements | Consider the level of expertise required for installation. |
In conclusion, when selecting a tub surround for your bathroom, it is essential to consider factors such as durability, design and style, and installation requirements. By carefully evaluating these factors, you can ensure that you choose a tub surround that not only looks great but also lasts for years to come. So take your time, explore different options, and make an informed decision that meets your needs and preferences.

Cleaning And Removing Old Caulk And Grout
Cleaning and removing old caulk and grout is an important step in installing a tub surround over an existing tub. Properly preparing the surface ensures a clean and long-lasting installation. In this section, we will guide you through the necessary tools and materials needed for this task, as well as provide you with a step-by-step process to follow. Let’s get started!
Tools and Materials Needed
To clean and remove old caulk and grout, you will need the following tools and materials:
- Utility knife
- Caulk removal tool
- Grout removal tool
- Plastic putty knife
- Scrub brush
- Mildew cleaner
- Gloves
- Protective eyewear
- Caulk gun
- Acrylic caulk
- Grout
- Sponge
- Bucket
Step-by-Step Process
Follow these steps to effectively clean and remove old caulk and grout:
- Put on your gloves and protective eyewear to ensure your safety during the process.
- Use a utility knife to score the old caulk along the edges of the tub surround and the tub. This will loosen it up and make it easier to remove.
- Use a caulk removal tool to carefully scrape away the old caulk from the surface. Be gentle to avoid damaging the tub or surround.
- Next, use a grout removal tool to remove the old grout between the tiles, if applicable. This will create a clean surface for the new grout.
- Once the old caulk and grout are removed, use a plastic putty knife to scrape off any remaining residue on the surface. Make sure to remove all traces of the old caulk and grout.
- Prepare a mixture of mildew cleaner and warm water as per the manufacturer’s instructions. Apply the mixture to the tub surround, focusing on any areas with stubborn stains or mildew.
- Scrub the tub surround with a scrub brush to remove any dirt, grime, or mildew. Rinse thoroughly with clean water and allow the surface to dry completely.
- Now it’s time to recaulk the tub surround. Load the caulk gun with acrylic caulk, and carefully apply a smooth, continuous bead of caulk along the edges, ensuring a tight seal.
- If necessary, apply new grout between the tiles using a grout float. Make sure to fill all the gaps and wipe away any excess grout with a damp sponge.
- Allow the caulk and grout to dry completely according to the manufacturer’s instructions before using the tub.
Following these steps will help you effectively clean and remove old caulk and grout, providing you with a pristine surface for the installation of your tub surround.
Ensuring A Stable Surface For The Tub Surround
Before installing a tub surround over an existing tub, it is crucial to ensure that you have a stable surface. This involves inspecting and repairing any damaged areas, sanding the surface for adhesion, and priming the surface for better bonding. By following these steps, you can ensure a durable and long-lasting installation of your tub surround.
Inspecting and Repairing any Damaged Areas
Prior to installing a tub surround, it is important to inspect the existing tub and its surrounding area for any damages. This includes cracks, chips, or holes in the tub or the walls surrounding the tub. Such damages can compromise the stability of the surface and may cause issues with the installation of the tub surround. If you notice any damages, it is crucial to repair them before proceeding with the installation.
To repair the damaged areas, you can use a suitable filler or patching compound. Apply the filler or compound to the damaged areas, following the manufacturer’s instructions. Once it dries, use sandpaper to smooth the surface and ensure an even finish. This will provide a stable surface for the tub surround and prevent any potential issues in the future.
Sanding the Surface for Adhesion
Sanding the surface is an essential step in preparing the existing tub for the installation of a tub surround. Sanding helps create a rough texture, which improves adhesion and ensures a strong bond between the tub surround and the existing surface. To sand the surface, follow these steps:
- Clean the surface with a mild cleaning solution, removing any dirt, grime, or soap residue.
- Use sandpaper with a medium grit, such as 120 or 150, to lightly sand the entire surface of the tub and the surrounding walls. This will create a slightly rough texture that promotes better adhesion.
- After sanding, thoroughly clean the surface again with a damp cloth to remove any dust or debris.
By sanding the surface, you are ensuring a strong bond between the tub surround and the existing tub, enhancing the overall stability of the installation.
Priming the Surface for Better Bonding
Priming the surface is an important step in ensuring better bonding between the tub surround and the existing tub. Primer acts as a bonding agent, creating a strong adhesion between the surfaces. Here’s how to prime the surface:
- Clean the sanded surface with a damp cloth to remove any remaining dust or debris.
- Apply a layer of primer specifically designed for the type of material your tub surround is made of. Follow the manufacturer’s instructions for application techniques and drying time.
- Allow the primer to dry completely before proceeding with the installation of the tub surround.
Priming the surface not only enhances the bonding between the tub surround and the existing tub, but it also provides additional protection against moisture and potential mold growth.
By following these steps – inspecting and repairing any damaged areas, sanding the surface for adhesion, and priming the surface for better bonding – you can ensure a stable surface for the installation of your tub surround. This will result in a secure and long-lasting tub surround that enhances the overall look and functionality of your bathroom.
Measuring And Marking Guidelines
Before you start installing a tub surround over your existing tub, it is essential to have accurate measurements and clear marking guidelines. This will ensure that the installation process goes smoothly and that your tub surround fits perfectly. In this section, we will discuss two crucial steps: establishing level and plumb lines, and measuring and cutting the tub surround panels.
Establishing Level and Plumb Lines
The first step in installing a tub surround over an existing tub is to establish level and plumb lines. These lines will act as a guide to ensure that your tub surround is level and properly aligned. Here’s how you can do it:
1. Gather the necessary tools:
- A level
- A pencil
2. Find and mark the center point:
- Measure the width of your tub
- Divide that measurement in half to find the center point
- Using a pencil, mark the center point on the top edge of the tub surround
3. Establish the vertical plumb line:
- Place the level vertically against the center point mark
- Align the bubble within the center of the level
- Use the pencil to mark the vertical plumb line from the top to the bottom of the tub surround
4. Establish the horizontal level line:
- Place the level horizontally against the plumb line mark at the top
- Align the bubble within the center of the level
- Use the pencil to mark the horizontal level line from one end of the tub surround to the other
5. Repeat for the other side:
- Measure and mark the center point on the other side of the tub surround
- Establish the vertical plumb line and horizontal level line using the same process as above
By establishing these level and plumb lines, you can ensure that your tub surround will be properly aligned and level during the installation process.
Measuring and Cutting the Tub Surround Panels
Once you have established the level and plumb lines, it’s time to measure and cut the tub surround panels. Here’s how you can do it:
1. Measure the wall length:
- Start at the top of one side of the tub surround
- Measure the length of the wall up to the height where the tub surround will end
- Repeat the process for the other side of the tub surround
2. Transfer the measurements to the tub surround panels:
- Using a tape measure, transfer the measurements from step 1 to the tub surround panels
- Use a pencil to mark the measurements on the panels
3. Cut the tub surround panels:
- Using a saw or utility knife, carefully cut the tub surround panels along the marked lines
- Ensure that the panels are cut straight and fit the measurements accurately
By following these measuring and cutting guidelines, you will be able to create tub surround panels that perfectly fit your existing tub and ensure a seamless installation.
Applying Adhesive And Attaching The Tub Surround Panels
Applying adhesive and attaching tub surround panels is a crucial step in the installation process. It ensures that the panels are securely fastened and will provide a long-lasting and functional tub surround. In this section, we will cover the key points to consider when choosing the right type of adhesive, applying it to the back of the panels, and placing and securing the panels.
Choosing the Right Type of Adhesive
Choosing the right type of adhesive is essential to ensure that the tub surround panels adhere properly to the existing tub. There are different adhesives available in the market, but it’s crucial to select one that is specifically designed for tub surrounds. These adhesives are water-resistant and provide a strong bond that can withstand regular exposure to moisture.
Here are some popular types of adhesives suitable for tub surround installations:
- Epoxy adhesive: Epoxy adhesive is known for its exceptional strength and durability. It forms a strong bond between the panels and the tub surface, providing excellent resistance to moisture and standing up to the test of time.
- Construction adhesive: Construction adhesives are widely used in various construction projects and are known for their strong bonding capabilities. Look for an adhesive designed specifically for tub surrounds.
- Acrylic adhesive: Acrylic adhesives are water-resistant and provide a reliable bond between the panels and the tub surface. They offer ease of use and flexibility during the installation process.
Applying Adhesive to the Back of the Panels
Once you have chosen the right adhesive, it’s time to apply it to the back of the tub surround panels. Before applying the adhesive, thoroughly clean the back of the panels and the existing tub surface to remove any dirt, grease, or debris. This step is crucial for ensuring proper adhesion.
Follow these steps to apply adhesive to the back of the panels:
- Using a caulk gun, apply a thin and even bead of adhesive along the perimeter of the back of the panel.
- Next, create a crisscross pattern in the center of the panel by applying another thin bead of adhesive.
- Make sure to leave a small gap between the adhesive beads to allow for expansion and contraction of the panels.
Remember, it’s important to work quickly but efficiently during this step to prevent the adhesive from drying out before the panels are secured in place.
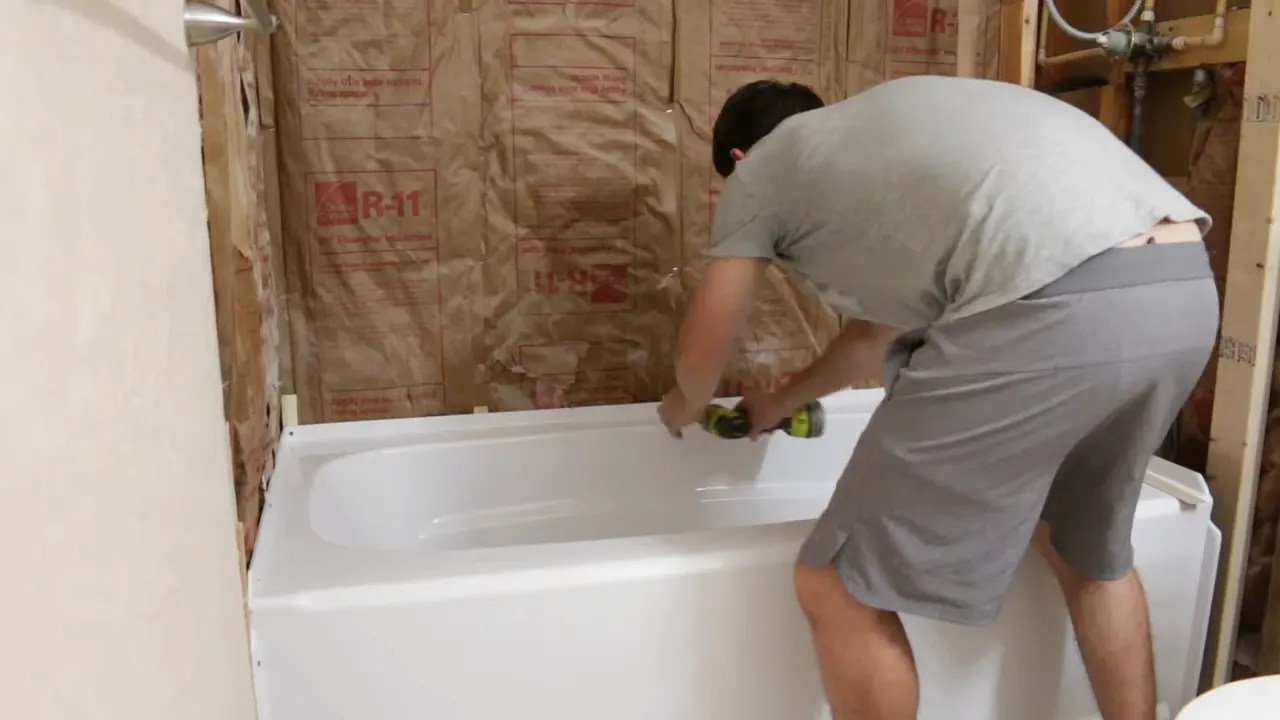
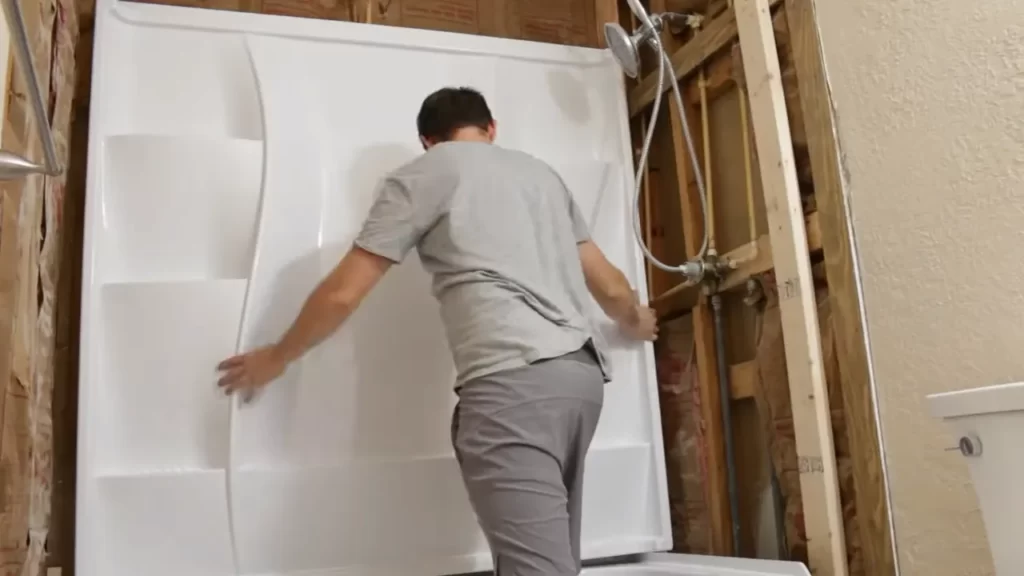
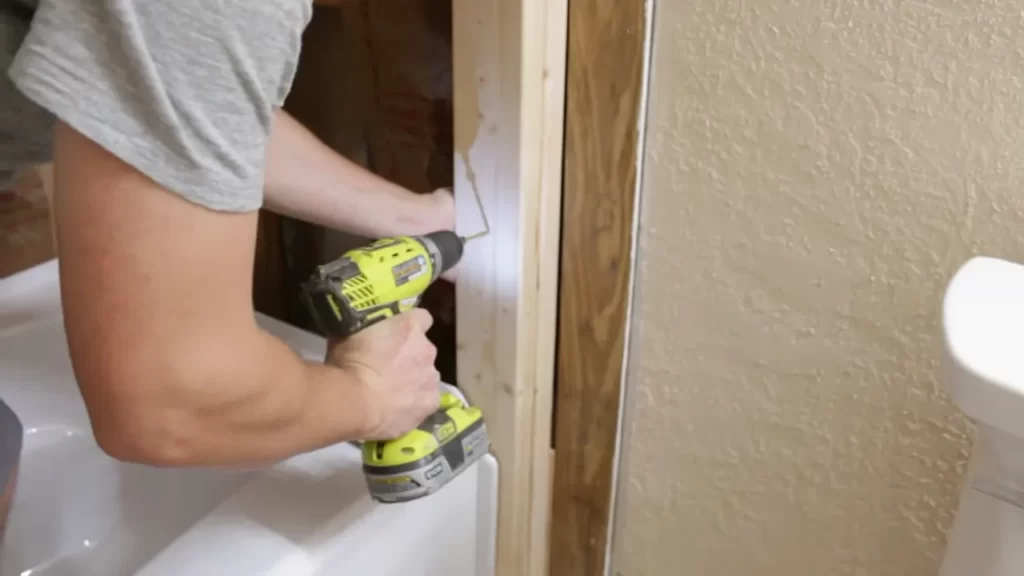
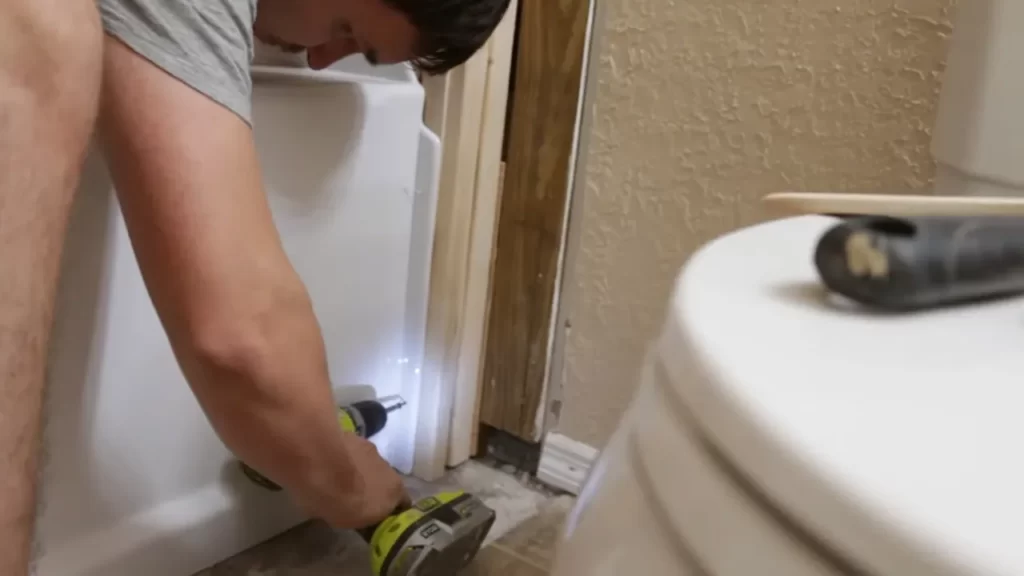
Placing and Securing the Panels
Now that the adhesive is applied, it’s time to place and secure the tub surround panels onto the existing tub.
- Start by aligning the first panel with the edge of the tub. Ensure it is level and plumb.
- Gently press the panel against the adhesive, starting from the top and working your way down. Apply firm pressure to ensure proper adhesion.
- Repeat the process for the remaining panels, making sure each one is level and securely attached.
Once all the panels are in place, use a level to double-check their alignment and make any necessary adjustments. Allow the adhesive to dry as per the manufacturer’s instructions before using the tub.
By carefully choosing the right adhesive and following proper application and attachment techniques, you can install a tub surround over your existing tub with confidence, knowing that it will provide both function and aesthetic appeal for years to come.
Sealing And Finishing The Tub Surround Installation
Once you have successfully installed the tub surround over your existing tub, it’s time to focus on sealing and finishing the installation. This crucial step ensures that the tub surround is watertight and provides a polished, professional look to your bathroom. In this section, we will discuss two important aspects of sealing and finishing: caulking around the edges and seams, and applying grout or sealer if applicable. We will also cover how to clean and polish the tub surround to maintain its beauty and longevity.
Caulking Around the Edges and Seams
One of the most important steps in sealing the tub surround installation is caulking around the edges and seams. This helps prevent water from seeping into the gaps, which can lead to mold and damage over time. To caulk effectively, follow these steps:
- Clean the areas where you will apply the caulk, ensuring they are free from dust and debris.
- Using a caulk gun, apply a thin, even bead of caulk along the edges and seams of the tub surround. Be sure to fill any visible gaps completely.
- Smooth the caulk with a caulk smoothing tool or your finger, removing any excess and creating a clean, polished finish.
- Allow the caulk to dry completely according to the manufacturer’s instructions before using the tub or shower.
Applying Grout or Sealer (if applicable)
In some cases, you may need to apply grout or sealer to further seal and protect the tub surround and create a uniform look. This is often necessary if you have used tile as your tub surround material. Follow these steps to apply grout or sealer:
- Prepare the grout or sealer according to the manufacturer’s instructions.
- Using a grout float or a sponge, apply the grout or sealer to the joints and gaps between the tiles.
- Use a grout smoothing tool or your finger to smooth and level the grout or sealer, ensuring it fills all the gaps completely.
- Remove any excess grout or sealer using a damp sponge or cloth, being careful not to disturb the freshly applied grout or sealer.
- Allow the grout or sealer to cure according to the manufacturer’s instructions before using the tub or shower.
Cleaning and Polishing the Tub Surround
To maintain the beauty and cleanliness of your tub surround, regular cleaning and polishing is essential. Follow these steps to keep your tub surround looking its best:
- Use a non-abrasive cleaner specifically designed for tub surrounds to remove dirt, grime, and soap scum. Avoid harsh chemicals that can damage the tub surround material.
- Scrub the tub surround gently using a sponge or soft cloth, paying special attention to any stained or discolored areas.
- Rinse the tub surround thoroughly with clean water, ensuring all cleaning residue is removed.
- Wipe the tub surround dry with a clean, lint-free cloth to prevent water spots or streaks.
- Apply a tub surround polish or sealant to protect the surface and enhance its shine. Follow the manufacturer’s instructions for application and drying time.
By following these steps to seal, finish, and maintain your tub surround installation, you can enjoy a beautiful and functional bathroom for years to come. Take the time to ensure each step is performed correctly, and don’t hesitate to seek professional assistance if needed. A properly sealed and finished tub surround will not only enhance the aesthetics of your bathroom but also provide peace of mind knowing that your investment is protected.
Taking Safety Precautions
Before diving into the exciting task of installing a tub surround over your existing tub, it’s crucial to prioritize safety. By taking the necessary precautions, you can ensure a smooth and accident-free installation process. In this section, we will discuss the importance of wearing protective gear and using proper tools and equipment to keep yourself and your surroundings safe.
Wearing Protective Gear
When working with tools and materials, it’s crucial to shield yourself from potential hazards. Wearing the right protective gear can prevent injuries and ensure you can work comfortably without worry. Here are some essential protective items you should have:
- Safety goggles: Protect your eyes from flying debris or any accidental splashes.
- Gloves: Choose gloves that offer a good grip and protect your hands from cuts, abrasions, or contact with harmful chemicals.
- Dust mask: Shield your respiratory system from inhaling dust, particles, or fumes that may be released during the installation process.
- Protective clothing: Wear appropriate attire that covers your body and minimizes the risk of any material or tool coming into direct contact with your skin.
Using Proper Tools and Equipment
Using the correct tools and equipment not only makes the installation process easier but also enhances safety. In order to ensure your project goes smoothly, be sure to have the following tools and equipment handy:
- Caulk gun: This will help you apply adhesive or caulk seamlessly.
- Pry bar: Use a pry bar to remove any existing trim or fixtures, ensuring a clean surface for the tub surround installation.
- Utility knife: A sharp utility knife will come in handy when cutting materials or removing old caulk.
- Tape measure: Precise measurements are crucial for a seamless installation. A tape measure will be your best friend throughout the process.
- Level: To confirm that your tub surround is installed properly, keep a level on hand to ensure it is straight and plumb.
- Silicone caulk: Invest in high-quality silicone caulk to create a watertight seal. This will keep water from seeping behind the tub surround.
- Cordless drill: This versatile tool will be useful for drilling pilot holes and securing fixtures.
Remember, safety should always be your top priority. By wearing the appropriate protective gear and using the right tools and equipment, you can complete your tub surround installation while minimizing risks and ensuring a successful project.
Making Adjustments And Corrections
During the installation process of a tub surround over an existing tub, it is not uncommon to encounter certain challenges such as uneven walls or tub surfaces. Additionally, misaligned panels can also pose a problem. However, with the right approach and a few adjustments, these issues can be easily resolved. In this section, we will discuss how to deal with uneven walls or tub surfaces, as well as how to correct misaligned panels for a seamless tub surround installation.
Dealing with Uneven Walls or Tub Surfaces
When it comes to installing a tub surround over existing walls or tub surfaces that are not perfectly even, it is important to make necessary adjustments to ensure a level and balanced installation. Here are a few steps to tackle this issue:
- Start by identifying the areas that are uneven. Use a level and measuring tape to determine the extent of the unevenness.
- Once you have identified the problem areas, you can use shims or spacers to level the tub surround. These can be placed behind the surround panels to even out the surface.
- Attach the shims or spacers securely to the wall or tub using a reliable adhesive or sealant. This will ensure that the tub surround panels are stable and level.
- After attaching the shims or spacers, double-check the level of the tub surround using a level. Make any necessary adjustments to achieve a balanced installation.
- Once you are satisfied with the leveling, proceed with the installation process, following the manufacturer’s instructions.
By carefully addressing the unevenness of the walls or tub surfaces, you can ensure a professional-looking tub surround installation that is both visually appealing and functional.
Correcting Misaligned Panels
In some cases, you may encounter misaligned panels during the installation of a tub surround. This can happen due to various factors such as inaccuracies in measurements or inconsistencies in the wall or tub surface. Fortunately, correcting misaligned panels is relatively straightforward. Here’s how:
- Start by identifying the areas where the panels are misaligned. This can be done by closely inspecting the joints between the panels.
- If the misalignment is minor, you can gently adjust the panels by applying pressure and shifting them into the correct position. Use a level to ensure that the panels are aligned both vertically and horizontally.
- If the misalignment is significant, you may need to remove the affected panels and reposition them. This can be done by carefully prying them off the wall or tub surface. Use a putty knife or a similar tool to avoid damaging the panels.
- Once the panels are removed, clean the area thoroughly to remove any adhesive residue.
- Reapply a fresh layer of adhesive or sealant to the back of the panels and carefully position them in their correct alignment.
- Use a level to ensure that the panels are properly aligned before securing them in place.
- Allow the adhesive or sealant to dry according to the manufacturer’s instructions before proceeding with the installation of the remaining panels.
By taking the time to correct misaligned panels, you can achieve a seamless look for your tub surround, enhancing the overall aesthetics of your bathroom.
Maintaining And Cleaning The Tub Surround
Maintaining and cleaning your tub surround is essential to keep it looking fresh and new. Regular maintenance and using proper cleaning products can help prevent the accumulation of dirt, soap scum, and stains. In this section, we will provide you with useful tips on how to maintain and clean your tub surround, ensuring it stays beautiful for years to come.
Recommended Cleaning Products
Choosing the right cleaning products for your tub surround is crucial to avoid damaging the material. Here are some recommended products that are effective yet gentle:
- Bathroom cleaner: Look for a non-abrasive, non-toxic bathroom cleaner that is safe for use on your tub surround material. Ensure that the cleaner is specifically designed to remove soap scum, grime, and hard water stains.
- Vinegar and water solution: A mixture of vinegar and water can be an excellent natural cleaning solution for your tub surround. It helps remove soap scum and disinfect the surface. Mix equal parts of white vinegar and water in a spray bottle and apply it to the tub surround. Let it sit for a few minutes before wiping clean with a soft cloth.
- Mild dish soap: Another gentle yet effective cleaning option is mild dish soap. Dilute a few drops of dish soap in warm water and use a sponge or soft cloth to wipe down the tub surround. Rinse thoroughly with water and dry with a clean towel.
Regular Maintenance Tips
Regular maintenance can help prolong the life and appearance of your tub surround. Follow these simple tips to keep it in top condition:
- Wipe down after each use: After each use, wipe down the tub surround with a soft cloth or sponge to remove any soap residue or water droplets. This will help prevent the build-up of stains and soap scum.
- Avoid abrasive materials: When cleaning, avoid using abrasive materials such as steel wool or harsh scrub brushes, as they can scratch the surface of the tub surround. Stick to soft cloths or non-abrasive sponges.
- Prevent standing water: Standing water can lead to the growth of mold and mildew. After showering or bathing, ensure that you dry the tub surround thoroughly to prevent water from pooling.
- Apply a protective sealant: Depending on the material of your tub surround, applying a protective sealant can help maintain its appearance and prevent staining. Consult the manufacturer’s recommendations for the best sealant to use.
Frequently Asked Questions
Can You Put A Tub Surround Over Existing Tub?
Yes, you can install a tub surround over an existing tub. It’s a cost-effective way to update your bathroom without removing the old tub. Ensure the tub is clean and properly prepared before installation for best results.
Can I Replace A Tub Surround Without Replacing The Tub?
Yes, you can replace a tub surround without replacing the tub.
Can You Use Any Tub Surround With Any Tub?
You cannot use any tub surround with any tub. Tub surrounds are designed to fit specific tubs for proper installation and functionality. It is important to check the compatibility of the tub surround with your specific tub model before making a purchase.
Can You Put A Tub Surround Over Old Tile?
Yes, you can install a tub surround over old tile.
Conclusion
Installing a tub surround over an existing tub is a cost-effective way to update your bathroom and give it a fresh, modern look. With the right tools and materials, you can easily transform your tub area into a sleek and stylish space.
Follow the step-by-step instructions in this guide to ensure a successful installation. By adding a tub surround, you not only enhance the aesthetic appeal of your bathroom but also provide a protective barrier against moisture and water damage. Enjoy your new tub surround and the enhanced beauty it brings to your bathroom.