
To install a towel warmer, start by measuring the height and width of the wall space where you want to mount it. Then, mark the position of the brackets on the wall and drill holes at the marked spots.
Attach the brackets to the wall using screws and place the towel warmer on the brackets, making sure it is level. Finally, connect the towel warmer to an electrical outlet following the manufacturer’s instructions.
The Various Benefits Of Installing A Towel Warmer
Installing a towel warmer in your bathroom can bring numerous benefits and enhance the overall functionality of your space. Not only does it add a touch of luxury and comfort, but it also offers practical advantages such as quick and effective towel drying. Moreover, a towel warmer can help prevent the growth of mildew and bacteria, ensuring a hygienic environment. Let’s delve into these benefits in more detail:
Enhanced comfort and luxury in your bathroom
Imagine stepping out of a soothing shower or bath, and being greeted by a warm, cozy towel waiting for you. That’s the level of comfort and luxury a towel warmer can bring to your bathroom. No longer will you have to endure the shock of a cold towel on your skin. With the simple installation of a towel warmer, you can indulge in the warmth and relaxation that it offers, creating a spa-like experience right in the comfort of your home.
Drying towels more quickly and effectively
Tired of using damp towels or waiting for them to air dry? A towel warmer can solve this problem effortlessly. By generating a constant source of heat, towel warmers are designed to dry your towels quickly and effectively. After use, simply hang your towels on the warming bars and let them be transformed into dry and warm clouds of comfort. No more musty odors or waiting for your towels to dry naturally; a towel warmer ensures your towels are always ready to use whenever you need them.
Reduced risk of mildew and bacteria growth
The warm and moist environment of a bathroom makes it an ideal breeding ground for mildew and bacteria. However, with a towel warmer, you can minimize this risk significantly. The constant heat generated by the warmer helps to maintain a dry and hygienic environment, preventing the growth of harmful microorganisms. This not only ensures that your towels remain fresh and clean, but it also contributes to a healthier overall bathroom environment for you and your family.
Don’t miss out on the incredible benefits that a towel warmer can bring to your bathroom. From enhanced comfort and luxury to quick and effective towel drying, and a reduced risk of mildew and bacteria growth, installing a towel warmer is a small yet significant step towards creating a more functional and enjoyable bathroom experience.
Factors To Consider Before Installing A Towel Warmer
If you love the feeling of warm, cozy towels after a shower, installing a towel warmer in your bathroom can be a game-changer. Not only does it add a touch of luxury to your space, but it also provides a practical solution for keeping your towels dry and comfortable. However, before you get started with the installation process, there are a few important factors to consider. Evaluating your bathroom space and layout, choosing the right type and size of towel warmer, and deciding on the best location for installation are crucial steps that can make a significant difference in the long run.
Evaluating your bathroom space and layout
Before choosing a towel warmer, it’s essential to evaluate your bathroom space and layout to determine the most suitable type and size for your needs. Consider the following:
- The available wall space: Measure the available wall space where you plan to install the towel warmer. This will help you determine the appropriate size and type that will fit seamlessly into your bathroom.
- The electrical wiring: Check if there is an electrical outlet nearby. If not, you may need to hire an electrician to install one or consider a plug-in towel warmer instead.
- Proximity to water sources: Ensure that the location you choose for installation is not too close to water sources like the shower or bathtub to avoid any potential safety hazards.
Choosing the right type and size of towel warmer for your needs
When it comes to choosing a towel warmer, you’ll encounter various types and sizes. Here are some factors to consider:
- Type of towel warmer: There are two main types – electric and hydronic. Electric towel warmers are popular due to their ease of installation and energy-efficient design. On the other hand, hydronic towel warmers are connected to the existing heating system and can provide consistent warmth throughout the entire bathroom.
- Size of the towel warmer: Consider the number of towels you want to warm simultaneously and the available wall space to determine the appropriate size. A larger towel warmer can accommodate multiple towels and even bathrobes, while a smaller one may be sufficient for individual use.
- Style and finish: Choose a towel warmer that complements your bathroom decor and personal taste. Whether you prefer a sleek, modern design or a more traditional look, there are plenty of options available to suit your style.
Deciding on the best location for installation
Once you have determined the appropriate type and size of towel warmer, the next step is to decide on the best location for installation. Consider the following:
- Height and accessibility: Install the towel warmer at a height that allows easy access to the towels, considering who will be using them. Generally, a height of around 48-52 inches is recommended for optimal accessibility.
- Proximity to power source: If you opt for an electric towel warmer, ensure that the chosen location is close to an electrical outlet or hire a professional to install a new one.
- Wall material: Check the material of the wall where you plan to install the towel warmer. Make sure it can support the weight of the unit and won’t be damaged by the heat generated.
By carefully evaluating your bathroom space and layout, choosing the right type and size of towel warmer, and deciding on the best location for installation, you can ensure a smooth and successful process. Now that you have considered these important factors, you are ready to install your towel warmer and enjoy the comfort and luxury it brings to your bathroom.

Essential Tools For Installing A Towel Warmer
Are you considering installing a towel warmer in your bathroom? A towel warmer is a luxurious addition to any bathroom, providing you with warm towels and a cozy ambiance. While the installation process may seem daunting, having the right tools can make it a breeze. Below are the essential tools you will need for installing a towel warmer.
Screwdriver
A screwdriver is an essential tool for installing a towel warmer. It allows you to securely attach the mounting brackets or brackets to the wall. When selecting a screwdriver, make sure to choose the appropriate size and type for the screws supplied with your towel warmer. It is important to have a firm grip and apply the necessary force to properly secure the brackets without damaging the wall surface.
Electric Drill
An electric drill is another indispensable tool for installing a towel warmer. This tool allows you to create holes in the wall for securing the mounting brackets. Ensure that the drill bit you choose is the right size for the screws or anchors you will be using. Operating the electric drill with precision and care will result in a secure and professional installation of your towel warmer.
Spirit Level
A spirit level is a tool used to ensure that your towel warmer is installed perfectly level. This tool has a glass tube filled with liquid and a bubble in the center. Simply place the spirit level on the top of the towel warmer and adjust its position until the bubble is centered. This ensures that your towel warmer is installed straight and level, enhancing its appearance and functionality.
Having the right tools is crucial for a successful towel warmer installation. With a screwdriver, electric drill, and spirit level in your toolkit, you can confidently tackle the installation process and enjoy the warmth and comfort of your new towel warmer. Stay tuned for our next blog post where we’ll walk you through the step-by-step installation guide.
Required Materials For Installing A Towel Warmer
Installing a towel warmer can be a great addition to your bathroom, providing you with warm, cozy towels after every shower. To ensure a successful installation, it’s essential to have the right materials on hand. Here are the required materials you will need:
Towel warmer unit
The first and most important material you’ll need is the towel warmer unit itself. There are various types and styles available in the market, so be sure to choose one that suits your preferences and bathroom decor. Whether you prefer a wall-mounted, freestanding, or floor-mounted unit, make sure it’s compatible with your bathroom layout and complements your aesthetic.
Mounting brackets
To securely attach the towel warmer unit to the wall, you will need mounting brackets. These brackets come in different sizes and designs, so it’s crucial to select ones that are specifically designed for your towel warmer model. The brackets should be sturdy enough to hold the weight of the unit and ensure its stability.
Screws and wall anchors
Properly securing the towel warmer unit to the wall is crucial, and this requires screws and wall anchors. The type and size of screws and anchors you’ll need will depend on the material of your bathroom wall. For example, if you have a tiled wall, you’ll need specific screws and anchors that are suitable for tiles. It’s important to choose high-quality screws and anchors to ensure the towel warmer remains securely attached to the wall over time.
Electrical connection components
Since most towel warmers require electricity to operate, you’ll need to have the necessary electrical connection components. These components may include electrical wires, wire connectors, and a wall-mounted switch or timer for controlling the towel warmer’s heat settings. If you’re not experienced with electrical work, it’s recommended to hire a professional electrician to ensure a safe and proper electrical connection.
With the required materials mentioned above, you’ll be well-prepared to install your new towel warmer and enjoy the luxury of warm towels in your bathroom. Make sure to carefully follow the manufacturer’s instructions and consult an expert if needed to ensure a successful and hassle-free installation.
Measuring And Marking The Location For Installation
Installing a towel warmer in your bathroom not only adds a touch of luxury but also provides you with warm, cozy towels all year round. Before you begin the installation process, it’s important to measure and mark the location where you want the towel warmer to be installed. This will ensure that it is positioned correctly and at the right height for optimal functionality and aesthetic appeal. In this section, we will guide you through the steps of determining the height and position of the towel warmer, as well as using a spirit level to ensure an even installation.
Determining the height and position of the towel warmer
The first step in measuring and marking the location for towel warmer installation is determining the height and position at which you want it to be mounted. Consider factors such as the height of your bathroom sink, the available wall space, and the average height of the people who will be using the towels. Keeping these factors in mind will help you choose the most suitable location.
To determine the height, start by measuring the distance between the floor and the desired height of the towel warmer. This will vary depending on personal preference, but a good rule of thumb is to have the bottom of the towel warmer at a height that is easily reachable. Additionally, consider the size of the towels you will be hanging and ensure there is enough space between the towel warmer and any nearby fixtures or furniture.
Once you have determined the height, use a measuring tape and a pencil to mark the position where the bottom of the towel warmer will be. Make sure the mark is level and straight. If you have multiple towel warmers or plan to install them in different parts of the bathroom, repeat this process for each unit, ensuring consistency in height and position.
Using a spirit level to ensure even installation
An important aspect of towel warmer installation is ensuring that it is mounted evenly. Uneven installation can not only affect the functionality of the unit but also detract from its overall appearance. To achieve a level and straight installation, it is recommended to use a spirit level.
- Start by placing the spirit level vertically against the wall where the towel warmer will be installed. Ensure that it is straight and level.
- Adjust the position of the towel warmer if necessary, using the marked position as a guide.
- Once the towel warmer is in position, place the spirit level horizontally on top of the unit. This will help you ensure that it is level from side to side.
- Make any necessary adjustments to the position of the towel warmer until the spirit level indicates that it is perfectly level.
By using a spirit level, you can have the confidence that your towel warmer is installed evenly and will provide you with evenly warmed towels. It is a small step that can make a big difference in the aesthetics and functionality of your towel warmer.
Preparing The Wall Surface
Checking for any obstacles or obstructions
Before installing a towel warmer, it’s important to thoroughly assess the wall surface for any obstacles or obstructions that may hinder the installation process. Taking the time to identify and address these issues upfront can save you from potential headaches down the line. Here are a few steps you can follow:
- Start by carefully examining the area where you plan to install the towel warmer. Look for any electrical outlets, switches, or light fixtures that may be in close proximity. It’s crucial to ensure that the location you’ve chosen won’t interfere with these fixtures or pose any safety risks.
- Next, inspect the wall for any pipework or plumbing that may be hidden beneath the surface. This is especially important if you’re installing the towel warmer in a bathroom or near a sink. Checking for any leaks or possible dampness is essential to avoid any future problems.
- If you have tiled walls, it’s necessary to assess the condition of the tiles. Ensure they’re secure and intact. Replace any loose or damaged tiles before proceeding with the installation. It’s crucial to have a solid and stable surface to secure the towel warmer.
- Finally, measure the height and width of the wall to ensure that the towel warmer will fit properly. Consider the dimensions of the towel warmer and make sure there is enough space for it to be mounted securely without any issues.
Removing any existing fixtures or accessories
Once you’ve evaluated the wall surface and addressed any obstacles or obstructions, it’s time to remove any existing fixtures or accessories that may be in the way. This step is crucial to ensure a seamless installation process. Here’s how you can proceed:
- Carefully remove any towel racks, hooks, or other accessories that are currently mounted on the wall. Use a screwdriver or any necessary tools to unscrew and detach them without causing any damage to the wall or surrounding areas.
- If there are any adhesive mounts or tiles that need to be removed, do so gently, taking care not to chip or break the tiles. Using a scraper or putty knife can help simplify this task. Once removed, the wall surface should be clean and free from any residue or debris.
- If you encounter any stubborn adhesive residue, consider using an adhesive remover specifically designed for the material you’re working with. This will ensure a smooth and clean surface for the towel warmer installation.
By thoroughly checking for obstacles or obstructions and removing any existing fixtures or accessories, you’ll be well on your way to preparing the wall surface for a successful towel warmer installation. Following these steps will help ensure a smooth and hassle-free process, resulting in a warm and cozy addition to your bathroom.
Attaching The Mounting Brackets To The Wall
Once you have determined the precise location for your towel warmer, the next step is to attach the mounting brackets securely to the wall. This ensures that your towel warmer stays in place and functions properly. Follow these steps to properly attach the mounting brackets:
Positioning the brackets according to the marked measurements
Begin by marking the desired height for your towel warmer on the wall. Measure the distance between the bottom of the towel warmer and the floor or any other reference point you have chosen. This will help you determine the ideal position for the brackets.
Using a measuring tape, measure and mark the corresponding distance from the floor on the wall. Make sure the marks are level and straight. These marks will serve as your reference points for positioning the brackets.
Take a look at the installation manual provided with your towel warmer to determine the recommended spacing between the brackets. This will vary depending on the size and model of your towel warmer. Measure and mark the appropriate distance between the marks you made for the brackets.
Securing the brackets with screws and wall anchors
Now that you have marked the correct positions for the brackets, it is time to secure them to the wall using screws and wall anchors.
- Begin by inserting the wall anchors into the marked positions on the wall. Wall anchors are essential to provide additional support and stability for the towel warmer. Make sure to choose wall anchors that are suitable for the specific type of wall material you have, whether it is drywall, tile, or concrete.
- Position the mounting brackets over the wall anchors, aligning them with the marks you made on the wall. Ensure that the brackets are level.
- Using a screwdriver or a power drill, drive screws through the holes in the brackets and into the wall anchors. Tighten the screws securely, but be careful not to over-tighten and damage the brackets or the wall.
- Once the brackets are securely attached, give them a gentle tug to check for any movement or looseness. If they feel secure, you can proceed with the next steps of your towel warmer installation.
Congratulations! You have now successfully attached the mounting brackets to the wall. The next step is to connect the towel warmer to the brackets, following the manufacturer’s instructions.
Remember, the proper installation of your towel warmer is crucial for its functionality and longevity. By correctly attaching the mounting brackets, you ensure that your towel warmer stays securely in place and provides optimal heating performance.
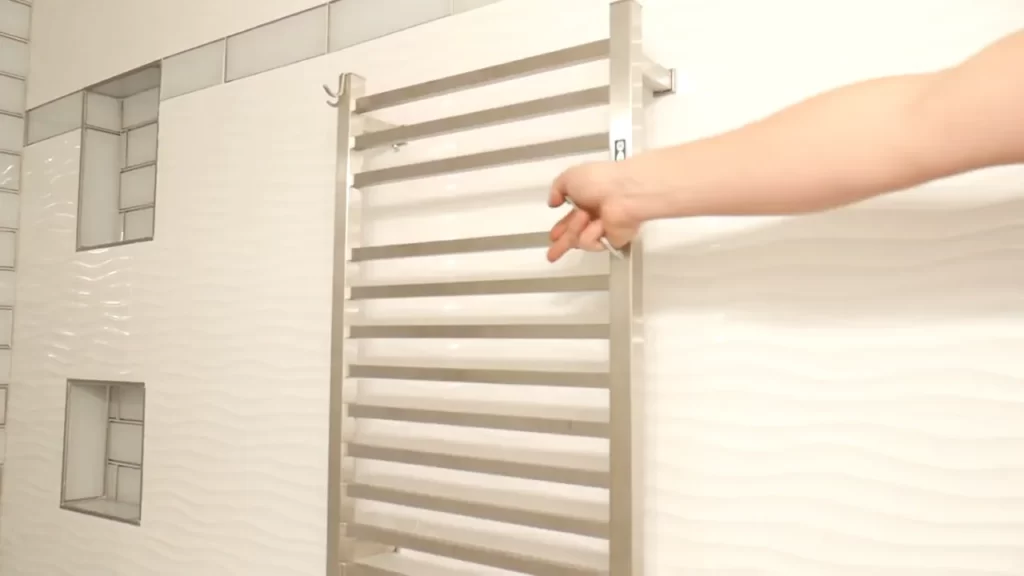
Installing The Towel Warmer On The Mounting Brackets
Now that you have successfully assembled your towel warmer, it’s time to install it onto the mounting brackets. This crucial step ensures that your towel warmer is securely attached to the wall, providing you with a stable and functional addition to your bathroom. Here’s a step-by-step guide to help you through the process.
Placing the unit onto the brackets
The first step is to carefully place the towel warmer onto the mounting brackets. Start by positioning one end of the towel warmer onto the corresponding bracket, making sure it aligns with the holes for screws or bolts. Slowly lower the other end onto the opposite bracket, ensuring that the unit rests securely without any wobbling or imbalance.
Ensuring proper alignment and stability
With the towel warmer now placed onto the mounting brackets, it’s crucial to ensure proper alignment and stability. Use a level to make sure that the unit is perfectly horizontal or according to your desired slope, and adjust if necessary. This will prevent any potential water pooling or uneven heat distribution within the towel warmer. Additionally, check the brackets and the unit itself to ensure they are fastened tightly, providing utmost stability.
To further enhance the stability of the towel warmer, you can also consider installing additional support brackets. These brackets can be secured to the wall at strategic points and provide extra reinforcement, particularly for larger towel warmers or for those installed in high-traffic areas.
Remember, proper alignment and stability are crucial to ensure the longevity and efficiency of your towel warmer. Take the time to double-check these aspects before moving on to the next steps.
With the towel warmer successfully installed onto the mounting brackets, you are now one step closer to enjoying the luxurious comfort it offers. In our next section, we will discuss the electrical connections and powering up your towel warmer. Stay tuned!
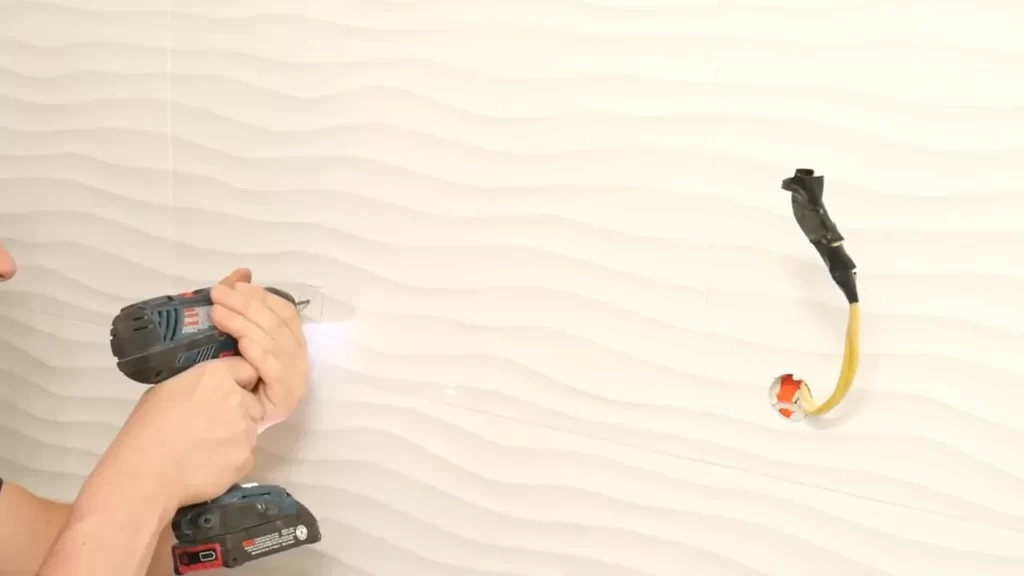
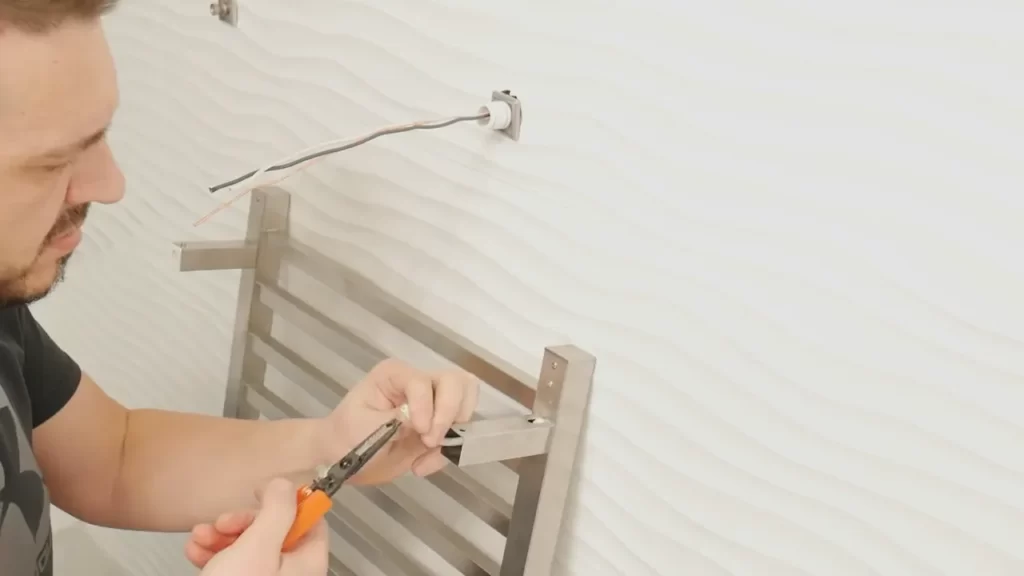
Connecting The Towel Warmer To The Electrical Supply
Consulting a professional electrician if necessary
Before you begin connecting your towel warmer to the electrical supply, it’s important to understand that working with electricity can be dangerous if not done correctly. If you are comfortable with electrical work and have experience with wiring, you may feel confident in tackling this task on your own. However, if you are unsure or have any doubts about your ability to safely connect the towel warmer to the electrical supply, it is highly recommended to consult a professional electrician.
Professional electricians are trained and have the required knowledge to ensure proper electrical connections. They will ensure that all wiring is done correctly and safely, reducing the risk of electrical accidents or damage to your towel warmer. Hiring a professional electrician may incur an extra cost, but it provides peace of mind knowing that the job will be done right.
Following the manufacturer’s instructions for wiring
Once you have determined that you are comfortable and knowledgeable enough to connect the towel warmer to the electrical supply, it is crucial to follow the manufacturer’s specific instructions for wiring. These instructions can usually be found in the product manual or on the manufacturer’s website.
The manufacturer’s instructions will outline the specific wiring requirements for your towel warmer, including the appropriate electrical wiring size, voltage, and any specific wiring techniques or tools required. It is essential to adhere to these instructions to ensure the safe and correct installation of your towel warmer.
Here are some general tips to keep in mind when following the manufacturer’s instructions for wiring:
- Ensure that the power source is turned off before you begin any wiring work. This will prevent electrical shocks or short circuits.
- Use the appropriate wiring size based on the manufacturer’s recommendations to ensure the proper flow of electricity.
- Securely connect the wires according to the instructions using wire connectors or terminal blocks. Avoid loose connections as they can cause electrical issues.
- Double-check all connections to ensure they are properly insulated and protected.
- If the towel warmer has grounding requirements, make sure to establish a proper ground connection.
- After completing the wiring, perform a thorough inspection to ensure everything is securely connected and there are no exposed wires.
Remember, deviating from the manufacturer’s instructions can potentially void the warranty of your towel warmer and may lead to electrical hazards. It is always best to follow the recommended guidelines to ensure a safe and functional installation.
By following these steps and consulting a professional electrician when necessary, you can confidently connect your towel warmer to the electrical supply and enjoy the luxury of warm, cozy towels whenever you need them.
Testing The Towel Warmer For Proper Functioning
Turning on the towel warmer to check for heat output
Once you have successfully installed your towel warmer, it’s important to test it for proper functioning. The first step in this process is to turn on the towel warmer and check if it is generating sufficient heat. Here’s how you can do it:
- Locate the power switch or control panel on the towel warmer. It is usually located on the side or bottom of the unit, depending on the model.
- Make sure the towel warmer is securely plugged into an electrical outlet.
- Turn on the power switch or press the appropriate button on the control panel to activate the unit.
- Wait for a few minutes and carefully touch the surface of the towel warmer. Be cautious not to burn yourself.
- If the surface feels warm to the touch, it indicates that the towel warmer is functioning properly and generating heat. You can move on to the next step of testing.
- If the surface does not generate any heat or if it is noticeably colder than expected, there might be an issue with the electrical connection or the internal heating mechanism. In such cases, it is advisable to consult the user manual or contact the manufacturer for troubleshooting or professional assistance.
Monitoring for any electrical or performance issues
After checking the heat output of the towel warmer, it’s essential to monitor its performance and ensure there are no electrical or performance issues. Here are some steps you can follow:
- Observe the towel warmer for any unusual sounds, such as buzzing or clicking noises. These could signify a problem with the internal components and should be addressed promptly.
- Check the power cord and the electrical outlet for any signs of damage or loose connections. Replace the cord or repair the outlet if necessary.
- Monitor the towel warmer for consistent heat output. It should maintain a constant temperature to effectively warm your towels or other items.
- If you notice any fluctuations in heat or inconsistent performance, it is recommended to consult the user manual or seek professional assistance.
- Regularly clean and maintain your towel warmer according to the manufacturer’s instructions to prevent any potential performance issues.
Securing And Finishing Touches
After successfully mounting your towel warmer in the desired location, it is time to focus on securing and adding those final touches to ensure optimal functionality and aesthetics. This step is crucial to prevent any accidents or damage in the long run. Follow these steps to properly secure your towel warmer and add those finishing touches for a flawless installation.
Tightening any loose screws or connections
Before you move forward, it is essential to double-check if any screws or connections need tightening. Over time, vibrations or daily use may cause them to become loose, compromising the stability of your towel warmer. Take a moment to inspect all visible connections, bracket screws, and wall anchors. Use the appropriate tools to tighten any loose elements securely. This ensures that your towel warmer remains firmly in place, providing reliable performance for years to come.
Checking for any additional adjustments or modifications
Once you have secured all the screws and connections, take a moment to evaluate if any additional adjustments or modifications are necessary. For example, check if the towel warmer is perfectly level and adjust the mounting brackets if needed. This step ensures that your towel warmer not only looks visually appealing but also functions optimally. Keep in mind that even slight adjustments can make a significant difference in the performance and longevity of your towel warmer.
If your towel warmer model comes with additional features such as temperature controls or timers, take the time to familiarize yourself with their settings. Ensure they are properly adjusted to your preferences before finalizing the installation process. This way, you can enjoy the convenience of towel warming tailored to your needs and preferences.
Finally, inspect the overall appearance of your towel warmer. Check for any visible scratches, blemishes, or imperfections on the surface. If you notice any, it is worth contacting the manufacturer for recommendations on touch-up paint or other solutions to restore the visual appeal of your towel warmer. This attention to detail enhances the overall look of your bathroom, creating a spa-like atmosphere right in your own home.
By taking the time to tighten all screws and connections, perform any necessary adjustments or modifications, and ensuring a flawless finish, you can rest assured that your newly installed towel warmer is both securely in place and visually appealing. Incorporate these steps into your installation process for a successful and satisfying outcome.
Enjoying Your Newly Installed Towel Warmer
Congratulations on successfully installing your new towel warmer! Now that you have added this luxurious and practical feature to your bathroom, it’s time to start reaping the benefits. From enjoying warm and cozy towels to maintaining the longevity of your towel warmer, here are a few essential tips to make the most of your investment.
Placing towels on the warmers for optimal drying and comfort
When it comes to placing your towels on the warmers, there are a few simple tips to ensure optimal drying and comfort. Follow these guidelines to make the most of your towel warming experience:
- Before placing your towels on the warmer, make sure they are clean and free of any dirt or excess moisture. This will help to maintain the cleanliness of the warmer and prevent any unpleasant odors.
- For best results, fold your towels neatly and evenly before placing them on the warmer. This will allow for better heat circulation and ensure that each part of the towel receives the warmth evenly.
- For maximum comfort, consider arranging your towels in a way that allows easy access. This will make it more convenient for you to grab a warm towel when you step out of the shower or bath.
Maintenance and cleaning the towel warmer for long-term use
Keeping your towel warmer clean and well-maintained is crucial for its long-term performance. Follow these simple steps to ensure your towel warmer stays in optimal condition:
- Regularly wipe down the surface of the warmer with a soft, damp cloth to remove any dust or residue. This will help to maintain its appearance and prevent any buildup.
- For deeper cleaning, mix a mild, non-abrasive cleaner with warm water and gently wipe the surface of the warmer. Avoid using harsh chemicals or abrasive materials as they may damage the finish.
- Inspect the wiring and connections of the towel warmer periodically to ensure they are secure and in good condition. If you notice any loose wires or signs of damage, contact a professional for assistance.
- Finally, consider investing in a timer or thermostat to control the operation of your towel warmer. This will help to conserve energy and ensure that it is only running when needed.
By following these simple tips, you can enjoy the warmth and comfort of your new towel warmer for years to come. Remember to take good care of your towels and the appliance itself, and you’ll surely enjoy the benefits of cozy, dry towels every day. Say goodbye to chilly mornings and hello to a luxurious bathing experience!
Frequently Asked Questions
Can You Install A Heated Towel Rail Yourself?
Yes, you can install a heated towel rail yourself. Just follow the instructions carefully.
Where Should A Towel Warmer Be Placed?
A towel warmer should be placed in the bathroom for easy access and convenience. It can be mounted on the wall or placed on the floor, depending on the available space. Just make sure it is near a power outlet for easy installation and use.
How Do You Install Heated Towels?
To install heated towels, start by selecting a suitable location near an electrical outlet. Mount the towel warmer securely on the wall or use a freestanding option. Connect the unit to a power source and ensure it is properly grounded.
Finally, turn on the heater and enjoy warm towels.
Do Towel Warmers Have To Be Plugged In?
Yes, towel warmers need to be plugged in to work.
Conclusion
Installing a towel warmer is a simple and rewarding DIY task that adds luxury and comfort to your bathroom. By following the step-by-step guide outlined in this blog post, you can easily transform your bathroom into a spa-like retreat. Remember to choose a suitable location, gather the necessary tools, and follow safety precautions during the installation process.
With a towel warmer in place, you can enjoy warm and cozy towels every time you step out of the shower.