
To install a Toto Washlet, follow these steps: 1. Turn off the water supply to the toilet.
2. Remove the existing toilet seat. Introducing a Toto Washlet to your bathroom can elevate your hygiene routine to another level. Whether you’re new to bidet technology or looking for an upgrade, the installation process can seem daunting. However, with a few simple steps, you can have your Toto Washlet up and running in no time.
We will guide you through the installation process, providing clear instructions and tips to ensure a successful setup. So, let’s dive in and learn how to install a Toto Washlet and transform your bathroom experience.
Gather The Necessary Tools And Materials
Before starting the installation process of your Toto Washlet, it is essential to gather all the necessary tools and materials. Having everything ready beforehand will not only save you time but also ensure a hassle-free installation experience. Here is a list of tools and materials you will need:
List of tools and materials needed
Make sure to have the following tools and materials at hand:
| Tools | Materials |
|---|---|
|
|
Importance of having everything ready beforehand
Having everything ready beforehand is crucial for a successful installation. It ensures that you can complete the installation process without any interruptions or delays. By having all the necessary tools and materials at hand, you can save time and avoid last-minute trips to the hardware store or searching for missing items. This level of preparedness will help you stay focused and make the installation process smooth and efficient.
Prepare The Bathroom
Before installing a Toto Washlet, it is important to properly prepare your bathroom area. This will ensure a smooth and hassle-free installation process. There are several key steps you need to take to prepare the bathroom:
Clear the surrounding area
Start by clearing the immediate area around your toilet. Remove any items such as rugs, trash cans, or storage units that may obstruct the installation process. It is important to create a clean and clutter-free space to work in.
Ensure proper electrical and water connections
Next, make sure you have the proper electrical and water connections in place. The Toto Washlet requires both an electrical outlet and a water supply. Ensure that there is an electrical outlet near the toilet area and that it is properly grounded.
| Electrical Connection | Water Connection |
|---|---|
| You may need to hire a licensed electrician to install a GFCI (Ground Fault Circuit Interrupter) outlet near the toilet area if you don’t already have one. | Check for a nearby water supply line. If there isn’t one in close proximity to your toilet, you may need to hire a plumber to install a new water line. |
| Ensure that the electrical outlet can handle the power requirements of the Toto Washlet. Refer to the product manual for the exact specifications. | Make sure the water supply line is in good condition and free from leaks. If there are any issues, repair or replace the water line before proceeding with the installation. |
By ensuring proper electrical and water connections, you can avoid any potential problems or delays during the installation process.
Once you have prepared your bathroom by clearing the surrounding area and ensuring the necessary electrical and water connections, you are ready to move on to the next step of installing a Toto Washlet. Stay tuned for our next blog post on the actual installation process, where we will provide step-by-step instructions on how to install a Toto Washlet.
Step 1: Turn Off The Water Supply
Before starting the installation process of your Toto Washlet, the first and most important step is to turn off the water supply to your toilet. This ensures that you can work on the installation without any water leakage or mess. Here’s how you can do it:
Locate the water shut-off valve
To turn off the water supply, you need to locate the water shut-off valve. This valve is usually located on the wall near the base of the toilet. It is a small valve that you can turn clockwise to shut off the water flow. Here’s how you can find the shut-off valve:
- Start by looking for a small lever or knob on the wall behind or next to the toilet.
- It is usually positioned near the water pipe that connects to the toilet tank.
- If you are unable to find the shut-off valve in this location, check other possible areas such as the basement or utility room where the water supply lines are connected.
Once you have located the shut-off valve, you are ready to proceed to the next step.
Shut off the water flow to the toilet
Now that you have located the water shut-off valve, it’s time to shut off the water flow to the toilet. Follow these simple steps:
- Using your hand or an adjustable wrench, turn the valve clockwise until it is fully closed.
- You will feel some resistance as you turn the valve.
- Make sure the valve is completely closed to prevent any water from flowing into the toilet tank.
By turning off the water flow to the toilet, you have successfully prepared the plumbing system for the installation of the Toto Washlet. Remember to double-check that the valve is completely closed before moving on to the next step. This ensures a smooth and hassle-free installation process.

Step 2: Remove The Existing Toilet Seat
Once you have gathered all the necessary tools and familiarized yourself with the installation process, you can move on to removing the old toilet seat. Follow these simple steps to complete this task:
Unscrew the bolts holding the seat in place
First, locate the two bolts that are holding the existing seat secure to the toilet bowl. These bolts are usually located at the rear of the seat, near the hinges. To remove them:
- Use a screwdriver or a wrench to turn the bolts counterclockwise. Make sure to grip the bolt head or the nut that’s visible beneath the rim of the toilet bowl.
- Apply some force if needed, as the bolts might be tight due to extended use.
- Continue loosening the bolts until they are completely detached from the toilet bowl.
- Repeat the same steps for the second bolt.
Lift and remove the old seat
Once the bolts are completely loosened, you can now lift and remove the old toilet seat:
- Gently lift the seat upwards, ensuring that it doesn’t snag on any parts of the toilet bowl.
- Slide the old seat out from the hinges and set it aside.
- Inspect the toilet bowl surface for any residue or dirt. Cleaning it before installing the new seat ensures a clean and secure fit.
With the old seat successfully removed, you are now ready to proceed to the next step of the installation process. Properly disposing of the old seat is also important for hygiene and environmental reasons, so consider recycling or following local waste disposal guidelines when discarding it.
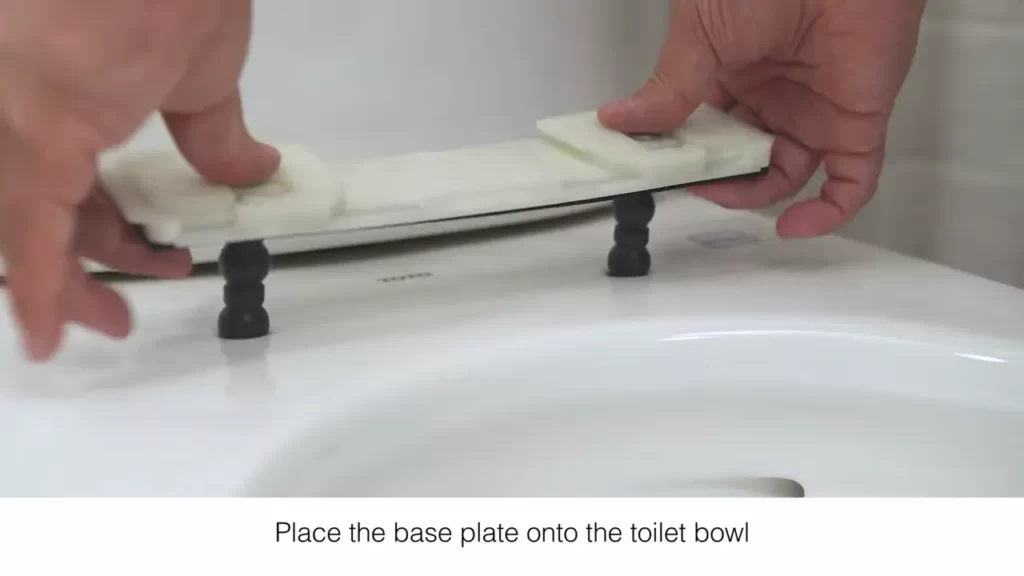
Step 3: Install The Toto Washlet Mounting Bracket
Once you have located the ideal spot for your Toto Washlet installation and prepared the toilet bowl, it’s time to move on to the next step: installing the mounting bracket. The mounting bracket is the essential component that will securely hold your Washlet in place, ensuring stability and convenience during use.
Attach the bracket to the toilet bowl
First, carefully unpack the Toto Washlet mounting bracket from its packaging. Check for any signs of damage or missing pieces before proceeding. Once you have confirmed that everything is intact, locate the mounting holes on the back of the toilet bowl.
Align the holes on the bracket with those on the toilet bowl, making sure to position the bracket at a suitable height and angle. The bracket should be centered and horizontally leveled with the bowl. It’s important to note that the exact placement may slightly vary depending on the specific model of your Toto Washlet. Refer to the manufacturer’s instructions for precise information.
When you have determined the correct position, hold the mounting bracket firmly against the toilet bowl, ensuring it does not shift during the installation process.
Secure it with the provided screws
Once the mounting bracket is in position, it’s time to secure it using the screws provided in the Washlet package. Insert the screws through the holes on the bracket and into the corresponding holes on the toilet bowl. Make sure the screws are tightly fastened, but be cautious not to overtighten and damage the bracket or toilet bowl.
If your Toto Washlet model includes additional attachment pieces, such as a backplate or adapter, refer to the manufacturer’s instructions for guidance on attaching these components securely.
Ensure that all screws are securely tightened before proceeding to the next step. Check for any loose fittings or wobbling of the mounting bracket to ensure it is properly secured. A stable and securely attached mounting bracket is crucial to the overall functionality and longevity of your Toto Washlet installation.
Now that the mounting bracket is securely in place, you can proceed to the next step—connecting the Washlet to the water supply. Stay tuned for the upcoming section on how to properly connect your Toto Washlet to the water source for optimal performance.
Step 4: Connect The Water Supply
Once you have successfully installed the Toto Washlet and positioned it securely on your toilet, it’s time to connect the water supply. This step is crucial as it ensures a proper flow of water to the Washlet for optimal functionality. To connect the water supply, follow the simple instructions outlined below:
Locate the water supply valve on the Toto Washlet
Before connecting the water supply hose, it is essential to locate the water supply valve on the Toto Washlet. This valve is responsible for controlling the flow of water to the washlet unit. Look for a small circular valve near the base of the Washlet. It may be labeled with a water droplet symbol or a similar indicator. Once you have located the valve, proceed to the next step.
Connect the water supply hose
Now that you have located the water supply valve on the Toto Washlet, it’s time to connect the water supply hose. This hose is responsible for delivering water from the main water supply to the Washlet unit. Follow the steps below to ensure a secure connection:
- 1. Take the water supply hose and hand-tighten one end to the water supply valve on the Toto Washlet. Be careful not to overtighten, as this may damage the valve.
- 2. Once the hose is securely attached to the water supply valve, locate the other end of the hose.
- 3. Find the corresponding water supply valve near your toilet. This valve is typically located either on the wall or the floor, depending on the plumbing setup.
- 4. Attach the other end of the water supply hose to the water supply valve near your toilet. Again, hand-tighten the connection, ensuring it is secure but not overly tight.
By following these steps, you have successfully connected the water supply hose to the Toto Washlet. This connection is essential for ensuring a steady flow of water to the unit, enabling it to function properly. Once the water supply is connected, you are ready to move on to the next step in the installation process.
Remember to always double-check the connections to ensure there are no leaks. If you notice any water leakage, gently tighten the connections until the leak stops, but be careful not to overtighten as it may cause damage.
Now that the water supply is in place, you’re one step closer to enjoying the luxuries and benefits of a Toto Washlet!
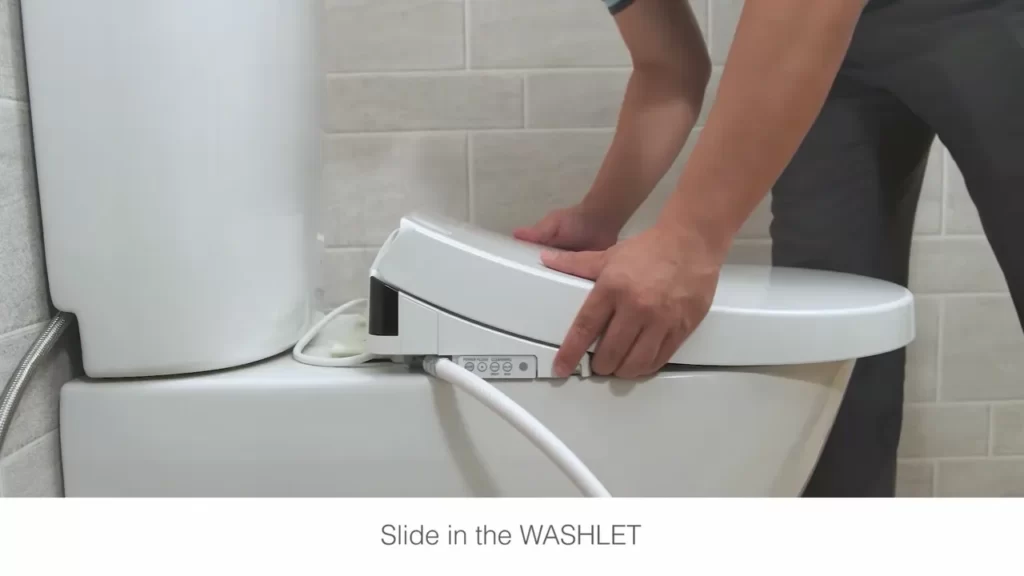
Step 5: Position And Secure The Toto Washlet
After successfully completing the previous steps of installing the Toto Washlet, it’s time to focus on positioning and securing it. This step is crucial to ensure the optimal functionality of your Toto Washlet and ensure a comfortable experience for anyone using it.
Align the Washlet with the bracket
First, double-check that the bracket is securely attached to your toilet bowl. Now, align the holes on the base of the Toto Washlet with the corresponding holes on the bracket. Take your time to make sure the alignment is accurate, as this will directly impact the stability and functionality of the Washlet.
Lower it onto the bracket and secure
Once the alignment is spot-on, carefully lower the Washlet onto the bracket. Make sure to do this slowly and steadily to avoid any damage. The Washlet should fit snugly onto the bracket, with no wobbling or instability.
To secure the Washlet onto the bracket, follow the manufacturer’s instructions provided with the product. Typically, this involves tightening the screws or bolts that came with the Washlet. Use a screwdriver or wrench, whichever is required, to firmly tighten the screws without over-tightening them.
Ensure each H3 heading adheres to HTML syntax
Step 6: Connect The Electrical Components
Now that you have successfully completed the previous steps of installing your Toto Washlet, it’s time to move on to connecting the electrical components that will power the device. This step is crucial in ensuring the washlet functions properly and safely. Follow the instructions below to complete this step accurately.
Locate the electrical connection on the Washlet
Before you can begin connecting the electrical components, you need to find the electrical connection on your Toto Washlet. This connection is typically located at the rear or bottom of the unit. Take a moment to visually inspect the washlet and locate the electrical connection point.
Connect the power cord to a GFCI outlet
Once you have identified the electrical connection on the Washlet, you can proceed to connect the power cord. To do this, you will need a GFCI (Ground Fault Circuit Interrupter) outlet. This type of outlet includes a built-in safety mechanism that protects against electrical shock.
Start by locating a suitable GFCI outlet near the toilet. Ensure that it is easily accessible and within reach of the power cord. If you don’t have a GFCI outlet in the desired location, consult a professional electrician to install one.
Take the power cord of the Washlet and plug it into the GFCI outlet. Confirm that it is securely connected and that there are no loose or exposed wires.
It is essential to emphasize the importance of using a GFCI outlet for safety purposes. The GFCI outlet will protect you from potential electrical hazards and prevent any damage to the Washlet.
Once you have successfully connected the power cord to the GFCI outlet, you are now ready to move on to the next step.
Step 7: Adjust The Settings And Test
Now that you’ve successfully installed your Toto Washlet, it’s time to customize the settings for water pressure, temperature, and more. This step ensures that the Washlet is tailored to your personal preferences for the ultimate comfort and cleanliness.
Customize the settings for water pressure, temperature, etc.
To customize the settings of your Toto Washlet, follow these steps:
- Locate the control panel on your Washlet. It is usually located on the side or the top surface, depending on the model you have.
- Press the power button to turn on the Washlet.
- Use the arrow buttons or touch screen, if available, to navigate through the various settings.
- Adjust the water pressure by selecting the “+” or “-” buttons. Increase or decrease the pressure until you find the level that suits you best.
- Similarly, adjust the water temperature by using the designated buttons. Experiment with different temperature levels to find your ideal comfort.
- If your Toto Washlet offers additional features like oscillation or massage, explore those options and customize them to your liking.
- Take note of any additional settings that may be important to you, such as seat heating or deodorizer options. Make the desired adjustments accordingly.
Remember, these settings can be modified at any time, so feel free to explore and adjust as needed to create the perfect Washlet experience.
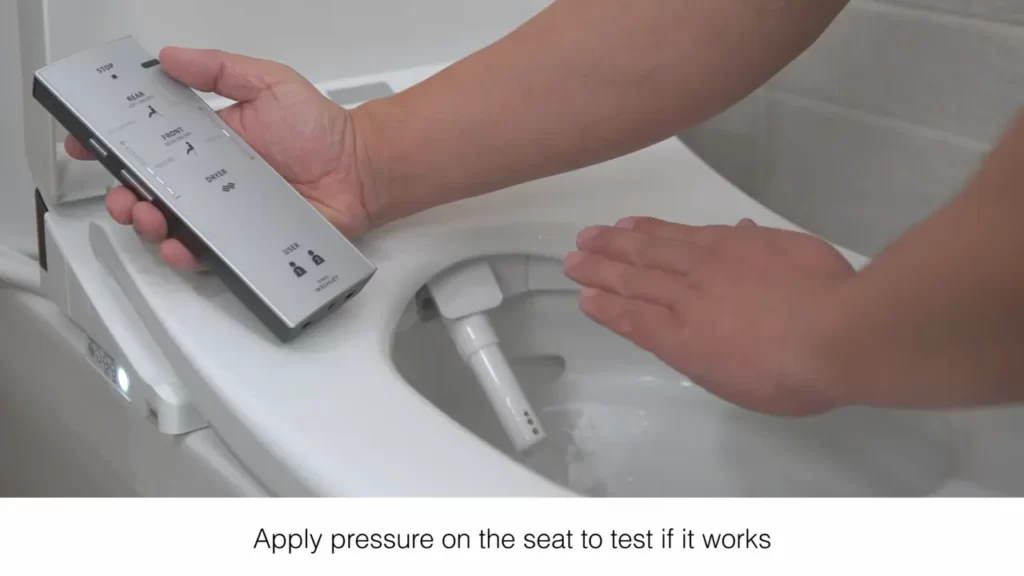
Test the Toto Washlet to ensure proper functioning
Once you have customized the settings to your liking, it’s crucial to test the Toto Washlet to ensure everything is functioning correctly. Follow these steps:
- Press the “Stop” button to stop any ongoing activity on the Washlet.
- Press the “Rear” or “Front” cleansing button, depending on your preference.
- Observe the water pressure and temperature, confirming if they match your desired settings.
- During the cleansing process, ensure that the water flow is consistent and at the desired pressure. Adjust any settings if necessary for optimal performance.
- Take note of any irregularities, such as unusual sounds or leaks. If any such issues arise, consult the user manual or contact Toto customer service for assistance.
By following these steps to customize the settings and test your Toto Washlet, you can ensure it provides you with the utmost comfort and functionality. Enjoy the luxurious experience that your Washlet brings to your daily routine!
Issue 1: Water Leakages
In this blog post, we will walk you through the process of installing a Toto Washlet, a popular bidet toilet seat. While the installation of a Washlet is generally straightforward, some issues may arise along the way. In this section, we will address one of the common issues you may encounter during installation: water leakages.
Possible Causes and Solutions
Causes
Water leakages during the installation of a Toto Washlet can occur due to several reasons. It is essential to identify the cause of the issue to address it effectively. Here are some common causes of water leakages during installation:
| Possible Cause | Solution |
|---|---|
| The water supply hose is not securely tightened. | Tighten the water supply hose properly using an adjustable wrench. |
| The sealing gasket is damaged or missing. | Inspect the sealing gasket and replace it if necessary before proceeding with the installation. |
| The water supply valve is faulty or not fully opened. | Check the water supply valve and ensure it is fully open. If the valve is faulty, consider replacing it. |
Solutions
- Ensure that the water supply hose is securely tightened. Use an adjustable wrench to tighten it properly, but be cautious not to over-tighten as it may cause damage.
- Inspect the sealing gasket. If it is damaged or missing, replace it with a new one. The sealing gasket ensures a tight seal and prevents water leakage.
- Check the water supply valve and ensure it is fully opened. If the valve is faulty, consider replacing it with a new one as it might affect the proper functioning of the Washlet.
By addressing these possible causes and implementing the corresponding solutions, you should be able to resolve water leakages during the installation of a Toto Washlet. Remember to follow the manufacturer’s instructions carefully throughout the installation process to ensure optimal performance.
Stay tuned for our next section, where we will tackle another common issue that you may encounter while installing a Toto Washlet: electrical wiring problems.
Issue 2: Electrical Malfunctions
Proper installation and functioning of the electrical components are crucial for the smooth operation of a Toto Washlet. However, electrical malfunctions can sometimes occur, causing inconvenience and frustration. In this section, we will explore potential problems related to electrical issues and provide troubleshooting steps to help you address these concerns effectively.
Potential Problems and Troubleshooting Steps
If you experience electrical malfunctions with your Toto Washlet, there are a few potential problems that could be causing the issue. By following these troubleshooting steps, you can identify and resolve the problem:
- No power supply: The first step is to make sure that there is power supply to the Washlet. Check if the power cord is securely plugged into a working power outlet. If you find that the power is not reaching the Washlet, try plugging it into a different outlet to determine if the issue lies with the outlet. If the problem persists, consider checking the circuit breaker or fuse box.
- Faulty electrical connections: Inspect the electrical connections of the Washlet to ensure that they are properly connected. If any connections are loose or disconnected, carefully reattach them. It’s important to handle electrical connections with caution and ensure that the power is turned off before attempting any repairs.
- Tripped GFCI outlet: Some Toto Washlets are equipped with a Ground Fault Circuit Interrupter (GFCI). If the GFCI outlet has tripped, it will cut off power to the Washlet. To fix this, locate the GFCI outlet and press the reset button. If the GFCI keeps tripping, it may indicate a more serious electrical issue that requires professional assistance.
- Power cord damage: Examine the power cord for any visible signs of damage, such as frayed wires or cuts. If you notice any damage, it is essential to replace the power cord immediately. Operating the Washlet with a damaged power cord can pose a safety hazard and may further aggravate the electrical malfunction.
- Malfunctioning control panel: In some cases, the electrical malfunction might be related to a faulty control panel. If the buttons on the control panel are unresponsive or not functioning as intended, it may be necessary to replace the control panel. Consult the user manual or contact the Toto customer support team for guidance on obtaining a replacement control panel.
Tackling electrical malfunctions with your Toto Washlet can be daunting, but by following these troubleshooting steps, you can often identify and resolve the problem on your own. However, if you are uncertain about working with electrical components or if the issue persists despite your efforts, it is always recommended to seek assistance from a qualified professional to ensure safety and avoid further damage.
Issue 3: Installation Errors
Proper installation of a Toto Washlet is crucial to ensure its functionality and longevity. However, many people overlook the importance of following the correct installation procedures and end up encountering various errors. In this section, we will discuss common mistakes to avoid during installation and provide you with valuable tips on rectifying these installation errors.
Common Mistakes to Avoid During Installation
Installing a Toto Washlet may seem like a straightforward task, but small errors can lead to significant issues down the line. By avoiding the following common mistakes, you can save yourself from unnecessary frustration and ensure a seamless installation:
- Incorrect positioning of the Washlet: One of the most common errors is not properly positioning the Washlet on the toilet. Ensure that the Washlet is aligned and firmly attached to the mounting bracket to prevent any wobbling or misalignment.
- Improper electrical connections: Another common mistake is not correctly connecting the Washlet to the electrical supply. It is crucial to follow the manufacturer’s instructions and ensure that the electrical connections are secure, as loose connections can lead to malfunctioning of the Washlet.
- Insufficient water supply: Inadequate water supply is a common installation error that can affect the functionality of the Washlet. Make sure that the water supply valve is fully open and the water pressure is within the recommended range, as specified by the manufacturer.
- Failure to tighten connections: Failing to tighten the connections between the water supply hose, the toilet tank, and the Washlet can result in leaks or damaged components. Always double-check the tightness of these connections to avoid any problems.
- Skipping the calibration process: After installation, it is essential to calibrate the Washlet to ensure proper functioning. Skipping this step can lead to incorrect water temperature, pressure, or spray angle settings. Take the time to follow the calibration instructions provided by Toto to optimize your Washlet experience.
Tips for Rectifying Installation Errors
If you encounter any installation errors while installing your Toto Washlet, don’t panic. Here are some helpful tips to rectify common installation errors:
- Review the installation manual: Before making any changes, go back to the installation manual and carefully review the instructions. This can help you identify any steps you might have missed or misunderstood.
- Check for loose connections: Inspect all the connections, including the water supply hose, electrical connections, and mounting bracket. Tighten any loose connections to ensure a secure and stable installation.
- Verify the water supply: Ensure that the water supply valve is fully open and there are no blockages in the water line. Check for any leaks or pressure issues that could be affecting the Washlet’s performance.
- Contact customer support: If you are still experiencing issues, reach out to Toto’s customer support for further assistance. They have knowledgeable representatives who can guide you through troubleshooting steps specific to your installation error.
- Consider professional help: When all else fails, it may be wise to seek help from a professional plumber or an authorized Toto service technician. They can diagnose and rectify the installation error accurately, ensuring your Washlet functions optimally.
By avoiding common installation mistakes and following these rectification tips, you can enjoy a hassle-free installation experience and maximize the performance of your Toto Washlet.
Frequently Asked Questions
What Is Required To Install A Toto Washlet?
To install a TOTO WASHLET, you need a water supply connection, an electrical outlet nearby, and a compatible toilet bowl. The installation process involves attaching the WASHLET to the toilet bowl and connecting it to the water supply and electrical outlet.
Professional assistance may be required for electrical connections.
Can Toto Washlet Be Installed On Any Toilet?
Yes, TOTO WASHLET can be installed on most toilets. It is designed to fit standard toilet sizes with a few exceptions. Make sure to check the compatibility of your toilet and choose the correct model for a hassle-free installation.
Do You Need An Outlet For A Toto Washlet?
Yes, you need an outlet for a TOTO WASHLET. It requires electricity to function properly.
What Are The Electrical Requirements For Toto Washlet S550E?
The TOTO WASHLET S550e requires an electrical outlet with a dedicated 120-volt, 15-amp circuit.
Conclusion
Installing a Toto Washlet is a straightforward process that can greatly enhance your bathroom experience. By following the steps outlined in this guide, you can confidently install the washlet without any professional help. Remember to gather all the necessary tools beforehand and carefully follow the instructions provided by Toto.
With a little effort and attention to detail, you’ll soon be enjoying the comfort and hygiene of a Toto Washlet in your own home!