
To install a torsion spring, you need to secure it to the torsion bar and adjust the tension using winding bars. Are you in need of installing a torsion spring?
Look no further! We will guide you through the step-by-step process of installing a torsion spring. Torsion springs are known for their ability to store mechanical energy as they twist or rotate. They are commonly used in garage doors, hinges, and various other applications.
Installing a torsion spring may seem intimidating, but by following these simple instructions, you can easily get the job done. So, let’s get started and learn how to install a torsion spring effectively and safely.
Understanding The Mechanics Of A Torsion Spring
In this section, we will delve into the fascinating mechanics of a torsion spring. Understanding how a torsion spring works is essential when it comes to installing one correctly. So, let’s dive right in and explore the inner workings of this incredible mechanical component.
What is a torsion spring and how does it work?
A torsion spring is a type of spring that exerts torque or rotary force when twisted or rotated. Unlike other springs that compress or extend linearly, torsion springs function by storing mechanical energy in their twisted coil shape.
When the spring is twisted or rotated, this energy is released, generating rotational movement or sustaining a rotational force. It works on the principle of Hooke’s Law, which states that the force exerted by a spring is directly proportional to the displacement of its ends.
Here’s a simplified breakdown of how a torsion spring works:
- Initially, the spring is in its resting position, with no torque or rotational force exerted.
- When the spring is twisted or rotated, it stores potential energy within its coil.
- As the spring is released or untwisted, the potential energy is converted into kinetic energy, resulting in torque or a rotational force.
Common uses of torsion springs in various applications
Torsion springs find widespread applications in many industries and everyday items due to their unique properties and versatility. Here are a few common uses of torsion springs:
| Application | Function |
|---|---|
| Garage doors | Torsion springs help counterbalance the weight of garage doors, making them easier to open and close. |
| Clothespins | Torsion springs provide the necessary force to hold clothes securely without causing damage. |
| Toys and game controllers | Torsion springs are often used in toys and game controllers to provide a snapping action, enhancing user experience. |
Torsion springs are also employed in automotive suspension systems, watches, mechanical clocks, and many other devices that require rotational force or torque.
Understanding the mechanics of a torsion spring allows for a better appreciation of its importance and functionality. Whether you’re installing a torsion spring in a garage door or working on a DIY project, ensuring proper installation and maintenance is crucial to ensure optimal performance and safety.

Identifying The Tools And Materials You’Ll Need
Before you begin installing a torsion spring, it’s important to ensure you have all the necessary tools and materials. Having the right equipment at hand will not only make the installation process smoother but also contribute to the safety and effectiveness of the job. In this section, we’ll discuss the essential tools for torsion spring installation, selecting the right type and size of the torsion spring, as well as the precautions you should take before starting the installation process.
Essential tools for torsion spring installation
When it comes to installing a torsion spring, having the right tools can make all the difference. Here’s a list of the essential tools you’ll need:
| Tool | Description |
|---|---|
| Safety glasses or goggles | To protect your eyes from any flying debris |
| Gloves | To protect your hands from sharp edges |
| Winding bars | Used to wind and unwind the torsion spring |
| Adjustable wrench | To loosen and tighten nuts and bolts |
| Tape measure | To measure the dimensions of the torsion spring |
| Socket set | For easy and efficient installation |
| Drill | If required for any additional installation steps |
Selecting the right type and size of torsion spring
When it comes to torsion springs, one size does not fit all. It’s important to select the right type and size of torsion spring for your specific needs. Here are a few factors to consider:
- Door weight: Determine the weight of your garage door as it will affect the size and capacity of the torsion spring required.
- Wire size: The wire size of the torsion spring should be appropriate for the weight and size of the garage door.
- Spring length: Measure the length of the existing torsion spring or the torsion tube to ensure the new spring will fit correctly.
- Number of coils: The number of coils needed will depend on the height of the garage door and its spring rate.
Precautions to take before starting the installation process
Prior to installing the torsion spring, it’s crucial to take certain precautions to ensure a safe and successful installation. Here are a few things you should keep in mind:
- Disconnect power: Before you begin, make sure to disconnect the power to your garage door opener system to prevent any accidental activation.
- Secure the door: Ensure the garage door is securely closed and clamped before working on the torsion spring.
- Wear safety gear: Protect your eyes with safety glasses or goggles and wear gloves to shield your hands from potential harm.
- Follow instructions: Always refer to the manufacturer’s instructions or consult with a professional to ensure you are following the correct procedures.
By identifying and gathering the necessary tools and materials, selecting the right type and size of torsion spring, and taking the necessary precautions, you’ll be well-prepared to install a torsion spring effectively and safely.
Preparing For Installation
Before you install a torsion spring, it’s important to make sure you are properly prepared. This involves several key steps, including measuring and marking the placement of the torsion spring, clearing the area for a safe installation process, and ensuring the correct winding direction for the spring.
Measuring and Marking the Torsion Spring’s Placement
Properly measuring and marking the placement of the torsion spring is crucial for a successful installation. Here’s how you can do it:
- Measure the width of your garage door opening from one side to the other using a tape measure. This will give you the required length of the torsion spring.
- Mark the center of the garage door header with a pencil. This will help you align the torsion spring properly.
- Measure the distance from the center mark to the left and right side of the garage door opening. This will ensure that the torsion spring is centered and evenly distributed.
- Using a level, mark a straight line vertically on each side of the center mark. These marks will serve as your reference points for installing the torsion spring.
Clearing the Area for a Safe Installation Process
Creating a safe environment for the installation process is essential to avoid accidents or damage. Follow these steps to clear the area:
- Remove any items or obstructions near the garage door that could get in the way during installation.
- Make sure the garage door is in the closed position to prevent it from accidentally opening or closing during installation.
- Ensure there is enough space for you to move around and work comfortably while installing the torsion spring.
- If necessary, use protective gear such as gloves and safety glasses to protect yourself from any potential hazards.
Ensuring the Correct Winding Direction for the Spring
The winding direction of the torsion spring plays a crucial role in its effectiveness. To ensure you wind the spring correctly, follow these guidelines:
- Check the manufacturer’s instructions or the old spring (if replacing) to determine the correct winding direction.
- Typically, garage doors in North America have a clockwise winding direction for the right-hand side, and a counter-clockwise winding direction for the left-hand side when viewed from inside the garage.
- Make sure to double-check the winding direction before proceeding with the installation.
By properly measuring and marking the torsion spring’s placement, clearing the area for a safe installation, and ensuring the correct winding direction, you are well-prepared to install the torsion spring with confidence and efficiency.
Installing The Torsion Spring: Step-By-Step Process
Installing a torsion spring might seem like a daunting task, but with the right tools and a methodical approach, you can easily complete this project. In this step-by-step guide, we will walk you through the process of installing a torsion spring, ensuring that you follow the correct procedures for optimal performance. By following each step carefully, you can have your torsion spring installed and functioning smoothly in no time.
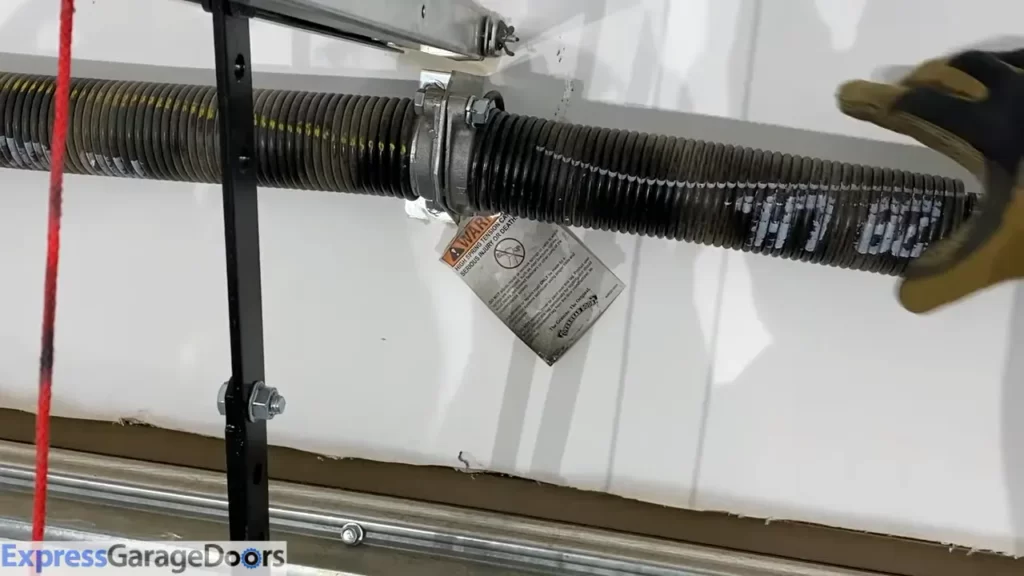
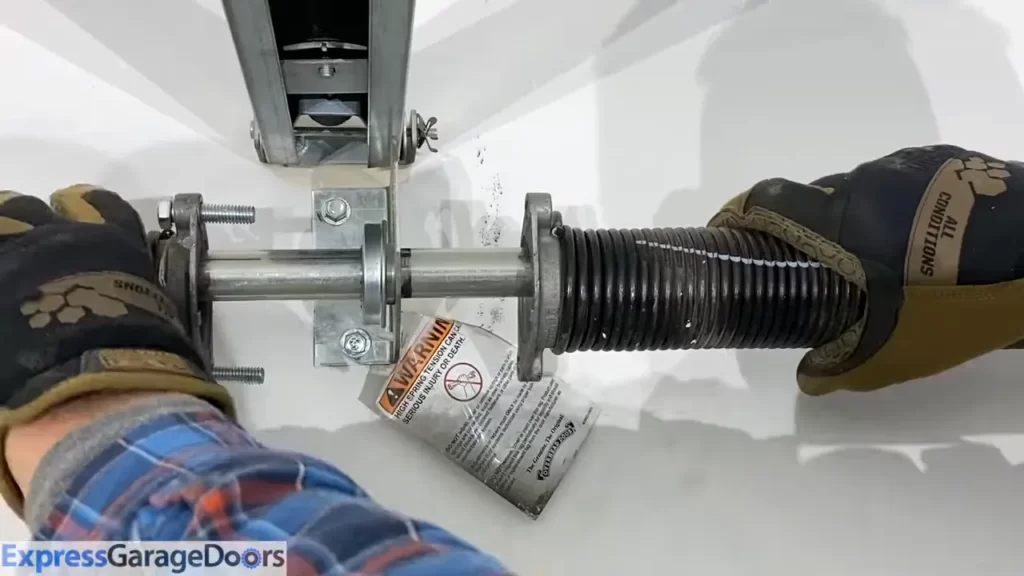
Securing the torsion spring anchor bracket
To begin the installation process, the first step is to secure the torsion spring anchor bracket. This bracket serves as the foundation for the entire torsion spring system. It is vital to ensure that the bracket is securely attached to the wall or ceiling, using appropriate hardware such as bolts or screws. Make sure that the bracket is level and aligned properly, as any misalignment can affect the performance of the torsion spring.
Placing the torsion spring onto the anchor bracket
Once the anchor bracket is securely fastened, it’s time to place the torsion spring onto the bracket. Carefully slide the spring onto the anchor, making sure that it fits snugly and is centered. Take note of the direction in which the spring needs to be wound, as this will depend on the specific type and configuration of the torsion spring. Refer to the manufacturer’s instructions for guidance on placing the spring onto the anchor bracket.
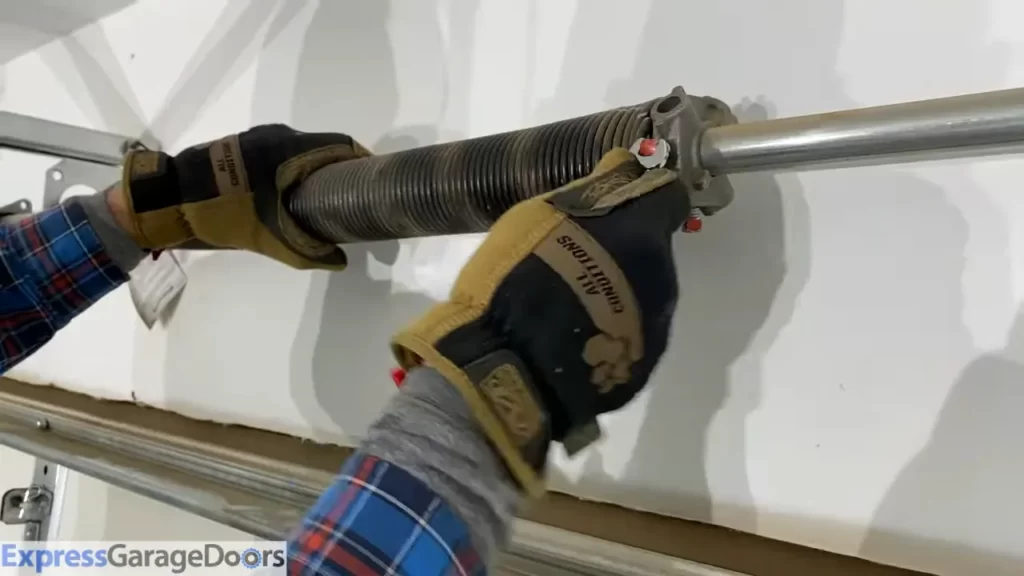
Winding the torsion spring using the correct winding bars
With the torsion spring in place, it’s time to wind it up using the appropriate winding bars. These bars are specifically designed to engage with the spring’s winding cone, allowing you to safely and effectively apply tension to the spring. Insert the winding bars into the winding cone and begin turning them slowly and steadily, following the manufacturer’s recommended number of turns. Take care not to overwind the spring, as this can lead to excessive tension and potential damage.
Adjusting the tension on the spring for optimal performance
Once the spring is wound to the desired tension, the final step is to adjust the tension for optimal performance. Using the winding bars, carefully loosen or tighten the tension on the spring as needed. It is crucial to achieve the proper balance, ensuring that the door operates smoothly and remains stable when opening and closing. Test the door’s functionality and make any necessary adjustments to the spring tension until it operates smoothly and effectively.
By following this step-by-step process for installing a torsion spring, you can ensure that your garage door or other application operates safely and smoothly. Remember to always prioritize safety during the installation process and consult professional help if you are unsure or uncomfortable with any step.
Testing And Adjusting The Torsion Spring
Testing and adjusting the torsion spring of your garage door is a crucial step in ensuring its smooth and efficient operation. Proper testing and adjustment will not only extend the lifespan of the torsion spring but also prevent potential safety hazards. In this section, we will guide you through the process of checking the balance of the garage door, fine-tuning the tension for smooth operation, and troubleshooting common issues.
Checking the balance of the garage door
Checking the balance of your garage door is the first step in determining whether the torsion spring needs adjustment. To do this, follow these simple steps:
- Ensure the garage door is closed and disconnected from the opener.
- Manually lift the garage door halfway and release it.
- If the door stays in place, it is perfectly balanced. However, if it starts to close or open on its own, the torsion spring may need adjustment.
Fine-tuning the tension for smooth operation
Fine-tuning the tension of the torsion spring will help achieve a smooth and balanced movement of the garage door. Follow these steps for accurate adjustment:
- Identify the winding cone at the end of the torsion spring shaft.
- Using a winding bar, insert it into one of the holes on the winding cone.
- Apply steady pressure in the opposite direction of the spring’s wind, increasing the tension slightly.
- Test the operation of the garage door by raising and lowering it manually several times, checking for smooth and balanced movement.
- Repeat the adjustment process until the desired tension and smooth operation are achieved.
Troubleshooting common issues and making necessary adjustments
Even after testing and adjusting the torsion spring, you may encounter certain issues that require further tweaking. Here are some common problems and their possible solutions:
| Problem | Solution |
|---|---|
| The garage door opens or closes too quickly | Decrease the tension of the torsion spring by releasing some of the pressure on the winding cone. |
| The garage door doesn’t fully open or close | Increase the tension of the torsion spring by applying more pressure on the winding cone. |
| The garage door makes excessive noise during operation | Inspect the garage door’s hardware for any loose or worn components. Tighten or replace as necessary. |
By taking the time to test, adjust, and troubleshoot your torsion spring, you ensure the optimal performance and longevity of your garage door. Always prioritize safety, and if you encounter any issues beyond your expertise, do not hesitate to seek professional assistance. Invest in the proper maintenance of your torsion spring, and enjoy the reliability and convenience it brings to your daily life.
Safety Tips And Best Practices
When it comes to installing a torsion spring, safety should be your top priority. Mishandling or improper installation of torsion springs can be extremely dangerous and lead to serious injuries. In this section, we will discuss important safety precautions to follow, the proper use of personal protective equipment (PPE), and regular maintenance and inspection to ensure the spring’s longevity.
Important safety precautions to follow during installation
Before you begin the installation process, it’s crucial to understand and follow these safety precautions:
- Ensure that you have a clear and clutter-free working area. Remove any tools, equipment, or debris that may pose a tripping hazard.
- Always work with a partner. Having an extra set of hands can greatly reduce the risk of accidents.
- Make sure to read and thoroughly understand the manufacturer’s instructions before starting the installation. Each torsion spring may have specific requirements and guidelines.
- Wear appropriate safety goggles or glasses to protect your eyes from any flying debris or particles.
- Use gloves to protect your hands from sharp edges and potential pinching hazards.
- Be cautious of the tension stored within the torsion spring. Never attempt to unwind or adjust the spring without proper knowledge and tools.
- Never stand directly underneath a torsion spring, as sudden release of tension can cause serious injuries.
Proper use of personal protective equipment (PPE)
When working with torsion springs, it is essential to utilize personal protective equipment (PPE) to minimize the risk of injury. Here’s a list of PPE to consider:
| PPE | Usage |
| Safety goggles or glasses | To protect your eyes from potential projectiles or debris. |
| Gloves | To shield your hands from sharp edges and pinching hazards. |
| Hard hat | To protect your head from any accidental falls or impacts. |
| Work boots | To provide stability and protect your feet from heavy objects. |
| Earplugs or earmuffs | To minimize the impact of loud noises from power tools used during installation. |
By utilizing proper PPE, you can significantly reduce the risk of injuries while installing a torsion spring.
Regular maintenance and inspection to ensure the spring’s longevity
Once the torsion spring installation is complete, regular maintenance and inspection are crucial to ensure its longevity and safe operation. Here are a few key practices to follow:
- Inspect the spring regularly for signs of wear, damage, or rust. Replace any worn or damaged parts promptly.
- Keep the spring clean by removing any dirt, dust, or debris that may accumulate over time. Use a soft cloth or brush to gently wipe away the contaminants.
- Apply a silicone-based lubricant to the spring and other moving parts as recommended by the manufacturer. This will help reduce friction and keep the spring functioning smoothly.
- Avoid any modifications to the torsion spring without professional guidance. Altering the spring can compromise its integrity and safety.
- Consider scheduling routine professional inspections to ensure the torsion spring is in optimal condition.
By following these maintenance and inspection practices, you can prolong the lifespan of your torsion spring and ensure its safe operation over time.
Hiring A Professional Vs. Diy Installation
Installing a torsion spring can be a daunting task, especially for those without experience in garage door maintenance. While some homeowners prefer the challenge of a DIY installation, others find it more practical and reassuring to hire a professional. In this section, we will discuss the pros and cons of hiring a professional for torsion spring installation and provide guidance on how to decide whether to hire a professional or tackle the installation yourself.
Pros and cons of hiring a professional for torsion spring installation
Pros:
- Expertise and experience: Professionals who specialize in garage door repairs have a wealth of knowledge and experience in handling torsion springs. They are familiar with the intricacies of the installation process and can ensure that it is done correctly the first time.
- Time-saving: By hiring a professional, you can save valuable time and effort. They have the necessary tools and equipment to complete the installation efficiently, allowing you to focus on other important tasks.
- Safety: Torsion springs are under high tension and can cause serious injury or property damage if mishandled. Professionals are trained to handle these springs safely, minimizing the risk of accidents during the installation process.
- Warranty and guarantees: Reputable professionals often provide warranties and guarantees on their work. This can give you peace of mind, knowing that any issues that may arise after installation will be taken care of.
Cons:
- Cost: Hiring a professional for torsion spring installation can be more expensive than attempting a DIY installation. However, it is important to weigh this cost against the potential risks and challenges associated with a DIY approach.
- Availability: Depending on your location and the availability of professionals in your area, scheduling an appointment may take time. If your garage door is in urgent need of repair, a DIY installation might be a more viable option.
- Limited learning opportunity: If you enjoy learning new skills and taking on DIY projects, hiring a professional may deprive you of the chance to learn about torsion spring installation and other aspects of garage door maintenance.
How to decide whether to hire a professional or tackle the installation yourself
Deciding whether to hire a professional or handle the torsion spring installation yourself depends on various factors. Consider the following tips to make an informed decision:
- Assess your skill set: Evaluate your familiarity with garage door mechanisms and your comfort level in handling complex installations. If you lack experience or have reservations about attempting the installation independently, it may be wise to hire a professional.
- Evaluate the risks: Torsion springs are under high tension and can be dangerous if not handled properly. If you have concerns about your safety or the potential for property damage, it is advisable to seek professional assistance.
- Consider time and convenience: DIY installations require time, research, and effort. If you have a busy schedule or limited availability, it might be more practical to hire a professional who can complete the installation efficiently.
- Weigh the costs: Compare the costs associated with hiring a professional and the potential expenses of a DIY installation gone wrong. Remember to consider the value of your time and the potential risks involved.
Ultimately, the decision to hire a professional or tackle the torsion spring installation yourself depends on your individual circumstances and comfort level. Keep in mind that safety should always be a top priority, and if in doubt, it is advisable to seek professional assistance.
Frequently Asked Questions
Can I Replace A Torsion Spring Myself?
Yes, you can replace a torsion spring yourself. Just make sure to follow proper instructions and safety precautions. If you feel confident and comfortable working with garage door components, it can save you money. However, for complex or risky replacements, it’s advisable to hire a professional.
How Do You Replace A Torsion Spring?
To replace a torsion spring, follow these steps: 1. Ensure safety by wearing protective gear. 2. Release tension from the old spring by unwinding it. 3. Remove the old spring from the torsion shaft. 4. Install the new spring onto the shaft.
5. Gradually wind the new spring to the desired tension level. Remember, it’s crucial to hire a professional if you lack experience or encounter difficulties.
How Are Torsion Springs Attached?
Torsion springs are attached by mounting them securely to a stationary object, such as a wall or ceiling. This allows the spring to rotate and store energy when twisted. Careful installation is necessary to ensure proper functioning and safety.
Are Torsion Springs Directional?
Yes, torsion springs are directional. They must be installed in a specific way to ensure proper functioning.
Conclusion
Installing a torsion spring may seem daunting, but with the right approach, it can be a manageable task. By following the step-by-step instructions outlined in this guide, you can successfully install a torsion spring and ensure the smooth operation of your garage door.
Remember to prioritize safety and take your time during the installation process. With patience and caution, you’ll have your torsion spring up and running in no time. Happy installing!