
To install a toilet tank gasket, first, remove the old gasket and clean the area thoroughly. Then, place the new gasket on the tank, aligning it properly.
Installing a toilet tank gasket is an essential part of maintaining a leak-free toilet. A worn-out or faulty gasket can cause water leaks around the base of the toilet, leading to potential water damage and increased water bills. By following a few simple steps, you can easily replace the gasket and ensure a proper seal between the tank and the bowl.
In this guide, we will walk you through the process of installing a toilet tank gasket, helping you save money on potential repairs and maintain the functionality of your toilet. Let’s jump right into it and learn how to install a toilet tank gasket in a few easy steps.
Factors To Consider When Selecting A Toilet Tank Gasket
Installing a toilet tank gasket is a crucial step in ensuring a leak-free and efficient toilet system. When selecting the right gasket for your toilet, there are a few key factors to consider. The material of the gasket, its compatibility with your toilet model, and its overall quality are essential aspects to pay attention to. Let’s take a closer look at each of these factors in detail.
Material: Rubber, Foam, or Wax
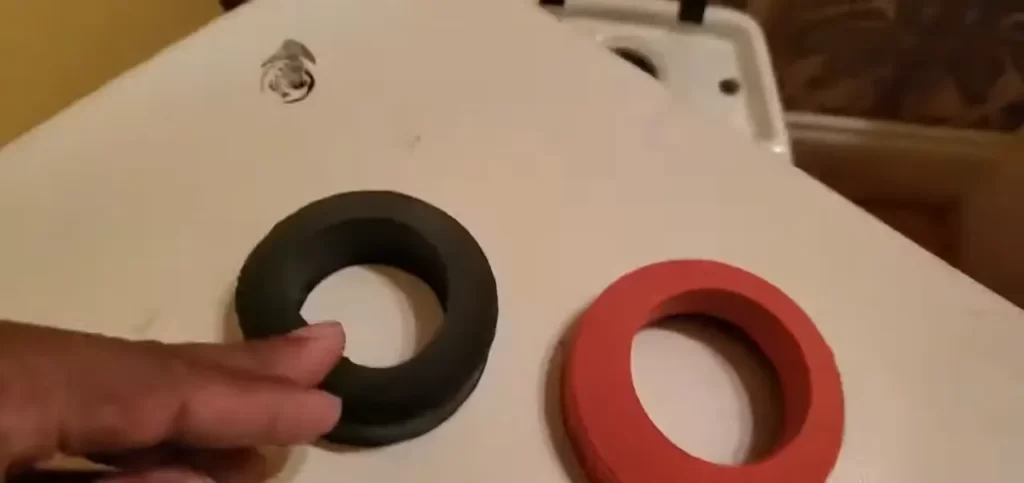
The material of the gasket plays a significant role in its performance and durability. Generally, there are three common options available: rubber, foam, and wax. Each material has its pros and cons, so it’s important to choose one that suits your specific needs.
- Rubber: Rubber gaskets are widely used and known for their flexibility, making them easy to install and provide a tight seal. They are resistant to water and chemicals, ensuring long-lasting performance. Rubber gaskets are also less likely to break or crack over time, making them a reliable choice.
- Foam: Foam gaskets are an affordable option and are popular due to their ability to conform to irregular surfaces. They provide a reliable seal and are resistant to chemicals and water. Foam gaskets are also easy to cut to size, ensuring a perfect fit for your toilet tank.
- Wax: Wax gaskets have been used for many years and have a proven track record of effectively sealing toilet tanks. They create an airtight seal, preventing any leaks. Wax gaskets are durable and can withstand pressure and temperature changes. However, they can be messy to work with during installation and may require replacement after several years.
Compatibility: Ensure it Fits Your Toilet Model
When selecting a toilet tank gasket, it is crucial to ensure compatibility with your specific toilet model. Different toilets have varying designs and dimensions, so it’s important to choose a gasket that fits perfectly. Refer to your toilet’s user manual or consult a professional if needed to determine the exact specifications required. Using an ill-fitting gasket can result in leaks and inefficiencies.
Quality: Look for Durability and Leak Resistance
The quality of the gasket is paramount in preventing leaks and maintaining the integrity of your toilet system. Look for gaskets that are durable and made from high-quality materials to ensure long-lasting performance. Seek out gaskets that are specifically designed to be leak-resistant, as this will help save water and prevent potential damage to your bathroom floor. Reading product reviews and purchasing from reputable brands can help ensure you are getting a high-quality gasket.
In conclusion, when selecting a toilet tank gasket, consider its material, compatibility with your toilet model, and overall quality. This will ensure you find a gasket that provides a secure and leak-free seal, promoting the efficiency and longevity of your toilet system.
Shutting Off The Water Supply To The Toilet
Before you begin replacing a toilet tank gasket, it’s crucial to shut off the water supply to the toilet. This step ensures that you won’t have any water spilling out while you work, preventing any potential mess or accidents. In this section, we’ll guide you through the process of locating the shut-off valve and turning it off properly.
Locate the shut-off valve
The shut-off valve is usually located close to the base of the toilet, typically on the lower left or right side. It’s crucial to find this valve before proceeding with any repairs or replacements. Here’s how you can locate it:
- Start by visually inspecting the area around the toilet. Look for a small metal or plastic knob attached to a pipe.
- Check the walls near the toilet. In some cases, the shut-off valve may be mounted on the wall instead of being positioned directly on the floor.
- If you’re having trouble locating the valve, don’t worry. In certain setups, the shut-off valve might be hidden behind a decorative cover or panel. Take a moment to check behind these coverings.
Once you’ve located the shut-off valve, you’re ready to move on to the next step.
Turn the valve clockwise to close it
Now that you’ve found the shut-off valve, it’s time to turn it off. This simple action will stop the flow of water to the toilet. Follow these steps to safely shut off the water supply:
- Ensure you have a good grip on the valve handle.
- Using your hand or a wrench, turn the valve handle clockwise. Keep turning until you can no longer rotate the handle.
- As you turn the valve, you’ll feel some resistance. This resistance is a sign that the valve is closing. Keep turning until the valve is fully closed and the water flow stops.
Remember to double-check that the valve is entirely closed. You can do this by flushing the toilet and observing if it doesn’t refill with water. Once you’ve confirmed that the water supply to the toilet is shut off, you can proceed with confidence to install the new toilet tank gasket.
By following these easy steps to shut off the water supply to your toilet, you’re ensuring a smooth and safe gasket replacement process. Taking this precautionary measure will help you avoid any potential water damage or accidents. Now that you’re ready to move forward, let’s move on to the next step: removing the toilet tank.
Draining The Tank And Removing The Old Gasket
To ensure a tight seal between the toilet tank and bowl, it is essential to have a properly installed toilet tank gasket. This small but crucial component prevents leaks and keeps your bathroom free from water damage. In this section, we will guide you through the process of draining the tank and removing the old gasket, setting the foundation for a successful installation. Let’s get started!
Flush the toilet to drain the tank
The first step in this process is to flush the toilet to drain the tank. This will remove most of the water, making it easier to work on the gasket. To do this, simply press and hold the flush handle until all the water is drained from the tank.
Use a sponge to remove any remaining water
Even after flushing, there might still be some water left in the tank. To ensure a dry working area, take a sponge and absorb any remaining water from the tank. Start from the bottom and work your way up, making sure to remove as much moisture as possible.
Carefully remove the old gasket
Now that the tank is drained, you can proceed to remove the old gasket. This step requires caution and precision to avoid damaging the surrounding components. Using a wrench, gently loosen the nuts connecting the tank to the bowl. Once they are loose, lift the tank slightly and set it onto a towel or soft surface to avoid any breakage.
Next, locate the old gasket positioned between the tank and bowl. Carefully remove it, making sure to not leave any residue behind. Inspect the gasket for any signs of wear or damage, as this might explain previous leaks or issues. If necessary, make a note of the gasket size to ensure a proper replacement.
As you remove the old gasket, it’s essential to be gentle and avoid using excessive force. The gasket should come off smoothly, without leaving any bits or pieces stuck to the tank or bowl. Once the old gasket is completely removed, set it aside for proper disposal.
By following these steps to drain the tank and remove the old gasket, you are well on your way to a successful installation. In the next section, we will guide you through the process of preparing the new gasket and installing it to ensure a watertight seal. Stay tuned for our step-by-step instructions!
Preparing The Toilet Tank And Gasket
Clean the tank and gasket area
Before installing a new toilet tank gasket, it is essential to clean the tank and the gasket area thoroughly. This ensures that the new gasket adheres properly and prevents any leakage in the future. Follow these steps to clean the tank and gasket area:
- First, turn off the water supply to the toilet by closing the shut-off valve.
- Flush the toilet to empty the tank completely.
- Use a sponge or cloth to wipe away any remaining water from the tank.
- Next, remove the tank lid and set it aside in a safe place.
- Inspect the gasket area for any dirt, debris, or old gasket remnants. If you notice any, use a mild detergent or toilet bowl cleaner and a brush to scrub the area gently.
- Rinse the tank and gasket area thoroughly to remove any cleaning residue.
- Finally, use a clean cloth to dry the tank and gasket area completely before proceeding with the installation of the new gasket.
Ensure a proper fit for the new gasket
To ensure a proper fit for the new toilet tank gasket, follow these steps:
- Locate the gasket groove on the bottom of the toilet tank. This groove will hold the gasket firmly in place.
- Inspect the gasket for any signs of damage or wear. If the gasket is cracked, torn, or brittle, it is recommended to replace it with a new one.
- Carefully place the new gasket into the groove, ensuring it is aligned with the flush valve opening.
- Press down on the gasket firmly to ensure a tight fit. Make sure the gasket is evenly seated in the groove without any gaps.
- If necessary, adjust the position of the gasket to ensure it covers the entire flush valve opening. This will help create a watertight seal.
- Once the gasket is in place, double-check that it is securely positioned and ready for the tank to be reattached to the bowl.
By cleaning the tank and gasket area thoroughly and ensuring a proper fit for the new gasket, you can successfully install a toilet tank gasket that will prevent water leakage and maintain the functionality of your toilet.
Placing And Aligning The Gasket
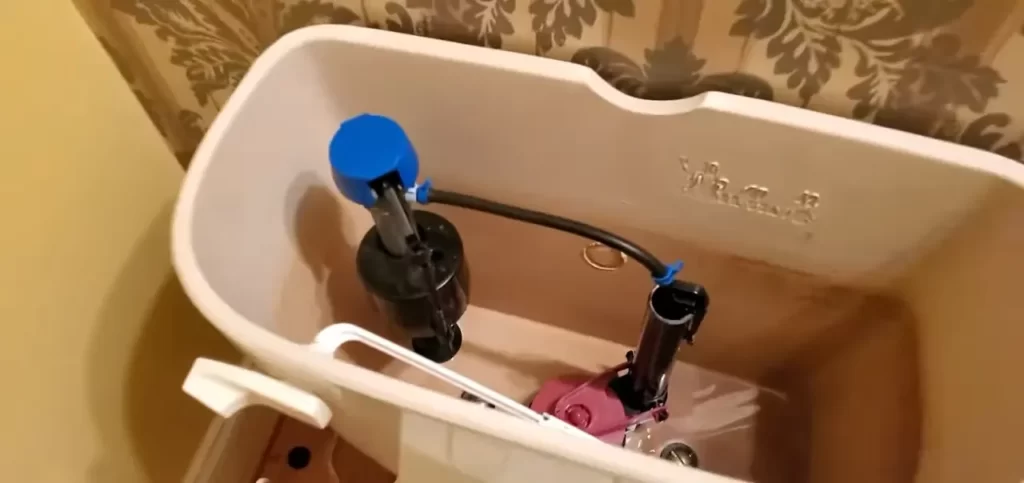
Position the gasket on the flush valve opening
When it comes to installing a toilet tank gasket, one crucial step is placing the gasket on the flush valve opening. This is where the gasket will create a watertight seal between the tank and the bowl. To position the gasket correctly, follow these simple steps:
- Start by removing the tank lid and setting it aside in a safe place.
- Carefully inspect the flush valve opening on the bottom of the tank. Make sure it is clean and free of any debris that may prevent a proper seal.
- Take the gasket and align it with the flush valve opening. The gasket should have a round shape with a central hole that fits snugly around the opening.
- Gently press the gasket onto the flush valve opening, making sure it is centered and covers the entire opening. Apply even pressure to ensure a secure fit.
Align it correctly with the tank
Once the gasket is in position on the flush valve opening, the next step is to align it correctly with the tank. Proper alignment is crucial for a tight seal and to prevent any leaks. Follow these steps to align the gasket with the tank:
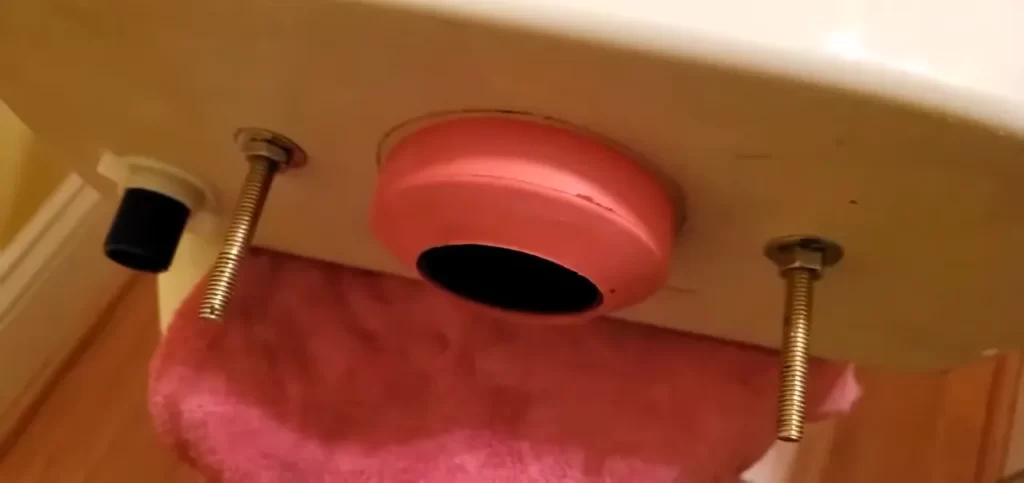
- With the gasket in place on the flush valve opening, position the tank over the bowl. Hold it steady and make sure it is aligned correctly.
- Lower the tank onto the bowl, ensuring that the gasket is sandwiched between the tank and the bowl.
- As you lower the tank, align the mounting bolts with the corresponding holes on the bowl. These bolts will secure the tank to the bowl.
- Once the tank is in place, tighten the mounting bolts using a wrench. Be careful not to overtighten, as this could damage the gasket or the tank.
By following these steps, you can easily position and align the gasket on the flush valve opening and tank. This will ensure a proper seal, preventing any leaks and keeping your toilet functioning efficiently. Now that you have successfully completed this step, you are one step closer to installing your toilet tank gasket.
Securing The Gasket And Reattaching The Tank
Once you have successfully positioned the toilet tank gasket in place, you can proceed to secure it and reattach the tank. Following these steps will ensure a secure and leak-free installation.
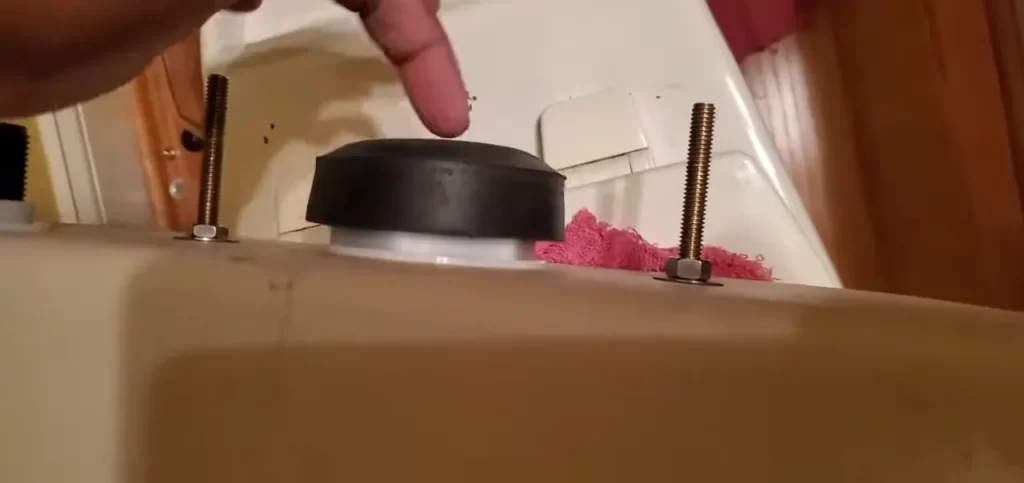
Gently press the gasket into place
Place your hands on each side of the toilet tank and gently press down. This will help the gasket adhere to the base of the toilet bowl, creating a tight seal. Applying even pressure will ensure that the gasket is properly aligned and will prevent any leaks from occurring.
Tighten the tank bolts to secure it
Locate the tank bolts at the bottom of the toilet tank. Using a wrench, tighten the bolts clockwise until they are secure. Be careful not to overtighten the bolts, as this can cause damage to the tank or the gasket. Remember, the goal is to create a snug fit, not to tighten the bolts as much as possible.
Reattach the supply line and turn on the water
Next, reattach the supply line to the bottom of the toilet tank. Make sure the connection is secure and there are no leaks. Once the supply line is reattached, turn on the water supply. Keep an eye on the tank and the surrounding area for any signs of leakage. If everything looks good, you have successfully installed the toilet tank gasket.
By following these steps, you can ensure that your toilet tank is properly secured with a new gasket. A well-installed gasket will prevent leaks and keep your bathroom free from any unsightly water damage. Now that you know how to secure the gasket and reattach the tank, you can confidently tackle this DIY project and enjoy a leak-free toilet for years to come.
Checking For Any Leakage
Checking for any leakage is an important step in the installation process of a toilet tank gasket. Ensuring that there are no leaks will help prevent future issues and maintain the proper functioning of your toilet. Below are the steps to follow to check for any signs of leakage.
Fill the tank with water
The first step in checking for leakage is to fill the tank with water. Slowly pour water into the tank until it is almost full, stopping about an inch below the overflow tube. Take care not to overflow the tank.
Observe for any signs of leakage
Once the tank is filled with water, it is time to observe for any signs of leakage. Keep a close eye on the tank and the areas around it. Look for any drips, puddles, or wet spots that may indicate a leak.
While observing for leakage, make sure to check the following areas:
- The base of the toilet tank: Look for water dripping from the base of the tank onto the floor. This could indicate a faulty gasket or loose connection.
- The bolts and washers: Inspect the bolts and washers that secure the tank to the bowl. Check for any water seepage around them, as this may suggest a need for tightening or replacing them.
- The water supply line: Examine the water supply line that connects the tank to the water source. Look for any drips or water accumulation near the connection points.
- The flush valve: Inspect the flush valve located at the bottom center of the tank. Ensure there are no visible signs of water leakage or pooling around the valve.
If you notice any leakage during the observation process, it is important to address it promptly. Leaks can waste water, increase water bills, and cause damage if left unattended.
By taking the time to thoroughly check for any signs of leakage, you can ensure the proper installation of your toilet tank gasket and minimize the risk of future issues.
Adjusting The Gasket If Needed
One of the most common issues that homeowners face after installing a toilet tank gasket is leakage. If you notice water seeping out from the base of the toilet or see wet spots on the floor, it might indicate a problem with the gasket’s position. Fortunately, adjusting the gasket is a simple task that can help you achieve a tight seal and prevent any further leaks.
If there’s leakage, adjust the gasket position
If you notice any leakage after installing the toilet tank gasket, the first step is to check its position. With wear and tear or improper installation, the gasket might shift, causing water to escape. To address this issue, you’ll need to adjust the gasket to ensure it is properly aligned with the fitting on the toilet tank.
Avoid over-tightening the bolts as this can lead to damage or cracking of the toilet tank. Instead, start by slightly loosening the bolts and then reposition the gasket to align it with the opening in the tank. Use your hands to gently push or pull the gasket until it fits properly. Remember to wear gloves for hygiene purposes.
Ensure a tight seal without over-tightening
Once you’ve adjusted the gasket’s position, it’s crucial to ensure a tight seal without over-tightening the bolts. Over-tightening can damage the gasket or the toilet tank and compromise the effectiveness of the seal. To avoid this, tighten the bolts gradually and evenly, alternating between each bolt until they are securely in place. A quarter turn with a wrench is usually sufficient, but make sure not to apply excessive force.
After tightening the bolts, check for any signs of leakage again. If there are no visible leaks and the toilet flushes and refills properly, then you have successfully adjusted the gasket. However, if leakage persists, you might need to repeat the adjustment process or consider replacing the gasket entirely.
Remember, a properly installed and adjusted toilet tank gasket is essential for maintaining a leak-free and functional toilet. By following these steps and ensuring a tight seal without over-tightening the bolts, you can resolve any leakage issues and enjoy a hassle-free toilet experience.
Gasket Misalignment Or Improper Fit
Remove and Reposition the Gasket
If you are experiencing gasket misalignment or an improper fit on your toilet tank, the first step is to remove the gasket and reposition it correctly. This can help create a proper seal and prevent leaks or other issues. Here’s how you can do it:
- Turn off the water supply: Before you begin, make sure to turn off the water supply to the toilet. Look for the shut-off valve near the base of the toilet and turn it clockwise to stop the flow of water.
- Empty the tank: Flush the toilet to empty the tank. This will help get rid of any remaining water and make the gasket removal process easier.
- Remove the toilet tank: Carefully unscrew the nuts and bolts that secure the toilet tank to the bowl. Once the tank is detached, set it aside on a soft surface to avoid any damage.
- Identify the gasket: Locate the gasket between the toilet tank and bowl. It is usually a rubber or foam ring that helps create a seal.
- Remove the gasket: Gently lift the gasket from its position. It may be adhered to the toilet by a sealant, so take your time and use a putty knife if necessary to loosen it.
- Reposition the gasket: Once the gasket is removed, examine it for any signs of damage or wear. If it’s still in good condition, clean it thoroughly and position it back in place, making sure it fits snugly between the tank and the bowl.
- Reassemble the toilet: With the gasket repositioned, carefully reattach the toilet tank to the bowl. Secure the nuts and bolts, but be cautious not to overtighten them, as it may cause damage. Finally, turn on the water supply and check for any leaks.
Remember, correctly positioning the gasket is crucial to ensure a proper seal between the toilet tank and bowl. Proper alignment minimizes the risk of leaks and helps maintain the functionality of your toilet. By following these steps, you can address gasket misalignment or fit issues efficiently.
Consider Replacing with a Better-Fitting Gasket
If you continue to experience issues with gasket misalignment or an improper fit, it may be time to consider replacing the gasket with one that fits better. A tight and secure fit is essential for a reliable toilet seal. Here are a few things to keep in mind when selecting a replacement gasket:
- Measurements: Take accurate measurements of the toilet tank opening and the bowl’s outlet. This will help you choose a gasket with the right dimensions for your toilet.
- Material: Opt for a gasket made from high-quality materials such as rubber or foam. These materials offer durability and flexibility, ensuring a long-lasting and secure fit.
- Compatibility: Check whether the replacement gasket is compatible with your specific toilet model. Each toilet may have unique requirements, so it’s essential to choose a gasket that fits your toilet perfectly.
By replacing the gasket with a better-fitting option, you can resolve any ongoing gasket misalignment or improper fit issues effectively. Remember to follow the manufacturer’s instructions during the installation process to ensure optimal results.
Persistent Leakage Or Inadequate Seal
If you’re experiencing persistent leakage or an inadequate seal with your toilet tank, it’s time to take action. A properly functioning toilet tank gasket is crucial for preventing leaks and ensuring a tight seal between the tank and bowl. In this guide, we’ll walk you through the steps to address this issue and restore the seal to your toilet tank.
Check for cracks or damage on the gasket
The first step in addressing persistent leakage is to inspect the gasket for any cracks or damage. Over time, gaskets can deteriorate or become worn, compromising their ability to create a tight seal. To check for cracks or damage:
- Turn off the water supply to the toilet tank.
- Remove the lid of the tank and set it aside.
- Locate the gasket between the tank and bowl.
- Inspect the gasket carefully, looking for any signs of cracks, tears, or deterioration.
If you notice any cracks or damage on the gasket, it will need to be replaced. You can find replacement gaskets at your local hardware store or online. Make sure to purchase the correct size and style for your specific toilet model.
Apply plumber’s putty or silicone sealant as needed
If the gasket appears to be in good condition but you’re still experiencing leakage, applying plumber’s putty or silicone sealant can help create a better seal. Here’s how to do it:
- Turn off the water supply to the toilet tank.
- Remove the lid of the tank and set it aside.
- Inspect the gasket for any cracks or damage, and replace if necessary.
- Apply a thin layer of plumber’s putty or silicone sealant around the underside of the gasket.
- Ensure that the putty or sealant covers the entire circumference of the gasket.
- Reattach the tank to the bowl, making sure the gasket is properly aligned.
- Tighten the tank bolts evenly to secure the tank in place.
- Turn on the water supply and check for any leaks.
By following these steps and addressing any cracks or damage to the gasket, as well as applying plumber’s putty or silicone sealant if necessary, you can eliminate persistent leakage and ensure a tight seal in your toilet tank. Remember to always follow safety precautions and refer to your toilet manufacturer’s instructions for specific guidance on your particular model.
Professional Help And When To Call A Plumber
While installing a toilet tank gasket can be a relatively straightforward DIY project, there may be instances when it’s best to seek professional help. Sometimes, despite our best efforts, our DIY attempts can prove unsuccessful. In such cases, it’s important to recognize when it’s time to call a plumber.
When DIY attempts are unsuccessful
There are several reasons why your DIY attempt to install a toilet tank gasket may be unsuccessful. Here are some common issues that could arise:
- The gasket does not fit properly: In some cases, the gasket you purchased may not be the correct size or design for your toilet tank. This can lead to leaks or an insecure fit.
- Difficulty accessing the tank: Depending on the setup of your bathroom, you may encounter challenges in reaching the toilet tank or maneuvering around tight spaces. This can make installation cumbersome and increase the likelihood of errors.
- Inadequate plumbing knowledge: If you lack experience or knowledge in plumbing, attempting to install a toilet tank gasket could result in mistakes that can impact the functionality and longevity of your toilet.
If you encounter any of these challenges or find that your DIY attempt is not resolving the issue, it’s best to consider seeking professional help. A plumber has the expertise and tools to efficiently identify and fix the problem, saving you time and potential frustrations.
If there are persistent issues or complex problems
Even if your initial DIY attempt at installing a toilet tank gasket seemed successful, persistent issues or complex problems may arise over time. Here are some indicators that it’s time to call a plumber:
- Continuous leaking: If you notice that the gasket is consistently leaking despite your DIY installation, it could be a sign of a more complex underlying issue that needs professional attention.
- Structural damage: If you discover any signs of structural damage around the toilet or surrounding areas, such as water stains or weakened flooring, it’s crucial to involve a plumber. They can assess the situation and provide the necessary repairs to prevent further damage.
- Issues beyond gasket installation: Sometimes, what appears to be a gasket problem may actually be an indication of a larger plumbing issue. A plumber will be able to diagnose the root cause of the problem and offer appropriate solutions.
Remember, your toilet is an essential fixture in your home, and any issues with its functionality can significantly impact your daily life. By recognizing the signs that professional help is needed, you can ensure that your toilet operates smoothly and avoid potential future headaches.
Frequently Asked Questions
How Do You Put A Gasket On A Toilet Tank?
To put a gasket on a toilet tank, start by turning off the water supply valve. Then, remove the tank lid and the old gasket if there is one. Position the new gasket on the tank bottom, aligning the mounting holes.
Place the tank back on the bowl and tighten the bolts. Finally, reconnect the water supply and check for any leaks.
How Do You Replace A Rubber Seal On A Toilet Tank?
To replace the rubber seal on a toilet tank, follow these steps: 1. Turn off the water supply to the toilet. 2. Flush the toilet to drain the water from the tank. 3. Remove the tank lid and locate the seal.
4. Carefully lift the seal off. 5. Place the new seal and press it firmly into position. 6. Turn the water supply back on and check for any leaks.
Is There A Gasket Between The Tank And Bowl Of A Toilet?
Yes, there is a gasket between the tank and bowl of a toilet. It helps create a watertight seal to prevent leaks. Gaskets are typically made of rubber or similar materials.
Are All Toilet Tank Gaskets The Same Size?
Toilet tank gaskets are not all the same size. It’s important to measure your old gasket or check the manufacturer’s specifications to ensure a proper fit. Use a gasket that matches the size of your toilet tank for a secure and leak-free seal.
Conclusion
To sum up, installing a toilet tank gasket doesn’t have to be a daunting task. By following the step-by-step guide outlined in this blog post, you can easily replace a worn or damaged gasket and prevent leaks in your toilet tank.
Remember to shut off the water supply, clean the area thoroughly, and ensure a proper seal for optimal functionality. With the right tools and a little patience, you’ll have your toilet up and running smoothly in no time. Happy fixing!