
To install a toilet shut off valve, turn off the water supply, drain the toilet tank, disconnect the water supply line, and then connect the shut off valve to the water supply line. Now, let’s explore the step-by-step process of installing a toilet shut off valve to ensure a proper and efficient installation.
Installing a shut off valve for your toilet is an essential task that allows you to control the water supply to your toilet easily. Whether you’re replacing an old valve or installing a new one, this guide will provide you with the necessary steps to complete the installation successfully.
By following these steps, you can ensure a functional shut off valve that will make future maintenance and repairs much easier.
Understanding The Different Types Of Toilet Shut Off Valves
When it comes to installing or replacing a toilet shut off valve, it’s important to understand the different types available. Each type has its own unique features and benefits, so choosing the right one for your needs is crucial. In this article, we will explore the four main types of toilet shut off valves: Ball Valve, Gate Valve, Compression Valve, and Angle Valve.
Ball Valve
A ball valve is one of the most popular types of shut off valves used in toilets. It features a lever or handle that, when turned, opens or closes a small ball inside the valve. This mechanism allows for quick and easy shut off of water supply to the toilet. Ball valves are known for their reliability and durability, making them a top choice for many homeowners.
Gate Valve
A gate valve, also known as a knife valve, is another common type of toilet shut off valve. It operates by raising and lowering a gate or wedge inside the valve to control the flow of water. Gate valves provide a full flow of water when fully open, but they can be slower to shut off compared to ball valves. Despite this, they are still widely used in residential plumbing systems.
Compression Valve
A compression valve, as the name suggests, uses compression to control water flow. It features a rubber washer or O-ring that compresses against a brass or plastic seat when the valve is closed. This creates a secure seal and prevents any water from passing through. Compression valves are known for their simplicity and affordability, making them a popular choice for DIY enthusiasts.
Angle Valve
An angle valve, also referred to as a stop valve or corner valve, is designed to be installed at an angle in tight spaces. It has an L-shaped body that allows for easy connection of the water supply line and the toilet. Angle valves can be found in both ball and compression valve configurations, offering versatility for various plumbing setups.
In conclusion, understanding the different types of toilet shut off valves is essential for any homeowner or DIY enthusiast. Whether you opt for a ball valve, gate valve, compression valve, or angle valve, each type has its own advantages and considerations. By choosing the right valve for your specific needs, you can ensure a reliable and efficient shut off mechanism for your toilet.
Gathering The Necessary Tools And Materials
Before you begin the process of installing a toilet shut off valve, it is essential to gather all the tools and materials you will need. Having everything prepared in advance will make the installation process smoother and more efficient. Here are the items you will require:
Adjustable Wrench
An adjustable wrench is a versatile tool necessary for this installation. It allows you to easily loosen and tighten nuts and bolts of varying sizes. When selecting an adjustable wrench, make sure to choose one that fits comfortably in your hand and has a sturdy grip.
Pipe Cutter
A pipe cutter is an essential tool for cutting through copper or plastic pipes. It creates a clean and precise cut, ensuring a proper fit for the shut off valve. When using a pipe cutter, remember to apply steady pressure and rotate it around the pipe in a circular motion until the pipe is fully cut.
Teflon Tape
Teflon tape, also known as plumber’s tape, is a thin white tape used to create a watertight seal on threaded pipe fittings. Applying Teflon tape to the threads of the shut off valve will prevent any leakage and ensure a secure connection.
Towels or Rags
Having towels or rags on hand is crucial during this installation process. They come in handy when cleaning up any excess water or spills that may occur. Additionally, they can be used to protect the floor or surrounding area from water damage.
By gathering these tools and materials beforehand, you will be fully prepared to tackle the task of installing a toilet shut off valve. Now that everything is organized, let’s proceed to the next steps of the installation process.
Step 1: Shut Off The Water Supply
Before you begin installing a toilet shut off valve, it is crucial to shut off the water supply. This step is essential to prevent water from gushing out while you work, saving you from unnecessary mess and potential damage. Follow the instructions below to safely shut off the water supply.
Locate the Main Water Shut off Valve
The main water shut off valve is responsible for controlling the water flow throughout your entire property. It is typically located near the meter or where the waterline enters your home. Look for a cylindrical valve that can be turned to stop the water supply.
| Tip: | Some common locations for the main shut off valve include basements, utility closets, crawl spaces, or near your water heater. |
Turn off the Water Supply to the Toilet
Once you’ve located the main shut off valve, it’s time to turn off the water supply to the toilet specifically. Follow these steps:
- Locate the water supply line connected to the back of the toilet tank.
- Turn the valve clockwise until it is fully closed. This will stop the flow of water to the toilet.
Double-check whether the water supply has been shut off by flushing the toilet. If no water refills the tank, then you have successfully shut off the water supply.
This crucial first step of shutting off the water supply to install a toilet shut off valve guarantees a smooth and mess-free installation process. It’s always better to take precautions and avoid any water-related mishaps. Stay tuned for the next steps to complete your toilet shut off valve installation!
Step 2: Empty The Tank And Bowl
Flush the Toilet
To begin emptying the tank and bowl, you first need to flush the toilet. This will ensure that the majority of water is drained out of the tank and bowl, making the rest of the process easier and less messy. To flush the toilet, simply press down on the flush handle or button located on the top or front of the tank. Watch as the water swirls and disappears down the drain, leaving behind an empty tank and bowl.
Remove any Remaining Water
Once you have flushed the toilet, there may still be some water left in the tank and bowl. It’s important to remove this remaining water to prevent any spills or leaks during the installation process. Here’s how you can do it:
1. Place a large bucket or container near the toilet to catch the water.
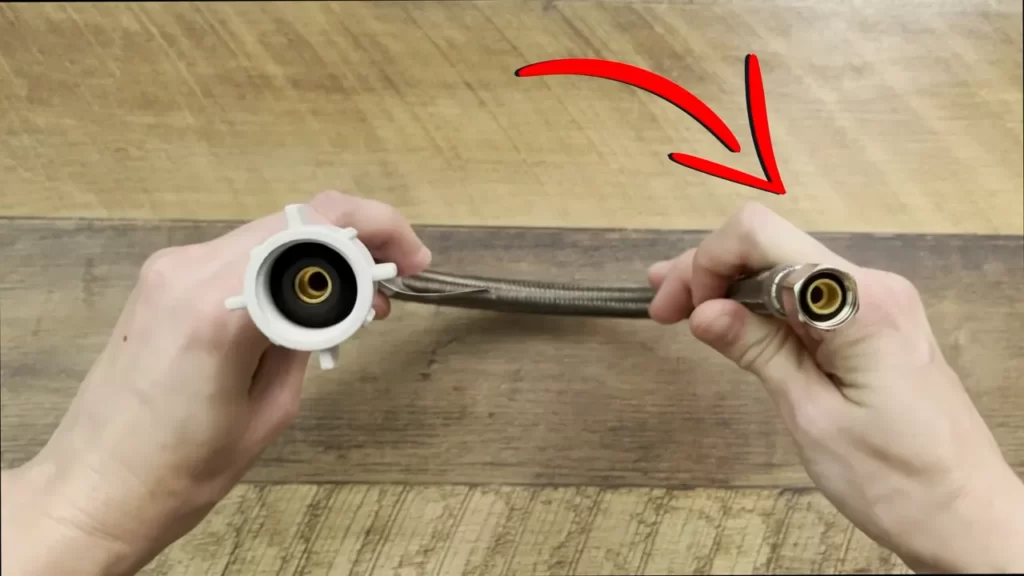
2. Locate the water supply line that connects the toilet tank to the shut off valve. This is usually a flexible tube made of metal or plastic.
3. Using a pair of adjustable pliers, carefully loosen and unscrew the nut connecting the water supply line to the shut off valve. Be prepared for some water to come out as you loosen the nut.
4. Direct the end of the water supply line into the bucket or container to catch any remaining water. You may need to hold the line in place to prevent it from splashing out.
5. Once the water has stopped flowing, remove the water supply line completely from the shut off valve.
If you want to ensure that all the water is drained from the tank and bowl, you can also consider emptying the bowl by using a plunger. Simply place the plunger over the drain hole at the bottom of the bowl and push down firmly, creating a strong suction. This will force any remaining water out through the drain.
Once you have successfully emptied the tank and bowl, you can proceed to the next step in installing the toilet shut off valve. Remember to always exercise caution while handling water and plumbing fixtures to avoid any accidents or damage.
Step 3: Remove The Old Shutoff Valve
When it comes to installing a toilet shut off valve, removing the old shutoff valve is an essential step. The old valve may become corroded or damaged over time, necessitating its replacement. This step is crucial in ensuring a smooth installation process. In this section, we will guide you through the process of removing the old shutoff valve.
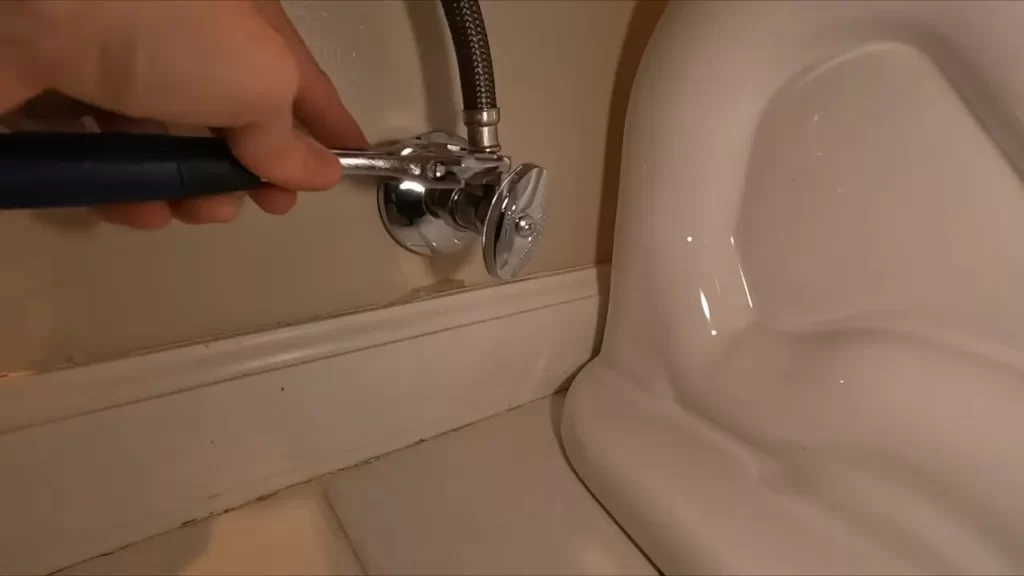
Use the Adjustable Wrench to Loosen the Nut
To begin, you will need an adjustable wrench to loosen the nut on the old shutoff valve. This nut connects the valve to the water supply line, and loosening it will allow you to remove the valve. Place the adjustable wrench around the nut, ensuring a firm grip. Rotate the wrench counterclockwise to loosen the nut. Apply steady pressure, but be cautious not to apply excessive force that could potentially damage the surrounding pipe or fittings.
Disconnect the Water Supply Line
Once the nut is loosened, you can proceed to disconnect the water supply line from the old shutoff valve. Using a backup wrench or pliers, hold the valve body firmly while using the adjustable wrench to completely remove the nut. Pull the water supply line away from the valve, ensuring that any remaining water drains into a bucket or container. It is vital to disconnect the water supply line carefully to avoid any water leakage or damage.
By following these steps, you can confidently remove the old shutoff valve in preparation for installing a new one. Remember to take your time and exercise caution to prevent any unnecessary complications.
Step 4: Prepare The Pipe
Now that you have successfully installed the shut off valve, it’s time to prepare the pipe. This step is crucial to ensure a proper and secure connection between the valve and the water supply line. Follow these substeps to prepare the pipe correctly:
Clean the Pipe Ends
Before you begin working with the pipe, it’s essential to clean the ends thoroughly. Over time, debris and dirt can accumulate, which can hinder the proper functioning of the shut off valve. To clean the pipe ends:
- Use a soft cloth or brush to remove any dirt or debris from the pipe ends.
- Make sure to clean both the inner and outer surfaces of the pipe ends.
- Inspect the pipe ends to ensure they are free from any visible obstructions or damage.
Measure and Cut the Pipe, if necessary
In some cases, you may need to adjust the length of the pipe to fit the shut off valve properly. Follow these steps to measure and cut the pipe:
- Measure the distance between the shut off valve and the water supply line to determine the required length of the pipe.
- Using a measuring tape, mark the desired length on the pipe.
- Secure the pipe in a pipe cutter and rotate the cutter around the pipe to make a clean, straight cut.
- Inspect the cut end of the pipe to ensure it is smooth and even.
Deburr the Pipe Ends
After cutting the pipe, it’s crucial to deburr the pipe ends to remove any sharp or rough edges. This step helps ensure a secure and leak-free connection. Follow these substeps to deburr the pipe ends:
- Inspect the cut ends of the pipe for any burrs or rough edges.
- Using a deburring tool or a utility knife, carefully remove the burrs by gently scraping the edges.
- Make sure to deburr both the inner and outer surfaces of the pipe ends.
- After deburring, use a soft cloth to wipe away any debris or shavings.
By properly preparing the pipe, you can ensure a secure and reliable connection between the shut off valve and the water supply line. This will help prevent leakage and maintain the efficiency of your toilet’s plumbing system.
Step 5: Install The New Shut Off Valve
Step 5: Install the New Shut off Valve
Now that you have successfully prepared the pipe and removed the old shut off valve, it’s time to install the new one. Follow these simple steps to ensure a proper installation.
Wrap Teflon Tape Around the Threads
Before attaching the new shut off valve, you’ll need to apply Teflon tape to the threads of the pipe. Teflon tape helps create a tight and secure seal to prevent any leaks. Here’s how you can do it:
- Take the end of the Teflon tape and hold it against the starting point of the threads.
- Wrap the tape clockwise around the threads, making sure to cover them completely.
- Keep wrapping until you reach the end of the threads.
- Press the end of the tape against the threads to secure it.
Attach the New Shut off Valve to the Pipe
Once you’ve wrapped the Teflon tape, it’s time to attach the new shut off valve to the pipe. Follow these steps to ensure a proper connection:
- Hold the shut off valve against the pipe, aligning the threads.
- Gently twist the shut off valve onto the pipe, threading it in a clockwise direction.
- Continue twisting until the valve is firmly in place.
Hand Tighten the Nut
After attaching the shut off valve to the pipe, you’ll need to tighten the nut to secure it in place. It’s important not to over-tighten the nut, as it can damage the valve or the pipe. Follow these steps:
- Use your hand to tighten the nut in a clockwise direction.
- Continue tightening until you feel resistance.
- Once you reach this point, give the nut an additional quarter-turn using a wrench.
- This ensures a snug fit without risking any damage.
With the new shut off valve securely installed, you are one step closer to completing the installation process. In the next step, we will cover how to test the shut off valve for any leaks and make the necessary adjustments if needed.
Step 6: Connect The Water Supply Line
Step 6: Connect the Water Supply Line
Now that you have successfully installed the shut off valve, it’s time to connect the water supply line. This step is crucial in ensuring that your toilet is properly connected to the water source and ready for use. Follow the simple steps below to complete this process:
1. Apply Teflon Tape to the Threads of the Supply Line:
Before attaching the supply line to the shut off valve, it is important to apply Teflon tape to the threads of the supply line. This tape helps create a tight seal and prevents any leaks from occurring. To do this, simply wrap the Teflon tape around the threads of the supply line in a clockwise direction. Make sure to wrap it tightly, but avoid overlapping the tape excessively.
2. Attach the Supply Line to the Shut off Valve:
Once you have applied the Teflon tape, it’s time to attach the supply line to the shut off valve. Take the end of the supply line and screw it onto the threaded connection of the shut off valve. Ensure that the connection is tight, but be careful not to overtighten it, as this may damage the threads.
3. Tighten the Nut with an Adjustable Wrench:
To secure the connection, use an adjustable wrench to tighten the nut. Hold the shut off valve in place with a second wrench, and use the adjustable wrench to tighten the nut in a clockwise direction. Be cautious not to overtighten, as this can cause damage to the valve and the supply line.
By following these simple steps, you can easily connect the water supply line to the shut off valve of your toilet. Remember to apply Teflon tape to create a tight seal, attach the supply line securely, and tighten the nut appropriately. Once this step is complete, you can move on to the final step of installing your toilet, ensuring that it is ready to be used without any water supply issues.
So, go ahead and confidently connect the water supply line to your shut off valve, knowing that you have completed this important step correctly. Enjoy the peace of mind that comes with a properly installed and functioning toilet in your home.
Note: This blog post provides a general overview of how to install a toilet shut off valve. It is always recommended to refer to the manufacturer’s instructions and consult a professional plumber if you are unsure or encounter any difficulties during the installation process.
Step 7: Check For Leaks
Once the toilet shut-off valve is installed and secured properly, it’s important to check for leaks to ensure everything is working correctly. Follow these steps to perform a thorough leak inspection:
Turn on the Water Supply
Before checking for leaks, turn on the water supply to allow water to flow into the toilet tank and fill up. Slowly open the shut-off valve by turning the handle counterclockwise. Be cautious not to open it too quickly, as it could result in a sudden water surge that may lead to unwanted splashing or further damage.
Inspect for any Leaks
Once the water supply is turned on, closely examine the area around the shut-off valve, the supply line connection, and the toilet tank for any signs of leakage. Some common areas to check include:
- Shut-off valve: Look for any water seeping or dripping around the shut-off valve handle or the connection between the valve and the supply line.
- Supply line connection: Inspect the connection between the supply line and the shut-off valve, ensuring that it is tightly secured. Look for any dripping or water stains around this area.
- Toilet tank: Examine the bottom of the toilet tank for any water accumulation or signs of leakage. Also, check the bolts and washers that connect the tank to the bowl for any water seepage.
Remember to take your time during the inspection and be meticulous. Even a small drip now can lead to larger leaks later on, causing water damage and potentially costly repairs.
If you find any leaks during the inspection, tighten the connection as necessary or consider using plumber’s tape to create a more secure seal. If the leakage persists, it may be best to contact a professional plumber for further assistance.
By following these steps and performing a thorough leak inspection, you can ensure that your toilet shut-off valve is properly installed and functioning without any leaks, providing you with peace of mind and avoiding potential water damage in the future.
Step 8: Reassemble The Toilet
After successfully installing the new shut off valve for your toilet, it’s time to put everything back together. This step will ensure that your toilet is functioning properly and ready for use. Follow these instructions to securely attach the tank and bowl and test the new shut off valve.
Securely Attach the Tank and Bowl
To reassemble the toilet, start by placing the tank back onto the bowl. Gently lower the tank onto the bowl, aligning the bolts on the bottom of the tank with the corresponding holes on the bowl. Once the tank is in position, secure it by attaching nuts to the bolts and tightening them with a wrench.
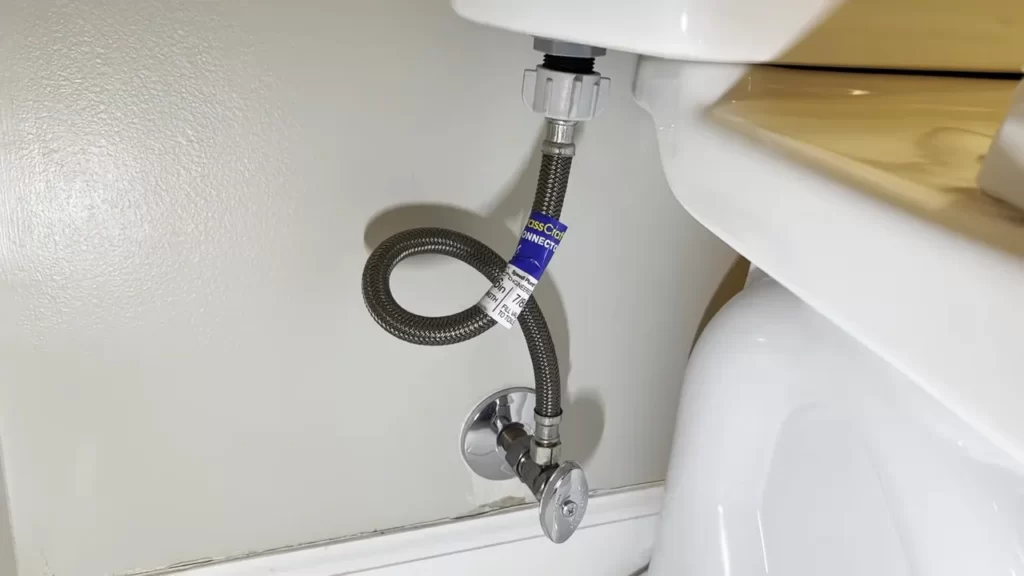
Next, connect the water supply hose from the shut off valve to the fill valve at the bottom of the tank. Ensure that the connection is tight and leak-free by using pliers or a wrench to tighten it. This will prevent any potential water leakage and ensure proper water flow to the toilet.
Test the New Shut off Valve
Now that the toilet is reassembled, it’s time to test the new shut off valve to ensure it’s working correctly. Turn the water supply back on by slowly opening the shut off valve. Allow the tank to fill with water and check for any signs of leakage around the shut off valve and the connection points.
Once the tank is filled, flush the toilet to ensure that the shut off valve effectively stops the flow of water after each flush. Observe the toilet for any irregularities, such as continuous running or weak flushing, which may indicate a problem with the shut off valve.
If everything appears to be in working order, congratulations! You have successfully installed a new shut off valve for your toilet and reassembled it. Your toilet should now be ready for use without any water leakage issues.
Remember, always perform regular maintenance checks on your toilet shut off valve to ensure its continued functionality and to prevent any potential water damage.
Safety Precautions And Final Tips
Always shut off the main water supply before performing any work
Before beginning the installation process of your toilet shut off valve, it is crucial to ensure your safety by shutting off the main water supply. This step is essential to prevent any water flow or potential water damage during the installation. Follow these steps to shut off the main water supply:
- Locate the main water supply valve in your home. Typically, this valve is found near the water meter or in the basement.
- Turn the valve clockwise to shut off the water supply. This will stop the flow of water to your entire house.
- Once the main water supply is turned off, open a faucet in your home to relieve any remaining water pressure.
Use caution when handling sharp objects
During the installation of a toilet shut off valve, it is important to exercise caution when handling sharp objects. Whether you are using a utility knife to cut pipes or removing sharp fragments during the process, take the following precautions to ensure your safety:
- Always wear protective gloves. They will help protect your hands from cuts and injuries.
- Handle sharp objects with care and avoid exerting excessive force. This can prevent accidents and ensure that you have better control over the tools you are using.
- When cutting pipes, make sure to cut away from your body and wear safety goggles to protect your eyes from potential debris.
Double-check for any leaks before finishing the installation
Before considering the installation complete, it is crucial to double-check for any leaks that may occur. Follow these steps to ensure a leak-free installation:
- After installing the toilet shut off valve, turn the main water supply back on.
- Inspect the shut off valve and the connection points to the water supply line and the toilet. Look for any signs of leaks such as dripping water or moisture.
- If you notice any leaks, use a wrench to tighten the connections. Ensure they are snug but be careful not to overtighten and cause damage.
- Turn the water supply off again and check for leaks once more. Repeat the tightening process if necessary until you have a watertight seal.
By adhering to these safety precautions and final tips, you can ensure a smooth and safe installation of your toilet shut off valve. Remember, always shut off the main water supply before performing any work, use caution when handling sharp objects, and double-check for any leaks before finishing the installation.
Frequently Asked Questions
How Do You Replace A Shut Off Toilet Valve?
To replace a shut-off toilet valve, follow these steps: 1. Turn off the water supply to the toilet. 2. Flush the toilet to drain any remaining water. 3. Remove the old valve by loosening the nuts. 4. Install the new valve, ensuring it is secure.
5. Turn on the water supply and test for any leaks.
How Do You Install A Shut-Off Valve On An Existing Water Line?
To install a shut-off valve on an existing water line, first turn off the water supply. Measure and mark the location where you want to install the valve. Cut the pipe, ensuring a clean and even cut. Attach the valve ends to the cut pipes using compression fittings.
Tighten the nuts with a wrench to secure the connection. Finally, turn on the water and check for any leaks.
How To Install A Shut-Off Valve In An Existing Copper Water Line?
To install a shut-off valve in an existing copper water line, first, turn off the water supply. Then, use a tubing cutter to cut the copper pipe. Next, solder the valve onto the pipe and connect the other end of the valve to the water line.
Finally, turn on the water to test for any leaks.
How To Install A Shut-Off Valve In An Existing Pvc Water Line?
To install a shut-off valve in an existing PVC water line, follow these steps: 1. Cut the PVC pipe in the desired location using a PVC cutter. 2. Clean the pipe ends and the shut-off valve with PVC primer and glue.
3. Apply PVC cement to the pipe ends and the valve socket. 4. Insert the pipe ends into the valve socket and hold in place for a few seconds. 5. Allow the cement to dry completely before turning the water on.
Conclusion
Installing a toilet shut off valve is a simple task that can save you from future plumbing issues. By following the steps outlined in this guide, you can confidently tackle this DIY project. Remember to gather the necessary tools, turn off the water supply, remove the old valve, and install the new one.
With a little patience and attention to detail, you can successfully complete this project and ensure a reliable and efficient shut off mechanism for your toilet. Happy DIY-ing!