
To install a toilet seat cover, align the cover with the seat, ensuring it is centered and the bolt holes match up. Then, insert the bolts through the holes, followed by the nuts underneath.
Tighten the nuts securely using a wrench, but be cautious not to overtighten and risk damaging the seat or cover. Now you can enjoy the clean and comfortable seat cover on your toilet. Introducing a toilet seat cover is a simple task that can greatly enhance your bathroom experience.
Whether you want to protect against germs or add a touch of style, a seat cover can easily be installed with a few simple steps. In this concise guide, we’ll outline the exact process, ensuring you can quickly and effectively install a toilet seat cover. So, let’s dive in and get started on upgrading the seat cover of your toilet.
Step 1: Gather The Necessary Tools And Materials
Before you begin installing a toilet seat cover, make sure you have all the necessary tools and materials within reach. This will save you time and ensure a smooth installation process. Here are the essential items you will need:
Toilet seat cover
A toilet seat cover is the primary material needed to complete the installation. It serves as a protective barrier between the seat and the user, providing comfort and cleanliness. Ensure you have a new or replacement toilet seat cover ready to be installed.
Screwdriver
A screwdriver is an indispensable tool when installing a toilet seat cover. You will need it to loosen and tighten the screws that secure the seat cover to the toilet bowl. Make sure you have a screwdriver with the appropriate head size to fit the screws.
Measuring tape
A measuring tape is necessary to ensure the proper fit of the toilet seat cover. It will help you determine the distance between the mounting holes on the seat cover and the holes on the toilet bowl. Having an accurate measurement will ensure a snug and secure fit.
Adjustable wrench
An adjustable wrench is an important tool for adjusting the nuts and bolts during the installation process. It allows you to tighten or loosen the nuts to achieve the desired tightness. Ensure you have an adjustable wrench that fits the size of the nuts and bolts on your toilet seat cover.
Now that you have gathered all the necessary tools and materials, you are ready to move on to the next step in installing the toilet seat cover. This preparation stage ensures that the installation process will proceed smoothly and efficiently, allowing you to complete the task with ease.
Step 2: Remove The Old Toilet Seat Cover
Once you have gathered all the necessary tools and supplies, it’s time to remove the old toilet seat cover. Follow these simple steps to get started:
Locate the screws or bolts securing the seat
Before you begin the removal process, you need to locate the screws or bolts that are securing the seat to the toilet bowl. These screws or bolts are typically located at the back of the seat, underneath the toilet bowl. They may be covered by small plastic caps that you’ll need to pry off with your fingers or a flat-head screwdriver.
Use the screwdriver or adjustable wrench to loosen and remove the screws
Once you have located the screws or bolts, use a screwdriver or an adjustable wrench to loosen and remove them. Turn the screwdriver or wrench counterclockwise to loosen the screws. If the screws are too tight or stubborn, you can give them a gentle tap with a hammer to help loosen them.
As you loosen the screws, you may notice that they are threaded through plastic or metal inserts embedded in the toilet bowl. Take care not to damage these inserts while removing the screws.
Lift the old seat cover off the toilet bowl and set aside
With the screws or bolts fully removed, lift the old seat cover off the toilet bowl and set it aside. It’s important to ensure that you lift the seat cover straight up and not at an angle, as this can cause damage to the toilet bowl or the new seat cover.
Once you have removed the old seat cover, take a moment to inspect the toilet bowl for any residue or debris. Use a damp cloth or sponge to clean the surface if necessary. This will ensure a clean and smooth base for installing the new seat cover.
Now that you have successfully removed the old toilet seat cover, it’s time to move on to the next step: installing the new seat cover.
Step 3: Prepare The Toilet Bowl
Before installing the new toilet seat cover, it is essential to prepare the toilet bowl. This step ensures cleanliness and makes sure the new seat cover fits securely. Follow the steps below to properly prepare the toilet bowl:
Clean the toilet bowl thoroughly with disinfectant
Start by cleaning the toilet bowl thoroughly with a disinfectant. This will not only remove any germs or bacteria present but also create a clean surface for the new seat cover to adhere to. Use a toilet bowl cleaner that is effective in removing stains and odors.
Tips:
- Choose a disinfectant that is safe to use on toilets and follows the manufacturer’s instructions for proper use.
- Wear gloves and use a toilet brush or scrubber to reach all areas of the bowl, including under the rim and along the sides.
- Rinse the bowl thoroughly after cleaning to remove any residue or cleaning solution.
- Ensure proper ventilation in the bathroom while cleaning to avoid inhaling strong fumes.
Ensure the bowl is dry before proceeding
Once the toilet bowl is clean, make sure it is completely dry before proceeding with the installation. A dry surface will allow the new seat cover to adhere properly and prevent any moisture from affecting its longevity. Use a clean towel or allow some time for the bowl to air dry naturally.
Tips:
- Check that all surfaces of the bowl, including the seat mounting area and surrounding areas, are dry.
- Avoid rushing the drying process by using a hairdryer or other heat sources, as this may damage the toilet or seat cover.
- Ensure there are no moisture or water droplets present on the surface before moving on to the next step.
By thoroughly cleaning and ensuring the toilet bowl is dry, you are now ready to proceed with the installation of the new toilet seat cover. Following these steps will help ensure a successful and hygienic installation process.

Step 4: Determine The Correct Size And Shape
Once you have removed the old toilet seat cover and cleaned the toilet bowl, it’s time to determine the correct size and shape for your new seat cover. This step is crucial to ensure a perfect fit and comfortable seating experience. In this section, we will guide you through the important factors to consider when choosing a seat cover that matches the dimensions and shape of your toilet bowl.
Measure the dimensions of the toilet bowl
The first step in determining the correct size of the seat cover is to measure the dimensions of your toilet bowl. This is important because toilet bowl sizes can vary, and it’s essential to have accurate measurements to find the right fit. To do this, you will need a measuring tape or ruler.
Start by measuring the length of the bowl, from the back towards the front where it meets the seat. Record this measurement in inches or centimeters. Next, measure the width of the bowl at its widest point. Note down these measurements as well.
Choose a seat cover that matches these dimensions
With the dimensions of your toilet bowl in hand, it’s time to choose a seat cover that matches these measurements. Many seat covers are labeled as either “standard” or “elongated” to indicate the type of toilet bowl they are designed for.
If your toilet bowl measurements match the standard dimensions, look for a seat cover labeled as such. On the other hand, if your toilet bowl is elongated, opt for a seat cover specifically designed for elongated bowls. Choosing the right size will ensure a snug fit and prevent any discomfort or instability.
Consider the shape of the bowl (round or elongated)
An additional factor to consider when determining the correct seat cover size is the shape of your toilet bowl, which can either be round or elongated. This is particularly relevant if you have an elongated bowl, as using a seat cover designed for a round bowl will not provide the ideal fit.
To determine whether your toilet bowl is round or elongated, take a look at the shape when standing in front of the toilet. Round bowls have a more circular shape, while elongated bowls have a longer, oval-like shape.
By carefully considering the shape of your toilet bowl, you can ensure that the seat cover you choose fits perfectly and provides optimal comfort and stability.

Step 5: Install The New Seat Cover
Now that you have prepared the toilet bowl and removed the old seat cover, it’s time to install the new one. Follow these simple steps to ensure a secure and stable seat:
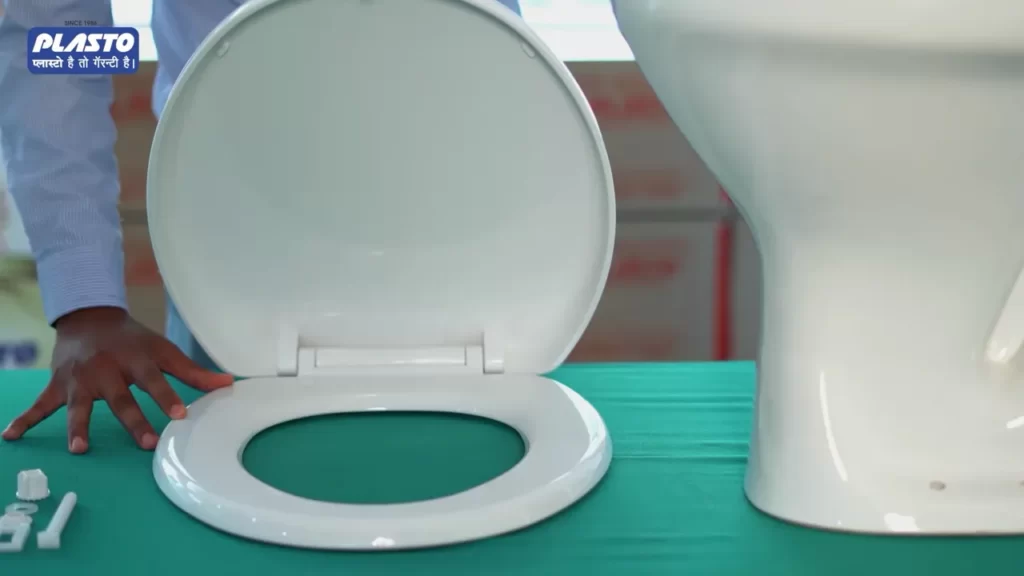
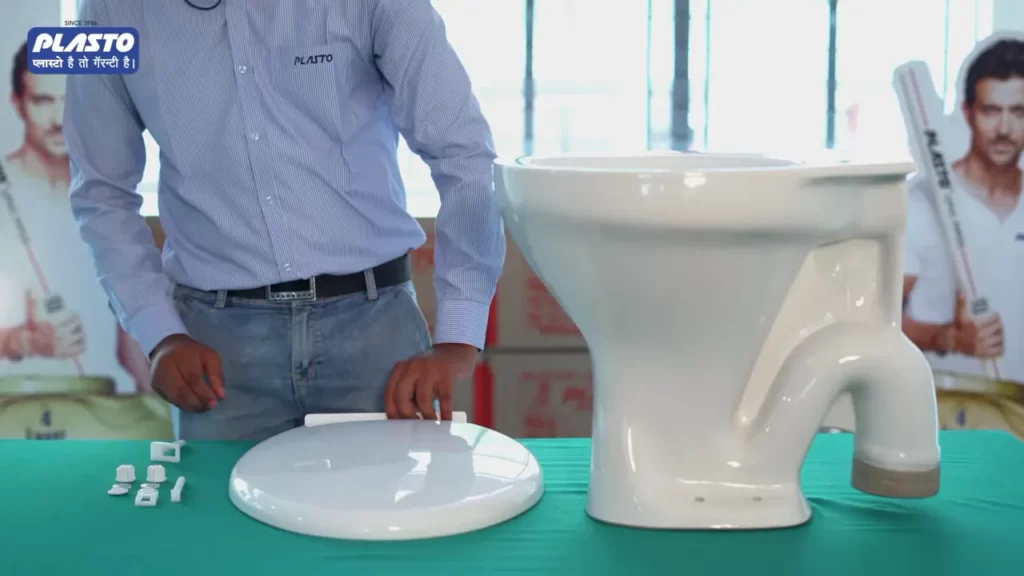
Place the new seat cover onto the toilet bowl, aligning the holes with the mounting points
Position the new seat cover onto the toilet bowl, making sure the holes on the seat align with the mounting points on the bowl. This will ensure a proper fit and prevent any wobbling or instability.
Insert and tighten the screws or bolts to secure the seat cover in place
Take the screws or bolts provided with the seat cover and insert them into the pre-drilled holes on the seat. Use a screwdriver or wrench to tighten them snugly, but be careful not to overtighten, as this could damage the seat or the toilet bowl.
If your seat cover comes with plastic screws, twist them clockwise to tighten. If it has metal bolts, use a screwdriver or wrench to tighten them clockwise until they are firmly in place.
Ensure the seat cover is level and stable
Once the screws or bolts are securely tightened, check to see if the seat cover is level and stable. Sit on the seat and test for any movement or rocking. If necessary, adjust the screws or bolts to achieve a stable and comfortable fit.
Additionally, make sure the seat cover is aligned with the toilet bowl and sits parallel to the floor. This will not only enhance the aesthetic appeal but also provide a comfortable seating experience.
In conclusion, following these simple steps will help you install a new toilet seat cover with ease. Remember to align the holes with the mounting points, insert and tighten the screws or bolts, and ensure the seat cover is level and stable. By doing so, you will achieve a secure, comfortable, and visually appealing seat cover installation.
Step 6: Test For Stability And Comfort
Sit on the newly installed seat cover to ensure it feels secure and comfortable
After successfully installing the toilet seat cover, it is crucial to test its stability and comfort. You wouldn’t want to unknowingly be sitting on an unstable or uncomfortable seat, right? So, take a moment to sit on the freshly installed toilet seat cover and determine whether it feels secure and provides the desired level of comfort. This step ensures that your efforts to install the seat cover were successful.
Adjust the position or tighten the screws if necessary
If you find that the toilet seat cover lacks stability or feels wobbly, it is likely that the position or screws need adjusting. Carefully observe if the cover moves or if there are any gaps between the seat and the toilet rim. If adjustments are needed, don’t worry, it’s a straightforward process. Firstly, remove the seat cover by unscrewing the nuts underneath the toilet rim. Then, reposition it to align perfectly with the toilet rim. Ensure that it sits snugly on the toilet and use a screwdriver or adjustable pliers to tighten the screws that secure the seat cover. This will enhance stability and prevent any unwanted movement.
Re-test the stability and comfort
After making the necessary adjustments, re-test the stability and comfort of the toilet seat cover. Sit on it once again to ensure that it feels secure and firmly in place. Confirm that it does not slide or wobble, providing you with the stability you desire. Additionally, pay attention to the comfort aspect. Is the seat comfortable enough for you? If not, consider padding options or alternative seat covers that better suit your preferences.
Enjoy your newly installed, stable, and comfortable toilet seat cover
Once you are satisfied with the stability and comfort of your newly installed toilet seat cover, congratulate yourself on a job well done! You have successfully followed each step and ensured that your toilet seat provides both security and comfort. Remember to tighten any loose screws periodically to maintain the stability of the seat cover over time. Now, you can confidently enjoy your restroom experience without any concerns about an unstable or uncomfortable seat. Well done!
Step 7: Clean And Maintain The Seat Cover
Properly maintaining your toilet seat cover is important to keep it clean and in good condition. Regular cleaning and periodic checks ensure that the seat cover remains stable and free from damage. Here are some essential steps to follow:
Regularly clean the seat cover with mild soap and water
To maintain hygiene and cleanliness, it is crucial to clean your toilet seat cover regularly. This can be done by using mild soap and water. Avoid using harsh chemicals or abrasive cleaners, as they can damage the surface of the seat cover. Instead, opt for gentle cleaning solutions that effectively remove dirt and germs without causing any harm.
Avoid using abrasive cleaners that can damage the surface
Abrasive cleaners may seem like a quick and easy way to get rid of tough stains, but they can actually do more harm than good. The rough particles in abrasive cleaners can scratch the surface of your toilet seat cover, leading to permanent damage and a deteriorated appearance. Stick to mild soap and water or specifically formulated toilet seat cleaners to ensure the longevity of your seat cover.
Check and tighten screws periodically to maintain stability
Over time, the screws that hold your toilet seat cover in place may loosen due to regular use. To maintain stability, it is essential to periodically check and tighten these screws. A loose seat cover can become wobbly and uncomfortable to use. By tightening the screws, you ensure that the seat cover remains securely in place and provides maximum comfort and support.
Remember to avoid overtightening the screws as it may cause damage. Simply tighten them until they are snug but not overly tight.
By following these simple maintenance steps, you can keep your toilet seat cover clean, intact, and visually appealing. Regular cleaning and periodic checks ensure the durability and longevity of your seat cover, providing a comfortable and sanitary experience for years to come.
Step 8: Enjoy Your Newly Installed Toilet Seat Cover
Congratulations! You have successfully installed your new toilet seat cover. Now it’s time to appreciate the added comfort and aesthetic enhancement it provides. With a simple installation process, you can now fully enjoy the benefits of your newly transformed bathroom experience.
Appreciate the added comfort and aesthetic enhancement the seat cover provides
With your new toilet seat cover installed, you can now indulge in enhanced comfort every time you use the restroom. The soft padding and ergonomic design offer a luxurious feel, making your daily bathroom routine more enjoyable. Moreover, the seat cover also adds an aesthetic touch to your bathroom decor, elevating the overall ambiance of your space. It’s the perfect addition to create a stylish and coordinated look in your bathroom.
Share this quick and easy installation guide with others who may find it useful
Now that you’ve successfully installed your toilet seat cover, why not spread the knowledge among your friends and family? Share this quick and easy installation guide with others who may benefit from it. By doing so, you’ll be helping them upgrade their bathroom experience and giving them the opportunity to enjoy the same comfort and aesthetic enhancement you now appreciate.
Here’s a summarized installation guide in a table format for quick reference:
| Step | Description |
|---|---|
| Step 1 | Take your new toilet seat cover out of the packaging. |
| Step 2 | Flip the existing toilet seat cover up. |
| Step 3 | Align the holes on the seat cover with the holes on the toilet bowl. |
| Step 4 | Insert the included bolts through the holes. |
| Step 5 | Tighten the nuts onto the bolts to secure the seat cover in place. |
| Step 6 | Ensure that the seat cover is properly aligned and level. |
| Step 7 | Check that the seat cover is securely attached. |
| Step 8 | Enjoy your newly installed toilet seat cover. |
Remember, proper installation is essential for optimal comfort and functionality. By following these steps and sharing this guide, you are sure to help others achieve a hassle-free toilet seat cover installation experience. Enjoy the perks of your newly installed seat cover and spread the knowledge one bathroom at a time.
Frequently Asked Questions
What Is The Correct Way To Put A Toilet Seat Cover On?
To put on a toilet seat cover, follow these steps: 1. Grab the cover and unfold it. 2. Position the cover over the toilet seat, ensuring it lines up with the edges. 3. Press it firmly to make it stick.
4. Dispose of the cover properly after use. 5. Wash your hands.
What Is The Middle Flap For On A Toilet Seat Cover?
The middle flap on a toilet seat cover is designed to provide hygienic protection. It acts as a barrier between the toilet seat and your skin, reducing direct contact with germs and bacteria. Using a seat cover can help prevent the spread of infections and maintain a cleaner bathroom environment.
How Do You Replace A Hidden Bolt On A Toilet Seat?
To replace a hidden bolt on a toilet seat, follow these steps: 1. Locate the bolt beneath the seat. 2. Use a screwdriver to loosen it. 3. Carefully remove the old seat. 4. Align the new seat over the holes.
5. Tighten the bolt with a screwdriver. Done!
How Do You Install A New Toilet Seat?
To install a new toilet seat: 1. Remove the old seat by unscrewing the nuts underneath. 2. Place the new seat on the toilet bowl, aligning the holes with the bolts. 3. Secure the seat in place by tightening the nuts.
4. Ensure the seat is stable and level. 5. Test the seat by sitting on it to make sure it’s properly installed.
Conclusion
To sum up, installing a toilet seat cover is a simple task that can be accomplished by following a few easy steps. By ensuring that you have the necessary tools and taking proper safety precautions, you can easily replace a toilet seat cover.
Remember to measure the size of your toilet seat and choose a cover that fits properly. By following this guide, you can have a clean and comfortable toilet seat in no time. Happy installing!