
To install a toilet flange on tile, first, measure and mark the center of the flange on the tile. Then, drill pilot holes for the screws, insert anchors into the holes, and secure the flange to the tile using screws.
Finally, place a wax ring onto the flange and install the toilet bowl over it, pressing down firmly to create a seal.
Understanding The Importance Of A Toilet Flange
When it comes to installing a toilet on tile, one essential component that often gets overlooked is the toilet flange. A toilet flange is a crucial element in ensuring a proper and leak-free installation. In this section, we will explore the purpose and function of a toilet flange, as well as highlight the significance of a properly installed flange on tile.
1. Brief Explanation of the Purpose and Function of a Toilet Flange
A toilet flange, also known as a closet flange, is a round fitting that connects the toilet to the plumbing system. It is usually made of PVC or cast iron and is installed on top of the floor drain. The primary function of a toilet flange is to provide a secure and leak-proof connection between the toilet and the drain pipe.
• The flange serves as a mounting point for the toilet. It supports the weight of the toilet and keeps it firmly in place.
• It acts as a seal, preventing any water or sewage from escaping and causing damage to the floor or subfloor.
• The flange also ensures that the toilet is aligned properly with the plumbing system, allowing for efficient waste removal and preventing clogs.
2. Highlighting the Significance of a Properly Installed Toilet Flange on Tile
Proper installation of a toilet flange on tile is essential to maintain the integrity of your bathroom and prevent potential issues down the road. Here are a few key reasons why:
• Prevents leaks and water damage: When a toilet flange is not properly installed, it can lead to leaks, which can cause water damage to the surrounding tiles and floor. By ensuring a tight and secure connection, a properly installed flange acts as a barrier, preventing any water from seeping through.
• Enhances stability and longevity: A toilet flange that is securely anchored to the tile provides stability to the toilet bowl. This significantly reduces the risk of any wobbling or movement and increases the lifespan of both the toilet and the flange itself.
• Fights against unpleasant odors: A properly installed flange creates an airtight seal, preventing sewer gases from escaping into your bathroom. This helps maintain a fresh and odor-free environment.
• Facilitates easier maintenance: In the event of any plumbing repairs or toilet replacements, a well-installed toilet flange makes the process much smoother. It allows for easier access to the drain pipe, minimizing the need for extensive renovations or retiling.
To sum it up, a toilet flange is more than just a simple plumbing fitting. It plays a vital role in maintaining the integrity of your bathroom, ensuring long-term functionality, and preventing costly water damage. By understanding its purpose and installing it correctly on tile, you can enjoy a seamless and worry-free toilet installation.
Types Of Toilet Flanges Suitable For Tile Installation
When it comes to installing a toilet flange on tile, it is important to choose the right type of flange that will provide a secure and leak-free connection. There are different types of toilet flanges available in the market, each with its own set of pros and cons. In this section, we will discuss the various types of toilet flanges suitable for tile installation and explain the advantages and disadvantages of each type.
Discussing different types of toilet flanges available in the market
Before delving into the pros and cons of each type of toilet flange, let’s first explore the different options available in the market. Choosing the right type of flange will depend on the specifics of your tile installation and the plumbing system in your home. Here are the three main types of toilet flanges you can consider:
- Regular toilet flange: This is the most common type of toilet flange and is suitable for most standard installations. It consists of a metal or plastic ring that connects the toilet to the waste pipe. Regular flanges can be either glued onto the drainpipe or attached using screws.
- Repair toilet flange: As the name suggests, this type of flange is used when the existing flange is damaged or corroded. Repair flanges are designed to fit over the existing flange, providing a sturdy base for the toilet to be installed on. They are a cost-effective solution for fixing a damaged flange without having to replace the entire plumbing system.
Explaining the pros and cons of each type in the context of tile installation
Now that we have discussed the different types of toilet flanges available, let’s dive into the pros and cons of each type in the context of tile installation. Understanding these advantages and disadvantages will help you make an informed decision when selecting the appropriate flange for your tile installation project.
| Type of Flange | Pros | Cons |
|---|---|---|
| Regular toilet flange |
|
|
| Offset toilet flange |
|
|
| Repair toilet flange |
|
|
By considering the pros and cons of each type of toilet flange, you can make an informed decision that best suits your specific tile installation needs. Whether you opt for a regular flange, an offset flange, or a repair flange, ensuring a secure and watertight connection will be key to a successful and long-lasting toilet installation.
Gathering The Necessary Tools And Materials
Before installing a toilet flange on tile, it is essential to gather all the necessary tools and materials. Having everything at hand will make the installation process smoother and more efficient. Below is a detailed list of tools and materials required for the installation process, along with a brief description of each item and its function.
List of tools and materials required for the installation process
Below is a comprehensive list of tools and materials you will need:
| Tools | Materials |
|---|---|
|
|
|
|
|
|
|
|
|
|
|
With this comprehensive list of tools and materials, you will have everything you need to successfully install a toilet flange on tile. The next step is to follow a systematic approach for the installation process, which will be covered in the upcoming sections.
Removing The Old Toilet And Flange
Step-by-step Guide on Removing the Existing Toilet and Flange from the Tile
Here is a simple step-by-step guide on how to remove the old toilet and flange from your tile without causing any damage:
- Start by turning off the water supply to the toilet. Locate the shut-off valve, usually located behind the toilet near the wall. Turn the valve clockwise until it is fully closed.
- Next, flush the toilet to empty the tank and remove any water in the bowl. You can do this by pressing and holding the flush lever until all the water has drained.
- Using a wrench, disconnect the water supply line that connects the toilet tank to the shut-off valve. Loosen the nuts on both ends of the supply line and carefully remove it.
- Now, it’s time to remove the toilet itself. Start by removing the caps covering the bolts on the base of the toilet. Once the caps are off, use a wrench to unscrew the nuts and bolts, holding the toilet in place.
- Gently lift the toilet off the flange and set it aside. Be cautious while moving the toilet as it can be heavy and delicate.
- The flange is usually secured to the floor with screws. Use a screwdriver or a wrench to remove these screws and detach the old flange from the floor.
By following these steps, you can successfully remove the old toilet and flange from your tile without causing any damage.
Tips for Avoiding Damage to the Tile During Removal
Removing the old toilet and flange from tile requires some caution to avoid damaging the tile surface. Here are a few valuable tips to keep in mind:
- Place a few old towels or rags on the floor around the toilet before starting the removal process. This will help protect the tile from any accidental scratches or chips that may occur while handling the toilet.
- Take your time and be patient when unscrewing the nuts and bolts securing the toilet to the flange. Applying too much force or rushing the process can lead to unintended damage to the tile.
- If you notice the toilet is sticking to the floor or the flange, avoid forcefully yanking it free. Instead, gently rock it from side to side while applying upward pressure to break the seal. This will help prevent any sudden jerks that can potentially crack or break the tile.
- Use a putty knife or scraper to carefully remove any old wax ring residue or adhesive from the tile and flange after the toilet has been removed. Be gentle to avoid scratching the tile.
- Inspect the tile and flange for any signs of damage or cracking. If you notice any issues, it’s best to consult a professional for repairs before proceeding with the installation of the new toilet and flange.
By following these tips, you can ensure the removal process goes smoothly, and your tile remains intact.

Prepping The Tile Surface For Flange Installation
Cleaning and Preparing the Tile Surface for Flange Installation
Before installing a toilet flange on tile, it is important to properly clean and prepare the surface to ensure a secure and durable attachment. By following these steps, you can ensure the flange is installed correctly and will provide a reliable connection for your toilet.
Clean the Tile Surface
The first step in prepping the tile surface is to thoroughly clean it. Use a mild detergent and warm water to remove any dirt, grime, or residues that may be present. Scrub the surface gently with a soft brush or sponge, being careful not to scratch or damage the tile. Rinse the area with clean water and allow it to dry completely before moving on to the next step.
Inspect for Damaged Tiles
While cleaning the tile surface, take the time to inspect for any damaged or cracked tiles. These should be replaced before proceeding with the flange installation. Not only will this ensure a smooth and level surface, but it will also prevent any further damage to the tiles or the flange itself.
Fill in Low Spots
If there are any low spots on the tile surface, it is important to fill them in to create a level base for the flange. This can be done using a high-quality ceramic or epoxy tile filler. Simply apply the filler to the low spots, following the manufacturer’s instructions, and ensure it dries completely before continuing with the installation process.
Level the Tile Surface
Before attaching the flange, it is essential to ensure the tile surface is level. An uneven surface can cause the flange to become unstable and result in leaks or other issues down the line. Use a spirit level to check the surface and make any necessary adjustments. This may involve adding or removing filler material until the surface is perfectly level in all directions.
Secure the Flange
Once the tile surface is cleaned, inspected, and leveled, it is time to secure the flange. Position the flange over the center of the drain pipe, ensuring it is aligned properly. Use screws or bolts, depending on the type of flange, to secure it firmly to the floor. Make sure each screw is tightened securely but be careful not to overtighten and risk damaging the tile surface or the flange itself.
By following these steps and properly prepping the tile surface, you can ensure a stable and secure installation of your toilet flange on tile. Taking the time to clean, inspect, level, and secure the surface will not only provide a solid foundation for your toilet but also prevent any future issues that may arise from an improperly installed flange.
Measuring And Marking The Flange Placement
Determining the Correct Position for the Flange on the Tile
Installing a toilet flange on tile requires careful measurement and precise placement. The correct position of the flange is crucial to ensure a tight seal and prevent any leaks or damage to the underlying structure. By following these simple steps, you can confidently measure and mark the flange placement on your tile.
Using Measurements and Guidelines for Accurate Placement
To determine the correct position for the flange on the tile, follow these guidelines:
- Gather your tools: Before you begin, gather all the necessary tools, including a tape measure, pencil, and masking tape or painter’s tape. Having these tools handy will make the process smoother and more efficient.
- Locate the centerline: Start by finding the centerline of the toilet drain pipe. This can usually be done by measuring the distance from one wall to the center of the existing drain pipe. Mark this centerline on the tile using a pencil.
- Measure the offset: Measure the distance from the centerline to the nearest wall. This measurement will determine the offset, which is the distance between the flange and the centerline. Make sure to measure both sides of the centerline, as the offset may differ depending on the toilet’s rough-in dimensions.
- Marking the flange placement: Once you have determined the offset, use a tape measure to measure this distance from the centerline in both directions. Mark these points on the tile using a pencil. These marks will serve as your guide for placing the flange.
- Make adjustments if needed: If your toilet has different rough-in dimensions or the existing drain pipe is not centered, you may need to make additional adjustments. Measure the distance from the centerline to the edges of the toilet base and adjust your marks accordingly.
By following these measurements and guidelines, you can ensure accurate placement of the toilet flange on your tile. Taking the time to measure and mark the flange placement correctly will greatly contribute to a successful toilet installation and long-lasting performance.
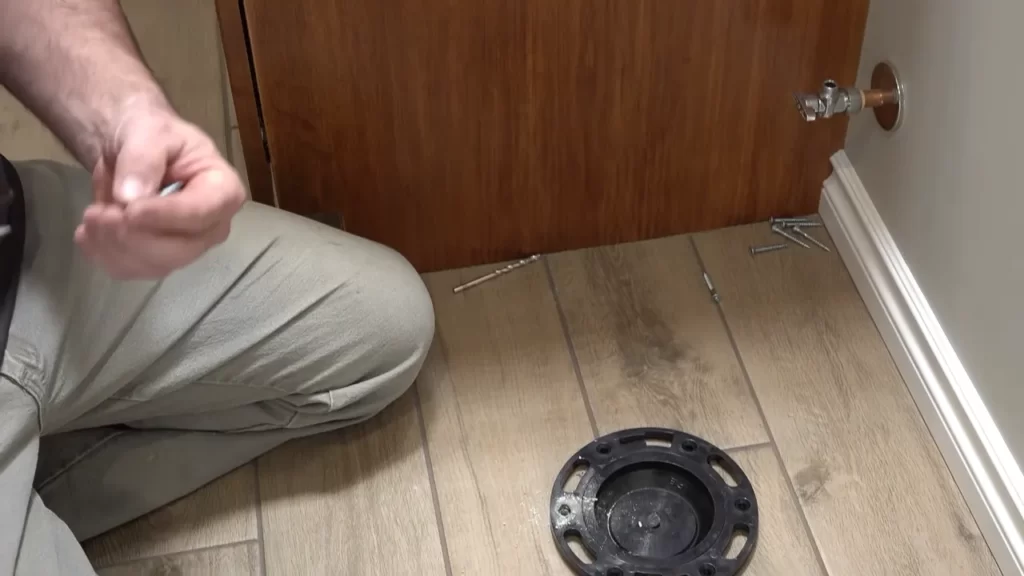
Drilling Holes For Flange Attachment
Step-by-step instructions for drilling holes into the tile for flange screws
Properly drilling holes into the tile is essential for securely attaching a toilet flange. Follow these step-by-step instructions to ensure a successful installation:
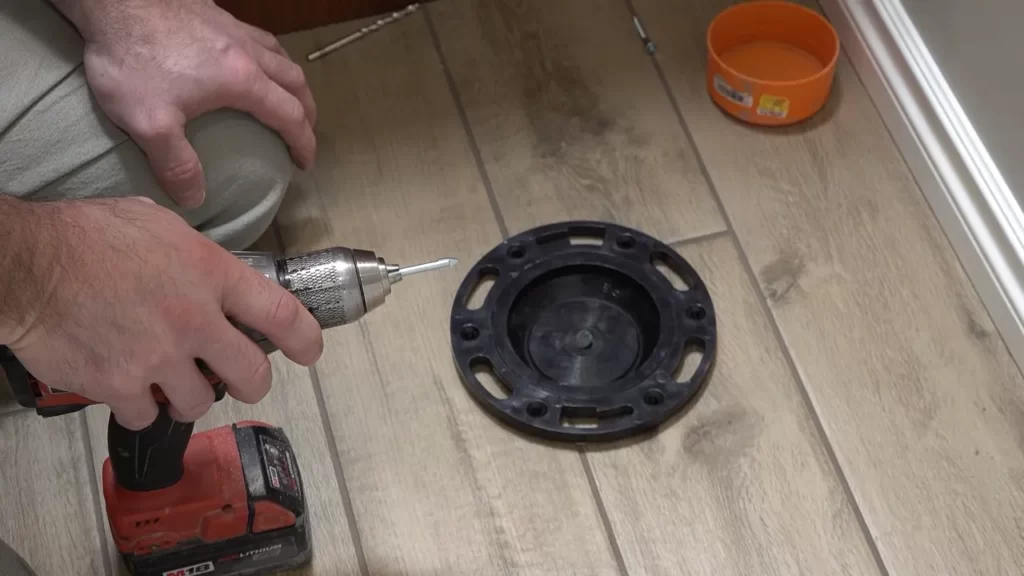
- Select the appropriate drill bit: Use a carbide-tipped masonry bit, ideally sized to match the diameter of the flange screws. This will help prevent tile cracking and ensure a snug fit.
- Mark the hole locations: Place the flange over the tile where you plan to install it. Using a pencil or marker, mark the location of each screw hole onto the tile surface. Ensure that the marks align perfectly with the flange holes.
- Prepare the drill: Insert the carbide-tipped masonry bit into your drill. Make sure it is securely locked in place.
- Wear safety gear: Before drilling, put on safety goggles and a dust mask to protect your eyes and lungs from debris.
- Start drilling: Position the drill perpendicular to the marked hole and apply gentle pressure. Begin drilling at a slow speed, allowing the drill bit to penetrate the tile surface gradually. Maintain a steady hand and avoid applying excessive force, as this may cause the tile to crack or chip.
- Drill to the required depth: Continue drilling until you reach the required depth for the flange screw. This will usually be around 1/4 to 1/2 inch deep, but refer to the manufacturer’s instructions for precise measurements.
- Remove excess dust: After drilling each hole, use a brush or compressed air to remove any dust or debris from the hole and surrounding area.
- Repeat the process: Repeat steps 4 to 7 for each marked hole, ensuring that all holes are drilled to the same depth.
Tips for using the correct drill bit and techniques for avoiding tile damage
When drilling holes into tile, it’s crucial to use the correct drill bit and employ techniques that minimize the risk of tile damage. Follow these tips for a successful and damage-free installation:
- Choose the right drill bit: Opt for a carbide-tipped masonry bit specifically designed for drilling through tile. Carbide tips are more durable and less prone to wear, ensuring a cleaner and more precise hole.
- Start with a small pilot hole: To reduce the risk of tile cracking, begin by drilling a small pilot hole. Gradually increase the size of the hole until it matches the diameter of the flange screw.
- Apply light pressure: Excessive force can cause the tile to crack or break. Instead, apply steady, even pressure while drilling to maintain control and avoid unnecessary damage.
- Use a low drill speed: Slow down your drill speed to prevent the tile from overheating or cracking due to friction. A slower speed also allows for greater precision and control.
- Keep the tile cool: If you notice the tile becoming hot during drilling, pause momentarily to allow it to cool down. Applying water to the drilling area can help cool the tile and reduce the chances of cracking.
- Protect the tile surface: Place a small piece of masking tape over the drilling area to help prevent the drill bit from slipping and scratching the tile surface.
- Consider using a drill guide: If you’re concerned about drilling straight and accurate holes, using a drill guide can provide added precision and stability.
By following these step-by-step instructions and implementing these tips, you’ll be able to successfully drill holes into your tile for secure attachment of the toilet flange, without compromising the integrity of the tile.
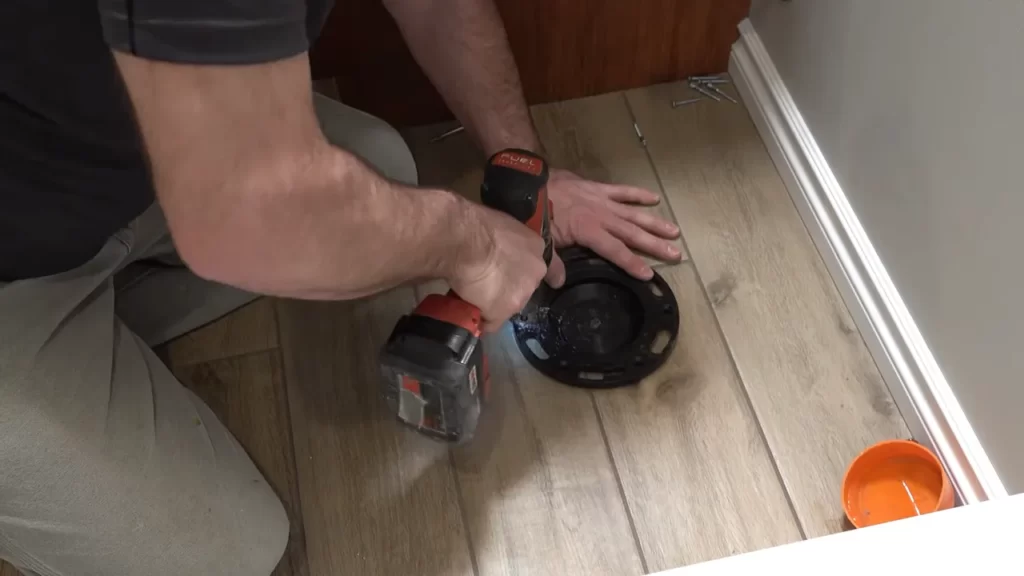
Attaching And Securing The Toilet Flange To The Tile
When installing a toilet flange on tile, it is crucial to ensure a tight and stable connection between the flange and the tile surface. This ensures that the flange will be durable and able to withstand the weight and movement of the toilet over time. One of the most effective methods for attaching and securing the flange to the tile surface is by using screws and anchors.
Using screws and anchors to secure the flange to the tile surface
To begin this process, you will need a drill, appropriate sized screws and anchors, a screwdriver or wrench, and a level for accuracy. Here is a step-by-step guide on how to use screws and anchors to secure the flange to the tile:
- Start by positioning the toilet flange onto the tile surface, making sure it is aligned properly with the drain pipe.
- Once you have confirmed the alignment, mark the screw holes on the tile using a pencil or a marker.
- Next, use a tile drill bit to create pilot holes on the marked spots. The size of the drill bit and the anchors should correspond to the size of the screws you will be using.
- After drilling the pilot holes, insert the anchors into the holes. This will provide a stable base for the screws and prevent them from coming loose over time.
- Now, align the flange again with the drain pipe and position it over the anchors.
- Using a screwdriver or wrench, carefully drive the screws through the holes in the flange and into the anchors. Be sure not to overtighten the screws, as this can potentially damage the tile or crack the flange.
- Finally, check the levelness of the flange to ensure a proper fit. Adjust if necessary and tighten any loose screws.
By using screws and anchors to secure the flange to the tile surface, you can have peace of mind knowing that your toilet installation is stable and reliable. This method provides a strong attachment that will withstand the test of time and prevent any unnecessary leaks or damages.
Remember, having a tight and stable connection between the flange and the tile is crucial for the overall functionality and longevity of your toilet. So take the time to ensure a proper installation by using screws and anchors, and you’ll be rewarded with a reliable and worry-free toilet flange installation.
Sealing The Flange And Tile Connection
Applying sealant or wax ring to create a watertight seal between flange and tile
One of the crucial steps in properly installing a toilet flange on tile is to create a watertight seal between the flange and the tile surface. This ensures that no water seeps into the crevices, preventing any potential leaks and odors. To achieve this, you have two options: applying sealant or using a wax ring.
To apply sealant, start by cleaning the tile surface and the flange thoroughly. Remove any dirt, grime, or old sealant residue using a gentle cleaner and a scrub brush. Once the surface is clean and dry, apply a generous amount of silicone sealant around the outer edge of the flange. Make sure to cover the entire circumference of the flange for a complete seal.
If you prefer using a wax ring, make sure to purchase a high-quality one that is specifically designed for toilet installations. Place the wax ring directly on top of the flange, ensuring that it fits snugly around the opening. Press down firmly to create a seal between the wax ring and the flange.
Importance of proper sealing to prevent leaks and odors
Properly sealing the connection between the toilet flange and the tile surface is of utmost importance to prevent leaks and odors. Any gaps or spaces between the flange and the tile can lead to water seepage, causing damage to your subfloor and potentially creating a breeding ground for mold and mildew. Not only can leaks lead to costly repairs, but they can also result in unpleasant odors permeating your bathroom. By creating a watertight seal, you ensure that water and odors are contained within the toilet and its plumbing system, keeping your bathroom fresh and clean.
Reinstalling The Toilet On The Installed Flange
Step-by-step instructions for reinstalling the toilet on the new flange
Now that you have installed the toilet flange on the tile successfully, it’s time to move on to the next crucial step – reinstalling the toilet on the installed flange. This step is important to ensure a secure and level seating of the toilet, preventing any leaks or wobbling.
Follow these step-by-step instructions to reinstall your toilet on the new flange:
- Prepare the toilet: Before reinstalling the toilet, make sure to inspect the wax ring. If it appears damaged or worn out, replace it with a new one. Additionally, check the mounting bolts to ensure they are in good condition. Clean the bottom of the toilet bowl and remove any debris or old wax residue.
- Align the toilet: Carefully lower the toilet bowl onto the flange, ensuring that the mounting bolts go through the corresponding holes on the base of the toilet. Take your time to make sure the toilet is aligned properly on the flange.
- Tighten the mounting bolts: Once the toilet is aligned, place a washer and nut onto each mounting bolt. Gradually tighten the bolts on both sides using a wrench or pliers. Be cautious not to overtighten, as it can crack the toilet base.
- Check for level seating: Using a level tool, check if the toilet is sitting level on the floor. Check from side to side and front to back. If any adjustments are needed, shim the toilet with plastic or rubber shims to ensure it sits level.
- Secure the toilet: Once the toilet is level, continue tightening the mounting bolts until they are snug. Avoid over-tightening, as this can also damage the toilet or the flange. Trim any excess bolt length if necessary.
- Reconnect the water supply: Reinstall the water supply line, ensuring a tight connection. Turn on the water supply valve and check for any leaks. If there are no leaks, flush the toilet a few times to ensure proper function.
Congratulations! You have successfully reinstalled your toilet on the new flange. It’s important to take your time during this step to ensure a secure and leak-free installation. By following these step-by-step instructions, you can have confidence in the stability and functionality of your toilet.
Testing For Leaks And Ensuring Proper Functionality
Testing for Leaks and Ensuring Proper Functionality
Now that you have successfully installed a toilet flange on your tile, it’s time to test for leaks and ensure the proper functionality of your new toilet. This step is crucial because hidden leaks can cause serious damage to your floors and walls over time. By following some simple techniques and guidelines, you can effectively test your toilet and flange connection for any potential leaks. Additionally, we will discuss how to ensure that your toilet flushes properly and doesn’t wobble. Let’s dive in!
Tips for testing the toilet and flange connection for any leaks
To ensure that your toilet and flange connection is leak-free, follow these helpful tips:
- If possible, leave the toilet bowl empty before testing for leaks to easily identify any signs of water leakage.
- Check the bolts connecting the toilet to the flange. Make sure they are tightly secured and not causing any gaps between the toilet and the flange.
- Inspect the wax ring. Ensure that the wax ring is properly aligned and adequately seated on the toilet flange. Any misalignment or gaps can lead to leaks.
- Apply a thin layer of silicone caulking around the base of the toilet to provide an extra layer of waterproofing and prevent any potential leaks.
- Flush the toilet and observe closely for any water seepage around the base or at the connection points. It’s essential to check for leaks from both the toilet and the flange.
- If you notice any leaks, tighten the bolts, realign the wax ring, or reapply silicone caulking, depending on the source of the leakage.
Ensuring the toilet flushes properly and doesn’t wobble
Proper functionality of your new toilet is equally important as preventing leaks. Here’s how you can ensure that your toilet flushes properly and doesn’t wobble:
- Check the water level inside the tank. It should be appropriately adjusted to ensure a strong and effective flush. In most cases, the water level should be about 1 inch below the overflow tube.
- Inspect the flush valve and flapper. They should seal completely after flushing, preventing any water from continuously running into the bowl.
- Test the flush mechanism by flushing the toilet multiple times. Ensure that the flush is powerful and efficiently clears the bowl.
- Check the toilet’s stability. Sit on the toilet and rock back and forth gently. If you notice any wobbling or movement, you may need to tighten the bolts connecting the toilet to the flange or level the toilet using shims.
- Make sure the toilet seat is securely attached and doesn’t move around. Tighten any loose screws or bolts as necessary.
By following these tips and techniques, you can effectively test for leaks and ensure that your toilet functions properly without any wobbling or stability issues. Remember, regular maintenance and inspections of your toilet will help prevent any potential problems in the long run. So, take the time to regularly check for leaks and ensure the optimal performance of your toilet.
Frequently Asked Questions
Can You Put A Toilet Flange On Top Of Tile?
Yes, you can place a toilet flange on top of tile. This ensures a proper seal between the toilet and the floor, creating a stable and durable installation. Remember to use the appropriate materials and techniques recommended for securing the flange to the tile surface.
Are You Supposed To Glue A Toilet Flange?
No, gluing a toilet flange is not necessary. It should be secured to the floor using screws or bolts instead. Doing so ensures a proper and stable installation of the toilet.
Does Toilet Flange Need To Be Screwed Down?
Yes, the toilet flange needs to be screwed down.
How Do You Secure A Toilet To A Tile Floor?
To secure a toilet to a tile floor: 1. Position the toilet over the flange and level it. 2. Mark the flange holes on the tile. 3. Drill holes through the tile. 4. Insert anchor bolts into the holes. 5.
Secure the toilet using nuts and washers on the anchor bolts.
Conclusion
Installing a toilet flange on tile can be a challenging task, but with the right guidance and tools, it is definitely achievable. By following the step-by-step instructions provided in this blog post, you will be able to successfully install a toilet flange on tile without any difficulties.
Remember to take your time, be patient, and ensure that each step is executed accurately. With a properly installed toilet flange, you can enjoy a leak-free and durable toilet fixture for years to come.