
To install a toilet flange, remove the old flange if present, clean and prepare the area, set the new flange in place, and secure it with screws. Whether you’re renovating a bathroom or replacing a broken flange, installing a toilet flange is a straightforward process that can be completed by following a few simple steps.
To begin, ensure you have the necessary tools and materials, including a new flange, screws, a screwdriver, and a wrench. Start by removing the old flange if there is one, then thoroughly clean the area around the drain pipe. Next, position the new flange over the drain hole, ensuring it is centered and level.
Secure the flange in place using screws, making sure it is tightly fastened to prevent leaks.
Factors To Consider Before Installation
Installing a toilet flange is an important step in any bathroom renovation or plumbing project. But before you jump into the installation process, there are a few key factors you should consider. These factors will ensure that you choose the right type of flange for your needs and that it is compatible with your existing plumbing system. In this article, we will explore three important factors that you should keep in mind:
Standard vs Offset Flanges
One of the first decisions you will need to make when choosing a toilet flange is whether to go with a standard or an offset flange. A standard flange is designed to fit a toilet with the drain centered on the flange, while an offset flange is used when the drain is not centered or when the flange needs to be raised to the correct height.
Standard flanges are typically used for new installations or when the existing flange is damaged and needs to be replaced. They are available in different diameters to accommodate various toilet sizes. On the other hand, an offset flange is ideal if you are replacing an old toilet that does not align with the existing pipe opening. It provides flexibility by allowing you to adjust the toilet’s position without major plumbing modifications.
Material and Durability Options
When selecting a toilet flange, it is essential to consider the material and durability options. Flanges are commonly made from PVC, cast iron, or stainless steel. Each material has its advantages and limitations, so you should choose one that suits your specific needs.
PVC flanges are lightweight, affordable, and resistant to corrosion. They are commonly used in residential applications and offer a good balance of strength and ease of installation. Cast iron flanges, on the other hand, are known for their durability and ability to withstand heavy loads. They are typically used in commercial or industrial settings where strength and durability are top priorities. Stainless steel flanges are a popular choice as they combine strength, rust resistance, and longevity. They are also compatible with various toilet materials and are suitable for both residential and commercial installations.
Compatibility with Existing Plumbing
Before purchasing a toilet flange, it is crucial to ensure that it is compatible with your existing plumbing system. Consider factors such as the pipe size, the location of the floor flange, and the distance between the toilet and the wall. It’s a good idea to measure these dimensions before selecting a flange to ensure a proper fit.
If you are unsure about the compatibility between your existing plumbing and the flange, it is always a wise decision to consult a professional plumber. They can guide you in selecting the right flange and ensure a seamless installation that will prevent any future issues.
In conclusion, choosing the right toilet flange is essential for a successful installation. By considering factors such as standard vs offset flanges, material and durability options, and compatibility with existing plumbing, you can ensure that your flange installation is hassle-free and long-lasting.
Essential Tools For The Job
When it comes to installing a toilet flange, having the right tools on hand is essential for a smooth and successful installation. Whether you’re a seasoned DIYer or a beginner, these tools will help you get the job done right. Here are the essential tools you’ll need:
Screwdriver
A screwdriver is a must-have tool for any DIY project, including installing a toilet flange. You’ll use a screwdriver to remove and install screws, which hold the toilet flange in place. Make sure to choose a screwdriver with the right size and type of head to fit the screws you’ll be working with.
Adjustable Wrench
An adjustable wrench is another indispensable tool for installing a toilet flange. This versatile tool allows you to tighten or loosen nuts and bolts of various sizes. When installing a toilet flange, you’ll need an adjustable wrench to secure the flange to the floor and connect it to the toilet waste pipe.
Hacksaw
A hacksaw is a handy tool that will come in handy during the installation process. You might need to cut through old closet bolts, flange spacers, or even pipes. If you encounter any obstacles that require cutting, a hacksaw will be your best friend. Remember to use proper safety measures when using a hacksaw.
Putty Knife
A putty knife is not the most obvious tool for installing a toilet flange, but it’s still essential. You’ll use a putty knife to remove any old wax or debris from the old flange and the toilet base, ensuring a clean and smooth surface for the new flange to sit on. This step is crucial for creating a watertight seal.
By having these essential tools ready and available, you’ll be well-prepared to tackle the task of installing a toilet flange. Remember to prioritize safety, take your time, and follow the manufacturer’s instructions for a successful installation.
Required Materials
Before you begin the process of installing a toilet flange, it is essential to gather all the necessary materials to ensure a successful installation. Here are the key materials you will need:
Toilet Flange
A toilet flange is a crucial component that connects the toilet bowl to the drainpipe. It acts as a seal and provides stability to the toilet.
Wax Ring
A wax ring is a ring-shaped seal made of wax and other materials. It helps to create a watertight seal between the toilet flange and the sewer pipe, preventing any leaks.
Closet Bolts
Closet bolts, also known as toilet bowl bolts, are used to secure the toilet flange to the floor. These bolts provide stability and prevent the toilet from shifting or rocking.
PVC Primer and Cement
PVC primer and cement are necessary for joining the toilet flange to the PVC pipe. The primer helps clean and prepare the surfaces for bonding, while the cement ensures a strong and secure connection.
Silicone Sealant
Silicone sealant is used to create an additional watertight seal between the toilet base and the floor. It helps prevent any leakage and provides added protection against water damage.
By having these materials on hand, you will be well-prepared to proceed with the installation of a toilet flange. Now, let’s move on to the step-by-step guide on how to install a toilet flange.
Assessing The Flange Condition
Before installing or replacing a toilet flange, it is crucial to assess the condition of the existing flange. This step is essential as it ensures a proper and secure installation, preventing potential leaks, and avoiding costly repairs in the future.
Signs of Damage or Misalignment
Determining the condition of a toilet flange starts with inspecting it for any signs of damage or misalignment. Here are some key indicators to look out for:
- Cracks or fractures: Examine the flange for any visible cracks, fractures, or breaks. These can compromise its stability and lead to leaks.
- Rust or corrosion: Rust or corrosion on the flange surface indicates moisture exposure. These issues can weaken the flange material over time.
- Loose or wobbly toilet: A toilet that feels loose or wobbles during use may be a sign of a damaged or poorly aligned flange.
- Uneven toilet seating: If the toilet does not sit flat on the floor, it could be due to a flange misalignment.
- Leakage around the base: Water pooling around the toilet base is often an indication of a faulty toilet flange.
Determining if Replacement is Necessary
Once you have identified potential issues with the flange, it is important to determine if replacement is necessary. In certain cases, the flange may be repairable, but in others, replacement is the best course of action. Consider the following:
- Severity of damage: Assess the extent of damage to the flange. If it is severely cracked, broken, or corroded, replacement is likely the safest and most cost-effective solution.
- Flange material: Evaluate the material of the existing flange. If it is made of plastic or PVC and shows signs of damage, it is generally recommended to replace it. Metal flanges, such as brass or cast iron, may be repairable depending on the extent of the damage.
- Age and wear: Consider the age of the flange and the frequency of use. Older, worn-out flanges are more prone to damage and may require replacement to ensure a secure toilet installation.
- Professional advice: If you are unsure about the condition of the flange or whether replacement is necessary, consult a professional plumber who can provide expert guidance based on their assessment.
Assessing the condition of your toilet flange is an important step in the installation or replacement process. By identifying any signs of damage or misalignment and determining if replacement is necessary, you can ensure a secure and leak-free toilet installation.
Detaching The Old Flange
Before installing a new toilet flange, you’ll need to detach the old one. This process involves emptying and removing the toilet, loosening and removing the bolts, and detaching the flange from the drainpipe. Let’s walk through the steps required for each of these tasks.
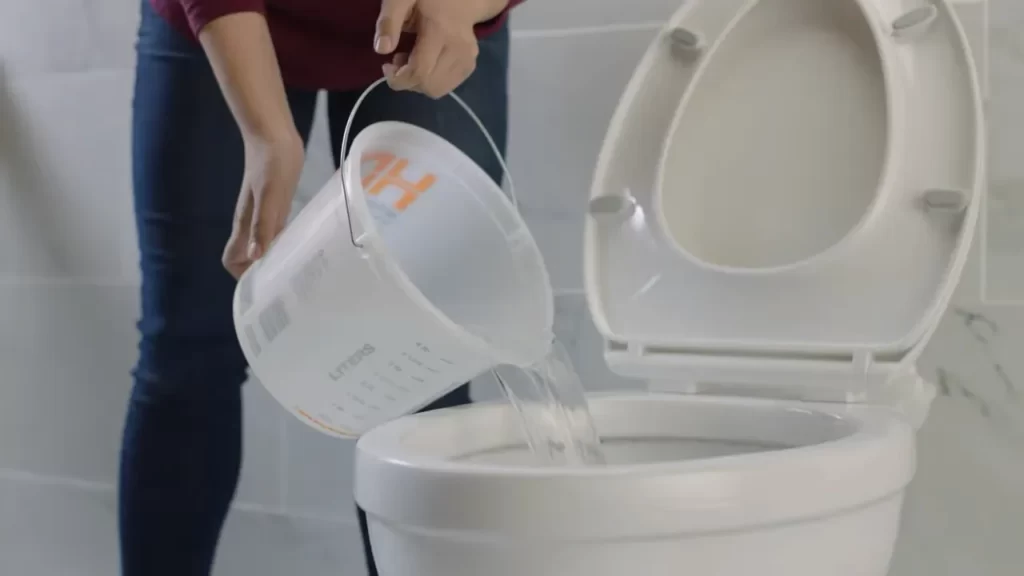
Emptying and Removing the Toilet
The first step in detaching the old flange is to empty and remove the toilet. This ensures you have a clear workspace to work with. Follow these steps:
- Turn off the water supply to the toilet by closing the shut-off valve located near the base.
- Flush the toilet a few times to remove as much water as possible from the tank and bowl.
- Use a sponge or towel to soak up any remaining water in the bowl and tank.
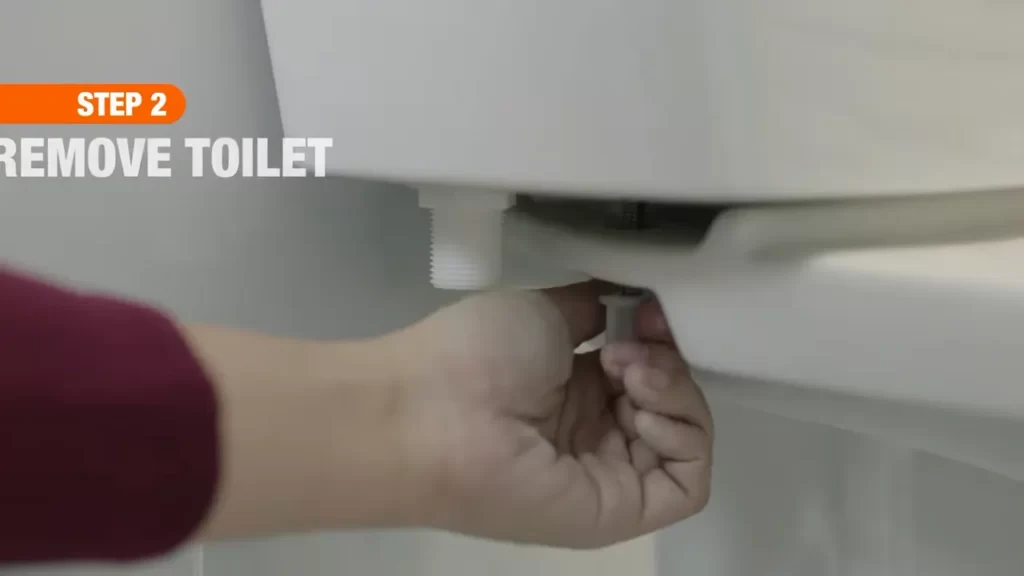
- Use a wrench to disconnect the water supply line from the bottom of the toilet tank.
- Remove the plastic caps covering the bolts on the base of the toilet.
- Loosen and remove the nuts that secure the toilet to the floor bolts.
- Lift the toilet straight up and place it aside on a protective surface.
Loosening and Removing the Bolts
With the toilet removed, it’s time to loosen and remove the bolts that secure the flange to the floor. Follow these steps:
- Inspect the bolts and nuts and determine the best tool to use for removal, such as a wrench or pliers.
- Secure the bolt head or nut with the appropriate tool.
- Rotate the opposite end counterclockwise to loosen and remove the bolts.
Detaching the Flange from the Drainpipe
Now that the bolts are removed, it’s time to detach the flange from the drainpipe. Follow these steps:
- Closely examine the flange for any screws or additional fasteners.
- If present, use a screwdriver or appropriate tool to remove the screws.
- Once the screws are removed, the flange should be free from the drainpipe.
By following these steps, you’ve successfully detached the old flange in preparation for installing a new one.
Preparing The Drainpipe
Before installing a toilet flange, it’s important to prepare the drainpipe properly. This step ensures a secure and leak-free connection between the flange and the toilet. Following these steps will help you prepare the drainpipe effectively:
Cleaning and Removing Obstructions
Start by thoroughly cleaning the drainpipe to ensure it’s free from any debris or obstructions. A clogged or dirty drainpipe can cause issues later on, such as poor flushing or plumbing problems. Here’s how you can clean the drainpipe:
- Use a plunger to remove any loose debris or buildup inside the pipe. Apply firm, controlled pressure to dislodge the blockage.
- For stubborn clogs, mix a solution of hot water and dish soap. Pour this mixture down the drainpipe and let it sit for a few minutes. Then, flush it with hot water to remove the clog.
- If the above methods don’t work, consider using a drain snake or auger to remove the obstruction. Insert the snake into the pipe and rotate it while applying gentle pressure. Slowly pull it out, and the clog should come out with it.
Proper Drainpipe Alignment
Once the drainpipe is clean, you need to ensure it is properly aligned for the toilet flange installation. A misaligned drainpipe can result in a wobbly toilet or leakage. Follow these steps to ensure correct alignment:
- Inspect the drainpipe to make sure it is centered and level with the floor. Use a spirit level to check for any deviations.
- If the drainpipe is not level, you may need to use shims or adjustable flange extenders to bring it in line with the floor. These tools help create a stable and secure connection.
- Measure the diameter of the drainpipe to ensure it matches the size of the toilet flange you will be installing. It’s crucial to have a proper fit for a tight seal.
By cleaning the drainpipe and ensuring proper alignment, you’ll create the ideal foundation for installing a toilet flange. Following these steps will help prevent future issues and provide a sturdy base for your toilet.
Attaching The New Flange
Attaching the new flange is a crucial step in the process of installing a toilet. This step ensures that the flange is securely fastened to the floor, providing a stable base for the toilet. In this section, we will discuss how to place and align the flange, secure it with screws, and apply primer and cement to the pipe.
Placing and Aligning the Flange
To start, place the new flange over the existing waste pipe, ensuring that it is aligned correctly with the floor drain. The flange should be centered over the drain opening, allowing the toilet to fit snugly without any leaks. Making sure that the flange is level is also important for proper installation. Use a level tool to check the alignment of the flange and make adjustments if necessary.
Securing the Flange with Screws
Once the flange is properly aligned, it’s time to secure it in place using screws. On the sides of the flange, you will find screw holes. Take screws that are suitable for the type of flooring you have and insert them into the holes, ensuring they are tightened securely. The number of screws required may vary depending on the size and shape of the flange, but typically three to four screws are sufficient to hold it firmly to the floor.
Applying Primer and Cement to the Pipe
To create a watertight seal between the flange and the waste pipe, it is important to apply primer and cement. Apply primer to the outside of the pipe and the inside of the flange, using a brush or sponge applicator. The primer will help clean the surfaces and ensure proper adhesion. Once the primer has dried, apply cement to the same areas. The cement will bond the flange to the waste pipe, preventing any leakage. Take care not to apply excessive amounts of cement as it can create a messy installation.
Positioning The Wax Ring
When it comes to installing a toilet flange, one of the most crucial steps is positioning the wax ring. The wax ring is a vital component that creates a watertight seal between the toilet bowl and the flange, preventing any leaks or odors from seeping out. Failing to properly position the wax ring can result in a faulty seal, leading to potential water damage and unpleasant bathroom experiences.
Ensuring Proper Alignment and Sealing
Before placing the wax ring, it’s essential to ensure proper alignment and sealing. Look for any obstructions or debris on the flange that could prevent the wax ring from sitting flush. Remove any excess wax or residue that may have accumulated over time. Additionally, check that the flange is securely fastened to the floor, as any movement can compromise the seal.
To ensure a proper seal, make sure the bolt holes on the toilet flange align with the holes on the toilet base. This alignment ensures that the toilet sits correctly on the wax ring and helps distribute weight evenly, reducing the risk of leaks or cracks. Take your time to double-check the alignment before proceeding to the next step.
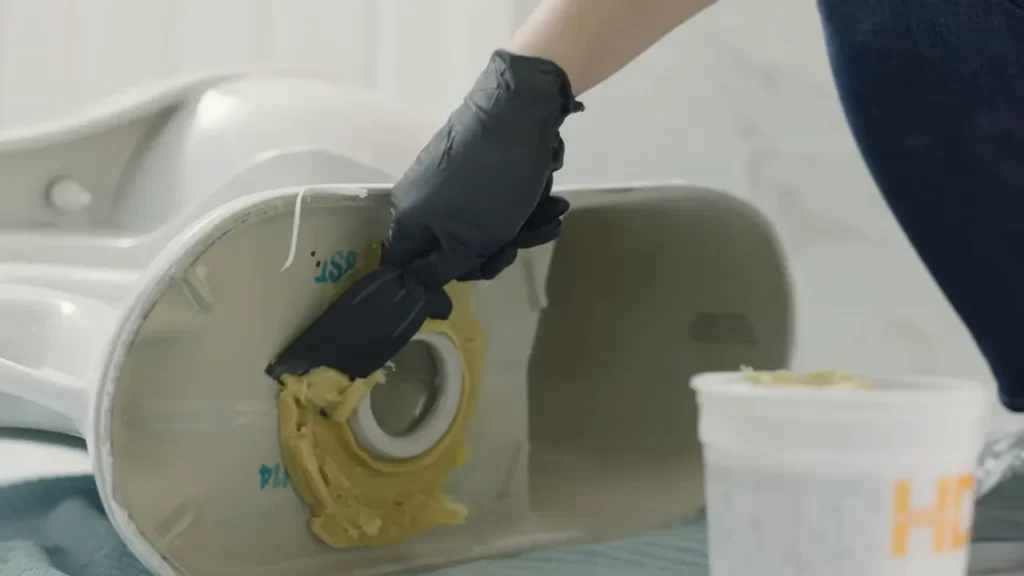
Placing the Wax Ring on the Flange
Once you have confirmed proper alignment, it’s time to place the wax ring on the flange. Hold the wax ring by the plastic packaging or use disposable gloves to protect your hands. Avoid touching the wax with bare hands, as this can leave residue and compromise the seal.
Place the wax ring directly onto the toilet flange, ensuring that the flange opening is fully covered. Gently press down on the wax ring to secure it in place. Be cautious not to apply too much pressure, as this can cause deformation and hinder the effectiveness of the seal.
If you are installing a flange extender, now is the time to attach it to the flange. Follow the specific instructions provided with the extender to ensure a proper fit.
Once the wax ring is securely positioned on the flange, it’s ready for the final step of installing the toilet bowl. Remember to align the bolt holes on the toilet base with the flange holes, and carefully lower the toilet onto the wax ring, applying even pressure.
With the wax ring properly positioned, you can now proceed with confidence, knowing that your toilet installation is off to a solid start. Taking the time to ensure proper alignment and sealing will provide you with a reliable and leak-free seal, allowing you to enjoy your bathroom without any worries.
Mounting The Toilet
Lowering the Toilet onto the Flange
Now that you have successfully installed the toilet flange and made sure it is secure, it is time to mount the toilet onto the flange. This is the final step in the installation process and requires careful attention to ensure a proper fit.
Here are the steps to lower the toilet onto the flange:
- Position the toilet bowl directly above the flange, ensuring that the mounting bolts are aligned with the holes on the base of the toilet.
- Slowly lower the toilet onto the flange, making sure that it sits evenly and securely.
- Apply gentle pressure to compress the wax ring, allowing for a tight seal between the toilet and the flange.
- Double-check that the toilet is centered and properly aligned with the wall and the flange.
By following these steps, you can ensure that the toilet is correctly mounted onto the flange, creating a solid foundation for years to come.
Aligning the Bolts
Once the toilet is lowered onto the flange, the next step is to align the bolts for secure attachment. Proper alignment is crucial to ensure that the toilet remains stable and does not rock or wobble.
Here is how to align the bolts:
- Position the mounting bolts through the holes on the base of the toilet.
- Use your fingers to align the bolts with the corresponding holes on the flange.
- Ensure that the bolts are straight and perpendicular to the floor.
Aligning the bolts accurately is essential for hassle-free installation and to prevent any future leaks or damage to the toilet.
Securing the Toilet with Nuts
Securing the toilet with nuts is the final step in the mounting process. This step ensures that the toilet remains securely attached to the flange, providing stability and preventing any movement.
Here is how to secure the toilet with nuts:
- Place a washer onto each bolt.
- Screw one nut onto each bolt and tighten them evenly using a wrench or pliers.
- Be careful not to overtighten the nuts, as this could damage the toilet or the flange.
- Test the toilet for stability by gently rocking it back and forth. If it feels secure, you have successfully installed the toilet flange.
By properly securing the toilet with nuts, you can ensure a solid and stable installation.
Checking For Leaks
Before completing the installation of a toilet flange, it is essential to thoroughly check for leaks. This step ensures that your installation is secure and leak-free, preventing any potential damage to your bathroom floor or surrounding areas.
Flushing and Inspecting for Proper Seal
After installing the toilet flange, the next step is to flush the toilet and inspect for a proper seal.
Here is how you can check for a proper seal:
- Remove the toilet tank lid and place it in a safe location.
- Slowly and gently flush the toilet, allowing the water to fill up the bowl.
- Observe the water level in the bowl. It should rise and then slowly recede once the toilet has finished flushing.
- Carefully inspect the area around the toilet flange for any signs of water leakage, such as dripping or pooling.
- If you notice any leakage, it is crucial to address the issue promptly to prevent further damage.
Addressing Leakage Issues
If you discover any leakage during the inspection, it is crucial to address the issue promptly to avoid potential damage. Here are some steps to follow:
- Turn off the water supply to the toilet by shutting off the shut-off valve located behind the toilet.
- Drain the water from the toilet bowl and tank by flushing the toilet again.
- Inspect the wax ring, which provides a watertight seal between the toilet flange and the toilet base.
- If the wax ring is damaged or misaligned, remove the toilet and replace the wax ring.
- Ensure that the toilet flange is securely attached to the floor. Tighten any loose screws or bolts.
- Reinstall the toilet and secure it to the flange using the appropriate bolts.
- Turn the water supply back on and repeat the flushing and inspecting process to ensure the leakage has been resolved.
By following these steps, you can ensure a secure and leak-free installation of your toilet flange. Keep in mind that addressing any leaks during the installation process is crucial to maintain the integrity of your bathroom and prevent costly repairs in the future.
Making Adjustments
‘Making Adjustments’
After successfully installing the toilet flange, it’s time to make the necessary adjustments to ensure a proper fit. This step is crucial as it ensures the stability and longevity of your toilet installation. In this section, we will discuss two important adjustments that need to be made – leveling the toilet and tightening bolts and nuts.
Leveling the Toilet
The first adjustment is leveling the toilet. This ensures that the toilet sits evenly on the floor and prevents any rocking or unstable movement. Here’s how you can do it:
- Place a level tool on top of the toilet tank or seat. Make sure it’s positioned left to right and front to back.
- Look for any gaps between the level tool and the toilet. If there are gaps, you’ll need to adjust the toilet’s position.
- Using shims, which are small leveling wedges, place them under the base of the toilet in the areas where there are gaps.
- Gradually add or remove shims until the level tool indicates an even balance.
By leveling the toilet, you can avoid future leaks and potential damage to the toilet and flooring. It’s important to ensure a stable and secure installation.
Tightening Bolts and Nuts
Once the toilet is leveled, the next adjustment is to tighten the bolts and nuts that hold the toilet in place. This step ensures a tight seal and prevents any leaks. Follow these steps:
- Using a wrench, tighten the bolts on both sides of the toilet base. Start with a slow and steady force to avoid overtightening, which can crack the base.
- Alternate tightening between the bolts on each side to ensure even pressure.
- Check the level one final time to ensure the toilet hasn’t shifted during the tightening process.
- If necessary, make minor adjustments by loosening and re-tightening the bolts until the toilet is firmly in place.
By properly tightening the bolts and nuts, you create a secure and watertight connection between the toilet and the flange. This prevents any wobbling and minimizes the risk of water leakage.
Remember, making these adjustments is crucial for a successful toilet flange installation. Take the time to level the toilet and tighten the bolts and nuts properly, and you’ll have a stable and reliable toilet for years to come.
Applying Silicone Sealant
Sealing the Base of the Toilet
One crucial step in installing a toilet flange is applying silicone sealant to ensure a tight and secure fit. Sealing the base of the toilet not only helps prevent leaks but also provides stability and longevity to your toilet installation. Follow these simple steps to correctly apply silicone sealant:
Step 1: Clean the Area
Before applying the sealant, make sure to clean the base of the toilet thoroughly. Remove any dirt, debris, or old sealant from the surface using a scraper or putty knife. Ensure the area is dry and free from any moisture.
Step 2: Prepare the Silicone Sealant
Next, prepare the silicone sealant by cutting the nozzle at a 45-degree angle, creating a small opening. Attach the nozzle to a caulk gun, making sure it is securely fitted.
Step 3: Apply the Sealant
Starting at the back of the toilet, squeeze a thin and even bead of silicone sealant along the entire base. Be sure to leave no gaps or breaks in the sealant line. Use a steady and controlled motion to avoid any excess or uneven application.
If you are unsure about the amount of sealant required, it is better to apply slightly more than less. You can always remove excess sealant later to achieve a neat and professional finish.
Ensuring Water Tightness
Once you have applied the silicone sealant, it is important to ensure water tightness to avoid any potential leaks or damage. Follow these additional steps:
Step 4: Let the Sealant Cure
- Allow the silicone sealant to cure according to the manufacturer’s instructions before proceeding. This typically takes around 24 hours.
- Avoid using the toilet during this curing period to prevent any disruption to the sealant.
Step 5: Check for Leaks
After the sealant has cured, check for any signs of leaks. Flush the toilet multiple times and carefully inspect the base for any water seepage. If you notice any leaks, tighten the toilet bolts and reapply the sealant as necessary.
Remember, properly sealing the base of the toilet is essential for a secure and leak-free installation. Take your time during the application process and ensure a thorough and even bead of silicone sealant.
Reattaching Water Supply And Flushing
Once you have successfully installed the toilet flange, the next step is to reattach the water supply line and test the functionality of your toilet. This crucial step ensures that your toilet is properly connected to the water source and ready for use. Follow the steps below to reconnect the water supply and flush your toilet.
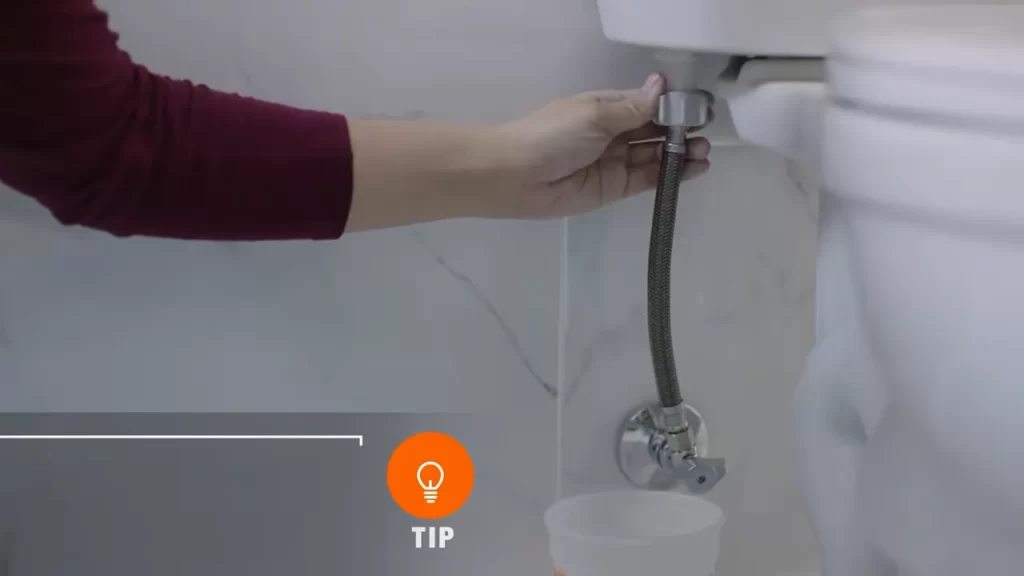
Reconnecting the Water Supply Line
The water supply line is responsible for providing fresh water to your toilet. Here’s how you can easily reconnect it:
- Locate the water supply valve, which is usually located on the wall behind the toilet or under the sink.
- Turn the valve in a clockwise direction to shut off the water supply. This will prevent any water from flowing while you reattach the supply line.
- Take the end of the supply line and connect it to the threaded water supply outlet on the bottom of the toilet tank. Tighten it securely using an adjustable wrench.
- Once the supply line is securely attached, turn the water supply valve counterclockwise to restore the water flow.
- Check for any leaks around the connection point. If you notice any leaks, tighten the connections further or consider using plumber’s tape to ensure a watertight seal.
With the water supply line properly reconnected, it’s time to move on to the next step to test the functionality of your toilet.
Flushing to Test Functionality
Testing the functionality of your toilet is essential to ensure that it’s working properly after reattaching the water supply line. Follow these steps to flush and test your toilet:
- Slowly lift the toilet tank lid and carefully place it on a nearby surface.
- Press the toilet handle down to activate the flush mechanism. This will release water from the tank and into the bowl.
- Observe the flushing process and ensure that the water flows smoothly into the bowl without any leakage from the tank or the base of the toilet.
- If the water level rises too high or doesn’t fill up enough, adjust the float arm or the fill valve to control the water level in the tank.
- Repeat the flushing process a few times to ensure consistent performance and proper functionality.
Congratulations! You have successfully reattached the water supply line and tested the functionality of your toilet. If you notice any issues or leaks during the flushing process, it’s recommended to consult a professional plumber for further assistance.
Frequently Asked Questions
What Is The Proper Way To Install A Toilet Flange?
To install a toilet flange properly, follow these steps: 1. Start by removing the old flange and cleaning the area around the drain pipe. 2. Position the new flange over the drain pipe and align it correctly. 3. Secure the flange to the floor using screws or bolts.
4. Connect the toilet to the flange using wax rings or gaskets. 5. Finally, tighten the bolts and check for any leaks before using the toilet.
Should Toilet Flange Be Flush With Floor?
Yes, the toilet flange should be flush with the floor. This ensures a proper and secure connection between the toilet and the waste pipe. By being flush with the floor, the flange creates a stable and leak-free seal, preventing any issues with the toilet installation.
Are You Supposed To Glue A Toilet Flange?
Yes, it is recommended to glue a toilet flange. Gluing ensures a secure installation and prevents leaks or loosening. Follow the manufacturer’s instructions for the correct adhesive and technique.
Should Toilet Flange Sit On Top Of Tile?
Yes, the toilet flange should sit on top of the tile. This ensures a proper and secure fit for the toilet, preventing leaks and instability. It is important to have a level and secure flange for a properly functioning toilet.
Conclusion
Toilet flange installation is an essential step in ensuring a functional and leak-free toilet. By following the step-by-step guide provided above, you can confidently tackle this DIY project. Remember to gather the necessary tools and materials, prepare the area, and carefully align and secure the flange.
With a little patience and attention to detail, you’ll have a sturdy and reliable toilet flange that will stand the test of time. Happy DIY-ing!