
To install a tile shower base, start by laying out the tiles in a dry run to ensure a proper fit, then apply a layer of thinset mortar to the subfloor before setting the base in place and pressing it firmly down. Finally, secure the base with screws and allow the mortar to dry before continuing with the tile installation.
Factors To Consider When Selecting A Tile Shower Base
When it comes to installing a tile shower base, there are several factors that you need to consider to ensure a successful and durable outcome. These factors include the material and durability of the shower base, the size and shape of the base, as well as the slope and drainage. Let’s take a closer look at each of these factors to help you make an informed decision for your tile shower installation.
Material and Durability
The material of the shower base is an important consideration as it determines the overall durability and longevity of your shower. There are various materials available, such as acrylic, fiberglass, and tile-ready options. Acrylic and fiberglass shower bases offer a lightweight and affordable option, but they may not be as sturdy and long-lasting as tile-ready bases.
A tile-ready base, on the other hand, is specifically designed to support the weight of the tiles and provide a solid foundation. It usually consists of a pre-sloped pan made of a durable material like high-density foam or cementitious material. These bases ensure superior durability and can withstand the weight and pressure of heavy tiles.
Size and Shape
The size and shape of the shower base are essential factors to consider to ensure a proper fit and a functional shower area. The base should correspond to the dimensions of your shower stall, allowing for comfortable movement and easy access. Additionally, consider the shape of the base, whether it is square, rectangular, or curved, based on your shower design and the available space.
Before purchasing a shower base, measure the dimensions of your shower enclosure accurately to determine the right size. This will prevent any issues with installation and ensure a seamless and aesthetically pleasing look.
Slope and Drainage
An essential factor to consider when selecting a tile shower base is the slope and drainage system. A proper slope is crucial to ensure that water flows towards the drain and avoids pooling, which can lead to leaks and mold growth. Look for a base that has a built-in slope and a well-designed drainage system to maintain a dry and safe shower area.
Some shower bases feature a linear drain system, which provides a sleek and modern appearance while efficiently draining water. Others may have a traditional center drain. Consider the location of your drain, along with the slope and waterproofing requirements, to choose a shower base that suits your needs.
Removing The Existing Shower Base
When it comes to renovating your bathroom, removing the existing shower base is an important step before installing a new one. This process requires careful attention to detail to ensure a smooth transition from the old to the new. In this article, we will guide you through the process of removing the existing shower base, from removing the tiles to dismantling the drain assembly to clearing the area. By following these steps, you will be well on your way to creating a fresh and functional tile shower base.
Removing the Tiles
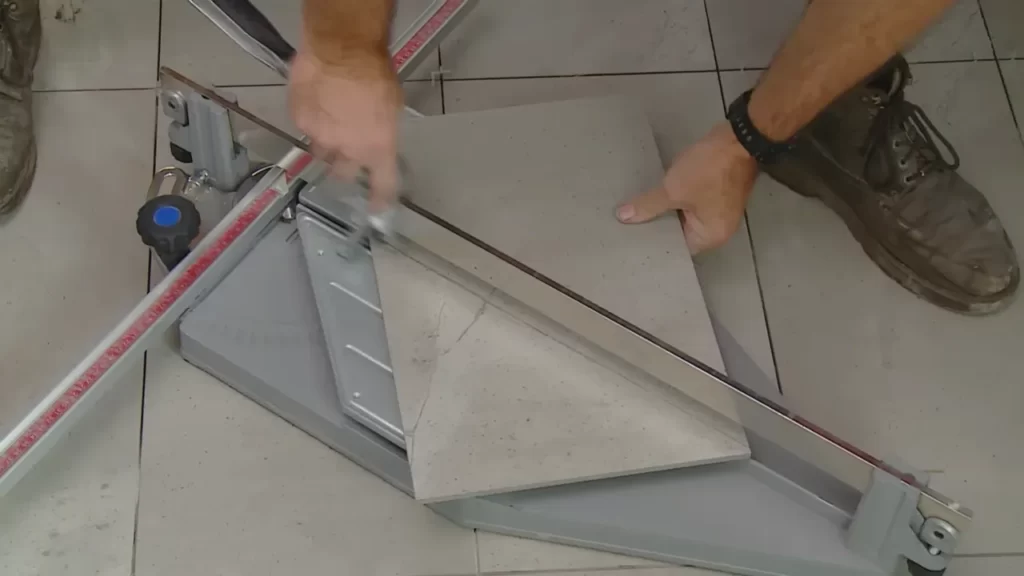
Before you can remove the shower base, you need to first remove the tiles surrounding it. This can be a tedious task, but with the right tools and techniques, it can be done efficiently. Here’s how:
- Carefully inspect the tiles to locate any loose or damaged ones. These should be your starting point for removal.
- Using a grout saw or a utility knife, carefully score the grout lines around the tiles you need to remove. This will help loosen the tiles and make the removal process easier.
- With a chisel or a putty knife, gently pry the tiles away from the wall. Be cautious not to damage the surrounding tiles or the wall surface.
- Continue removing the tiles in a systematic manner until all the surrounding tiles are removed.
Remember, safety should always come first. Wear protective gloves and goggles when removing tiles to avoid any potential injuries.
Dismantling the Drain Assembly
Once the tiles have been successfully removed, the next step is to dismantle the drain assembly. Follow these steps to ensure a smooth removal:
- In most cases, the drain assembly can be accessed from underneath the shower base. Make sure to locate and turn off the water supply to avoid any leaks or water damage.
- Using a wrench or pliers, carefully disconnect the drain pipe from the existing shower base. This may require some force, so be prepared.
- If there is a rubber gasket or a flange securing the drain assembly to the base, carefully remove it as well.
- Inspect the drain assembly for any signs of damage or wear. If necessary, replace it with a new one.
Remember to take your time and be cautious when dismantling the drain assembly. It is crucial to avoid any damage to the plumbing or the surrounding area.
Clearing the Area
With the tiles and drain assembly removed, it’s time to clear the area and prepare it for the installation of the new shower base. Follow these steps:
- Thoroughly clean the area where the shower base used to be. Remove any debris, adhesive, or grout residue to ensure a clean surface.
- If necessary, use a scraper or a chisel to level out any uneven spots or bumps on the floor. This will help create a smooth and stable base for the new shower base.
- Inspect the surrounding walls and floor for any signs of water damage or mold. If any issues are found, address them accordingly before proceeding with the installation.
By following these steps, you have successfully cleared the area and prepared it for the installation of your new tile shower base. Now you’re ready to move on to the next step in the process.
Applying A Mortar Bed
Preparing the Mortar Mix
To ensure a sturdy and durable tile shower base, it’s essential to properly prepare the mortar mix before applying it on the subfloor. The mortar mix acts as a solid foundation for your shower base, providing stability and preventing any movement or cracks over time.
To begin, gather the necessary materials for the mortar mix: Portland cement, sand, water, and a mixing bucket. The ratio of cement to sand may vary depending on the specific product you’re using, so be sure to follow the instructions on the packaging.
Here’s a step-by-step guide to preparing the mortar mix:
- Measure the required amount of cement and sand according to the recommended ratio.
- Combine the cement and sand in the mixing bucket.
- Use a trowel or shovel to thoroughly blend the two ingredients together until they form a homogeneous mixture.
- Add water gradually as you continue mixing. The consistency of the mortar should be thick but workable.
- Keep mixing until the mortar reaches a uniform texture and all dry spots are eliminated.
- Let the mortar rest for a few minutes to allow the chemicals to activate.
Applying the Mortar Bed on the Subfloor
With the mortar mix properly prepared, it’s time to apply the mortar bed on the subfloor. This step is crucial as it provides a stable and level surface for the shower base to sit on, ensuring proper drainage and preventing any water leakage.
Here’s a detailed process for applying the mortar bed:
- Start by moistening the subfloor to prevent it from absorbing too much moisture from the mortar.
- Use a notched trowel to apply a layer of mortar on the subfloor. Work in small sections to ensure the mortar remains workable.
- Hold the trowel at a 45-degree angle and spread the mortar in even, diagonal ridges.
- Once the mortar is spread, use the flat side of the trowel to smooth and level the surface. Make sure the mortar bed is even and free from any high or low spots.
- Continue applying and smoothing the mortar bed until the entire subfloor is covered.
- Allow the mortar bed to cure for the recommended time, usually around 24 to 48 hours, before proceeding with the installation of the shower base.
By following these steps and taking the time to properly apply a mortar bed, you can ensure a solid foundation for your tile shower base. This will not only contribute to the longevity of your shower, but also provide a safe and enjoyable bathing experience. Remember to always follow manufacturer instructions and best practices to achieve the best results.
Setting The Tile Shower Base
Positioning the Base
Before you begin installing your tile shower base, it’s crucial to ensure that the base is properly positioned. This step is of utmost significance as it sets the foundation for your entire shower. Here’s how you can position the base correctly:
- Locate the drain hole in your bathroom floor and mark the center of it.
- Measure the distance from the mark to the nearest walls of your shower area.
- Using those measurements, mark the center point of each wall to indicate where the tile base will be positioned.
- Next, identify the high point of the floor by using a level. This will let you know which areas need to be built up with thinset mortar to ensure a level base.
- Apply the thinset mortar starting from the center point and working towards the outer edges. Make sure to create a slight slope towards the drain so that water can effectively drain out.
- Once the mortar is spread evenly, place the tile shower base onto it, aligning it with the marked positions on the walls. Press firmly to ensure proper adhesion.
Securing the Base in Place
Now that you have positioned the tile shower base, it’s time to secure it in place to guarantee long-lasting durability. Follow these steps to properly secure the base:
- Check the manufacturer’s instructions to determine the recommended method of securing the base. This may involve using screws or adhesive.
- If screws are required, drill pilot holes into the marked positions on the walls and into the flange of the tile base. Then, drive the screws through the flange and into the walls, making sure they are snug and secure.
- If adhesive is recommended, apply it to the bottom edges of the tile base and press it firmly against the thinset mortar and wall surfaces. Use a level to ensure the base remains level during this process.
- Allow the adhesive or thinset mortar to fully dry and cure according to the manufacturer’s instructions before proceeding further with your shower installation.
By following these steps for positioning and securing your tile shower base, you’ll ensure a strong and stable foundation for your shower. Next up, we’ll cover the exciting part – tiling the walls and floor to create a stunning and functional shower space!
Connecting The Drain Assembly
Connecting the drain assembly is a crucial step in installing a tile shower base. This involves installing the drain flange and connecting the drain pipe. By following these steps, you can ensure a proper and watertight connection for your shower drain.
Installing the Drain Flange
The drain flange is the visible part of the drain assembly that sits on top of the shower base. It forms a seal to prevent water from leaking into the subfloor. Here’s how you can install the drain flange:
- Start by applying a thin layer of plumber’s putty to the underside of the drain flange. This putty will create a watertight seal.
- Place the flange on top of the shower base, aligning it with the drain hole.
- Tighten the flange into place by screwing the retaining ring onto the drain body. Use a pair of pliers to ensure a snug fit.
- Wipe away any excess putty that squeezes out from under the flange.
Connecting the Drain Pipe
Once the drain flange is securely in place, you can move on to connecting the drain pipe. This pipe will carry the water from the shower to the plumbing system. Follow these steps to ensure a proper connection:
- Insert the drain pipe into the drain body beneath the shower base. Make sure it fits snugly and extends downward to the desired height.
- Apply PVC primer to the outside of the drain pipe and the inside of the drain body.
- Next, apply PVC cement to the same areas. This will create a strong and watertight bond between the pipe and the drain body.
- Hold the pipe in place for a few seconds to allow the cement to set.
Ensure that both the drain flange and drain pipe are securely connected to avoid any future leaks. Taking the time to properly connect the drain assembly will not only ensure a functional shower but also help prevent water damage to your bathroom. Now that you’ve successfully connected the drain assembly, it’s time to move on to the next steps in installing your tile shower base.
Applying A Waterproof Membrane
One crucial step in installing a tile shower base is applying a waterproof membrane. This membrane serves as a barrier to prevent water from seeping through the tiles and into the substrate, protecting it from damage. It is an essential part of ensuring the longevity and durability of your shower installation. In this section, we will guide you through the process of preparing and applying a waterproof membrane on the shower base and walls, for a water-tight and leak-free shower.
Preparing the Membrane
Before applying the waterproof membrane, it’s important to ensure that the surface is clean, dry, and free from any debris. Start by thoroughly cleaning the area, removing any loose particles or residues. Next, make sure the surface is completely dry, as moisture can compromise the adhesion of the membrane. You may need to use a towel or allow the surface to air dry for some time.
Once the surface is clean and dry, it’s time to prepare the waterproof membrane. There are various types of membranes available, such as liquid membranes and sheet membranes. Read the manufacturer’s instructions carefully to understand the specific requirements for your chosen membrane. Some membranes may require mixing with a specific ratio of water or other additives.
If you’re using a sheet membrane, measure and cut it to fit the shower base and walls. It’s essential to ensure that the membrane covers the entire surface, with a minimum overlap between adjacent sheets as indicated by the manufacturer’s recommendations. Remember to account for any curbs or corners by carefully cutting the membrane to fit the shape.
Applying the Membrane on the Base and Walls
Now that the membrane is prepared, it’s time to apply it to the shower base and walls. Start by applying a layer of waterproofing primer or bonding agent to the surface. This helps improve the adhesion of the membrane. Using a brush or roller, evenly spread the primer or bonding agent, covering the entire area where the membrane will be applied.
Next, carefully place the membrane onto the shower base, starting from one corner. Press it firmly onto the surface, ensuring there are no creases or air pockets. Use a roller or trowel to smooth out the membrane and ensure good contact with the substrate. Repeat this process for the walls, carefully aligning the membrane with the edges of the base.
Pay special attention to seams and corners, using a waterproofing adhesive or tape specifically designed for sealing membrane joints. Apply the adhesive or tape according to the manufacturer’s instructions, ensuring a secure and watertight bond.
Once the membrane is applied to the entire shower base and walls, allow it to cure as per the manufacturer’s recommendations. This is usually 24 to 48 hours, depending on the specific product used. It’s essential to follow the curing time to ensure the membrane fully sets and bonds to the surface, providing maximum protection against water infiltration.
In summary, applying a waterproof membrane is a critical step in installing a tile shower base. By carefully preparing the surface and ensuring proper application, you can create a water-tight and leak-free shower environment. Remember to follow the manufacturer’s instructions for the specific waterproof membrane product you are using, and allow sufficient curing time for a successful installation.
Setting The Tiles
Mixing the Thinset Mortar
Once you have properly prepared the shower base and walls, it’s time to mix the thinset mortar. Thinset mortar is a special type of adhesive that is specifically designed for tile installation. It’s important to mix the thinset correctly to ensure a strong bond between the tiles and the shower base.
To mix the thinset mortar, you’ll need a bucket and a mixing paddle. Start by adding the recommended amount of water to the bucket. Then, gradually add the thinset powder while continuously mixing with the paddle. Aim for a smooth and creamy consistency, similar to peanut butter. Avoid adding too much water, as it can weaken the mortar’s bonding strength.
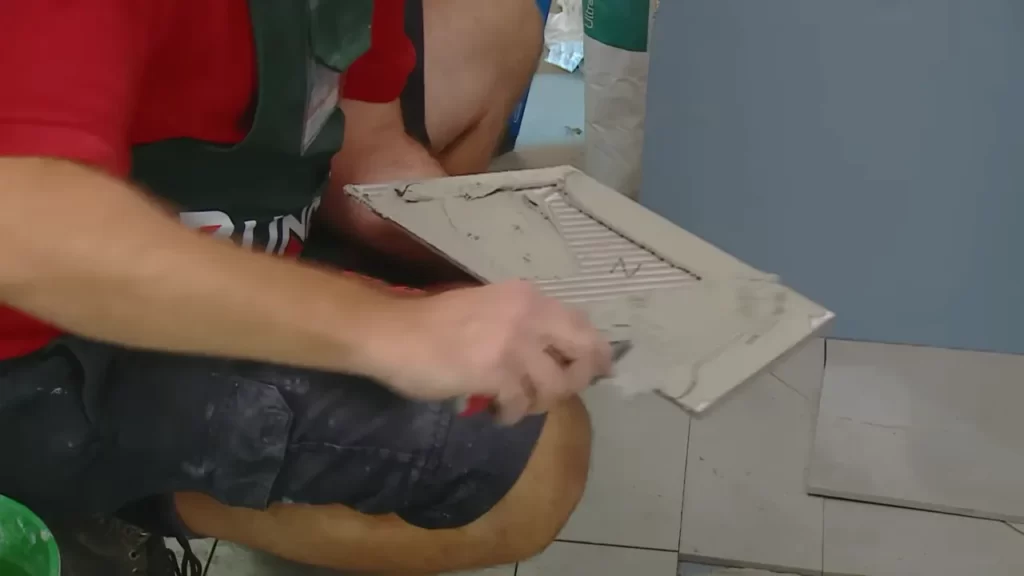
Applying the Mortar on the Base and Walls
Once the thinset mortar is properly mixed, it’s time to apply it to the shower base and walls. Start by scooping a small amount of mortar onto the trowel and then apply it evenly on the shower base, working in small sections at a time. Use the notched side of the trowel to create grooves in the mortar, which will help with the adhesion of the tiles.
Next, apply the mortar onto the walls using the same technique. Make sure to spread the mortar evenly, covering the entire surface where the tiles will be installed. It’s important to work quickly and efficiently, as the mortar can dry and become difficult to work with.
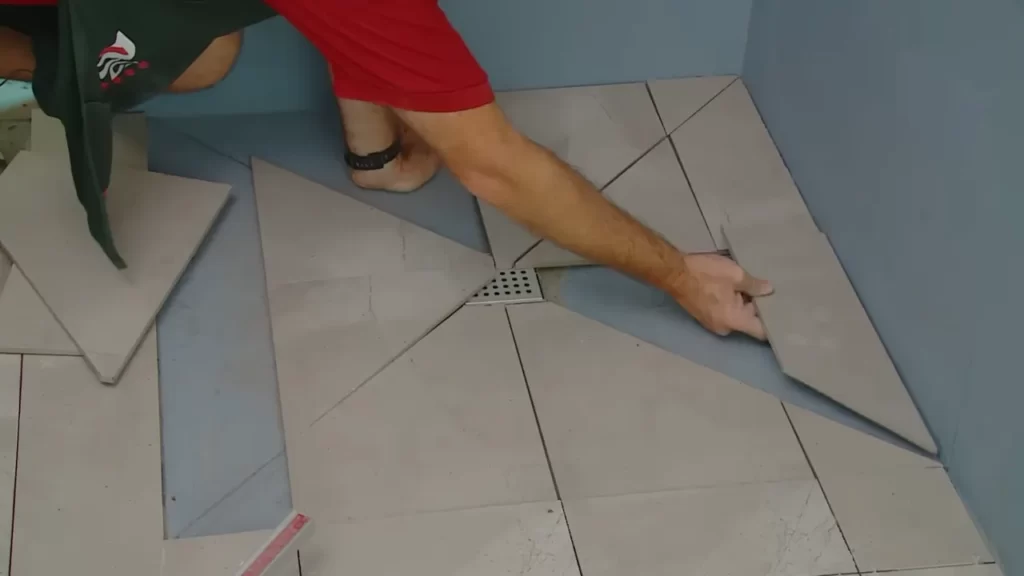
Now, it’s time to set the tiles on the shower base and walls. Start by placing the tiles on the mortar, firmly pressing them down to ensure proper adhesion. Use tile spacers to maintain consistent spacing between the tiles, ensuring an even and professional-looking finish.
Work in small sections at a time, applying the mortar and setting the tiles as you go. This will prevent the mortar from drying out before you have a chance to set the tiles. As you progress, periodically check for level and adjust as necessary to ensure a properly aligned tile installation.
Once all the tiles are set, allow the mortar to dry according to the manufacturer’s instructions. This may take anywhere from 24 to 48 hours. Avoid putting any weight or pressure on the tiles during the drying process to ensure a strong and durable installation.
And there you have it – a step-by-step guide on how to install a tile shower base and set the tiles. Follow these instructions carefully, and you’ll have a beautiful and functional tile shower that will stand the test of time.
Grouting The Tiles
Once you have successfully installed the tile shower base and allowed it to set properly, the next crucial step is grouting the tiles. This process involves filling the gaps between the tiles with a grout mixture, which not only enhances the overall appearance of your shower but also provides a protective barrier against water damage. In this section, we will guide you through the steps of preparing the grout mixture, applying it to the tile joints, and cleaning any excess grout.
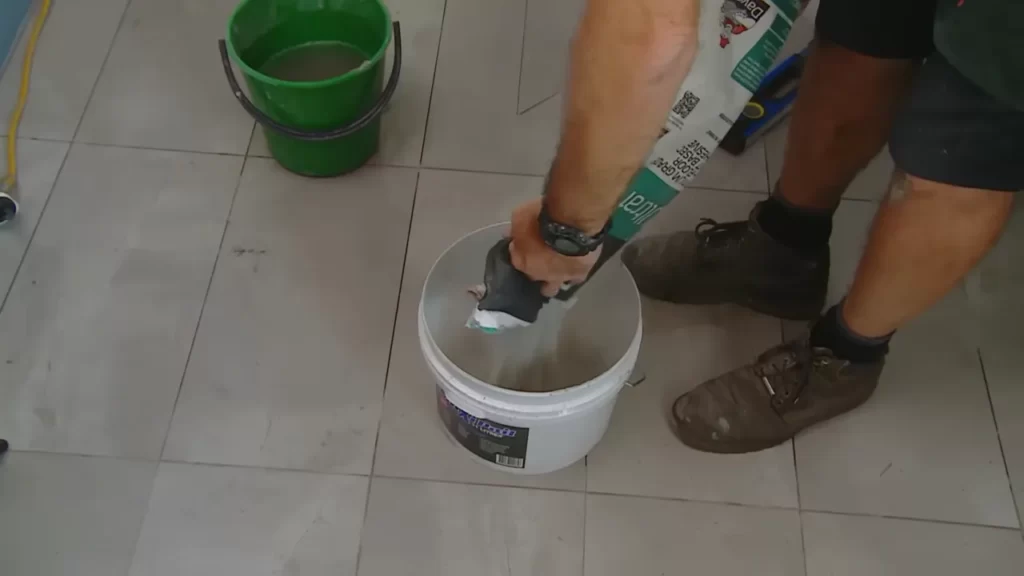
Preparing the Grout Mixture
Before you embark on the grouting process, it is essential to prepare the grout mixture correctly. Follow the steps below:
- Gather all the necessary materials, including grout, water, a grout float, and a grout sponge.
- Read the instructions on the grout packaging carefully to determine the appropriate water-to-grout ratio. Typically, the ratio is one part water to four parts grout.
- In a clean mixing container, pour the recommended amount of water.
- Gradually add the grout powder to the water while stirring continuously. Use a grout mix paddle or a drill with a mixing attachment for efficient blending. The goal is to achieve a thick, paste-like consistency.
- Allow the grout mixture to sit for a few minutes to activate the bonding agents.
Applying the Grout to the Tile Joints
Once you have prepared the grout mixture, it’s time to apply it to the tile joints. Take note of the following steps to ensure a successful grouting process:
- Hold the grout float at a 45-degree angle and scoop a generous amount of grout onto its surface.
- Using the float, spread the grout evenly over the tiles, making sure that the gaps between each tile are fully filled. Apply firm, diagonal strokes to ensure proper grout penetration.
- Continue adding more grout to the float as needed and repeat the process until all tile joints are covered.
Cleaning Excess Grout
After applying the grout, it is crucial to clean up any excess grout to achieve a polished and professional finish:
- Wait for the grout to set for approximately 15-30 minutes, or until it reaches a tacky consistency.
- Using a damp grout sponge, gently wipe away the excess grout from the tile surface. Be careful not to disturb the grout lines.
- Rinse the sponge regularly to ensure effective removal of the grout residue.
- Once you have removed most of the excess grout, buff the tiles with a clean, dry cloth to reveal their lustrous appearance.
By following these steps, you will be able to successfully grout the tiles of your shower base. Remember to take your time and pay attention to detail to achieve stunning results. Now that you have mastered the art of grouting, you can take pride in your beautifully tiled shower.
Sealing The Tile Shower Base
After successfully installing a tile shower base, a crucial step to ensure its longevity and functionality is sealing it properly. Proper sealing prevents water damage and mold growth, helping to maintain a clean and leak-free shower space. In this section, we will discuss how to choose the right sealant and the correct application technique for sealing the tile shower base.
Choosing the Right Sealant
When selecting a sealant for your tile shower base, it is important to choose a product that is specifically designed for bathroom use and is suitable for the type of tile material you have installed. Look for sealants that offer high water-resistance, mold and mildew resistance, and durability. Silicone sealants are commonly used for shower bases due to their excellent waterproof properties. Ensure the sealant is available in a color that matches or complements your tile for a seamless finish.
Applying the Sealant around the Base and Corners
To effectively seal the tile shower base, follow these steps:
- Thoroughly clean the base surface and corners with a non-abrasive cleaner and let it dry completely.
- Cut the tip of the sealant tube at a 45-degree angle using a utility knife.
- Insert the sealant tube into a caulking gun and apply a small bead of sealant along the edge of the tile base where it meets the floor, starting from one corner.
- Continue applying the sealant in a consistent manner, moving along the base edge until you reach the opposite corner.
- For corners, apply the sealant in a circular motion, ensuring a continuous and even line of sealant along both sides of the corner. This helps to create a watertight seal.
- Smooth the applied sealant with a caulk smoothing tool or a damp finger, removing any excess and creating a neat finish.
- Allow the sealant to dry according to the manufacturer’s instructions before using the shower.
Note: It is important to follow the manufacturer’s instructions for proper application and drying time of the sealant. Additionally, regular maintenance and resealing may be required to keep the shower base in optimal condition.
Testing The Shower Base
After complete installation of the tile shower base, it’s crucial to ensure its durability and functionality. Testing the shower base involves two essential steps: checking for leaks and ensuring proper drainage.
Leakage can lead to severe water damage and unnecessary expenses, so it’s essential that you detect and fix any leaks before proceeding further. Similarly, ensuring proper drainage ensures optimal functionality and prevents water pooling in the shower area. By following these steps, you can confidently test your newly installed tile shower base and enjoy a leak-free and well-draining shower experience.
Checking for Leaks
To check for leaks in your tile shower base, follow these simple steps:
- Close the shower drain by placing a stopper or covering it securely with duct tape.
- Fill the shower floor with water up to a level of about 1-2 inches.
- Observe the shower base carefully for any signs of leaks, such as water seeping through the grout lines or pooling in certain areas.
- If you notice any leaks, mark the affected areas and empty the water from the shower floor.
- Allow the shower floor to dry completely.
- Apply a suitable waterproof sealant or caulking to the marked areas and ensure proper sealing.
- Repeat the test by filling the shower floor with water again and recheck for leaks.
Remember, even a small leak can cause significant damage over time, so it’s crucial to fix any leaks promptly. By diligently checking for leaks and taking appropriate measures to address them, you can ensure that your tile shower base remains watertight and free from any potential leaks.
Ensuring Proper Drainage
A properly functioning drainage system is essential for an efficient and hassle-free shower experience. To ensure proper drainage in your tile shower base, follow these steps:
- Fill the shower floor with water up to a level of about 1-2 inches.
- Observe the water flow and drainage pattern.
- The water should drain steadily and efficiently without any pooling or slow draining.
- If you notice any issues with drainage, such as sluggish or inadequate water flow, there might be an obstruction or a problem with the drain assembly.
- Inspect the drain assembly for any debris or blockages and clean it thoroughly if necessary.
- Conduct another test by filling the shower floor with water and check if the drainage has improved.
Ensure that the water drains quickly and completely, leaving no residual water on the shower floor. Proper drainage not only prevents water accumulation but also helps in maintaining the cleanliness and longevity of your tile shower base.
By prioritizing thorough testing and ensuring that your tile shower base is leak-free and adequately draining, you can complete the installation process with confidence. Taking the time to perform these tests will provide you with the peace of mind that your shower base is durable, functional, and will provide you with many years of enjoyable shower experiences.
Completing The Bathroom Renovation
Completing the Bathroom Renovation
When it comes to renovating your bathroom, installing a tile shower base is a crucial step in achieving a functional and stylish space. Once the tile shower base is installed and waterproofed, you’re almost at the finish line! In this section, we will discuss the final touches you need to complete your bathroom renovation. From reinstalling fixtures and accessories to cleaning up the work area, we’ll walk you through the remaining steps to ensure your bathroom project concludes with success.
Reinstalling Fixtures and Accessories
With the tile shower base securely in place, it’s time to reinstall the fixtures and accessories that will bring your bathroom to life. This includes items such as the showerhead, faucet handles, towel bars, and other elements that were removed during the renovation process. Reinstalling these fixtures may involve following specific manufacturer instructions or seeking the help of a professional plumber, especially if any plumbing connections need to be made or adjusted.
Cleaning Up the Work Area
After the long hours and hard work you’ve put into the bathroom renovation, it’s finally time to enjoy the fruits of your labor. But before you can relax and revel in your beautiful new shower, there’s one last task to tackle – cleaning up the work area. Removing all construction debris, dust, and excess grout is essential to ensure a clean and safe environment. Start by sweeping or vacuuming the floor, then wipe down surfaces with a mild cleaning solution to remove any residue. Be sure not to overlook corners, crevices, and hard-to-reach areas where dirt may have accumulated during the installation process.
Below is a simplified, easy-to-follow list of steps to complete the bathroom renovation:
1. Remove all construction debris from the work area and dispose of it properly.
2. Sweep or vacuum the floor to remove any loose dirt or dust.
3. Use a mild cleaning solution to wipe down all surfaces, including walls and tiles, to remove any residue or grout haze.
4. Reinstall fixtures and accessories, following manufacturer instructions or seeking professional help if necessary.
5. Double-check all connections and ensure that everything is properly secured and functioning.
6. Give the shower base a final inspection to make sure there are no leaks or cracks.
7. Test the shower and all other fixtures to ensure they are working correctly.
8. Enjoy your brand new, refreshed bathroom space!
In conclusion, completing a bathroom renovation involves reinstalling fixtures and accessories and cleaning up the work area. Following these final steps will help ensure that your tile shower base installation is the finishing touch to a successful project. By paying attention to detail and taking the time to clean up properly, you can step back and admire the beautiful transformation of your bathroom. Now it’s time to relax and enjoy the fruits of your hard work.
Frequently Asked Questions
What Do You Put Under A Tile Shower Floor?
To create a tile shower floor, you typically put a layer of cement mortar as the base, followed by a waterproofing membrane. Then, the tile is set in thinset mortar. This helps ensure a solid, waterproof foundation for a durable and beautiful shower floor.
What Do You Use For The Base Of A Tile Shower?
The base of a tile shower is typically made with a cement backer board or a waterproofing membrane.
How Do You Do A Tile Shower Base?
To create a tile shower base, follow these steps: 1. Start by prepping the area and installing the drain. 2. Build a sloping mortar bed for proper drainage. 3. Install a waterproof membrane over the sloping mortar bed. 4. Lay the tile using thinset mortar, making sure to create a slope towards the drain.
5. Lastly, grout the tiles and seal the grout to prevent water damage.
Do You Put Shower Base In Before Tiling?
Yes, it is recommended to install the shower base before tiling. Installing the base first ensures proper waterproofing and prevents leaks. It also provides a stable foundation for the tiles and ensures a professional finish.
Conclusion
To sum it up, installing a tile shower base requires careful planning and precise execution. By following the step-by-step instructions outlined in this blog post, you can confidently tackle this project and enjoy the benefits of a beautiful and functional shower base.
Remember to measure accurately, choose the right materials, and pay attention to detail for a successful installation. So, roll up your sleeves, put on your DIY hat, and create a shower space that’ll bring satisfaction for years to come. Happy tiling!