To install a stand-alone tub, first, measure the space and make sure it fits properly. Then, place the tub in the desired location and connect the plumbing fixtures.
Installing a stand-alone tub can add a touch of elegance and luxury to your bathroom. Whether you’re renovating your current space or starting from scratch, a freestanding tub can be a stunning focal point. However, the installation process requires careful planning and attention to detail to ensure a seamless and functional result.
We will guide you through the steps to install a stand-alone tub, from measuring the space to connecting the plumbing fixtures. By following these instructions, you’ll be able to enjoy a relaxing soak in your new tub in no time. So, let’s get started!
Why Choose A Stand Alone Tub
Benefits of a Stand Alone Tub
Are you considering a bathroom remodel or building a new home? One of the decisions you’ll need to make is what type of bathtub to install. While there are many options available, a stand alone tub offers unique benefits that make it worth considering.
First and foremost, stand alone tubs create a stunning focal point in any bathroom. Unlike traditional built-in tubs, which are often tucked away and hidden, stand alone tubs take center stage and can be a beautiful addition to your overall bathroom design. They come in a variety of styles, shapes, and materials, allowing you to choose a tub that fits your personal taste and complements your bathroom decor.
Another advantage of stand alone tubs is their versatility. These tubs can be placed anywhere in the bathroom, giving you more flexibility in your layout. You can position them near a window to take advantage of natural light, or place them in the center of the room for a luxurious and spacious feel. Some stand alone tubs even come with freestanding faucets, further enhancing their flexibility in terms of placement.
Factors to Consider Before Installation
Before you rush to install a stand alone tub in your bathroom, there are a few factors you should consider:
- Size: Measure the available space in your bathroom to ensure the tub you choose will fit comfortably. Consider the dimensions of the tub, as well as any additional space needed for plumbing and installation.
- Plumbing: Stand alone tubs often require special plumbing arrangements, so it’s important to consult with a professional plumber to ensure your bathroom is equipped to handle the installation.
- Weight: Stand alone tubs can be heavy, especially if they are made from materials like cast iron or stone. Make sure your bathroom floor can support the weight of the tub, and consider reinforcing the floor if necessary.
- Maintenance: Different materials require different levels of maintenance, so consider your willingness to clean and care for the tub. For example, acrylic tubs are easy to clean and maintain, while natural stone tubs may require more attention.
Different Types of Stand Alone Tubs Available
Stand alone tubs come in various types, each with its own unique features and advantages. Here are a few popular options:
| Type | Description |
|---|---|
| Clawfoot Tubs | Classic and vintage-inspired, these tubs have claw-shaped feet and add a touch of elegance to any bathroom. |
| Freestanding Pedestal Tubs | These tubs sit on a pedestal base, adding a modern and sleek look to the bathroom while still offering the luxury of a stand alone tub. |
| Soaking Tubs | Designed for ultimate relaxation, soaking tubs are deeper and offer a more immersive bathing experience. |
| Slipper Tubs | Featuring a higher backrest on one end, slipper tubs provide added comfort and support, making them ideal for long, leisurely baths. |
Each type of stand alone tub has its own unique charm and benefits, so take the time to explore your options and choose the one that best suits your needs and preferences.
Preparing For The Installation
When it comes to adding a touch of luxury and relaxation to your bathroom, a stand alone tub can be the perfect addition. Whether you’re renovating your existing bathroom or building a new one, installing a stand alone tub requires proper planning and preparation. This article will guide you through the necessary steps to ensure a successful installation. The first step is to measure your bathroom space, select the right stand alone tub, and gather the necessary tools and materials.
Measuring the bathroom space
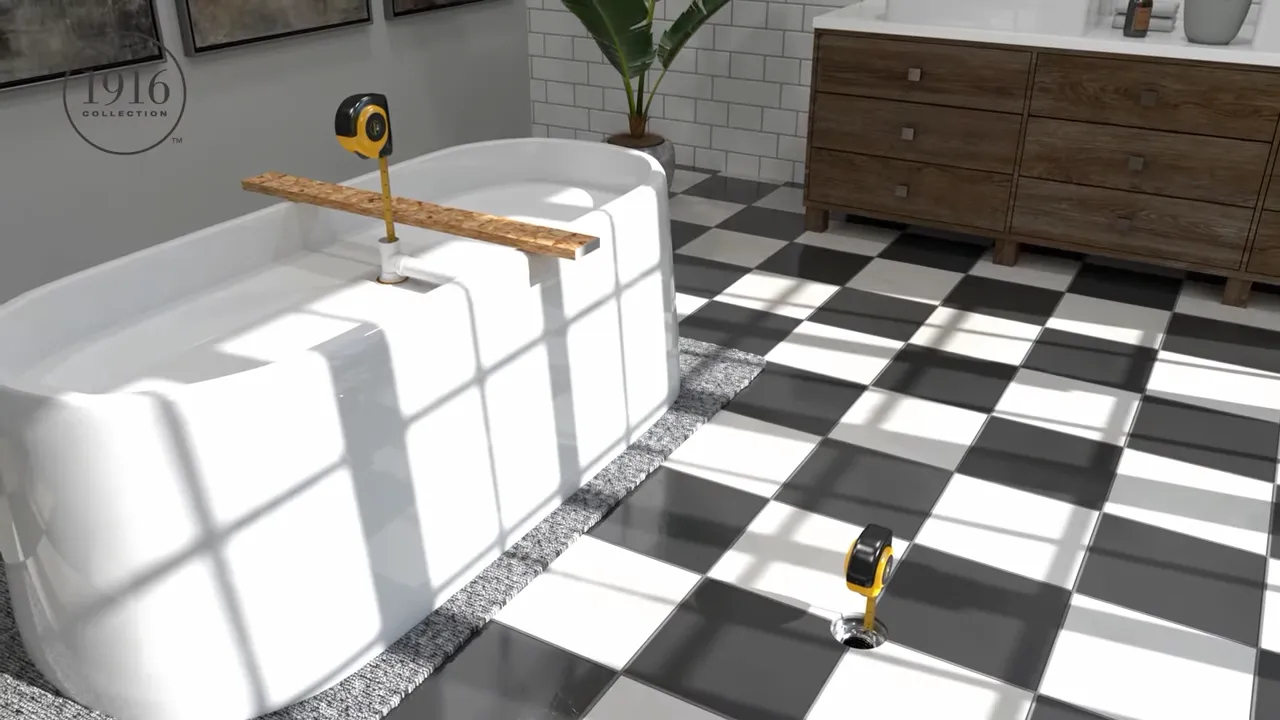
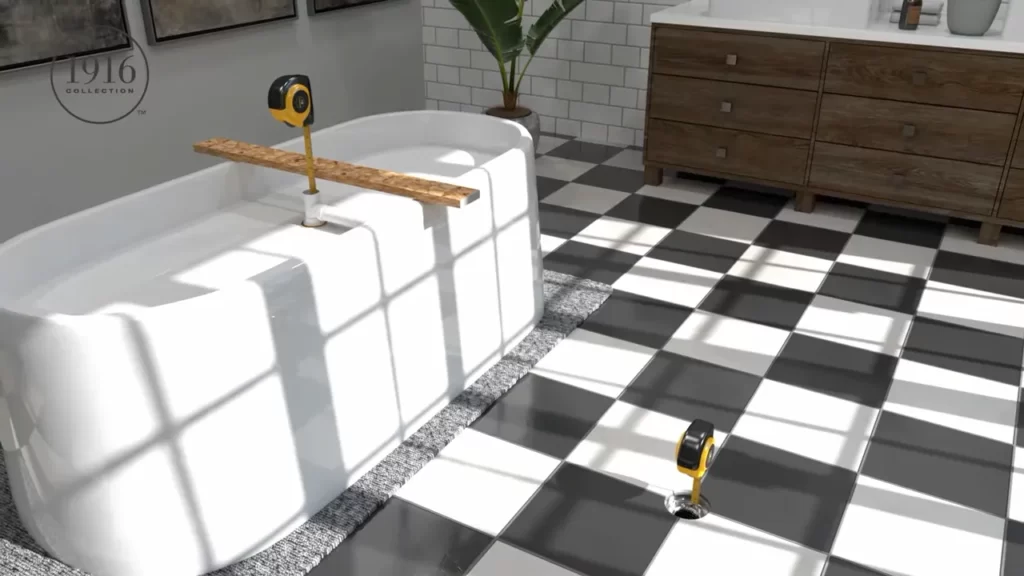
Before you start shopping for a stand alone tub, it’s crucial to measure your bathroom space to determine the right size tub for your needs. To accurately measure the available space, follow these simple steps:
- Clear out any obstacles, such as furniture or accessories, from the bathroom.
- Take a measuring tape and measure the length, width, and height of the area where you plan to install the tub.
- Make sure to take note of any architectural features, such as windows or doors, that could impact the installation.
With these measurements in hand, you can now move on to selecting the right stand alone tub for your space.
Selecting the right stand alone tub for your space
Choosing the perfect stand alone tub involves considering both the aesthetic appeal and the practicality of the tub. Keep the following factors in mind during the selection process:
- Size: Compare the measurements of your bathroom space with the dimensions of the tub to ensure a proper fit.
- Style: Consider the overall design of your bathroom and select a stand alone tub that complements it. Whether you prefer a classic clawfoot tub or a sleek modern design, there are options to suit every taste.
- Material: Stand alone tubs can be made of various materials including acrylic, cast iron, and stone. Each material has its unique advantages and disadvantages in terms of durability, insulation, and maintenance.
By taking these factors into account, you can make an informed decision and find the stand alone tub that meets both your aesthetic preferences and functional requirements. Once you’ve made your selection, it’s time to gather the necessary tools and materials for the installation.
Gathering the necessary tools and materials
To ensure a smooth installation process, it’s important to gather all the necessary tools and materials beforehand. Here’s a list of the items you’ll likely need:
| Tools | Materials |
|---|---|
| Adjustable wrench | Stand alone tub |
| Pipe wrench | Plumber’s putty |
| Hacksaw | Drain and overflow kit |
| Level | Plumbing connectors and fittings |
| Tape measure | Plumbing sealant |
| Screwdriver | Plumbing supply lines |
Check with your specific tub manufacturer or installation guide to ensure you have all the necessary tools and materials required for your specific installation. Having everything prepared beforehand will save you time and reduce the chances of any unexpected delays.
With your bathroom space measured, the right stand alone tub selected, and the tools and materials gathered, you’re now ready to move on to the installation process. Stay tuned for the next part of this series, where we will guide you through the step-by-step instructions for installing your new stand alone tub.
Installation Process Step By Step
When it comes to installing a stand alone tub, following a step-by-step process is essential to ensure a successful installation. Each stage of the installation process requires careful attention to detail, from removing the old bathtub or shower to testing for leaks and ensuring proper functionality. In this guide, we will walk you through the installation process step by step, highlighting key points to consider along the way.
Removing the old bathtub or shower
The first step in the installation process is to remove the old bathtub or shower. This may involve disconnecting the plumbing fixtures, removing any surrounding tiles or panels, and dismantling the old unit. It is important to wear protective gloves and eyewear during this process to avoid injury. Once the old unit is removed, the area should be thoroughly cleaned and prepared for the new stand alone tub.
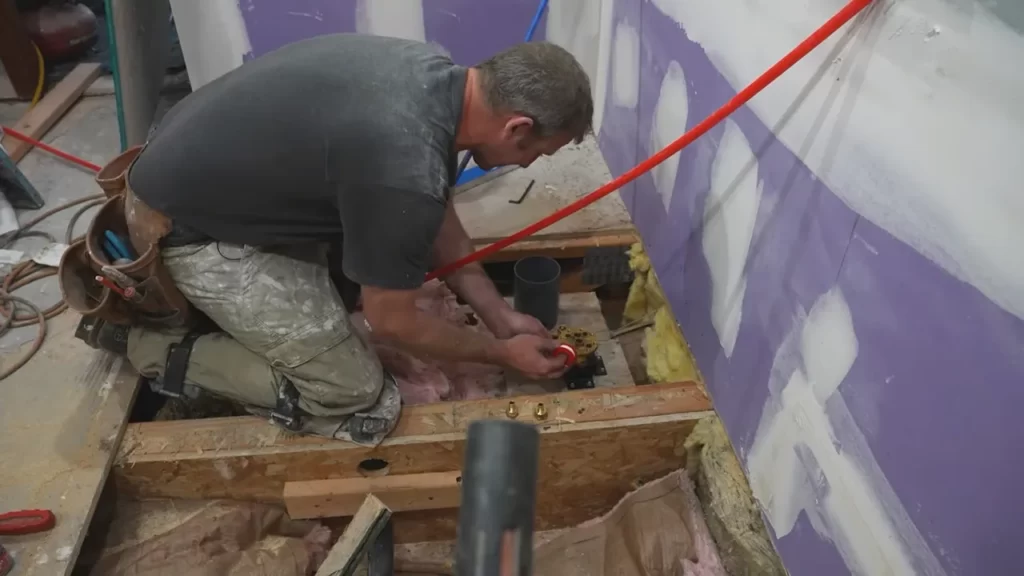
Installing the plumbing and drainage
After the old unit is removed, the next step is to install the plumbing and drainage for the stand alone tub. This may require adjusting or relocating existing plumbing lines to accommodate the new fixture. It is important to ensure that the plumbing and drainage are properly connected and aligned to prevent any leaks or issues in the future. If needed, consult a professional plumber for assistance.
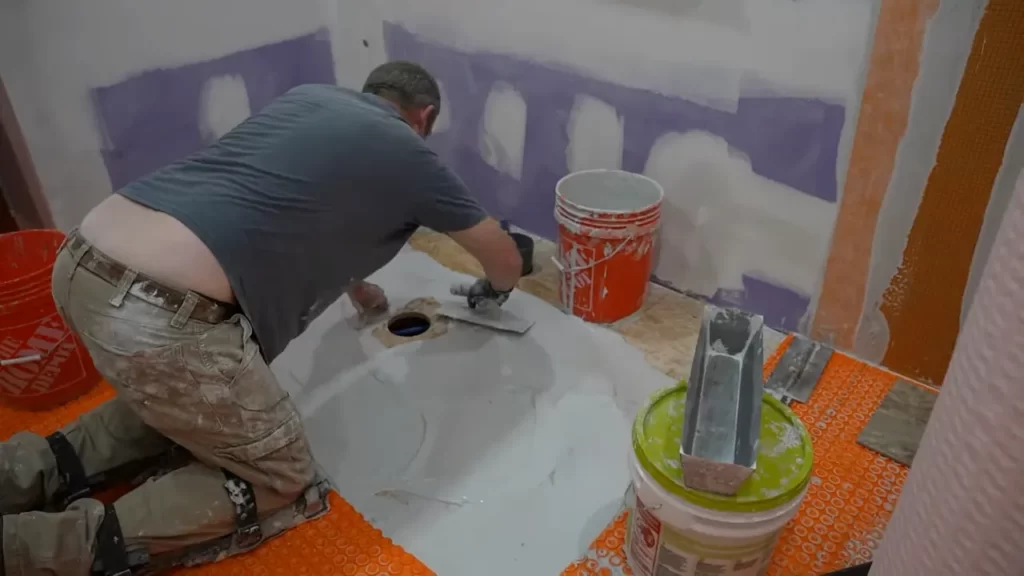
Leveling the floor for the stand alone tub
Before placing the stand alone tub in position, it is crucial to ensure that the floor is level. This can be done by using a leveling tool to check for any uneven areas. If the floor is not level, adjustments may need to be made by adding or removing subflooring. A level floor is essential to prevent any wobbling or instability of the tub once it is installed.
Placing and securing the tub in position
Now that the floor is level, it is time to place the stand alone tub in position. This should be done carefully to avoid any damage to the tub or surrounding surfaces. Once the tub is in position, it should be securely anchored to prevent any movement or shifting. Follow the manufacturer’s instructions for the specific method of securing the tub, whether it be through brackets, screws, or other means.
Connecting the plumbing fixtures
With the tub securely in place, it is time to connect the plumbing fixtures. This includes attaching the faucet, showerhead, drain, and any other necessary components. It is important to ensure that all connections are tight and secure to prevent any leaks. Test each fixture by turning on the water and checking for proper functionality.
Testing for leaks and ensuring proper functionality
The final step in the installation process is to test for leaks and ensure that the stand alone tub is functioning properly. Check all connections and joints for any signs of leakage, such as dripping or pooling water. Adjust or tighten any fittings as necessary. Run the water and test the tub to ensure that it is draining properly and that there are no issues with water flow or temperature. Once you are satisfied with the functionality of the tub, the installation process is complete!
Finishing Touches And Considerations
Once you have successfully installed your stand alone tub, there are a few important finishing touches and considerations to keep in mind to ensure a polished and functional end result. These include sealing and caulking the tub edges, adding any necessary accessories or fixtures, cleaning and maintaining the stand alone tub, and personalizing your tub area.
Sealing and Caulking the Tub Edges
One crucial step in completing your stand alone tub installation is properly sealing and caulking the edges. This helps to prevent water leaks and damage to your bathroom flooring and walls. Start by cleaning the surfaces that will be sealed, ensuring they are free from any dust or debris. Next, apply a high-quality silicone sealant along the edges, evenly and smoothly, using a caulk gun. Be sure to fill any gaps completely to create a watertight seal. After applying the sealant, use a damp cloth or your finger to smooth the caulking, ensuring a neat and professional finish. Allow the sealant to dry completely before using the tub.
Adding Any Necessary Accessories or Fixtures
To enhance the functionality and aesthetics of your stand alone tub, consider adding any necessary accessories or fixtures. This could include a tub filler, handheld showerhead, towel bars, or even a bath caddy for holding your favorite book or a glass of wine while you relax. These additions not only make your bathing experience more convenient but also add a touch of luxury to your bathroom space. Remember to carefully follow the manufacturer’s instructions for installing these accessories to ensure proper functionality and longevity.
Cleaning and Maintaining the Stand Alone Tub
To keep your stand alone tub looking its best and functioning properly, regular cleaning and maintenance are essential. Depending on the material of your tub, you may need to use specific cleaning products or solutions to avoid damage. Check the manufacturer’s recommendations for cleaning instructions and follow them diligently. A gentle cleanser, warm water, and a soft cloth are usually safe options for most tub materials. Avoid using abrasive cleaners or harsh brushes that can scratch or dull the surface. Additionally, be sure to address any mineral deposits or soap scum buildup promptly to prevent staining or discoloration.
Tips for Personalizing Your Tub Area
To make your stand alone tub area truly your own, consider personalizing it with a few thoughtful touches. This could include adding scented candles, hanging artwork or photos, placing plants or flowers nearby, or installing ambient lighting. These simple additions create a relaxing and inviting atmosphere, transforming your bathroom into a spa-like retreat. Remember to keep any decorative elements away from direct contact with water to avoid damage. Get creative and explore options that reflect your personal style and preferences, turning your tub area into a haven of relaxation and serenity.
Frequently Asked Questions
Are Freestanding Tubs Hard To Install?
Freestanding tubs are not hard to install. They come with clear instructions and can be easily installed by following the provided guidelines. A professional plumber may be hired for assistance, but with basic plumbing knowledge, installation can be done without any difficulties.
What Holds A Freestanding Tub In Place?
A freestanding tub is held in place by its weight and gravity. The tub is typically made of heavy materials like cast iron or stone, which help stabilize it. In some cases, a mounting bracket or leveling pads may be used to secure the tub to the floor.
Do You Need To Tile Under A Freestanding Tub?
Yes, it is recommended to tile under a freestanding tub. Tiling provides a protective barrier against water damage, prevents mold, and enhances the overall aesthetics of the bathroom. It also ensures that any potential leaks are contained and do not seep into the subfloor.
How Are Freestanding Baths Installed?
Freestanding baths are installed by positioning them in the desired location, making sure the floor is level for stability. Connect the drainpipe to the bath’s waste outlet and attach the taps or faucet. Seal the joints with waterproof silicone sealant to prevent leaks.
Finally, test the bath for proper functioning.
Conclusion
Installing a stand-alone tub may seem like a daunting task, but with the right guidance, it can be a seamless process. By following the step-by-step instructions outlined in this blog post, you can confidently transform your bathroom into a luxurious oasis.
From choosing the perfect tub to ensuring proper installation, we have covered all the essentials. So go ahead, take the plunge and enjoy your new stand-alone tub!