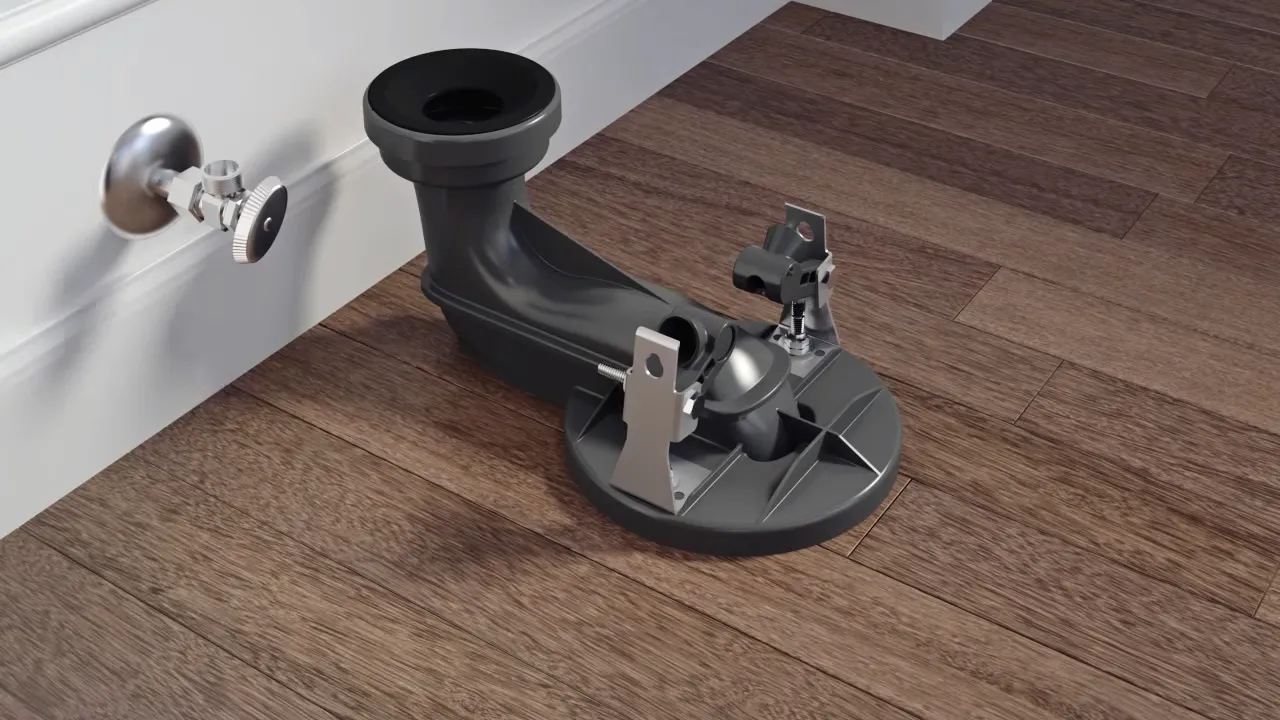
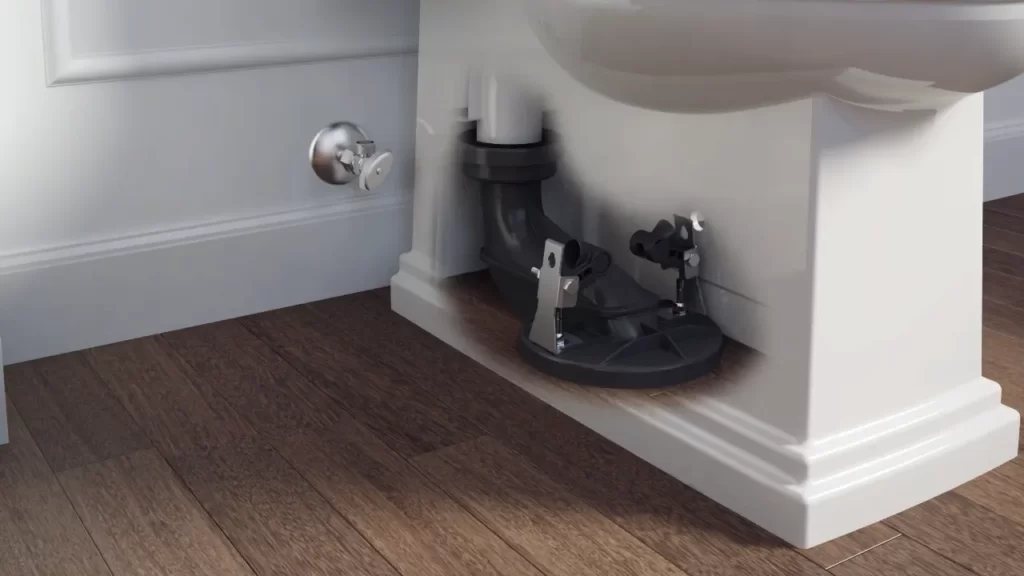
To install a skirted toilet, first, place the toilet base onto the floor, aligning the waste outlet with the drain flange. Then, connect the water supply line to the tank and secure it with a wrench.
Finally, tighten the bolts to secure the toilet base to the floor. Skirted toilets offer a sleek and modern appearance while also making cleaning and maintenance easier. If you’re looking to upgrade your bathroom with a skirted toilet, you’ve come to the right place.
In this guide, we will walk you through the simple steps of how to install a skirted toilet. By following these instructions, you can have your new toilet up and running in no time. So, let’s dive in and learn how to install a skirted toilet for a stylish and efficient bathroom upgrade.
Choosing The Perfect Skirted Toilet Design
When it comes to selecting a skirted toilet, design plays a crucial role in enhancing the overall aesthetics of your bathroom. With its sleek profile and hidden trapway, a skirted toilet offers a modern and seamless look that elevates the style quotient of any bathroom. Whether you are renovating your existing bathroom or building a new one, choosing the right skirted toilet design can make all the difference. In this article, we will discuss the factors to consider when selecting a skirted toilet design, as well as popular designs and their unique features.
Factors to consider when selecting a skirted toilet design
Choosing the perfect skirted toilet design involves several factors that you should consider. These considerations will help you determine which design will best suit your bathroom and meet your functional requirements.
1. Bathroom Style: Consider the overall style of your bathroom. Is it modern, traditional, or transitional? Look for a skirted toilet design that complements the existing style and adds to the overall aesthetic appeal.
2. Size and Shape: Assess the available space in your bathroom and choose a skirted toilet design that fits comfortably. Consider the shape of the toilet bowl, whether it is round or elongated, to ensure comfort and convenience.
3. Flush Mechanism: Different skirted toilet designs come with various flushing mechanisms, such as gravity-fed, pressure-assisted, or dual-flush. Consider your water-saving preferences and individual needs before selecting a specific design.
4. Easy Maintenance: Skirted toilets with smooth surfaces and concealed trapways are easier to clean and maintain. Look for designs that minimize dirt accumulation, reduce the need for frequent cleaning, and provide hassle-free maintenance.
Popular skirted toilet designs and their features
Now that we have discussed the factors to consider, let’s explore some popular skirted toilet designs and their unique features:
| Design | Features |
|---|---|
| Clean, minimalist design | – Concealed trapway – Soft-close seat – Dual-flush mechanism |
| Traditional design | – Detailed base and bowl – Chrome lever – Efficient flush system |
| Contemporary design | – Sleek lines – Wall-mounted option – Water-saving flush |
Note: The features mentioned above are just examples, and each design may offer additional options and features based on the manufacturer and model. Ensure you consider specific features that align with your preferences and needs.
By considering these factors and exploring popular skirted toilet designs, you can make an informed decision and choose the perfect skirted toilet design that not only adds style to your bathroom but also meets your functional requirements. Remember to prioritize both aesthetics and functionality to create a beautiful and practical bathroom space.

Steps For Preparing The Installation Area
Clearing the old toilet and preparing the space for the new skirted toilet
Before you can install your new skirted toilet, it’s important to clear the old toilet and prepare the space properly. This ensures a smooth and successful installation process. Follow these steps to get started:
Gathering the necessary tools and materials for the installation process
To make the installation process easier, gather all the necessary tools and materials beforehand. This will save you time and frustration during the installation. Here is a list of the essential tools and materials you will need:
| Tools | Materials |
|---|---|
| Adjustable wrench | New skirted toilet |
| Bucket | Toilet wax ring |
| Plunger | Toilet bolts and nuts |
| Sponge or towel | Flexible supply line |
| Putty knife | Waterproof caulk |
- Turn off the water supply to the toilet by closing the shut-off valve located behind the toilet.
- Flush the toilet to empty the tank and bowl. Use a plunger to remove any remaining water from the bowl.
- Disconnect the water supply line from the bottom of the toilet tank using an adjustable wrench. Place a bucket or towel underneath to catch any water that may spill.
- Use a putty knife to remove the caps covering the toilet bolts on the base of the toilet. Unscrew the nuts from the bolts and carefully lift the toilet off the flange. Set the old toilet aside.
- Inspect the flange and remove any old wax residue using a putty knife. Make sure the flange is clean and in good condition.
- Install the new wax ring onto the flange, making sure it is centered.
- Place the new skirted toilet onto the flange, aligning the holes on the base with the toilet bolts. Press down firmly to seal the wax ring.
- Secure the toilet by tightening the nuts onto the toilet bolts. Be careful not to overtighten, as it may crack the toilet.
- Reconnect the water supply line to the bottom of the toilet tank and tighten with an adjustable wrench.
- Turn on the water supply to the toilet by opening the shut-off valve. Check for any leaks and adjust the connections if necessary.
- Use waterproof caulk to seal around the base of the toilet, creating a watertight seal.
- Finally, flush the toilet a few times to ensure proper functioning and to check for any leaks.
Congratulations! You have successfully prepared the installation area for your new skirted toilet. Now you can move on to the next step in the installation process.

Installing The Skirted Toilet: A Step-By-Step Guide
Installing the Skirted Toilet: A Step-by-Step Guide
When it comes to upgrading your bathroom, installing a skirted toilet can be a game-changer. Not only do they provide a sleek and modern look, but they also offer easy cleaning and a more hygienic experience. If you’re ready to make the switch, we’ve got you covered with this step-by-step guide on how to install a skirted toilet.
Step 1: Removing the old toilet and inspecting the flange
The first step in installing your new skirted toilet is to remove the old one. Start by turning off the water supply to the toilet and flushing it to empty the tank and bowl. Disconnect the water supply line from the bottom of the tank and remove the bolts that secure the toilet to the floor. Carefully lift the old toilet and set it aside.
Once the old toilet is removed, take a moment to inspect the flange. The flange is the metal or plastic ring that connects the toilet to the floor and serves as a seal. Ensure that the flange is in good condition and securely fastened to the floor. If you notice any damage or instability, it may need to be repaired or replaced before proceeding to the next step.
Step 2: Ensuring the flange is level and secure
Before installing your new skirted toilet, it’s important to ensure that the flange is level and securely attached to the floor. Use a level tool to check for any unevenness. If you find that the flange is not level, you can use shims or a leveling compound to correct the issue.
Once the flange is level, secure it to the floor using screws or bolts. Make sure that the flange is tightly fastened, as it will provide stability to the toilet and prevent leaks.
Step 3: Installing the wax ring and setting the new skirted toilet
Now it’s time to install the wax ring, which will create a watertight seal between the toilet and the flange. Place the wax ring onto the flange, making sure it is centered. Gently press down on the toilet bowl to ensure a proper seal.
Carefully lower the skirted toilet onto the wax ring, aligning the mounting bolts with the corresponding holes on the flange. Press down firmly to ensure a tight connection. Use a level to ensure that the toilet is straight and adjust as necessary.
Step 4: Connecting the water supply and checking for leaks
With the toilet in place, it’s time to connect the water supply line. Attach one end of the water supply line to the fill valve at the bottom of the toilet tank. Tighten the nut using an adjustable wrench, but be careful not to overtighten and damage the connection.
Now, turn on the water supply and check for any leaks. Inspect the connection between the water supply line and the fill valve, as well as the base of the toilet. If you notice any leaks, tighten the connections or replace any damaged parts as needed.
Step 5: Adjusting the toilet seat and completing the installation
The final step is to adjust the toilet seat to ensure a comfortable fit. Most skirted toilets come with adjustable seats that can be moved forward or backward for optimal positioning. Follow the manufacturer’s instructions to adjust the seat according to your preference.
Once the toilet seat is adjusted, double-check all connections and ensure everything is properly tightened. Give the toilet a test flush to make sure it’s functioning smoothly. Finally, clean up any debris or excess wax, and you’re done! Your new skirted toilet is ready to be enjoyed.
Installing a skirted toilet may seem like a daunting task, but by following this step-by-step guide, you can easily achieve a professional installation. Remember to take your time, double-check all connections, and never hesitate to seek professional assistance if needed. Enjoy your upgraded bathroom and the sleek, modern look of your new skirted toilet!
Troubleshooting Common Skirted Toilet Installation Issues
Installing a skirted toilet can be a great way to enhance the appearance of your bathroom. However, like any installation project, it’s not always smooth sailing. In this section, we will discuss some common issues that may arise during the installation process and how to troubleshoot them. By following these tips, you’ll be able to overcome any hurdles and enjoy the benefits of your new skirted toilet.
Identifying and resolving issues with the flange or wax ring
One of the most crucial steps in installing a skirted toilet is ensuring a proper seal between the toilet and the floor. Issues with the flange or wax ring can cause leaks and other problems. Here’s how to identify and resolve these issues:
- Inspect the flange: Check to see if the flange is securely fastened to the floor. Loose or damaged flanges can cause the toilet to wobble or leak. If you notice any issues, tighten or replace the flange as needed.
- Check the wax ring: The wax ring is located between the flange and the toilet base. It creates a watertight seal. If you notice water leaks, the wax ring may be damaged or incorrectly installed. To resolve this issue, carefully remove the toilet, replace the wax ring, and reattach the toilet following the manufacturer’s instructions.
Troubleshooting leaks and addressing water supply problems
Another common issue during skirted toilet installation is leaks or problems with the water supply. Here’s what you can do to troubleshoot and resolve these problems:
- Check the water connections: Ensure that the water supply line is securely attached to both the toilet tank and the water supply valve. Use a wrench to tighten any loose connections.
- Inspect the fill valve: The fill valve is responsible for controlling the water flow into the tank. If you notice water constantly running or tank overflows, the fill valve may be faulty. Replace the fill valve if necessary.
- Addressing leaks: If you observe any water leaks around the base of the toilet, it may indicate a problem with the wax ring or flange. As mentioned earlier, inspect and replace these components if needed.
By addressing these common skirted toilet installation issues, you can ensure a successful and hassle-free installation. Remember to follow the manufacturer’s instructions and take your time to ensure everything is properly installed. With a little troubleshooting and a few adjustments, you’ll soon have a beautiful and functional skirted toilet that you can enjoy for years to come.

Tips For Proper Maintenance And Care
Cleaning and maintaining a skirted toilet for optimal performance and longevity
Proper maintenance and care are crucial for keeping your skirted toilet in top condition. By implementing a few simple tips, you can ensure its optimal performance and longevity. Regular cleaning, addressing potential issues, and preventive measures will help keep your skirted toilet functioning flawlessly for years to come.
Addressing any potential issues and preventing future problems
Maintaining a skirted toilet involves being proactive to address any potential issues and prevent future problems. Here are some important tips to keep in mind:
- Inspect for leaks regularly: Regularly check for any signs of leaks around your toilet’s base. This could indicate a faulty wax ring or loose connections. Promptly addressing leaks can prevent further damage to your bathroom floor and subfloor.
- Watch out for clogs: Be mindful of what you flush down your skirted toilet. Avoid flushing items that can cause clogs, such as excessive toilet paper, feminine hygiene products, or non-flushable materials. If a clog does occur, use a plunger or a plumbing snake to resolve it. Chemical drain cleaners should be used sparingly, as they can potentially damage the toilet’s internal components.
- Monitor water pressure: Proper water pressure is essential for the optimal functioning of your skirted toilet. Ensure that the pressure is neither too high nor too low to prevent undue stress on the toilet’s mechanisms. If you notice any irregularities, consult a professional plumber to address the issue.
- Keep the toilet clean: Regular cleaning is essential for maintaining hygiene and preventing the buildup of mineral deposits or mold. When cleaning a skirted toilet, use a mild toilet cleaner and a soft brush to gently clean the exterior surfaces. Avoid abrasive cleaners or scrub brushes that can scratch the toilet’s finish.
- Inspect and replace parts as needed: Periodically inspect the components of your skirted toilet, such as the flapper, fill valve, and flush handle. If you notice any signs of wear or malfunction, replace them promptly to prevent further damage to the toilet’s overall performance.
By following these tips for proper maintenance and care, you can ensure that your skirted toilet remains in excellent condition, providing reliable performance and longevity.
Frequently Asked Questions (Faqs)
As you prepare to install a skirted toilet, you may have some questions about the installation process and how to properly maintain it. In this section, we will address some of the most common questions that people have regarding skirted toilet installation and maintenance.
Answering common questions about skirted toilet installation
When it comes to installing a skirted toilet, it is important to have all the necessary information to ensure a smooth and successful installation. Here are some common questions about skirted toilet installation:
- Do I need a professional plumber for skirted toilet installation?
Installing a skirted toilet can be done by an experienced DIY enthusiast, but it is recommended to hire a professional plumber to ensure proper installation. A professional will have the necessary tools and knowledge to handle the job efficiently and effectively, minimizing the risk of any complications. - What tools do I need for skirted toilet installation?
To install a skirted toilet, you will need a few essential tools, including a wrench, a screwdriver, a measuring tape, and a level. Additionally, you may need sealant, caulk, and plumbing tape, depending on the specific installation requirements and your bathroom setup. - Can I install a skirted toilet on my existing plumbing?
In most cases, a skirted toilet can be installed on existing plumbing. However, it is essential to check the dimensions and requirements of the specific toilet model you have chosen to ensure compatibility with your plumbing system. If you are unsure, it is advisable to consult with a professional plumber.
Answering common questions about skirted toilet maintenance
Proper maintenance is crucial to the longevity and performance of your skirted toilet. Here are some frequently asked questions regarding the maintenance of skirted toilets:
- How do I clean a skirted toilet?
Cleaning a skirted toilet is relatively simple. Start by using a non-abrasive cleaner or mild soap and water to wipe down the outer surface of the toilet. Pay extra attention to the skirted portion, as it may collect dust and dirt. Avoid using harsh chemicals or abrasive materials that may damage the toilet’s surface. Regular cleaning will help maintain its appearance and hygiene. - Do skirted toilets require any special maintenance?
Skirted toilets do not require any special maintenance compared to traditional toilets. However, it is essential to follow the manufacturer’s instructions for cleaning and maintenance, as each toilet model may have specific recommendations. Regular inspections for leaks and malfunctions are also recommended. - How do I troubleshoot common issues with a skirted toilet?
If you encounter any issues with your skirted toilet, such as a weak flush or clogging, there are a few troubleshooting steps you can take. Firstly, check the water supply and ensure it is connected properly. If there is a weak flush, adjusting the water level in the tank may help. For stubborn clogs, consider using a plunger or a drain snake to clear the blockage. If the problem persists, it is advisable to seek professional assistance.
By addressing these common questions about skirted toilet installation and maintenance, we hope to help you feel more confident and informed as you embark on this home improvement project. Remember, proper installation and regular maintenance will ensure the functionality and durability of your new skirted toilet for years to come.
Frequently Asked Questions
Are Skirted Toilets Harder To Install?
Skirted toilets are not harder to install. They have a sleek design that conceals the trapway, making them easier to clean and maintain. The installation process is similar to traditional toilets, with a few additional steps. Overall, it’s a straightforward process that can be done by a professional plumber or a competent DIYer.
How Do You Tighten The Bolts On A Skirted Toilet?
To tighten the bolts on a skirted toilet, use a adjustable wrench or pliers to turn the nuts clockwise until they are snug. Do not overtighten, as it can crack the toilet. Make sure to check for any leaks after tightening.
How Do You Install A Skirted Toilet Seat?
To install a skirted toilet seat, first, remove the existing seat by unscrewing the bolts. Then, place the new seat over the toilet bowl and align the holes. Insert the bolts through the holes and tighten them with a screwdriver.
Finally, check for any wobbling and adjust if needed.
How Much Does It Cost To Install A Skirted Toilet?
The cost to install a skirted toilet varies depending on factors such as brand, style, and additional features. On average, you can expect to pay between $200 and $1,500 for a skirted toilet installation. Factors like labor charges and location may also affect the overall cost.
Conclusion
Installing a skirted toilet is a straightforward task that can enhance the overall aesthetic of your bathroom. By following the steps outlined in this guide, you can easily achieve a professional and efficient installation. Remember to gather all necessary tools and materials, prepare the area properly, and carefully follow the manufacturer’s instructions.
With a little patience and attention to detail, you’ll soon have a stylish and functional skirted toilet in your home. Enjoy the improved appearance and enhanced functionality of your bathroom with your newly installed skirted toilet.