
To install a shower valve rough in, first, turn off the water supply to the shower. Then, measure and mark the location for the valve, cut the necessary openings in the wall, and attach the valve to the pipes according to the manufacturer’s instructions.
Are you planning to install a shower valve rough in? This process involves essential steps like turning off the water supply, measuring and marking the valve location, cutting openings in the wall, and attaching the valve to the pipes. By following the manufacturer’s instructions, you can successfully complete this task.
In this guide, we will take you through each step to help you install a shower valve rough in with ease and precision. Let’s dive in!
Understanding The Shower Valve Rough-In Process
Understanding the Shower Valve Rough-in Process
When it comes to installing a shower valve, the rough-in process is an essential step that lays the foundation for the entire installation. Properly understanding this process is crucial in achieving a functional and durable shower system. In this section, we will delve into the importance of a proper shower valve installation, explore the components involved in a shower valve rough-in, and highlight common mistakes to avoid during this critical stage.
H3: Importance of Proper Shower Valve Installation
A proper shower valve installation is of utmost importance because it directly affects the performance and functionality of your shower. By ensuring that the valve is installed correctly, you can avoid issues such as leaks, inconsistent water pressure, and temperature fluctuations, guaranteeing a comfortable and enjoyable shower experience.
Improperly installed shower valves can result in expensive repairs down the line. From water damage to structural issues, the consequences of a faulty installation can be far-reaching. To prevent headaches and unnecessary expenses, it is crucial to adhere to the proper installation guidelines and ensure that the valve is securely fastened and sealed.
H3: Components Involved in a Shower Valve Rough-in
A shower valve rough-in involves several key components that contribute to the overall functionality of your shower. These components include:
1. Valve Body: The valve body is the core component of the shower valve system. It is responsible for regulating the flow of water and controlling temperature.
2. Valves and Cartridges: Valves and cartridges within the valve body determine the mix of hot and cold water, as well as the pressure. Different types of valves, such as thermostatic and pressure-balancing valves, offer specific functionalities and benefits.
3. Piping and Connections: Properly sized pipes and connections are crucial for optimum water flow and pressure. Choosing the right materials and following the recommended pipe sizes will ensure effective water distribution throughout the system.
4. Flanges and Escutcheons: Flanges and escutcheons provide a decorative cover for the valve, concealing any unsightly piping and creating a polished and finished look for your shower.
H3: Common Mistakes to Avoid During Installation
To achieve a successful shower valve rough-in, it is important to avoid common mistakes that can compromise the functionality and longevity of your shower system. Here are some pitfalls to steer clear of:
1. Improper Pipe Sizing: Choosing incorrectly sized pipes can lead to reduced water pressure, inadequate flow, and even clogs. Ensure you use pipes appropriate for your water supply and the fixtures you plan to install.
2. Incorrect Valve Placement: Placing the valve too high or too low can result in discomfort when adjusting the water temperature and flow. Always follow manufacturer guidelines to determine the optimal height for your valve installation.
3. Insufficient Sealant Application: Properly sealing all connections with appropriate sealant or plumber’s tape is essential to prevent leaks. Failing to do so can result in water damage and potential mold growth.
4. Lack of Planning for Future Repairs: While it is easy to focus solely on the present installation, planning for future repairs and maintenance is crucial. Provide access panels or valves that allow for easy access to the system if repairs or adjustments are needed.
5. Neglecting Building Codes and Regulations: Ensure that your shower valve rough-in adheres to local building codes and regulations. Non-compliance may lead to complications during inspections and potential penalties.
By understanding the importance of proper shower valve installation, familiarizing yourself with the components involved in a shower valve rough-in, and avoiding common installation mistakes, you can create a reliable and optimal shower system that will stand the test of time. Remember to follow manufacturer guidelines and consult with professionals if needed to ensure a successful installation.
Preparing For The Shower Valve Rough-In
Before installing a shower valve rough-in, it’s important to properly prepare the area and gather the necessary tools and materials. By following these steps, you can ensure a successful installation and save yourself from any potential headaches down the line.
Gathering the necessary tools and materials
Before you begin, gather the following tools and materials:
- Adjustable wrench
- Plumber’s tape
- Pipe cutter
- Soldering torch
- Flux and solder
- Tubing cutter
- Shower valve rough-in kit
- Pipe fittings and connectors
- Measuring tape
- Pencil
Having the right tools and materials on hand will make the installation process much smoother.
Shutting off the water supply
Before you can begin removing any existing fixtures or components, you’ll need to shut off the water supply to your bathroom. Locate the main water shut-off valve, typically found near the water meter or at the point where the water line enters your home.
| Step | Instructions |
|---|---|
| 1 | Locate the main water shut-off valve. |
| 2 | Turn the valve clockwise to shut off the water supply. |
| 3 | Open the faucet in the bathroom to drain any remaining water. |
Make sure the water supply is completely shut off and the faucet is open to drain any remaining water before proceeding with the removal of fixtures or components.
Removing any existing fixtures or components
With the water supply shut off and drained, it’s time to remove any existing fixtures or components that may interfere with the shower valve rough-in installation. This may include the showerhead, handles, trim, and any other accessories.
- Use an adjustable wrench to disconnect the showerhead
- Remove any handles or trim using a screwdriver
- Inspect the wall to ensure there are no hidden electrical wires or pipes behind the fixture
- Disconnect and remove any remaining components
By carefully removing these fixtures or components, you’ll have a clear workspace to proceed with the installation.
Step 1: Marking And Measuring
Installing a shower valve rough-in requires careful planning and precise measurements to ensure a successful installation. In this step, we will guide you through the process of marking the ideal placement for the shower valve and taking accurate measurements to prepare the wall.
Identifying the ideal placement for the shower valve
Before you start marking the wall, it is important to determine the ideal placement for the shower valve. The valve should be positioned at a convenient height for the user and installed in a location that allows easy access for maintenance or repairs in the future.
To identify the ideal placement, consider the height of the tallest member of your household. Ideally, the valve should be installed around 40-48 inches above the finished floor. This height ensures comfortable access and allows you to reach the hot and cold water controls effortlessly.
In addition to height, consider the distance between the valve and any surrounding walls or fixtures. Make sure there is ample space for the valve and handles to operate smoothly without any obstructions.
Taking accurate measurements and marking the wall
Now that you have identified the ideal placement for the shower valve, it’s time to take accurate measurements and mark the wall accordingly. This step ensures that the rough-in is properly aligned, minimizing any future issues during the installation of the shower unit.
To begin, measure the height and width of the shower valve using a measuring tape. Take note of these measurements as they will guide your markings on the wall. Using a level, draw a vertical line where the center of the valve will be located.
Next, measure the horizontal distance between the center of the valve and the adjacent walls or fixtures. Use this measurement to draw additional reference lines on the wall, ensuring that the valve will be centered perfectly.
It’s important to double-check your measurements and make any necessary adjustments before proceeding. Once you are confident in the accuracy of your markings, you can move on to the next step of the installation process.
In conclusion, marking and measuring the wall for shower valve rough-in is a critical step that sets the foundation for a successful installation. By identifying the ideal placement and taking precise measurements, you can ensure that your shower valve will be positioned correctly and function flawlessly. Stay tuned for the next step in our guide to learn how to proceed with the installation process.
Step 2: Cutting And Preparing The Opening
Once you have identified the location for your shower valve rough-in, it’s time to move on to the next step: cutting and preparing the opening. This step is crucial to ensure that the valve is properly installed and functions as intended.
Creating the opening in the wall for the shower valve
To begin, you need to create an opening in the wall where you plan to install the shower valve. Here’s how you can do it:
- Start by measuring the height and width of the valve, as specified by the manufacturer. This will help you determine the size of the opening you need to make.
- Use a stud finder to locate any studs or plumbing pipes behind the wall. It’s important to avoid cutting into these to ensure the structural integrity of the wall.
- Using a pencil, mark the outline of the opening on the wall, ensuring it is centered and level with the faucet and showerhead.
- Put on safety goggles and use a reciprocating saw or a drywall saw to carefully cut along the marked outline. Take your time and make precise cuts to ensure a clean and accurate opening.
By following these steps, you can create a neat and properly sized opening in the wall to accommodate the shower valve.
Ensuring the opening is the correct size and shape
Once the opening is made, it’s essential to ensure that it is the correct size and shape to accommodate the valve. Here’s what you should do:
- Double-check the measurements of the valve and compare them to the opening you created. They should match closely to ensure a snug fit.
- Trim any excess drywall or adjust the opening if needed, using a utility knife or a drywall saw. It’s crucial to be meticulous at this stage to guarantee a perfect fit for the valve.
- Remove any debris or loose drywall fragments from the opening. A clean and smooth opening will make the next steps of the installation process easier.
By taking the time to ensure the opening is the correct size and shape, you can avoid any complications during the installation of the shower valve.
Preparing the surrounding area for installation
Before installing the shower valve, it’s important to prepare the surrounding area to ensure a secure and long-lasting installation. Here are the steps to follow:
- Inspect the pipes and plumbing connections in the vicinity of the opening. Make sure they are in good condition and free from any leaks or damages.
- If necessary, turn off the water supply to the shower before proceeding with the installation.
- Remove any loose drywall or debris from the area around the opening.
- If there are any sharp edges or rough surfaces, use sandpaper or a file to smoothen them out. This will prevent any damage to the valve or your hands during the installation process.
Preparing the surrounding area properly will help ensure a smooth and trouble-free installation of the shower valve.
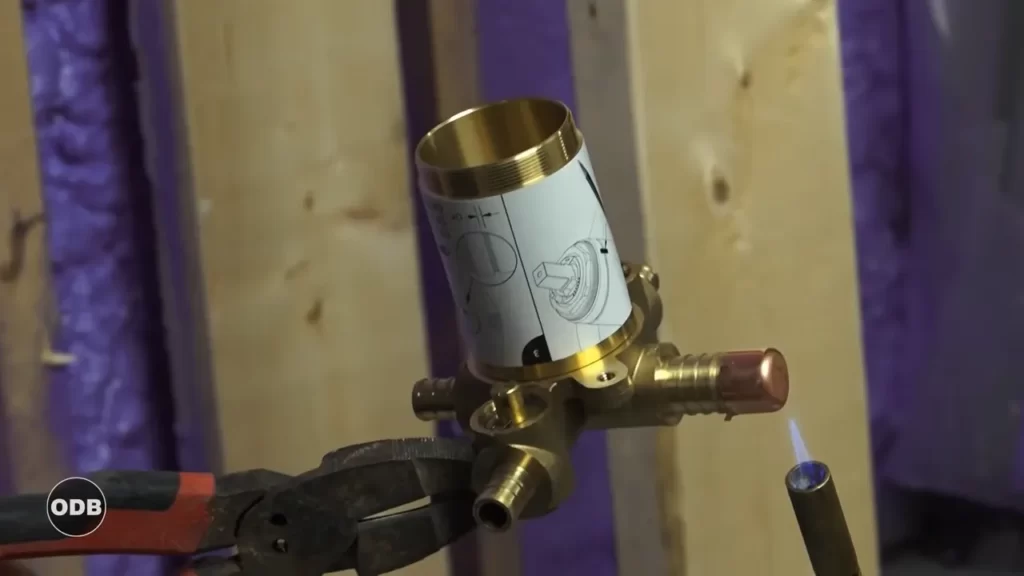
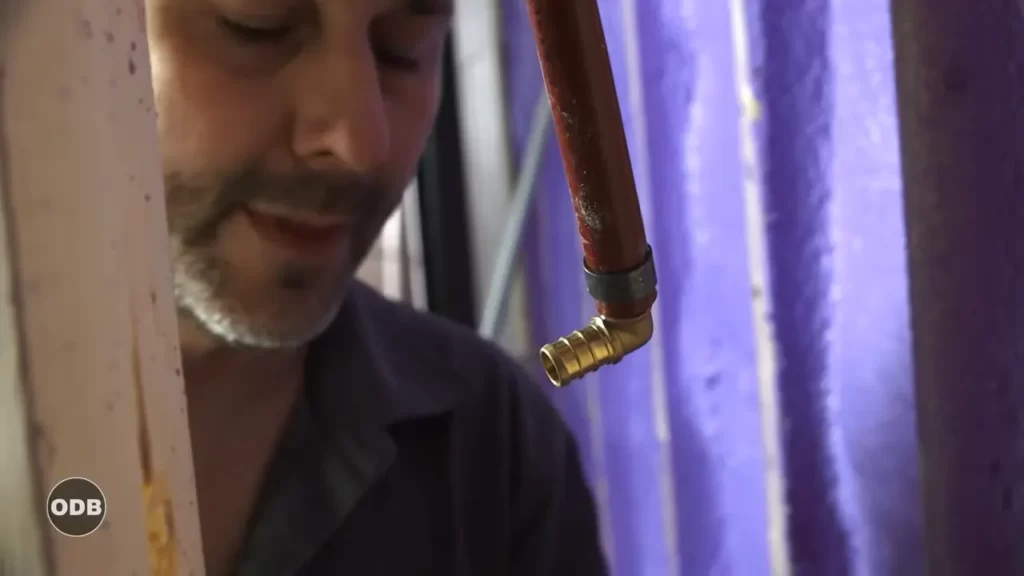
Step 3: Connecting The Hot And Cold Water Supply Lines
After determining the appropriate supply line connections and installing shut-off valves for the hot and cold water, the next step involves connecting the supply lines to the shower valve.
Determining the appropriate supply line connections
Before you can connect the hot and cold water supply lines to the shower valve, it’s crucial to determine the appropriate connection for each line. This usually depends on the type of shower valve and the plumbing layout in your bathroom.
If you have a standard two-handle shower valve, you will need to connect the hot water supply line to the hot water inlet on the valve and the cold water supply line to the cold water inlet. On the other hand, if you have a thermostatic or pressure-balancing valve, you may need to follow specific instructions provided by the manufacturer to determine the appropriate connection for each line.
Installing shut-off valves for the hot and cold water
Installing shut-off valves for the hot and cold water is an essential step in the shower valve rough-in process. These valves allow you to control the flow of water to the shower valve and make future maintenance or repairs easier. Here’s how to install shut-off valves:
- Turn off the main water supply: Before installing the shut-off valves, locate the main water supply line for your house and turn off the water.
- Cut the hot and cold water lines: Use a pipe cutter to cut the hot and cold water lines where you want to install the shut-off valves. Make sure the cuts are clean and free of burrs.
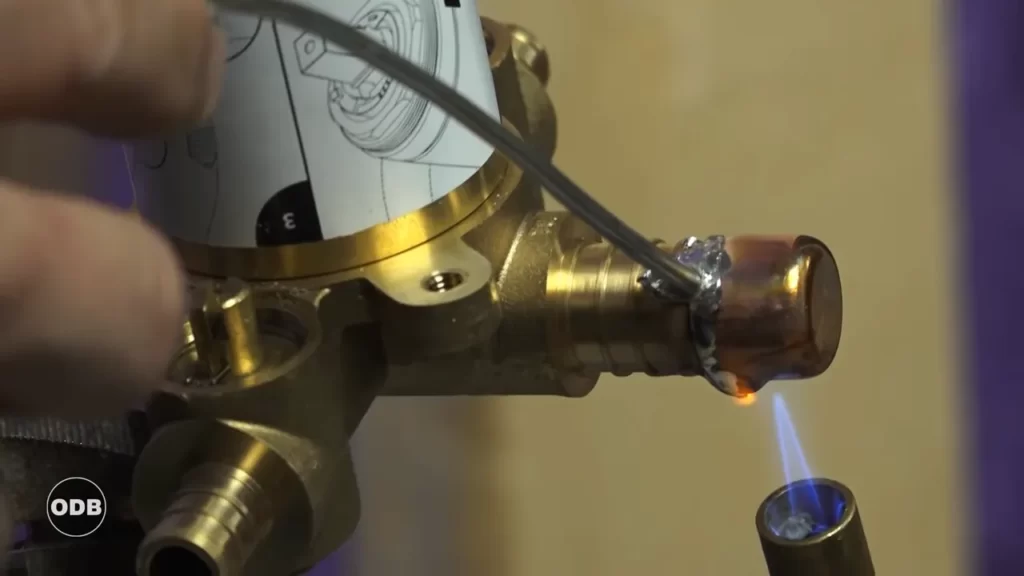
- Attach the shut-off valves: Connect the shut-off valves to the cut ends of the hot and cold water lines. Use compression fittings or solder the connections, depending on the type of valves and pipes you are working with.
- Tighten the fittings: Use an adjustable wrench to tighten the compression fittings or solder the connections carefully. Ensure there are no leaks by turning on the main water supply temporarily and checking for any signs of leakage.
Connecting the supply lines to the shower valve
Now that you have installed the shut-off valves, it’s time to connect the supply lines to the shower valve. Here’s how to do it:
- Prepare the supply lines: Measure and cut the hot and cold water supply lines to the appropriate length, ensuring a clean and accurate cut. Remove any burrs or debris using a file or sandpaper.
- Connect the supply lines: Attach one end of each supply line to the corresponding shut-off valve. Use the appropriate fittings, such as compression fittings or soldered connections, based on the type of valves and pipes.
- Secure the connections: Tighten the fittings using an adjustable wrench, making sure they are secure and leak-free. Double-check the connections to ensure they are properly aligned with the shower valve inlets.
Once you have completed these steps, you can move on to the next phase of the shower valve installation, which may involve setting the valve in place, securing it to the framing, and making final adjustments. With the supply lines properly connected to the shower valve, you are one step closer to enjoying a refreshing shower experience.
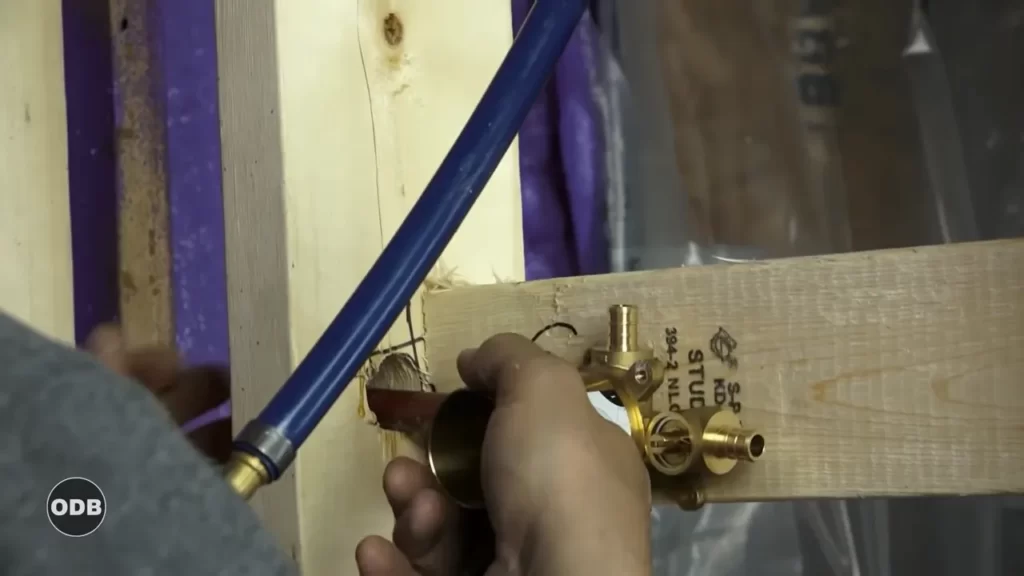
Step 4: Installing The Shower Valve
Once you’ve ensured that the rough-in plumbing is complete and the wall is prepped for installation, it’s time to move on to the exciting part – installing the shower valve! This crucial step ensures that water flows smoothly and efficiently, giving you the perfect showering experience. In this section, we’ll walk you through the necessary steps to ensure a successful installation of your shower valve:
Ensuring the valve is compatible with the chosen shower system
Before diving into the installation, it’s crucial to ensure that the shower valve you have selected is compatible with the chosen shower system. Different shower systems may require specific types of valves, such as pressure balance or thermostatic valves. Make sure to consult the manufacturer’s instructions or consult a professional plumber to ensure you have the correct valve for your shower system.
Applying plumber’s tape to the valve threads
Now that you have the compatible valve in hand, it’s time to prepare it for installation. The first step is applying plumber’s tape to the valve threads. Plumber’s tape, also known as Teflon tape, creates a watertight seal and prevents leaks at the connection points. Simply wrap the tape clockwise around the threads, ensuring to cover them completely. This step will ensure a tight seal between the valve and the shower pipes, preventing any water leaks.
Installing and securing the shower valve in the wall opening
With the tape applied, it’s time to install and secure the shower valve in the wall opening. This step requires precision and careful handling of the valve. Follow these steps:
- Insert the valve into the wall opening, ensuring that it is centered and level.
- Once the valve is in position, use a wrench to secure it tightly. Be careful not to overtighten, as it may damage the valve.
- Ensure that the valve is secure and does not move or wobble.
By following these steps, you can ensure that your shower valve is properly installed, allowing for optimal performance and a leak-free shower experience. Remember to test the valve by turning on the water and checking for any leaks. If you notice any leaks, tighten the connections further or consult a professional plumber for assistance.
With the shower valve successfully installed, you’re now one step closer to enjoying a refreshing and invigorating shower experience in your newly renovated bathroom. In the next section, we’ll move on to installing the showerhead and trim, completing the final touches of your shower installation.
Step 5: Testing For Leaks And Proper Functioning
Gradually turning on the water supply
After successfully installing the shower valve rough-in, it’s time to move on to the crucial step of testing for leaks and ensuring proper functioning. To do this, start by gradually turning on the water supply. Slowly open the shut-off valves, allowing the water to flow into the system.
Checking for any leaks and making necessary adjustments
As the water flows through the shower valve, carefully inspect the connections and joints for any signs of leakage. Look for any water drips or wet spots around the valve, pipes, or fittings. If you notice any leaks, it’s important to address them immediately to prevent water damage and ensure the proper functioning of your shower.
Testing the operation and functionality of the shower valve
Once you have confirmed that there are no leaks, it’s time to test the operation and functionality of the shower valve. Here’s how:
- Turn on the shower faucet and check if the water flows smoothly.
- Switch between the hot and cold water handles to ensure they control the temperature effectively.
- Test the diverter valve, if applicable, to confirm that it redirects the water flow to the desired showerhead or tub spout.
- Pay attention to any unusual noises or delays in water flow, as these could indicate underlying issues.
If you encounter any problems during the testing phase, refer to the manufacturer’s instructions or consult a professional plumber for assistance. It’s crucial to ensure that the shower valve is fully operational to provide a satisfying and efficient showering experience.
Step 6: Sealing And Finishing The Installation
After successfully installing the shower valve rough in, it’s time to seal and finish the installation. This step ensures that the shower valve and its surrounding areas are properly sealed and protected, creating a clean and polished look. Here’s what you need to do:
Applying sealant and caulking around the shower valve trim
To prevent any water leakage and ensure a watertight seal, it’s important to apply sealant and caulking around the shower valve trim. Follow these simple steps to get the job done:
- First, remove any excess debris or dirt from the area.
- Using a caulk gun, apply a thin and even layer of silicone caulk around the edges of the shower valve trim.
- Smooth out the caulk using a caulk smoothing tool or your finger, ensuring it adheres properly.
- Wipe away any excess caulk using a damp cloth or sponge.
Applying sealant and caulking not only helps in preventing water damage but also adds a professional touch to your installation.
Installing the decorative escutcheon plate or trim kit
Once the sealant and caulking are in place, it’s time to install the decorative escutcheon plate or trim kit. This adds an aesthetic appeal to your shower valve and provides a finished look. Follow these steps to install the decorative plate or trim kit:
- Carefully align the decorative escutcheon plate or trim kit with the shower valve.
- Secure it in place using the provided screws or clips.
- Tighten the screws or clips gently, ensuring they are snug but not overtightened.
Installing the escutcheon plate or trim kit completes the visual aspect of your shower valve installation, enhancing the overall appearance of your bathroom.
Cleaning up and restoring any areas affected by the installation
Lastly, it’s important to clean up and restore any areas that were affected during the installation process. This ensures that your bathroom looks pristine and any mess created is taken care of. Follow these tips to clean up and restore the affected areas:
- Remove any dust, debris, or excess caulk from the surrounding tiles or walls using a clean cloth or sponge.
- If any paint or finish has been damaged, touch it up with a matching color or repaint the area for a seamless finish.
- Inspect the surrounding areas for any signs of damage, such as cracks or leaks, and address them immediately.
By properly cleaning up and restoring the areas affected by the installation, you can ensure that your bathroom maintains its pristine appearance and that the installation process is truly complete.
Now that you have completed the sealing and finishing of your shower valve installation, your bathroom is one step closer to being transformed into a functional and aesthetically pleasing space. The next and final step is to test your newly installed shower valve to ensure it is working properly and enjoy the refreshing showers it will provide.
Frequently Asked Questions
What Is The Rough In On A Shower Valve?
The rough in on a shower valve refers to the installation depth required for the valve and associated plumbing components. It ensures proper positioning within the wall for proper operation and connection to water supply lines. Ensure proper measurement and installation for optimal functionality and performance.
What Is The Standard Rough In Height For A Shower Valve?
The standard rough in height for a shower valve is typically around 44 to 48 inches from the finished floor.
How Far Apart Should Studs Be For Shower Valve?
The studs for a shower valve should be spaced approximately 6 to 8 inches apart.
Do You Have To Cut A Hole In A Wall To Replace A Shower Valve?
No, you don’t typically need to cut a hole in the wall to replace a shower valve.
Conclusion
To summarize, installing a shower valve rough-in may seem overwhelming at first, but with the right tools and guidance, it can be a straightforward process. By following the steps outlined in this blog post, you can ensure a successful installation that will provide you with a reliable and functional shower valve.
Remember to take your time, double-check all connections, and seek professional help if needed. With this knowledge, you’ll be well-equipped to tackle any shower valve rough-in project in the future. Happy plumbing!