To install a shower stall, measure the space, choose a stall that fits the dimensions, remove the old shower, install the new stall according to the manufacturer’s instructions, and make sure all plumbing connections are secure. Shower stall installation involves measuring the dimensions of the space where the shower will be placed, selecting a stall that fits those dimensions, removing any existing shower components, following the manufacturer’s instructions to install the new stall, and ensuring that all plumbing connections are properly secured.
By following these steps, you can successfully install a shower stall in your bathroom.
Understand The Basics Of The Project
Before embarking on a project to install a shower stall in your bathroom, it is essential to understand the basics of the project. By doing so, you can ensure a successful and hassle-free installation process. This section will guide you through the initial steps, including assessing the condition and size of your current bathroom, determining the appropriate shower stall type for your space and needs, and setting a budget for the project.
Assess the condition and size of your current bathroom
The first step in installing a shower stall is to assess the condition and size of your current bathroom. This involves evaluating the available space and inspecting the condition of the walls, floors, plumbing, and electrical systems. Here are a few factors to consider:
- The dimensions of the bathroom: Measure the length, width, and height of the space to determine the size limitations for your shower stall.
- The condition of the walls and floors: Ensure that the walls and floors are in good condition, free of any leaks, cracks, or water damage.
- The location of existing plumbing and electrical connections: Take note of the location of existing plumbing and electrical connections to determine if any modifications will be required for the installation.
Determine the appropriate shower stall type for your space and needs
Once you have assessed the condition and size of your bathroom, the next step is to determine the appropriate shower stall type for your space and needs. There are several options available, including:
- Standard pre-fabricated shower stalls: These are ready-to-install units that come in various sizes and designs, making them a popular choice for many homeowners.
- Custom-built shower stalls: If you have specific design preferences or a unique space, a custom-built shower stall may be the best option for you. This allows for greater flexibility in terms of size, shape, and materials.
- Walk-in showers: Ideal for those with mobility issues or a desire for a more spacious showering area, walk-in showers offer ease of access and can be customized to suit your preferences.
Set a budget for the project
Setting a budget for your shower stall installation project is a crucial step in ensuring that you stay within your financial means. Consider the following points when determining your budget:
- The cost of the shower stall: Research the prices of different shower stall options to determine which one aligns with your budget.
- Additional materials and accessories: Account for any additional materials and accessories that may be required for the installation, such as plumbing fixtures, tiles, grout, and caulking.
- Professional installation or DIY: Decide whether you will hire a professional to install the shower stall or if you will take on the task yourself, considering the associated costs and your skill level.
- Contingency fund: It’s always wise to set aside some extra funds for unexpected expenses or modifications that may arise during the installation process.
By understanding the basics of the project, including assessing the condition and size of your current bathroom, determining the appropriate shower stall type, and setting a budget, you are well-prepared to embark on your shower stall installation journey.

Measure And Prepare The Area
Before beginning the installation process of a shower stall, it is crucial to measure and prepare the area in your bathroom. This step is essential to ensure that the shower stall fits perfectly and that the installation process goes smoothly. Taking accurate measurements and clearing the area of any obstacles or existing fixtures will provide a solid foundation for the installation. Additionally, gathering the necessary tools and materials beforehand will help streamline the process.
Measure the dimensions of your bathroom and mark the shower stall location
Start by measuring the dimensions of your bathroom to determine the available space for the shower stall. Accurate measurements will help you select the appropriate shower stall size. Use a tape measure to measure the width, length, and height of the designated area. Once you have obtained the measurements, mark the shower stall’s position on the bathroom floor with a pencil or masking tape. This will serve as a guide during the installation process.
Clear the area of any obstacles or existing fixtures
Before installing the shower stall, clear the area of any obstacles or existing fixtures that might hinder the installation process. Remove any furniture, cabinets, or other items that are located within the designated area. Additionally, check for any electrical outlets or plumbing fixtures that might need to be relocated. It is essential to have a clean and clear space to ensure a seamless installation and avoid any disturbances.
Gather the necessary tools and materials for the installation process
To install a shower stall, you will need specific tools and materials. Gather these beforehand to avoid any delays or interruptions during the installation process. Some common tools and materials needed for installing a shower stall include a tape measure, level, drill, screwdriver, pipe wrench, silicone caulk, shower base or pan, shower panels or walls, and shower door or curtain. Make sure to have all the necessary items ready and easily accessible for efficient installation.
Turn Off The Water Supply And Disconnect Plumbing
When it comes to giving your bathroom a facelift, installing a new shower stall can make a world of difference. Whether you’re replacing an old shower or converting a bathtub into a shower, the process requires careful planning and execution. One of the first steps in this process is to turn off the water supply and disconnect the plumbing. In this article, we will guide you through the necessary steps to complete this task effectively.
Locate the water shut-off valves and turn off the water supply
Before you begin any plumbing work, it is crucial to locate the water shut-off valves and turn off the water supply to your bathroom. These valves are typically located near the plumbing fixtures, such as the toilet or sink. To find the valve for your shower, you may need to refer to your house’s plumbing diagram or consult a professional plumber.
Once you have located the valve, turn it clockwise to shut off the water supply. This step is important to prevent any water from flowing during the installation process. By turning off the water supply, you can ensure a smooth and mess-free transition to your new shower stall.
Disconnect the plumbing connections to the existing shower or bathtub
Now that the water supply is turned off, it’s time to disconnect the plumbing connections to the existing shower or bathtub. Start by removing the showerhead, tub spout, and any other fixtures or accessories attached to your current setup.
To disconnect the plumbing connections, you’ll need a set of basic plumbing tools, such as an adjustable wrench or pliers. Loosen the nuts or connectors that secure the pipes to the shower or bathtub fittings. Be careful not to apply too much force to avoid damaging the pipes or other components.
Once the connections are loosened, gently pull the pipes away from the fittings and set them aside. If you encounter any resistance, apply a small amount of lubricant to facilitate the removal process.
If you’re unsure about how to disconnect the plumbing properly, it’s always a good idea to seek assistance from a professional or consult online resources for detailed instructions.
With the water supply turned off and the plumbing connections disconnected, you’re now ready to move on to the next step in installing your new shower stall. In the following sections, we will guide you through removing any existing tiles, fixtures, or accessories to make way for your new shower.
Prepare The Subfloor And Walls
Before installing a shower stall, it is crucial to properly prepare the subfloor and walls. This step is vital as it ensures a sturdy and durable foundation for the shower installation. In this section, we will guide you through the necessary steps to inspect and repair any damaged subflooring, remove any existing wall coverings or damaged drywall, and install a moisture barrier and waterproofing membrane if necessary.
Inspect and repair any damaged subflooring
Begin by thoroughly inspecting the subfloor for any signs of damage or rot. Start by examining the floor from underneath the bathroom, in the basement or crawl space. Look for any sagging or soft spots, as these may indicate rotted or weakened wood.
If you locate any areas of concern, it is essential to repair or replace the damaged subflooring. This involves removing the affected section and replacing it with new plywood. Use a circular saw to cut along the edges of the damaged area, taking care not to cut into surrounding subflooring. Remove the damaged section and replace it with a new piece of plywood of the same thickness. Secure the new plywood to the adjoining subfloor using screws, ensuring it is level with the surrounding floor.
Remove any existing wall coverings or damaged drywall
Prior to installing a shower stall, it is necessary to remove any existing wall coverings or damaged drywall. Begin by removing any wallpaper, tiles, or other decorative materials from the walls. Use a scraper or putty knife to gently pry away the covering, being cautious not to damage the underlying surface.
If the walls are covered with drywall that is damp, moldy, or structurally compromised, it is crucial to remove and replace it. Start by cutting along the edges of the damaged section using a utility knife. Carefully pry away the damaged drywall, ensuring not to damage the neighboring sections. Once the damaged piece is removed, cut a replacement piece of drywall to fit the opening. Secure the new drywall with drywall screws, ensuring it is flush with the surrounding sections.
Install a moisture barrier and waterproofing membrane if necessary
Depending on the construction of your shower stall and the materials used, it may be necessary to install a moisture barrier and waterproofing membrane. This extra layer of protection helps prevent water damage and mold growth.
To install a moisture barrier, apply a layer of plastic sheeting or vapor barrier to the walls and subfloor. Ensure the plastic sheeting covers the entire surface, overlapping the seams by at least six inches. Secure the sheeting using a staple gun or adhesive, taking care to create a watertight seal.
Next, apply a waterproofing membrane to the walls and floor of the shower stall. This can be done using a product specifically designed for this purpose, such as a liquid membrane or a sheet membrane. Follow the manufacturer’s instructions for application, making sure to cover all areas that will come into contact with water.
By thoroughly preparing the subfloor and walls before installing a shower stall, you are setting the stage for a successful and long-lasting installation. Taking the time to inspect and repair any damaged subflooring, remove outdated or damaged wall coverings, and apply a moisture barrier and waterproofing membrane will ensure that your shower stall remains in optimal condition for years to come.
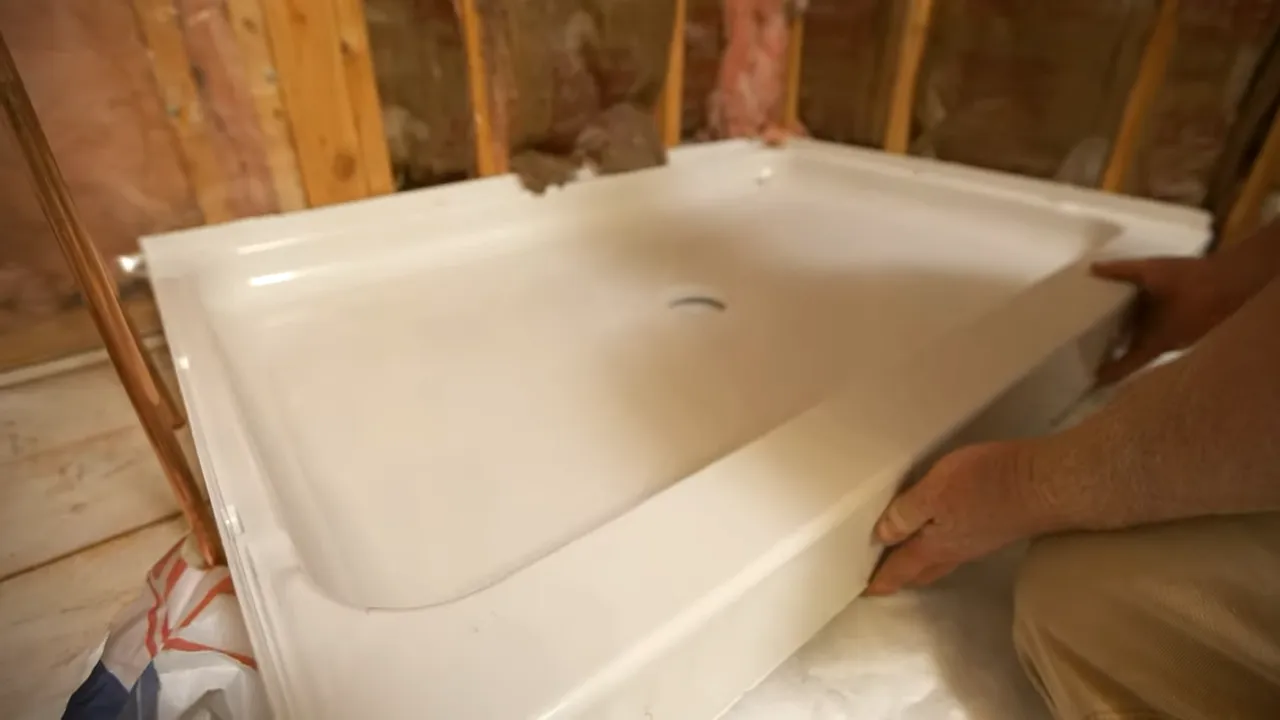
Assemble The Shower Stall Components
Before you dive into the exciting task of installing your new shower stall, it’s crucial to ensure that all the components are in place. Unboxing and inspecting all the parts of the shower stall kit is the first step in this process.
Unbox and inspect all parts of the shower stall kit
Once you’ve received your shower stall kit, carefully unbox it and lay out all the parts. Take a moment to inspect each item, ensuring there are no damages or missing pieces. It’s always better to address these issues before you start assembling the shower stall.
Follow the manufacturer’s instructions to assemble the base and walls
Every shower stall kit comes with specific instructions from the manufacturer. It’s essential to read and follow these instructions diligently to ensure a smooth assembly process. Make sure you have the necessary tools mentioned in the instructions before you proceed.
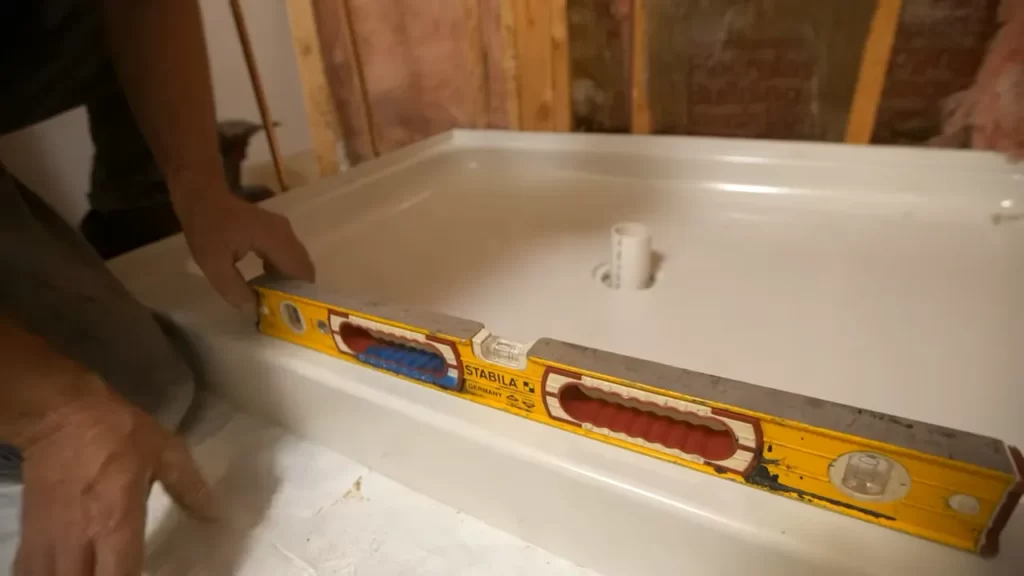
To assemble the base of the shower stall, position the base according to the manufacturer’s guidelines. Ensure that it is level and secure it in place as per the instructions. It’s vital to pay attention to any specific requirements mentioned by the manufacturer to achieve a sturdy and durable base.
When assembling the walls, carefully attach each panel according to the manufacturer’s instructions. Be sure to align the panels properly, ensuring that they fit together snugly. Secure the walls following the specified procedures and double-check the alignment to prevent any issues down the line.
Ensure proper alignment and secure all components together
Proper alignment is crucial to the overall stability and functionality of your shower stall. Ensure that all the components, including the base and walls, are correctly aligned before securing them together. Use the suggested fasteners and connectors provided with your kit to secure each component firmly in place.
By following the manufacturer’s instructions and ensuring proper alignment, you can have peace of mind knowing that your shower stall is sturdy and secure. Take your time during this step to avoid any potential problems in the future.
To summarize, to assemble your shower stall components, remember to unbox and inspect all the parts, follow the manufacturer’s instructions for base and wall assembly, and ensure proper alignment and secure all components together. With this information, you’re well on your way to a successful shower stall installation.
Connect The Plumbing And Drainage
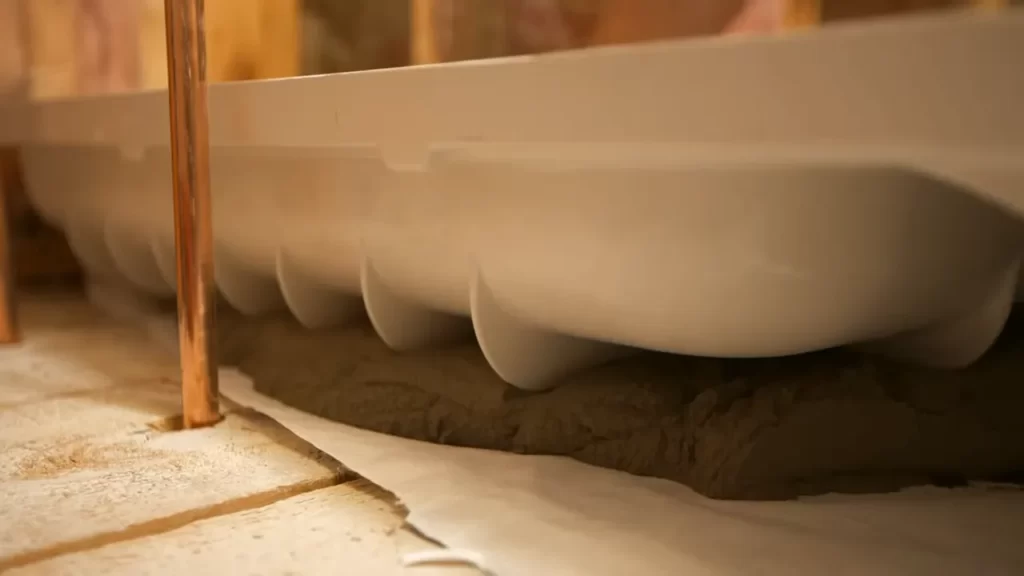
Install the shower pan and connect the drain assembly
When it comes to installing a shower stall, it is crucial to connect the plumbing and drainage properly to ensure a functional and leak-free shower. One of the first steps in this process is to install the shower pan and connect the drain assembly. Here’s how you can do it:
- Start by placing the shower pan onto the subfloor in the desired location. Make sure the pan fits securely and level against the subfloor. Adjust the pan if necessary.
- Connect the drain assembly to the shower pan. This typically involves inserting the drain pipe into the designated hole in the shower pan and securing it with a compression fitting or adhesive.
- Tighten the drain assembly using a wrench, ensuring it is snug and secure.
- Apply a waterproof sealant around the edges of the drain assembly to prevent any potential leaks. This step is crucial to maintain the integrity of the shower stall.
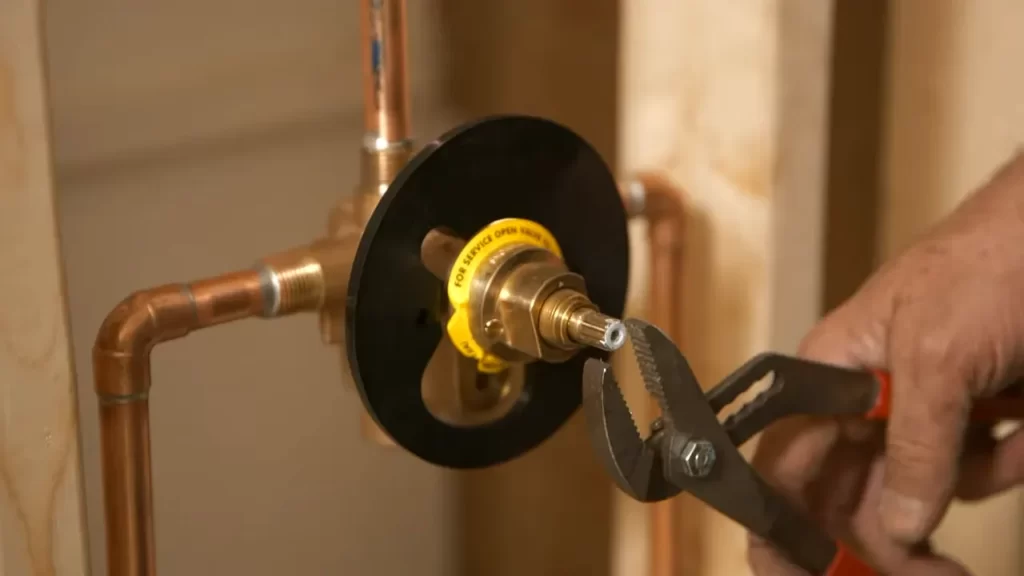
Position and secure the shower head, faucets, and other plumbing fixtures
Once the shower pan and drain assembly are in place, the next step is to position and secure the shower head, faucets, and other plumbing fixtures. Here’s how you can proceed:
- Identify the desired locations for the shower head, faucets, and other fixtures. Measure and mark these positions on the shower walls.
- Drill holes into the shower walls according to the marked positions. Use appropriate drill bits and techniques based on the wall material.
- Insert the shower head, faucets, and other fixtures into their respective holes. Make sure they fit snugly and are level.
- Tighten the fixtures using a wrench or pliers, ensuring they are securely attached to the shower walls.
Test the connections for leaks and make any necessary adjustments
Once the plumbing fixtures are in place, it is important to test the connections for leaks and make any necessary adjustments. Follow these steps to ensure a leak-free shower:
- Turn on the water supply to the shower stall.
- Inspect the connections for any signs of leakage, such as dripping or pooling water.
- If leaks are detected, tighten the connections further or apply plumber’s tape or sealant as needed.
- Repeat the leak-testing process until no leaks are observed.
By following these steps, you can successfully connect the plumbing and drainage in your shower stall. Remember to take your time during the installation process and double-check all connections to ensure a reliable and enjoyable shower experience.
Complete The Installation With Finishing Touches
Apply caulk or sealant to all joints and connections for waterproofing
Once you have successfully installed your shower stall, the next step is to ensure it is properly sealed and waterproofed. This is an essential part of the installation process as it helps prevent any water damage or leaks in the future. To do this, you will need to apply caulk or sealant to all the joints and connections of the shower stall.
Install any additional accessories, such as shelves or grab bars
To enhance the functionality and convenience of your shower stall, you can consider installing additional accessories such as shelves or grab bars. Shelves provide a place to store your shower essentials, while grab bars offer added safety and support, especially for those with limited mobility. Ensure they are securely attached to the shower stall, following the manufacturer’s instructions.
Make any final adjustments and ensure the shower stall is level and secure
Before wrapping up the installation process, it’s crucial to make any final adjustments to ensure that your shower stall is level and secure. Use a level to check if the stall is perfectly aligned, making any necessary tweaks to the feet or base. This ensures a comfortable and stable showering experience. Additionally, check that all the screws and fittings are tight and secure.
Remember, completing your shower stall installation with these finishing touches not only adds functionality but also ensures the longevity and durability of your new fixture. Waterproofing the joints and connections with caulk or sealant guarantees a watertight seal, preventing any potential water damage. Installing additional accessories enhances the convenience and safety of your shower experience, while making any final adjustments ensures a level and secure stall. So dive into your shower remodel with confidence, knowing that every detail has been taken care of.
Turn On The Water Supply And Test For Leaks
After successfully installing the shower stall, the next crucial step is to turn on the water supply and test for any leaks or drips. It’s important to ensure the proper functioning of the water flow and drainage system before finalizing the installation. Here are the steps to follow:
<Gradually turn on the water supply and check for any leaks or drips>
To begin the testing process, gradually turn on the water supply. It’s important to do this slowly to avoid any sudden surge of water that may cause damage or leaks. As you turn on the supply, attentively observe the shower stall for any signs of leakage or dripping. Pay close attention to the areas around the pipes, connections, and valves. If you notice any leaks or drips, it’s crucial to address them promptly to prevent further damage.
<Ensure proper drainage and water flow from the shower stall>
Along with checking for leaks, it is equally important to ensure proper drainage and water flow from the newly installed shower stall. Turn the shower on and observe whether the water flows smoothly into the drain without any obstruction or backup. If you notice slow drainage or any standing water, it may indicate a clog or improper installation. Addressing these issues right away will ensure optimal functionality and prevent potential water damage.
<Address any leaks or issues before finalizing the installation>
If you encounter any leaks, drips, or drainage issues during the testing process, it’s crucial to address them before finalizing the installation. Inspect the area causing the problem and identify the source of the issue. It could be a loose connection, faulty seal, or improper installation of pipes. Take the necessary steps to fix the problem, which may involve tightening connections, applying sealant, or seeking professional assistance if needed. By resolving any leaks or issues at this stage, you can ensure the long-term functionality and enjoyment of your shower stall.
Testing for leaks and proper water flow is a crucial step in installing a shower stall. By carefully examining the water supply, drainage, and addressing any issues that arise, you can confidently finalize the installation and enjoy a fully functional, leak-free shower stall.
Clean Up And Enjoy Your New Shower Stall
Congratulations on successfully installing your new shower stall! Now that the construction is complete, it’s time to clean up and get ready to enjoy your upgraded bathroom space. Follow these steps to ensure your shower stall is clean and ready for use.
Remove any debris or construction materials from the bathroom
The first step in cleaning up your new shower stall is to remove any debris or construction materials that may have been left behind during the installation process. This could include excess grout, tile scraps, or packaging materials.
Take a close look at the floor, walls, and corners of your bathroom to ensure that everything is cleared out. Use a broom and dustpan to sweep up any loose debris, or if necessary, use a vacuum cleaner to get rid of smaller particles. Remember, a clean workspace is essential for a fresh start in your new shower stall.
Clean the shower stall thoroughly before use
Before you can start enjoying your new shower stall, it’s important to clean it thoroughly. This will remove any dirt, dust, or residue that may have accumulated during the installation process.
Start by mixing a mild cleaning solution with warm water. This could be a gentle shower cleaner or a mixture of vinegar and water. Avoid using harsh chemicals or abrasive cleaners, as they can damage the surfaces of your shower stall.
| Step | Description |
|---|---|
| 1 | Dampen a sponge or cloth with the cleaning solution. |
| 2 | Wipe down the walls, floor, and any other surfaces of the shower stall. |
| 3 | Rinse the surfaces with clean water. |
| 4 | Use a squeegee or towel to dry the shower stall. |
By following these steps, you can ensure that your shower stall is clean and ready for use. It’s important to maintain regular cleaning habits to keep your new shower stall looking its best.
Appreciate the upgraded bathroom space and enjoy your new shower stall
Now that your shower stall is clean and ready to go, take a moment to appreciate the upgraded bathroom space. You’ve put in the time and effort to install the shower stall, and now you can enjoy the fruits of your labor.
Step into your new shower stall, feel the warm water on your skin, and enjoy the enhanced functionality and aesthetics it brings to your bathroom. Whether it’s a quick morning rinse or a relaxing evening shower, make the most of your new shower stall and embrace the comfort it provides.
Remember to maintain regular cleaning and maintenance routines to keep your shower stall in top condition. With proper care, your new shower stall will continue to bring joy and functionality to your daily routine for years to come.
Frequently Asked Questions
Is It Difficult To Install A Shower Stall?
Installing a shower stall is not difficult. With proper tools and instructions, it can be done easily. Just follow the steps for plumbing and securing the stall to the walls. Seek professional help if needed. Enjoy your new shower stall!
How Much Does It Cost To Install A Stall Shower?
The cost of installing a stall shower varies depending on factors such as size, materials, and labor. On average, you can expect to spend between $1,500 to $4,000 for installation. However, prices can range higher or lower based on individual project requirements.
Can I Install A Shower Myself?
Yes, you can install a shower yourself if you have the necessary knowledge and skills. It is important to follow the instructions carefully and ensure that the installation meets safety guidelines. However, it is recommended to consult with a professional to ensure the job is done correctly.
What Do You Put Under A Shower Base?
Shower bases are typically installed on a solid foundation made of concrete or a mortar bed. This provides stability and a level surface for the shower base to sit on. The foundation should be properly prepared and level to ensure a secure and sturdy installation.
Conclusion
Installing a shower stall can be a straightforward task if you follow the right steps. From preparing the space to connecting the plumbing and ensuring proper waterproofing, this guide has provided you with the necessary instructions. By taking the time to plan and execute the installation carefully, you can enjoy a beautiful and functional shower stall in your bathroom.
Remember to consult professional assistance if needed and always prioritize safety. Happy showering!