
To install a shower pipe, follow these steps: 1. Turn off the water supply.
2. Remove the old pipe. 3. Clean the connections. 4. Apply plumber’s tape. 5. Secure the new pipe tightly. Are you looking to upgrade your bathroom with a new shower pipe? Perhaps your existing shower pipe is old or damaged and needs to be replaced.
Installing a shower pipe may seem like a daunting task, but with the right steps, it can be a relatively simple project that you can do yourself. We will guide you through the process of installing a shower pipe. We’ll provide you with step-by-step instructions on how to properly remove the old pipe and install the new one, ensuring a secure and leak-free connection. So, let’s get started and give your bathroom a fresh and functional upgrade.
How To Choose The Right Shower Pipe
Installing a new shower pipe can greatly enhance your showering experience and transform your bathroom. However, with so many options available in the market, choosing the right shower pipe can feel overwhelming. To help you make an informed decision, here are some key factors to consider when selecting the perfect shower pipe for your needs.
Consider the Material and Durability
The material and durability of the shower pipe should be at the top of your priority list. You want a pipe that is not only sturdy but also resistant to rust and corrosion. One of the most common materials used for shower pipes is stainless steel, known for its durability and long-lasting performance. Stainless steel pipes are not only strong but also easy to maintain, making them a popular choice among homeowners.
Another option to consider is brass shower pipes. Brass is highly resistant to rust and corrosion, making it a reliable choice for your bathroom. It also offers a classic and timeless look that can blend seamlessly with any bathroom decor. Additionally, brass shower pipes are known for their excellent water pressure due to their smooth interior surface.
Determine the Best Size and Length for your Shower Pipe
Choosing the right size and length of the shower pipe is essential to ensure a comfortable and efficient showering experience. To determine the optimal size, consider the height and layout of your shower area. Measure the distance from the showerhead to the shower valve to determine the length of the pipe needed.
Additionally, take into account the height of the users, as a taller individual may require a longer shower pipe for optimal water flow and coverage. It’s also worth noting that a longer shower pipe allows for more flexibility in adjusting the showerhead height for users of different heights.
Choose the Suitable Finish for your Bathroom Decor
The finish of the shower pipe is not just about aesthetics; it also plays a crucial role in tying together the overall bathroom decor. Whether you prefer a modern, classic, or rustic look, there are various finishes to choose from.
Chrome is a popular choice for its sleek and shiny appearance, making it suitable for modern bathrooms. It is also known for its durability and easy maintenance. Brushed nickel is another popular option that adds a subtle, warm tone to the bathroom. This finish is great for both contemporary and traditional bathroom designs.
If you’re looking to create a luxurious and elegant atmosphere, consider a polished brass or oil-rubbed bronze finish. These finishes can add a touch of sophistication to your bathroom decor.
Ultimately, choosing the right shower pipe requires careful consideration of the material, size, length, and finish to ensure a functional and visually appealing addition to your bathroom. Taking the time to select the most suitable shower pipe will enhance your daily showering experience and contribute to the overall ambiance of your bathroom.
How To Prepare For Shower Pipe Installation
Before you begin installing a shower pipe, it’s important to take the necessary steps to prepare for the installation. This will ensure a smooth and successful installation process, minimizing any potential issues along the way. In this section, we will walk you through the steps to gather the necessary tools and materials, shut off the water supply and drain the faucet, and measure and mark the installation area.
Gather the Necessary Tools and Materials
Before you can start installing your new shower pipe, make sure you have all the tools and materials you’ll need for the job. This will save you time and frustration later on. Here are the essential items you’ll need:
| Tools | Materials |
|---|---|
| Screwdriver | Shower pipe |
| Adjustable wrench | Plumber’s tape |
| Teflon tape | Pipe joint compound |
| Hacksaw | Thread sealant |
| Measuring tape |
Shut off the Water Supply and Drain the Faucet
Before you begin any plumbing work, it’s crucial to shut off the water supply to your shower. This will prevent any water from flowing while you’re working, avoiding messy and potentially damaging situations. Follow these steps to shut off the water supply and drain the faucet:
- Locate the main water shut-off valve for your home. This is typically found near the water meter or where the main water line enters your house.
- Turn the valve clockwise to shut off the water supply to your entire home. This will ensure that no water is flowing through the pipes.
- To drain the faucet, turn on the shower and let the water run until it stops flowing.
- Once the water has stopped, you can proceed with the installation.
Measure and Mark the Installation Area
Accurate measurements and markings are crucial for a successful shower pipe installation. Follow these steps to measure and mark the installation area:
- Use a measuring tape to measure the distance between the existing faucet and the desired location of the new shower pipe.
- Mark the installation area with a pencil or marker, ensuring that your measurements are precise and level.
- Double-check your measurements before moving on to the next step.
By following these steps to prepare for your shower pipe installation, you’ll be well on your way to a successful and hassle-free process. Now that you have gathered the necessary tools and materials, shut off the water supply and drained the faucet, and measured and marked the installation area, you’re ready to move on to the next step: Installing the shower pipe.
Step-By-Step Guide: Installing A Shower Pipe
Are you tired of dealing with a leaky or outdated shower pipe? Installing a new shower pipe can be a simple and rewarding DIY project that can greatly improve your daily shower experience. In this step-by-step guide, we will walk you through the process of installing a shower pipe, from removing the old one to ensuring a tight and secure connection. Let’s get started with our comprehensive guide on how to install a shower pipe.
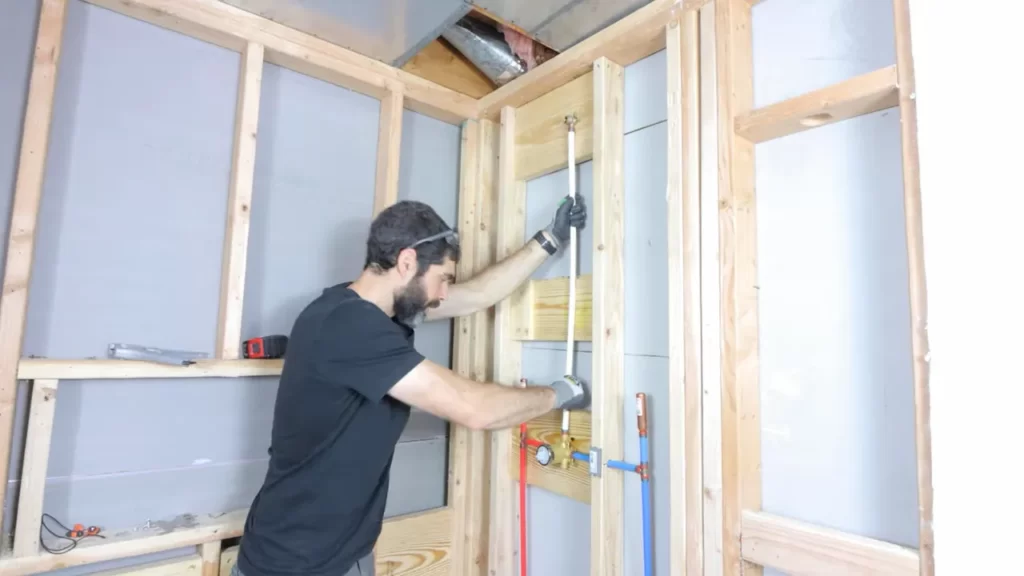
Remove the Old Shower Pipe
Before you begin installing a new shower pipe, it’s important to remove the old one. Start by turning off the water supply to your shower. This can typically be done by turning off the water valves located near the shower or shutting off the main water supply to your house. Once the water supply is turned off, use a wrench or pliers to loosen and remove the nuts connecting the old pipe to the shower wall. Carefully remove the old pipe, making sure not to damage the surrounding tiles or plumbing connections.
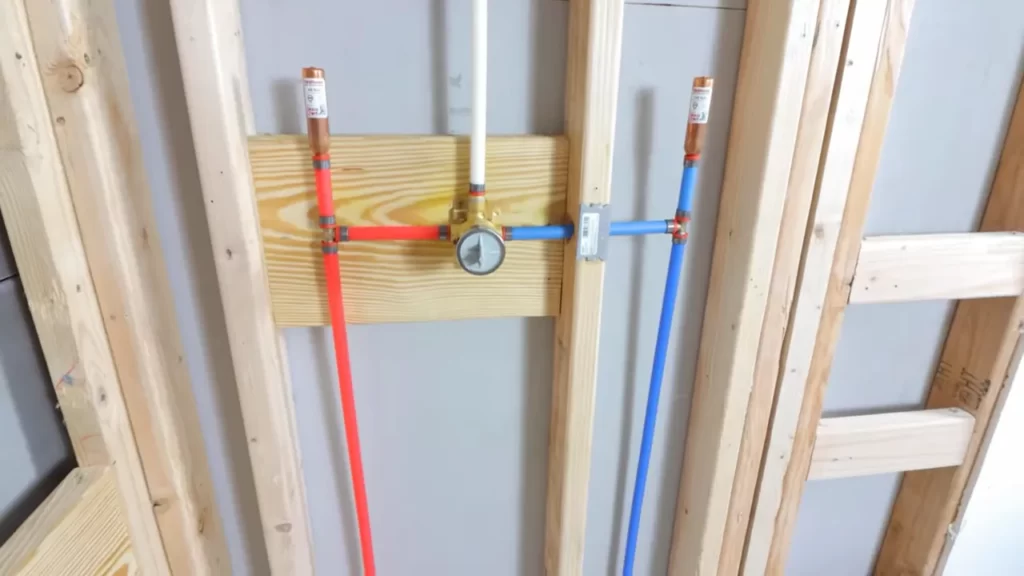
Install the Pipe Nipple
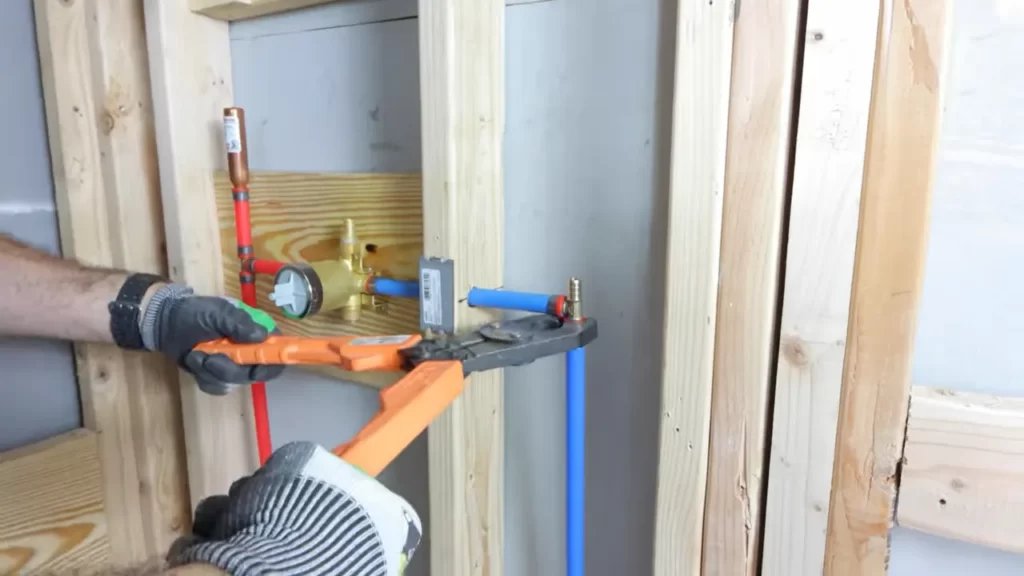
With the old shower pipe removed, it’s time to install the new pipe nipple. The pipe nipple is the portion of the pipe that extends out from the shower wall and connects to the shower head. Measure the length of the pipe nipple needed and cut it to size using a pipe cutter or hacksaw. Ensure that the cut is clean and smooth.
Apply Teflon Tape to the Threads
Before attaching the pipe nipple, it’s important to create a secure seal between the threads on the pipe and the shower head. This can be done by applying Teflon tape to the threads. Take the end of the Teflon tape and wrap it around the threads in a clockwise direction. Be sure to wrap the tape tightly and evenly, covering all the threads to prevent any water leaks.
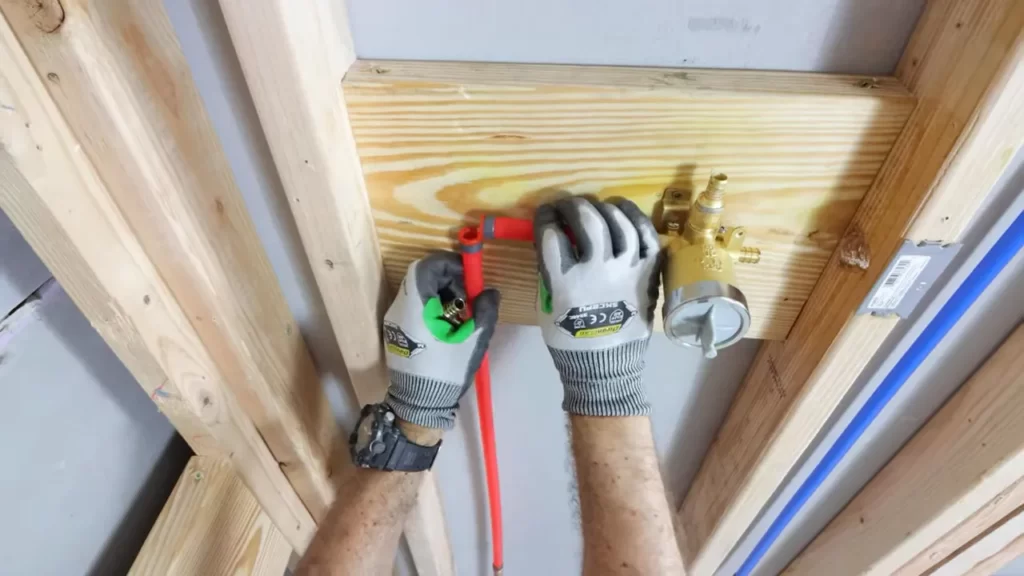
Attach the Flange and Secure it Properly
Once the Teflon tape is applied, you can now attach the flange to the pipe nipple. The flange is the decorative or protective cover that sits against the shower wall. Align the flange with the pipe nipple and firmly press it against the wall. Use screws or bolts to secure the flange in place. Make sure the flange is centered and level.
Connect the Shower Head to the Pipe Nipple
Now it’s time to connect the shower head to the pipe nipple. Depending on the type of shower head you have, this may involve simply twisting the shower head onto the pipe nipple or attaching it using a wrench. Apply gentle pressure and tighten the shower head until it is firmly in place, ensuring there are no gaps between the shower head and the flange.
Seal Any Leaks and Test the Water Flow
Before declaring the installation complete, it’s crucial to check for any leaks and test the water flow. Turn the water supply back on and let the water run through the shower pipe. Keep an eye out for any signs of water leaks around the pipe nipple, flange, or shower head. If you notice any leaks, tighten the connections as needed or apply additional Teflon tape. Once you are confident that there are no leaks, test the water flow to ensure it is consistent and sufficient for your showering needs.
By following this step-by-step guide, you can easily install a shower pipe and enjoy a refreshed shower experience. Remember to take your time and ensure all connections are secure and properly sealed to prevent leaks. Now, go ahead and transform your shower with a brand new pipe!
Tips For Troubleshooting And Common Issues
Installing a shower pipe may seem like a straightforward task, but sometimes, issues arise. Whether it’s a leak, an ill-fitting pipe, or low water pressure, troubleshooting common problems can save you time and frustration. In this article, we will discuss how to fix leaks in the shower pipe, what to do if the pipe doesn’t fit, and how to address low water pressure issues.
How to Fix Leaks in the Shower Pipe
Dealing with a leaky shower can be frustrating, but fortunately, fixing leaks in the shower pipe is often a simple task. Here are a few steps you can follow to address this issue:
- Start by turning off the water supply to the shower.
- Next, inspect the connection points of the pipe. Look for any loose joints or damaged washers.
- If you find a loose joint, tighten it using a wrench. However, be careful not to overtighten it, as this can cause damage.
- If the washer is damaged, replace it with a new one. Ensure that the new washer is the correct size and material for your pipe.
- Finally, turn on the water supply and check for any remaining leaks. If the problem persists, you may need to consult a professional plumber.
What to Do If the Shower Pipe Doesn’t Fit
Encountering an ill-fitting shower pipe can be a common issue during installation. If you find yourself in this situation, here’s how you can tackle it:
- First, double-check the measurements of the pipe and the shower fixture. Ensure that they are compatible.
- If the pipe is too large for the fixture, you can use a pipe cutter or a hacksaw to trim it down to size. Take the necessary precautions to avoid injury while trimming the pipe.
- If the pipe is too small, consider using adaptors or connectors to bridge the gap between the pipe and the fixture. These can be readily available at your local hardware store.
- Once the pipe fits properly, secure it in place by tightening the connections using a wrench.
- Test the shower to ensure that water flows smoothly without any leaks or further issues.
How to Address Low Water Pressure Issues
If you’re experiencing low water pressure in your shower, there are a few steps you can take to improve the situation:
- Start by checking if the water pressure is low throughout your home. If it is, the issue may be with your main water supply. Contact your water provider or a plumber to address this problem.
- If the low water pressure is isolated to the shower, remove the showerhead and clean it thoroughly. Mineral deposits or debris can clog the showerhead, affecting water flow. Use a toothbrush and vinegar solution to unclog any blockages.
- Inspect the shower pipe for any obstructions. Clear out any debris or mineral build-up that may be impeding water flow.
- Consider installing a low-flow showerhead to conserve water and potentially improve pressure. These showerheads are designed to provide a satisfying shower experience while using less water.
- If none of these steps improve the water pressure, you may need to consult a professional plumber to identify and address the underlying cause.
By following these troubleshooting tips, you can address common issues and successfully install a shower pipe that functions optimally. Remember to always prioritize safety and consult a professional if needed. With the right knowledge and tools, you’ll be able to enjoy a refreshing and hassle-free shower experience.
Maintenance And Care For Your Shower Pipe
Proper maintenance and care of your shower pipe are essential for ensuring its longevity and performance. By taking a few simple steps, you can keep your shower pipe running smoothly and prevent any potential issues from arising. In this section, we will outline the key aspects of maintaining and caring for your shower pipe, including regular cleaning and maintenance, preventing mineral build-up, and checking for wear and tear.
Regular Cleaning and Maintenance
Regular cleaning and maintenance play a vital role in keeping your shower pipe in optimal condition. By cleaning your shower pipe regularly, you can remove any built-up grime, soap scum, and mineral deposits that may hinder its performance. To clean your shower pipe, follow these simple steps:
- Start by turning off the water supply to your shower.
- Remove the showerhead and clean it using a mixture of warm water and mild soap.
- Inspect the shower pipe for any clogs or debris and use a toothbrush or pipe cleaner to remove any particles.
- Rinse the shower pipe thoroughly and reattach the showerhead.
Regular cleaning not only improves the water flow but also helps prevent corrosion and extends the lifespan of your shower pipe.
Preventing Mineral Build-Up
Mineral build-up, often caused by hard water, can lead to clogged shower pipes and reduced water pressure. To prevent mineral build-up, you can take the following steps:
- Invest in a water softener or water conditioner to reduce the mineral content in your water.
- Regularly clean and descale your showerhead using a mixture of vinegar and water. Simply soak the showerhead in the solution and scrub away any mineral deposits.
- Consider installing a water filter or cartridge system to remove impurities before they reach your shower pipe.
By following these preventative measures, you can significantly reduce the chances of mineral build-up and keep your shower pipe functioning properly.
Checking for Wear and Tear
Regularly inspecting your shower pipe for wear and tear is essential to catch any potential issues before they escalate. Here are some simple steps to follow when checking for wear and tear:
- Inspect the shower pipe for any visible signs of corrosion, such as rust spots.
- Check for leaks or drips around the connections and joints. Tighten any loose fittings if necessary.
- Examine the showerhead for cracks or damage. If you notice any issues, it may be time to replace the showerhead.
By regularly checking for wear and tear, you can address any problems early on and avoid costly repairs or replacements in the future.
In conclusion, proper maintenance and care are vital for the optimal performance of your shower pipe. By following the steps outlined in this section, including regular cleaning and maintenance, preventing mineral build-up, and checking for wear and tear, you can ensure that your shower pipe remains in excellent condition for years to come.
Frequently Asked Questions
How Do You Replace A Shower Pipe?
To replace a shower pipe, follow these steps: 1. Turn off the water supply. 2. Remove the old pipe using a wrench or pliers. 3. Apply plumber’s tape to the threads of the new pipe. 4. Attach the new pipe to the showerhead and water supply.
5. Turn on the water to ensure there are no leaks.
Can You Plumb A Shower With Plastic Pipe?
Yes, you can use plastic pipe to plumb a shower. Plastic pipes like PVC or PEX are commonly used due to their durability, affordability, and ease of installation. They are resistant to corrosion and can withstand the water pressure required for a shower.
How Do You Connect Shower Arm To Pipe?
To connect a shower arm to a pipe, first, ensure the showerhead is removed. Then, apply plumber’s tape to the pipe threads. Screw the shower arm onto the pipe until tight. Finally, attach the showerhead to the end of the shower arm.
What Is The Pipe That Connects To The Shower Head?
The pipe that connects to the shower head is called a shower arm. It is responsible for directing water flow from the plumbing system to the shower head for a refreshing bathing experience.
Conclusion
Installing a shower pipe can be a straightforward process if you follow the steps outlined in this guide. By gathering the necessary tools and materials, preparing the area, and carefully following the installation instructions, you can enjoy a functioning shower pipe in no time.
Remember to prioritize safety and consult professional help if needed. With these guidelines, you’ll be able to confidently tackle this DIY project and transform your bathroom.