To install a shower pan liner video, follow these steps: measure and cut the liner, fold the corners, apply adhesive to the shower base, lay the liner into place, then smooth out any wrinkles or air bubbles. Installing a shower pan liner is a crucial step in ensuring a waterproof and leak-free shower.
Whether you’re a seasoned DIY-er or a first-timer, this video guide will walk you through the installation process, making it a breeze. By following along, you’ll learn how to measure and cut the liner, fold the corners, apply adhesive to the shower base, and lay the liner into place.
With attention to detail and a bit of patience, you’ll have a reliable shower pan liner that will protect your bathroom from water damage for years to come. So, let’s get started and create a durable barrier for your shower floor.
Gathering The Necessary Materials
Before you start the installation process of a shower pan liner, it’s important to gather all the necessary materials. Having everything you need beforehand will save you valuable time and ensure a smooth and efficient installation. Below are the essential tools, equipment, and materials you’ll need to get started on your shower pan liner installation:
Tools and Equipment Needed for the Installation
The following tools and equipment will come in handy during the installation of your shower pan liner:
- Tape Measure: A tape measure will help you accurately measure the dimensions of your shower area.
- Utility Knife: This tool is essential for cutting the shower pan liner to the required size and shape.
- Pencil or Marker: You’ll need a pencil or marker to mark the dimensions and cut lines on the shower pan liner.
- Notched Trowel: A notched trowel is used to evenly spread the mortar or adhesive on the shower base.
- Margin Trowel: This tool will come in handy when working with small amounts of mortar or adhesive.
- Flat Head Screwdriver: A flat head screwdriver can be used to remove any existing screws or nails from the shower area.
- Bucket: You’ll need a bucket to mix the mortar or adhesive for the shower pan installation.
- Paintbrush: A paintbrush is useful for applying primer to the shower base before installing the liner.
- Sponge: Keep a sponge nearby to wipe away any excess mortar or adhesive during the installation process.
- Mallet: A mallet will help you tap the shower pan liner into place, ensuring a tight and secure fit.
Measuring and Preparing the Shower Area
Before purchasing your shower pan liner, it’s crucial to measure the dimensions of your shower area accurately. Measure the length, width, and depth of the shower base to ensure you get a liner that fits perfectly. Additionally, examine the shower area for any existing damage or leaks that need to be repaired.
Once you have your measurements, clean the shower area thoroughly, removing any debris, soap scum, or residue. Repair any cracks or damage to the shower base and ensure it is level and free from any obstructions.
Choosing the Right Type of Shower Pan Liner
When it comes to choosing a shower pan liner, there are several options available in the market. The most commonly used and recommended type is a PVC or vinyl liner due to its durability and resistance to water penetration.
PVC liners are available in various thicknesses, typically ranging from 20 to 40 mils. A thicker liner provides better protection against leaks and is recommended for heavier use or tiled showers.
Make sure to select a liner that is large enough to cover the entire shower base, including the walls and curb. It’s important to have enough material to create a watertight seal and prevent any water damage.
Consider purchasing a shower pan liner that has been tested and approved by relevant standards organizations, such as the American Society for Testing and Materials (ASTM). This ensures that the liner meets the necessary quality and safety standards for shower installations.
By gathering all the necessary materials, measuring and preparing the shower area, and choosing the right type of shower pan liner, you are one step closer to a successful installation. Next, we’ll delve into the installation process in detail to help you achieve a watertight and long-lasting shower pan liner.

Preparing The Shower Area
When it comes to installing a shower pan liner, proper preparation of the shower area is crucial. This step ensures that the installation is seamless and durable, preventing any leaks or water damage in the future. In this section, we will look at how to prepare the shower area before installing the shower pan liner.
Removing the existing shower base
The first step in preparing the shower area is to remove the existing shower base. This may involve removing the tiles or any other material that covers the base. It is essential to do this carefully to avoid damaging the subfloor or any surrounding areas.
Cleaning and inspecting the subfloor
Once the shower base is removed, it is important to thoroughly clean and inspect the subfloor. Use a broom or vacuum cleaner to remove any debris or dust particles. Next, visually inspect the subfloor for any signs of damage, such as rot or water stains. If any damage is found, it must be repaired before proceeding with the installation.
Ensuring proper slope and level for drainage
The next step in preparing the shower area is to ensure proper slope and level for drainage. This ensures that water flows towards the drain efficiently, preventing any pooling or standing water. Use a level and a slope measurement tool to ensure that the subfloor is sloped towards the drain at a rate of 1/4 to 1/2 inch per foot.
Additionally, make sure that the subfloor is level to avoid any uneven surfaces. This will provide a stable base for the shower pan liner and prevent any issues with the final installation.
Installing The Shower Pan Liner
The installation of the shower pan liner is a crucial step in ensuring a watertight and durable shower. The shower pan liner acts as a barrier, preventing water from seeping into the subfloor and causing structural damage. In this guide, we will walk you through the process of installing the shower pan liner step-by-step, from cutting the liner to size, placing it in the shower area, to securing it to the walls and floor.
Cutting the liner to size
The first step in installing the shower pan liner is to cut it to the correct size. To do this, lay the liner in the shower area and leave an overhang of at least 2 inches on all sides. This will ensure that the liner covers the entire shower base and extends up the walls.
Placing the liner in the shower area
Once the liner is cut to size, carefully place it in the shower area. Make sure that the liner is centered and that it covers the entire shower base. Smooth out any wrinkles or creases in the liner to ensure a tight fit. If needed, you can use a hairdryer to gently heat the liner and make it more pliable.
Securing the liner to the walls and floor
Now it’s time to secure the shower pan liner to the walls and floor. Start by applying a layer of adhesive to the bottom of the walls, using a trowel. Press the liner firmly against the adhesive, making sure it adheres well.
Next, apply adhesive to the shower base and press the liner down onto the floor. Use a roller or a wooden block to firmly press the liner into place, ensuring it is flat and smooth. Trim off any excess liner, leaving a small overhang along the walls.
Finally, secure the liner to the walls by nailing a strip of galvanized metal lath over the top edge of the liner. This will provide added stability and prevent the liner from shifting or tearing. Be sure to nail the metal lath securely to the studs in the walls.
Congratulations! You have successfully installed the shower pan liner. This important step in the shower installation process will help protect your shower from water damage and ensure its longevity. Now you can proceed with the next steps of finishing your shower, such as installing the tile or wall covering.
Creating The Drain Hole
Installing a shower pan liner is an important step in ensuring a watertight shower base that prevents leaks and water damage. One crucial aspect of this process is creating the drain hole. In this section, we will guide you through the necessary steps to mark, cut, fit, and install the drain hole in the liner.
Marking the Drain Hole Location
Before proceeding with the actual cutting, it’s essential to mark the drain hole’s accurate location on the shower pan liner. This will ensure a proper fit and alignment with the shower drain assembly. To mark the drain hole:
- Clean the area where the drain hole will be located to remove any dirt or debris.
- Place the shower pan liner over the shower base, ensuring it covers the entire area and extends up the walls.
- Secure the top edge of the liner to the wall studs using staples or an adhesive, making sure it is taut and smooth.
- Locate the center of the shower drain opening by measuring its dimensions and dividing it in half.
- Using a marker or pencil, mark the center of the drain hole on the liner.
Cutting and Fitting the Drain Hole in the Liner
Now that you have marked the drain hole location, it’s time to cut and fit the hole in the shower pan liner. Follow these steps to ensure a proper fitting:
- Double-check the marking to ensure its accuracy.
- Using a utility knife or sharp scissors, carefully cut along the marked outline of the drain hole.
- Make sure to cut slightly inside the marked line to allow for a precise fit.
- Test-fit the drain assembly on the hole to ensure it fits smoothly and securely.
- If needed, trim the edges of the hole until the drain assembly fits snugly.
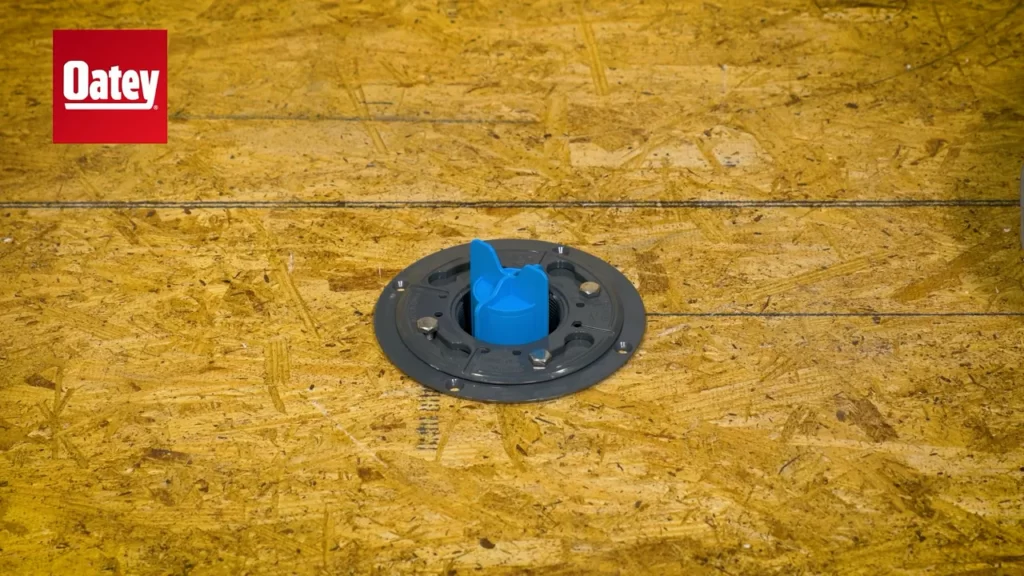
Installing the Drain Assembly on the Liner
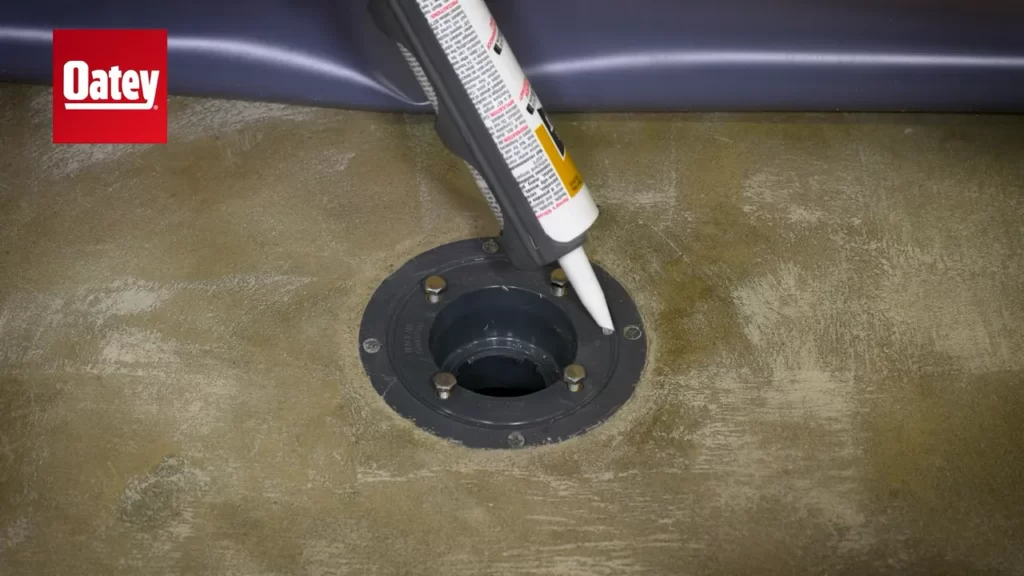
With the drain hole cut and fitted, it’s now time to install the drain assembly on the shower pan liner. Follow these steps for a secure and watertight installation:
- Apply a thin layer of the recommended adhesive around the drain hole’s edges on the liner.
- Insert the drain flange into the hole, making sure it sits flush and evenly against the liner.
- Tightly secure the drain flange to the liner using the provided screws or clips.
- Apply a bead of waterproof sealant around the edges of the drain assembly to create a watertight seal.
- Allow the sealant to dry according to the product’s instructions before proceeding with further installation.
By following these steps, you can successfully create the drain hole in the shower pan liner and install the drain assembly. This ensures a proper fit and a reliable barrier against leaks and water damage in your shower.
Building The Shower Curb
When it comes to installing a shower pan liner, one crucial step is building the shower curb. The shower curb ensures that water remains within the shower area and prevents it from leaking onto the bathroom floor. In this section, we will discuss two methods for framing the curb – using wood or cement board. Following that, we will cover the application of a waterproofing membrane to the curb and finally, attaching the liner to the curb while ensuring a proper slope.
Framing the Curb with Wood or Cement Board
Before you can begin framing the shower curb, gather the necessary materials such as pressure-treated wood or cement board, a circular saw, nails, and a level. Here’s how you can frame the curb:
- Measure the intended height and width of the curb.
- Using a circular saw, cut the wood or cement board to the desired size.
- Place the framing material in the desired location, ensuring it is level.
- Secure the frame by nailing it into the subfloor.
By framing the curb, you create a sturdy structure that will support the shower pan liner and keep water contained within the shower area.
Applying Waterproofing Membrane to the Curb
The next crucial step in building the shower curb is applying a waterproofing membrane. This membrane will ensure that any water that comes into contact with the curb does not penetrate through to the subfloor. Here’s how you can apply the waterproofing membrane:
- Clean the surface of the curb, removing any dust or debris.
- Apply a layer of waterproofing primer using a paintbrush or roller.
- Allow the primer to dry completely before proceeding.
- Next, apply the waterproofing membrane to the curb, following the manufacturer’s instructions.
- Smooth out any wrinkles or air bubbles in the membrane using a flat edge or trowel.
Applying a waterproofing membrane adds an extra layer of protection, ensuring that your shower curb remains watertight and preventing any potential water damage.
Attaching the Liner to the Curb and Ensuring Proper Slope
After framing the curb and applying the waterproofing membrane, it’s time to attach the shower pan liner and ensure a proper slope. Here’s how:
- Position the shower pan liner over the curb, allowing it to extend over the shower floor.
- Secure the liner to the curb using screws or nails, ensuring it is taut and free from any wrinkles.
- Trim off any excess liner using a utility knife.
- To ensure proper slope, create a gentle slope on the liner towards the shower drain, using a level to guide you.
Attaching the liner to the curb and ensuring a proper slope is crucial as it allows for proper water drainage, preventing any pooling or standing water within your shower.
With the shower curb properly framed, waterproofed, and the liner securely attached, you are one step closer to completing your shower installation. In the next section, we will cover the final steps of installing the shower pan and finishing the shower floor.
Test For Leaks And Adjustments
Filling the shower base with water
Firstly, it is important to fill the shower base with water as this will allow you to test for any potential leaks. To do this, simply close the drain and start filling the base with water. Make sure to fill it to a level where it covers the shower pan liner entirely. It is advisable to fill the water up to at least a few inches above the curb. This will ensure that you are testing the entire shower pan liner for any leaks or issues.
Checking for any leaks or pooling
Once the shower base is filled with water, carefully inspect the entire area for any signs of leaks or pooling. This includes examining the corners, edges, and walls for any moisture or water buildup. Keep an eye out for any damp spots, as these could indicate a leak in the shower pan liner. It is important to take your time during this inspection process, as even small leaks can lead to bigger problems if not addressed promptly.
Making necessary adjustments and repairs
If you notice any leaks or pooling during the inspection, it is crucial to make the necessary adjustments and repairs to ensure the shower pan liner functions properly. Start by identifying the source of the leak and determine whether it is due to a faulty liner installation or a problem with the plumbing. If it is an issue with the liner, you may need to remove it and install a new one. On the other hand, if the problem lies with the plumbing, you may need to consult a professional plumber to fix the issue.
During the adjustment process, pay close attention to the corners and seams of the shower pan liner as these are common areas for potential leaks. Consider using a waterproofing membrane or sealer to reinforce these vulnerable spots and prevent any future leaks. It is important to address any issues promptly to avoid water damage and ensure a long-lasting and reliable shower pan liner installation.
In conclusion, testing for leaks and making necessary adjustments and repairs is a crucial step when installing a shower pan liner. By following these steps and thoroughly inspecting the filled shower base, you can identify any leaks or pooling and take the appropriate measures to fix them. This will not only prevent water damage but also ensure a durable and functional shower pan liner.
Finishing Touches And Cleanup
Trimming Excess Liner and Sealing Edges
After successfully installing the shower pan liner, the next step is to trim any excess liner and seal the edges for a seamless finish. To accomplish this, follow these simple steps:
- Start by trimming the excess liner with a utility knife. Make sure to cut it close to the top of the shower curb or wall.
- Once the excess liner is trimmed, you need to seal the edges to prevent water leakage. Apply a bead of silicone caulk along the edges of the liner, including the corners and seams.
- Using a caulk smoothing tool or your finger, smooth the silicone caulk to ensure a tight and waterproof seal.
Trimming the excess liner and sealing the edges is a crucial step in the shower pan installation process. It not only creates a tidy appearance but also prevents any potential water damage in the future. Take your time and pay attention to detail while performing this step to ensure a leak-free shower.
Installing Cement Board or Other Wall Materials
Once the shower pan liner is properly trimmed and sealed, it’s time to install the wall materials such as cement board. This step provides a solid foundation for the tile installation and ensures the durability of your shower. Here are the steps to follow:
- Cut the cement board to the desired size using a utility knife or circular saw.
- Position the cement board against the walls, starting from the bottom and working your way up. Make sure to leave a small gap at the bottom to prevent water wicking up.
- Attach the cement board to the framing studs using cement board screws or nails. Place the screws or nails every 8-12 inches along the edges and every 12-16 inches in between.
- Leave a 1/8-inch gap between each piece of cement board for expansion and contraction.
- Apply a layer of waterproof membrane or primer over the cement board to enhance its water resistance capabilities.
By installing cement board or other suitable wall materials, you are creating a sturdy and waterproof foundation for your shower. This step is crucial for the longevity and performance of your tiled shower walls, so give it the attention it deserves.
Cleaning Up the Worksite and Preparing for Tiling
With the shower pan liner installed, excess liner trimmed, edges sealed, and cement board or other wall materials in place, it’s time to clean up the worksite and prepare for the exciting task of tiling your shower walls. Follow these steps for a smooth transition:
- Remove any debris, tools, or materials from the worksite that might hinder the tiling process.
- Clean the walls thoroughly using a mild detergent or vinegar solution and a scrub brush to remove any dirt or grime.
- Rinse the walls with clean water to ensure they are free from any cleaning residues.
- Allow the walls to dry completely before proceeding to the next step.
- Inspect the walls for any imperfections or areas that require additional attention or repair.
- Address any issues, such as filling small cracks or holes, before proceeding with the tiling process.
By properly cleaning up the worksite and preparing the walls before tiling, you are ensuring a smooth and seamless installation. Take the time to eliminate any potential obstacles and create a clean and well-prepared canvas for your tile installation.
Frequently Asked Questions
Does Thinset Stick To Shower Pan Liner?
Yes, thinset does stick to a shower pan liner.
Do You Have To Put Mortar Under A Shower Pan?
Yes, it is necessary to put mortar under a shower pan. This helps to provide stability and support for the pan, creating a solid foundation for the shower. Without mortar, the pan may shift or crack over time.
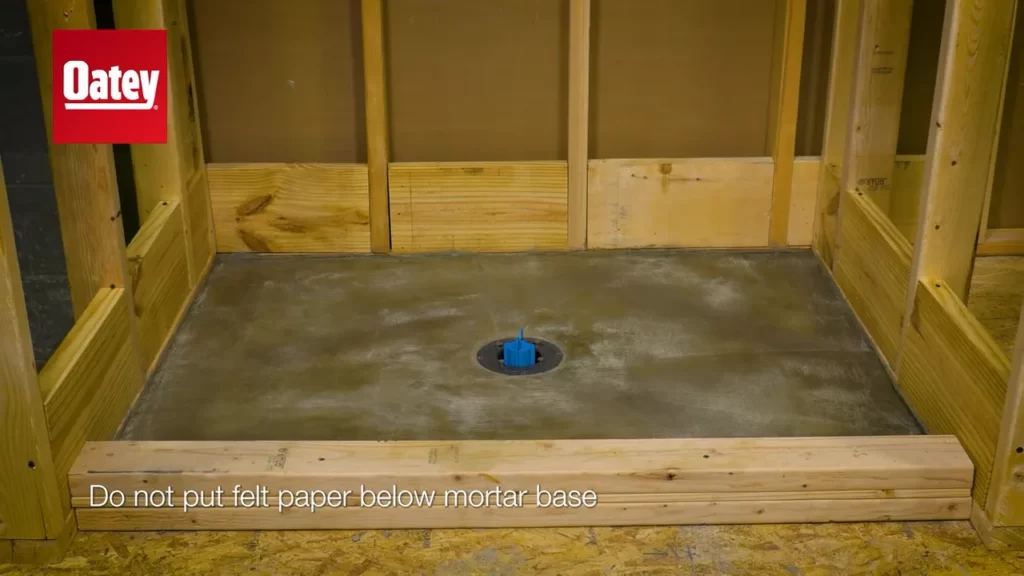
What Goes On Top Of Shower Pan Liner?
A shower pan liner is typically topped with a mortar bed or a pre-formed shower pan.
What Is The Slope Under A Shower Pan Liner?
The slope under a shower pan liner is important for proper drainage. It should have a minimum slope of 1/4 inch per foot to ensure water flows towards the drain. This slope prevents water from puddling and helps prevent leaks or water damage in the shower area.
Conclusion
To successfully install a shower pan liner, follow the step-by-step instructions highlighted in our comprehensive video guide. From preparing the subfloor to applying adhesive and securing the liner, this tutorial provides essential tips for a leak-free installation. Make sure to gather all the necessary tools and materials before starting the process.
With this video, you can confidently undertake this project and enjoy a properly functioning shower for years to come.