To install a shower pan liner, you need to: 1) Clean the subfloor to remove any dirt or debris. 2) Install a layer of mortar on the subfloor.
3) Place the shower pan liner over the mortar, ensuring it covers the entire surface. 4) Fold and cut the liner to fit securely around the drain. 5) Secure the liner to the subfloor using roofing nails or staplers, making sure it is snug and smooth.
6) Finally, install the shower pan and connect it to the drain. With these steps, you can install a shower pan liner successfully. Now let’s dive into the details. Shower pan liner installation is a crucial step in waterproofing your shower and preventing leaks. It acts as a barrier between the shower base and the subfloor, ensuring that water does not seep through. In this guide, we will walk you through the steps to install a shower pan liner efficiently. We will cover everything from cleaning the subfloor to securing the liner and connecting it to the drain. By following these steps meticulously, you can ensure a watertight and durable shower base. Now, let’s get started and learn how to install a shower pan liner correctly.
Choosing The Right Shower Pan Liner Material
Choosing the right shower pan liner material is crucial for a successful shower installation. The shower pan liner is an essential component that prevents water leaks and damage to surrounding areas. With different materials available in the market, it’s important to understand the benefits of using a shower pan liner and the factors to consider before making a decision.
Benefits of Using a Shower Pan Liner
A shower pan liner serves as a waterproof barrier beneath the shower floor. By choosing a high-quality liner, you provide protection against water seepage into the floor and walls, preventing potential mold growth and structural deterioration. A properly installed shower pan liner helps to maintain the integrity of your bathroom, prolonging its lifespan.
Here are some other benefits of using a shower pan liner:
- Prevents water damage: By directing water towards the drain, a shower pan liner effectively prevents water damage to the subfloor and surrounding areas.
- Easy installation: Shower pan liners are relatively easy to install, making them suitable for both professionals and DIY enthusiasts.
- Durable and long-lasting: Investing in a high-quality shower pan liner ensures durability and long-lasting performance, minimizing the need for future repairs or replacements.
- Customizable: Shower pan liners come in various sizes, allowing you to customize the liner to fit your specific shower dimensions.
Factors to Consider When Choosing a Shower Pan Liner
When selecting a shower pan liner, several factors should be taken into account:
- Material: The material of the shower pan liner plays a significant role in its performance and longevity. Common materials include PVC, chlorinated polyethylene (CPE), and rubber. Each material has its own advantages and characteristics, so it’s important to choose one that suits your needs and preferences.
- Thickness: The thickness of the shower pan liner is a crucial aspect to consider. A thicker liner offers enhanced durability and resistance to punctures, ensuring long-term water protection.
- Size: Measure your shower dimensions accurately to determine the appropriate size of the shower pan liner. It should cover the shower floor and extend up the walls to ensure full water containment.
- Installation method: Different shower pan liners require varying installation methods. Some liners are adhesive-backed, while others need to be adhered with an adhesive product. Consider your skill level and the ease of installation when selecting a liner.
By carefully considering these factors, you can choose a shower pan liner that meets your specific needs and ensures a successful installation. Take the time to research and compare different options to make an informed decision that will provide long-lasting protection for your shower and bathroom.

Preparing The Shower Base For Installation
Before installing a shower pan liner, it is crucial to properly prepare the shower base. This step ensures a solid foundation for the liner and helps prevent leaks or damage in the future. In this section, we will guide you through the important steps involved in preparing the shower base for installation.
Removing the Existing Shower Base
The first step in preparing the shower base is to remove the existing shower base, if applicable. This may involve unscrewing or prying off any panels or tiles that cover the base. Once exposed, carefully remove the base by disconnecting any plumbing fixtures and lifting it out. Take care not to damage the surrounding walls or floor during this process.
Cleaning and Leveling the Shower Base
After removing the old shower base, it is essential to thoroughly clean the area to ensure a clean and level surface for installation. Start by removing any debris, such as old caulk or grout, using a scraper or putty knife. Once the surface is clean, use a level to check if the shower base is level and make any necessary adjustments. This will help ensure proper drainage and stability for the new shower pan liner.
Checking for Leaks or Damage
Before proceeding with the installation of the shower pan liner, it is crucial to check for any leaks or damage in the shower base. Inspect the plumbing connections and look for any signs of water damage or moisture. This includes checking for loose or corroded pipes, as well as any visible cracks or leaks. Addressing these issues before installation prevents potential problems in the future and ensures a watertight shower area.
Additionally, it is a good idea to test the shower base by pouring water into the basin and checking for any leaks. This will help identify any potential issues before the installation of the shower pan liner.
In conclusion, preparing the shower base for installation is a critical step in ensuring a secure and leak-free shower area. By carefully removing the existing shower base, cleaning and leveling the surface, and checking for leaks or damage, you are creating a solid foundation for the shower pan liner. This not only ensures the longevity of your shower but also provides a safe and enjoyable bathing experience.
Step-By-Step Guide To Installing The Shower Pan Liner
Installing a shower pan liner is an essential step in creating a waterproof barrier for your shower. A proper installation ensures that your shower remains leak-free, preventing any potential water damage. In this step-by-step guide, we will take you through the process of installing a shower pan liner, from gathering the necessary tools and materials to adding the finishing touches. Follow along to achieve a successful and professional installation.
Gathering the Necessary Tools and Materials
Before starting the installation process, make sure you have all the tools and materials that you need. Here’s a checklist:
| Tools | Materials |
|---|---|
| – Utility knife | – Shower pan liner |
| – Trowel | – Adhesive |
| – Measuring tape or ruler | – Nails or staples |
| – Scissors | – Sealant/caulk |
| – Level | – Drain assembly |
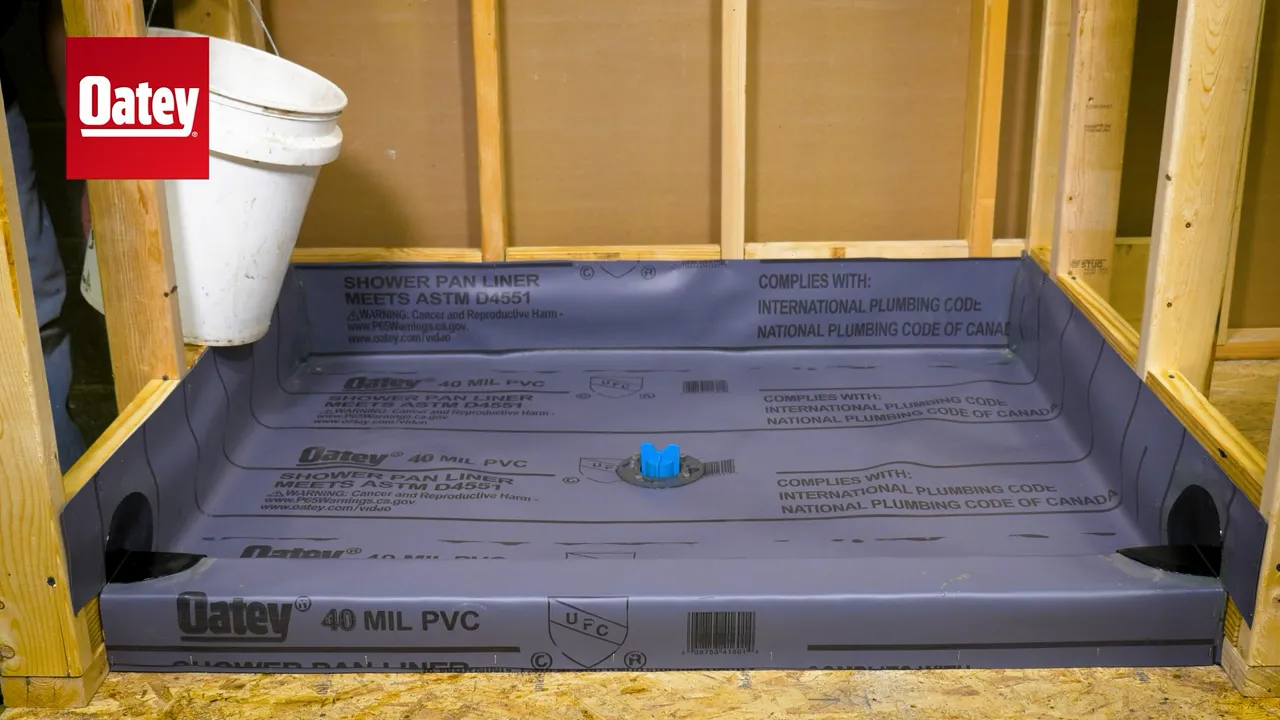
Measuring and Cutting the Shower Pan Liner
Start by measuring the dimensions of your shower base. It’s crucial to have accurate measurements, as it will ensure a proper fit and prevent any future leaks. Cut the shower pan liner accordingly, leaving enough material to go up the walls of the shower area.
Applying Adhesive to the Shower Base
Next, apply a waterproof adhesive to the shower base using a trowel or a putty knife. Make sure to spread the adhesive evenly, covering the entire surface. This adhesive will create a secure bond between the shower pan liner and the base, ensuring a watertight seal.
Placing and Securing the Shower Pan Liner
Place the shower pan liner over the adhesive, ensuring that it covers the entire base and goes up the walls. Smooth out any wrinkles or bubbles using a trowel or your hands. Secure the liner to the walls using nails or staples, ensuring that they are placed at regular intervals to provide a secure attachment.
Trimming and Sealing the Edges of the Liner
Trim any excess liner material using scissors or a utility knife, leaving a small overlap on the outside corners. Fold the liner tightly into the corners and seal them with adhesive or caulk. This step is crucial for creating a waterproof barrier at the corners and preventing any potential leaks.
Testing the Waterproofing of the Shower Pan Liner
Before proceeding further, it’s essential to test the waterproofing of the shower pan liner. Fill the shower base with water to a reasonable level, and let it sit for at least 24 hours. Check for any signs of leaks or seepage. If there are any issues, address them before continuing with the installation process.
Tips and Troubleshooting for a Successful Installation
Here are some tips and troubleshooting steps to ensure a successful installation:
- Ensuring Proper Slope for Drainage: The shower pan liner should slope towards the drain to facilitate proper water drainage. Use a level to check the slope and make any necessary adjustments.
- Dealing with Corner and Crease Foldings: Take extra care while folding the liner into corners or dealing with crease foldings. Make sure the folds are tight and secure to prevent water penetration.
- Addressing Leaks and Seepage Issues: If you notice any leaks or seepage during the waterproofing test, carefully inspect the area and identify the source. Apply additional adhesive or caulk to seal any gaps or openings.
Finishing Touches and Next Steps
Once you have successfully installed and tested the shower pan liner, you can proceed with the finishing touches and the next steps of your shower installation process.
Installing the Shower Base or Tile Over the Liner
If you are installing a pre-made shower base, follow the manufacturer’s instructions for proper installation. If you plan to tile your shower, apply a layer of thinset mortar over the shower pan liner before laying the tiles.
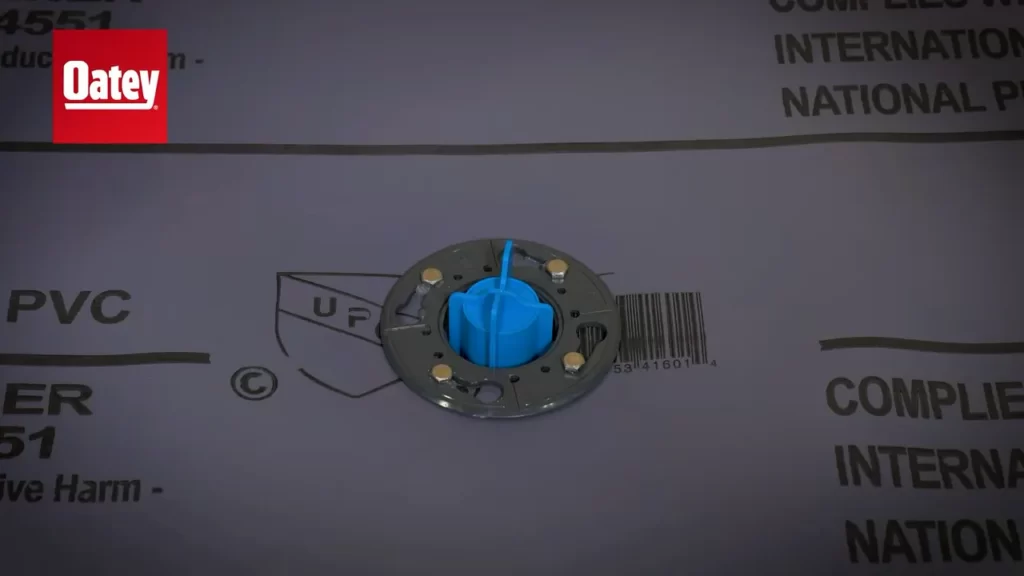
Adding the Drain Assembly
Install the drain assembly on top of the shower pan liner according to the manufacturer’s instructions. Ensure a proper seal around the drain to prevent any potential leaks.
Sealing the Shower Pan Liner with Caulk
Apply a bead of caulk along the edges of the shower pan liner where it meets the walls or any other fixtures. This will provide an additional layer of waterproofing and ensure a clean and professional finish.
Final Testing and Inspection
After completing the installation, perform a final test and inspection to ensure everything is watertight. Run water through the shower and check for any signs of leaks or seepage. If everything looks good, congratulations! You have successfully installed a shower pan liner.
Frequently Asked Questions
What Is The Proper Way To Install A Shower Pan?
To install a shower pan properly, follow these steps: 1. Prepare the area by removing the existing floor and ensuring a level surface. 2. Install the drain assembly according to the manufacturer’s instructions. 3. Apply a waterproof membrane to the subfloor and up the wall studs.
4. Set the shower pan in place, ensuring it is level and properly supported. 5. Secure the shower pan to the subfloor and connect the drain. Test for leaks before proceeding.
Can You Tile Directly On Shower Pan Liner?
Yes, you can tile directly on a shower pan liner.
Do You Have To Put Mortar Under A Shower Pan?
Yes, it is recommended to use mortar under a shower pan. This helps to provide stability and support for the pan, preventing any movement or leaks. By applying mortar, it creates a strong bond between the shower pan and the subfloor, ensuring a durable and secure installation.
How Do You Fasten A Shower Pan Liner?
To fasten a shower pan liner, follow these steps: 1. Start by laying the liner over the shower base. 2. Use adhesive to attach the liner to the base and the walls. 3. Ensure there are no wrinkles or air pockets.
4. Fasten the liner at the corners and edges with nails or staples. 5. Trim off any excess liner and seal the edges with caulk.
Conclusion
Installing a shower pan liner may seem like a daunting task, but with the right guidance and tools, it can be achieved successfully. By following the step-by-step instructions outlined in this blog post, you can ensure a watertight seal and a durable foundation for your shower.
Remember to consider factors such as slope, material compatibility, and proper adhesion techniques. With these tips, you’ll be well-equipped to tackle your shower pan liner installation like a pro. Happy renovating!