
To install a shower filter, first, remove the showerhead by unscrewing it counterclockwise. Then, attach the shower filter to the exposed pipe, ensuring a tight fit.
Finally, screw the showerhead back onto the filter. A shower filter can be an excellent addition to your bathroom, as it helps to remove impurities and contaminants from your water supply, providing you with cleaner and healthier shower water. However, installing a shower filter may seem like a daunting task for some.
We will provide you with a quick and easy guide on how to install a shower filter, so you can enjoy a more refreshing and rejuvenating shower experience. By following these simple steps, you can have your shower filter up and running in no time, ensuring that you and your family can enjoy the benefits of cleaner water.
Assessing Your Shower Filter Needs
Before you proceed with installing a shower filter, it’s important to assess your specific needs to ensure you choose the right one for you. Understanding the importance of a shower filter, identifying common water contaminants, and choosing the right shower filter for your needs are crucial steps in this process.
Understanding the Importance of a Shower Filter
Shower filters play a vital role in ensuring the cleanliness and safety of your shower water. They are designed to remove various impurities and contaminants that may be present in your water supply. By eliminating these harmful substances, shower filters help protect your skin, hair, and overall health.
Identifying Common Water Contaminants
Before selecting a shower filter, it’s essential to identify the common contaminants in your water. This knowledge will help you choose the right filter that can effectively eliminate those specific impurities. Some common water contaminants include:
| Contaminant | Effect |
|---|---|
| Chlorine | Can cause dry skin and hair, irritation, and unpleasant odors |
| Heavy Metals | May cause skin rashes, allergic reactions, and long-term health issues |
| Sediments | Can clog pores, leading to acne breakouts and other skin problems |
| Chemicals | Can have adverse effects on the skin’s natural pH balance and moisture levels |
Choosing the Right Shower Filter for Your Needs
Once you have identified the contaminants in your water, it’s time to select the appropriate shower filter. Keep the following factors in mind:
- Contaminant removal: Ensure that the shower filter you choose targets the specific contaminants present in your water.
- Filter type: Different types of filters, such as activated carbon, KDF, and vitamin C filters, offer various benefits. Research each type to determine which one suits your needs best.
- Filter lifespan: Consider the filter’s lifespan and the frequency at which it needs to be replaced. A longer-lasting filter can help you save time and money in the long run.
- Installation: Look for a shower filter that is easy to install and compatible with your existing shower setup.
- Budget: Set a budget for your shower filter purchase and compare different options within that range.
By carefully assessing your shower filter needs, understanding the importance of a shower filter, identifying common water contaminants, and selecting the right shower filter, you can ensure a clean and rejuvenating shower experience. Now that you have gained insights into this process, it’s time to take action and install a shower filter that meets your specific requirements.
Gathering The Necessary Tools And Materials
List of Tools and Materials Required
Before you can install a shower filter to improve the quality of your bathing water, you will need to gather some essential tools and materials. Having these items on hand will streamline the installation process and ensure that you can complete the task efficiently. Here is a list of the tools and materials you will need:
Tools:
- Adjustable wrench
- Plumbers tape
- Phillips head screwdriver
- Bucket
- Old towel
Materials:
- Shower filter
- Replacement filter cartridge (if applicable)
With these tools and materials at your disposal, you will be well-prepared to tackle the installation process. Now, let’s move on to where you can purchase shower filters and accessories.
Where to Purchase Shower Filters and Accessories
When it comes to purchasing shower filters and accessories, you have several options. Below are some suggested places where you can find a wide variety of high-quality shower filters and the accessories you may need:
1. Home Improvement Stores:
Home improvement stores like Home Depot and Lowe’s offer a diverse selection of shower filters and accessories. You can visit their physical stores to see the products in person or explore their online platforms for added convenience.
2. Plumbing Supply Stores:
Specialized plumbing supply stores are another excellent option for purchasing shower filters and accessories. These stores often carry a wider range of products and may offer assistance from knowledgeable staff who can help you find the right filter for your needs.
3. Online Retailers:
Online retailers such as Amazon and eBay provide a vast array of shower filters and accessories. With just a few clicks, you can browse through multiple brands, compare prices, and read customer reviews to make an informed decision. This option is particularly convenient if you prefer the ease of online shopping.
With these options at your disposal, you can choose the most convenient and reliable source for purchasing your shower filter and any necessary accessories. Once you have acquired all the required tools and materials, you are ready to move on to the next step of the installation process.
Step-By-Step Installation Guide
Are you tired of taking showers with water that is full of impurities and chemicals? Installing a shower filter can greatly improve the quality of your shower water by removing harmful substances and ensuring a healthier bathing experience. In this step-by-step installation guide, we will walk you through the process of installing a shower filter, from preparing it for installation to reattaching the showerhead. Follow these simple steps to enjoy cleaner and safer showers.
Preparing the Shower Filter for Installation
Before you start the installation process, make sure you have all the necessary tools and materials ready. Check the packaging of your shower filter for a list of items that should be included. Typically, you will need an adjustable wrench, plumber’s tape, and the shower filter itself. Once you have everything you need, you can begin preparing the shower filter for installation.
Removing the Existing Showerhead
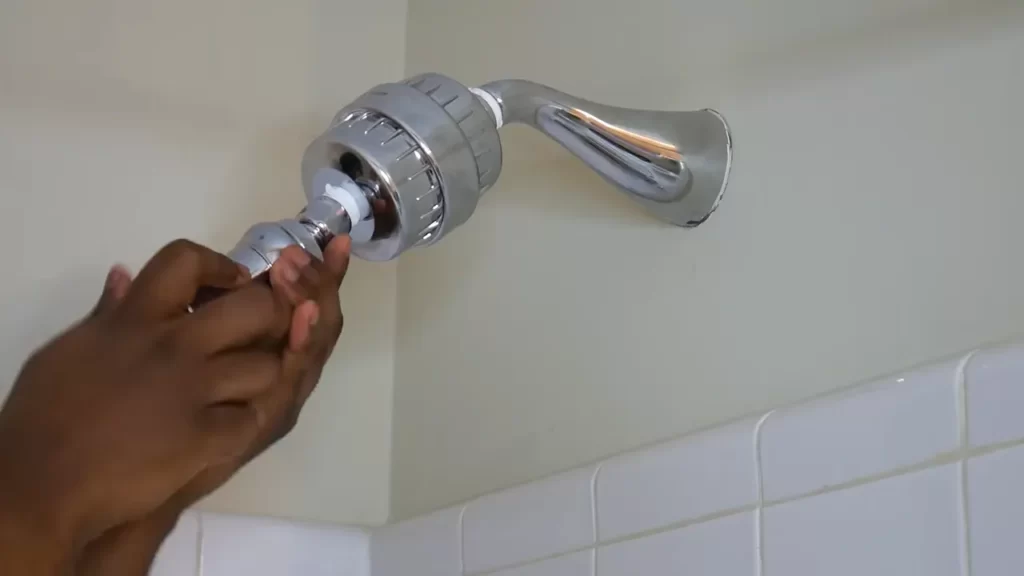
The next step is to remove the existing showerhead. This can be done by unscrewing it counterclockwise. Use an adjustable wrench if necessary to loosen the connection. Once the showerhead is detached, set it aside for the moment. Take this opportunity to inspect the shower arm for any dirt or debris that may have accumulated over time. Clean the arm if necessary to ensure a proper connection with the shower filter.
Installing the Shower Filter
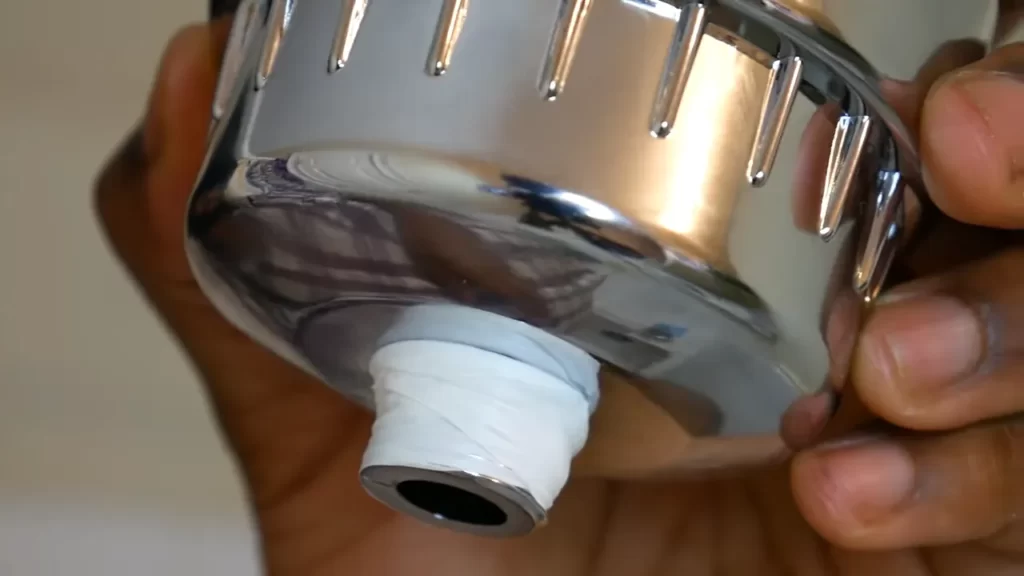
Now that the showerhead is removed, you can install the shower filter. Start by applying plumber’s tape to the threads of the shower arm. This will help create a tight seal and prevent any leaks. Wrap the tape in a clockwise direction, making sure to cover all the threads. Once the tape is applied, you can screw the shower filter onto the shower arm. Use your hands to tighten it initially, and then use an adjustable wrench to give it a final twist for a secure fit. Be careful not to overtighten, as this can cause damage to the shower arm or filter.
Testing for Leaks and Adjusting the Position
With the shower filter installed, it’s time to test for any leaks. Turn on the shower and let the water run for a few minutes. Check the connections between the shower arm and the filter, as well as the filter and the showerhead, for any signs of leaks. If you notice any leaks, try tightening the connections further. If the leaks persist, you may need to disassemble and reassemble the components, ensuring the plumber’s tape is applied correctly. Once you have confirmed that there are no leaks, you can proceed to adjust the position of the shower filter to your desired angle. Simply loosen the connection with the shower arm and adjust the filter accordingly. Once in position, tighten the connection once more to secure the filter in place.
Reattaching the Showerhead
Now that the shower filter is securely installed, it’s time to reattach the showerhead. Take the showerhead that you set aside earlier and screw it clockwise onto the filter. Use your hands to tighten it initially, and then use the adjustable wrench for a final twist. Make sure the connection is tight to prevent any leaks. Once the showerhead is reattached, turn on the shower and test the water flow. Congratulations! You have successfully installed a shower filter and can now enjoy cleaner and safer showers.
Maintaining And Cleaning Your Shower Filter
When it comes to maintaining and cleaning your shower filter, regular upkeep is essential. By taking the time to clean and replace the necessary parts, you can ensure that your shower filter continues to work efficiently and effectively. In this section, we will discuss the regular cleaning and maintenance requirements, how to replace the filter cartridge, and some tips for extending the lifespan of your shower filter.
Regular Cleaning and Maintenance Requirements
Regular cleaning and maintenance of your shower filter are necessary to keep it in optimal condition. Follow these simple steps to ensure your shower filter stays clean:
- Start by turning off the water supply to the shower.
- Remove the shower filter from the showerhead according to the manufacturer’s instructions.
- Inspect the filter for any visible buildup or debris. If you notice any, gently clean it using a soft brush or toothbrush.
- Soak the filter in a mixture of warm water and vinegar for about 30 minutes to remove any stubborn mineral deposits.
- Rinse the filter thoroughly with clean water to remove any residue.
- Reattach the shower filter to the showerhead and turn on the water supply.
By following these cleaning steps on a regular basis, you can ensure that your shower filter remains free from clogs and performs at its best.
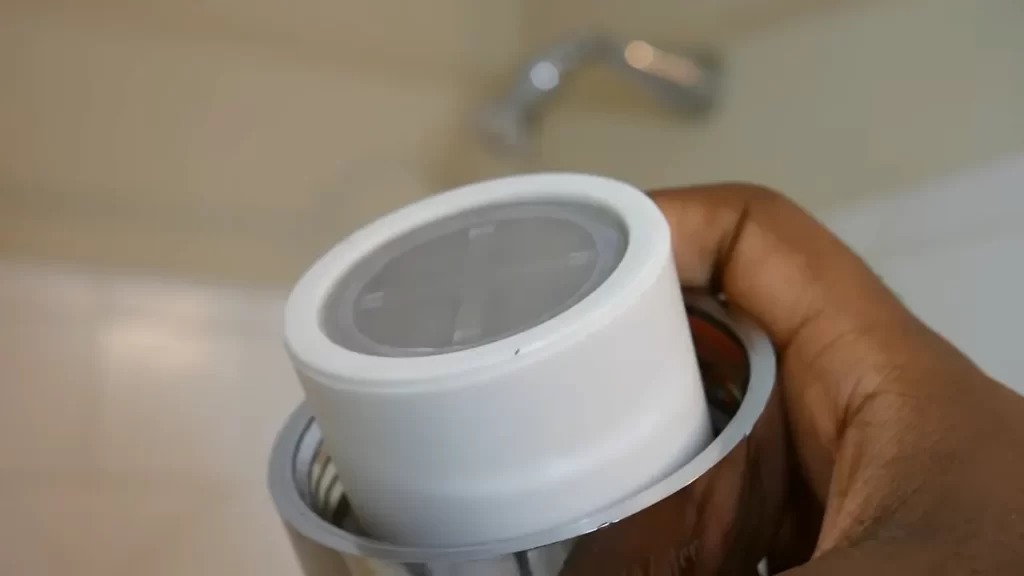
Replacing the Filter Cartridge
The filter cartridge is an essential component of your shower filter and needs to be replaced periodically. Here’s how you can do it:
- Start by turning off the water supply to the shower.
- Remove the shower filter from the showerhead according to the manufacturer’s instructions.
- Locate the filter cartridge inside the shower filter housing.
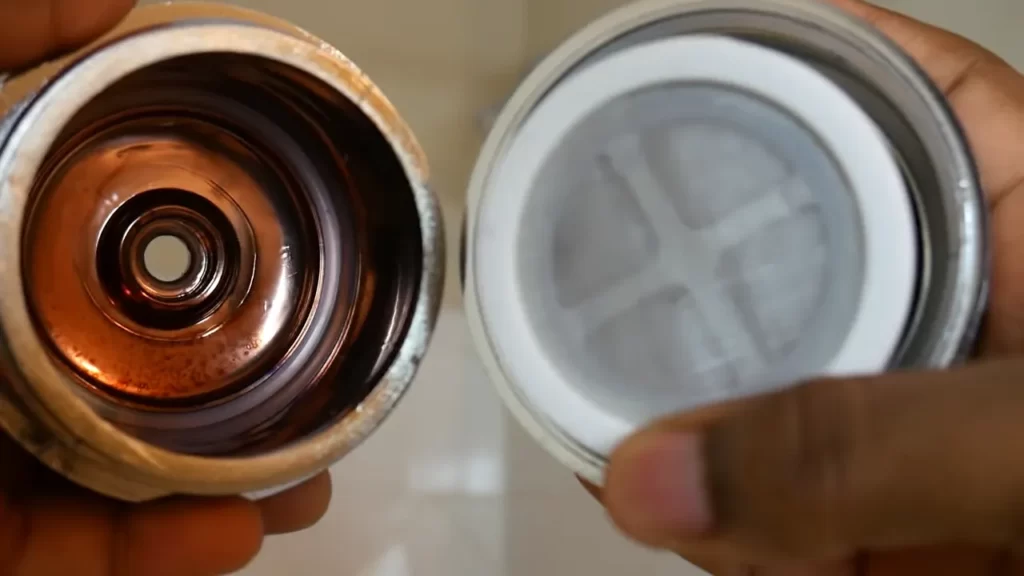
- Unscrew the filter cartridge and remove it from the housing.
- Discard the old filter cartridge and replace it with a new one.
- Secure the new filter cartridge in place by screwing it back into the housing.
- Reattach the shower filter to the showerhead and turn on the water supply.
Remember to check the manufacturer’s recommendations for the recommended lifespan of the filter cartridge. Typically, it is recommended to replace it every 6 to 9 months to ensure the optimal performance of your shower filter.
Extending the Lifespan of Your Shower Filter
To extend the lifespan of your shower filter and maximize its efficiency, consider the following tips:
- Avoid using excessively hot water, as it can damage the filter cartridge.
- Install a pre-filter to remove larger particles and sediments before they reach the shower filter.
- Regularly clean the showerhead to prevent any buildup that can affect the performance of the shower filter.
- Check for any leaks or cracks in the shower filter housing and replace them if necessary.
- Keep the area around the shower filter dry to prevent the growth of mold or mildew.
By following these tips and regularly maintaining your shower filter, you can ensure that it continues to provide clean and filtered water for your showers.
Troubleshooting Common Installation Issues
Even though installing a shower filter is a relatively simple task, there can be some common issues that may arise during the installation process. It’s important to address these problems to ensure that your shower filter is functioning optimally. In this section, we will discuss the three most common installation issues: low water pressure after installation, leaks or drips from the shower filter, and compatibility issues with your plumbing system.
Low Water Pressure After Installation
If you notice a decrease in water pressure after installing a shower filter, there are a few possible reasons for this issue:
- Check if the water flow restrictor inside the filter cartridge has been installed properly. Sometimes, improper installation can restrict water flow. Refer to the user manual to ensure that the flow restrictor is correctly positioned.
- Inspect the filter cartridge for any debris or sediments that might be blocking the water flow. Remove the cartridge and rinse it thoroughly to get rid of any clogs.
- Examine the showerhead for any blockages as well. Sediments and mineral build-up can obstruct the water flow. Clean or replace the showerhead if necessary.
Leaks or Drips from the Shower Filter
If you are experiencing leaks or drips from your shower filter, follow these troubleshooting tips:
- Ensure that all connections between the shower filter and your plumbing system are tight and secure. Use a wrench to tighten any loose fittings.
- Inspect the rubber washers or O-rings in the filter connections. Over time, these components may wear out or become damaged, leading to leaks. Replace any faulty washers or O-rings with new ones.
- If you have a metal shower pipe, consider using plumber’s tape to create a tight seal between the pipe and the shower filter connections.
Compatibility Issues with Your Plumbing System
In rare cases, you may encounter compatibility issues between your shower filter and the existing plumbing system. Here are some steps to troubleshoot this problem:
- Check the thread size of your shower pipe and ensure that it matches the thread size of the shower filter. If there is a mismatch, you may need to purchase an adaptor or consult a professional plumber for assistance.
- Inspect the plumbing system for any signs of corrosion or damage. These issues can affect the functionality of the shower filter. If you notice any problems, it may be necessary to repair or replace the damaged plumbing components.
- Verify that the water pressure in your home meets the minimum requirements specified by the shower filter manufacturer. Insufficient water pressure can lead to compatibility issues and affect the performance of the filter. Consider installing a booster pump if needed.
By troubleshooting these common installation issues, you can ensure that your shower filter works effectively and provides you with clean and refreshing showers. If you are unable to resolve the problems on your own, don’t hesitate to seek professional help to ensure a proper installation.
Additional Tips And Considerations
Installing a shower filter is a simple yet effective way to improve the quality of your shower water. However, there are a few additional tips and considerations to keep in mind to ensure you get the most out of your shower filter. In this section, we will discuss the benefits of using a shower filter, explore other water treatment options for your home, and answer frequently asked questions about shower filters.
Benefits of Using a Shower Filter
A shower filter offers numerous benefits for both your health and your home. Below are some of the top advantages:
- Improved skin and hair health: Shower filters remove chlorine and other impurities from the water, preventing them from stripping moisture and natural oils from your skin and hair. This can lead to smoother skin, shinier hair, and reduced skin irritation.
- Reduces respiratory issues: Chlorine vapors present in shower steam can aggravate respiratory conditions such as asthma and allergies. A shower filter removes these harmful vapors, creating a healthier breathing environment.
- Protection from harsh chemicals: Tap water often contains chlorine, chloramines, heavy metals, and other chemicals. A shower filter acts as a barrier, neutralizing these substances and protecting your body from their potentially harmful effects.
- Prolongs the lifespan of your shower: Hard water minerals can build up in your showerhead, causing it to clog and reducing water flow. A shower filter helps prevent this buildup, extending the life of your shower and reducing maintenance.
Other Water Treatment Options for Your Home
While a shower filter is an excellent choice for improving the quality of your shower water, there are other water treatment options you can consider. These include:
| Water Treatment Option | Description |
|---|---|
| Whole-house water filtration system | A whole-house filtration system treats all water entering your home, ensuring clean and filtered water for every tap and appliance. |
| Under-sink water filter | An under-sink water filter is installed under the kitchen sink and provides filtered water specifically for drinking and cooking purposes. |
| Reverse osmosis system | A reverse osmosis system uses a membrane to remove contaminants from water, producing purified water for drinking and other household uses. |
| Water softener | A water softener removes minerals that cause hard water, preventing scale buildup in pipes, appliances, and fixtures. |
Frequently Asked Questions about Shower Filters
Here are some common questions people have about shower filters:
- Are shower filters easy to install? Yes, most shower filters are designed for easy installation without requiring any special tools. Simply follow the manufacturer’s instructions for your specific shower filter model.
- How often should I replace my shower filter? Shower filters typically have a lifespan of a few months to a year, depending on the water quality and usage. It is recommended to replace the filter cartridge as suggested by the manufacturer.
- Do shower filters reduce water pressure? No, shower filters should not significantly impact water pressure when properly installed. However, if you notice a decrease in water pressure, it may be due to a clogged filter, so regular maintenance and filter replacement are important.
- Can I use a shower filter with any type of showerhead? Yes, most shower filters are compatible with a wide range of showerheads, including fixed, handheld, and rain showerheads. However, it is advised to check the compatibility before purchasing.
By considering these additional tips and exploring various water treatment options, you can make an informed decision about installing a shower filter and take steps towards improving the quality of your water and overall shower experience.
Frequently Asked Questions
How Do You Put A Filter In A Shower?
To install a shower filter: 1. Unscrew the showerhead using a wrench. 2. Wrap plumber’s tape around the threads of the shower pipe. 3. Attach the filter to the shower pipe. 4. Tighten the showerhead back onto the filter. 5. Turn on the shower and check for any leaks.
Are Shower Head Filters Easy To Install?
Shower head filters are easy to install. They offer clean water by filtering out impurities and can be installed without any hassle.
Can You Put A Water Filter On Any Shower Head?
Yes, you can attach a water filter to any shower head to improve water quality and remove impurities. This helps provide cleaner and healthier shower water.
What Is The Best Easy To Install Shower Filter?
The best easy-to-install shower filter is the AquaBliss High Output Revitalizing Shower Filter. It effectively removes chlorine, heavy metals, and impurities, enhancing water quality and protecting your skin and hair. Its universal design fits most shower types, making installation quick and hassle-free.
Enjoy a refreshing shower experience now.
Conclusion
Installing a shower filter is a simple and cost-effective way to improve the quality of your shower water. By removing impurities and harmful chemicals, such as chlorine and lead, you can protect your skin and hair from damage and irritation.
Additionally, a shower filter can enhance the overall showering experience by providing cleaner and fresher water. So, take the necessary steps to install a shower filter and enjoy the numerous benefits it offers for your health and well-being.