To install a shower drain for tile, first, prepare the drain base by connecting it to the drainpipe and securing it tightly. Then, apply a layer of mortar or thin-set over the drain base, ensuring it is level and sloped towards the drain.
Choosing The Right Shower Drain For Tile Installation
When it comes to installing a shower drain for tile, choosing the right drain is crucial. Not only does it ensure proper functionality, but it also adds to the overall aesthetic appeal of your bathroom. In this section, we will discuss the factors to consider for the perfect drain and the different types of shower drains that are suitable for tile installation.
Factors to Consider for the Perfect Drain
Before diving into the various types of shower drains available, it is important to consider a few factors to ensure you choose the perfect drain for your tile installation:
- Drainage Capacity: The drain should have the capacity to handle the volume of water that your shower produces. A drain with a higher GPM (gallons per minute) rating will allow for efficient water drainage.
- Size and Shape: The size and shape of the drain should complement your shower design and tile layout. Consider factors such as the space available, the size of your tiles, and the overall design theme of your bathroom.
- Material: The material of the drain should be durable and resistant to corrosion. Stainless steel and brass are popular choices as they are both sturdy and long-lasting.
- Easy Installation: Look for a drain that offers easy installation and maintenance. A user-friendly design will save you time and effort during the installation process.
Types of Shower Drains Suitable for Tile Installation
Now that we understand the important factors to consider, let’s explore the different types of shower drains that are suitable for tile installation:
| Drain Type | Features |
|---|---|
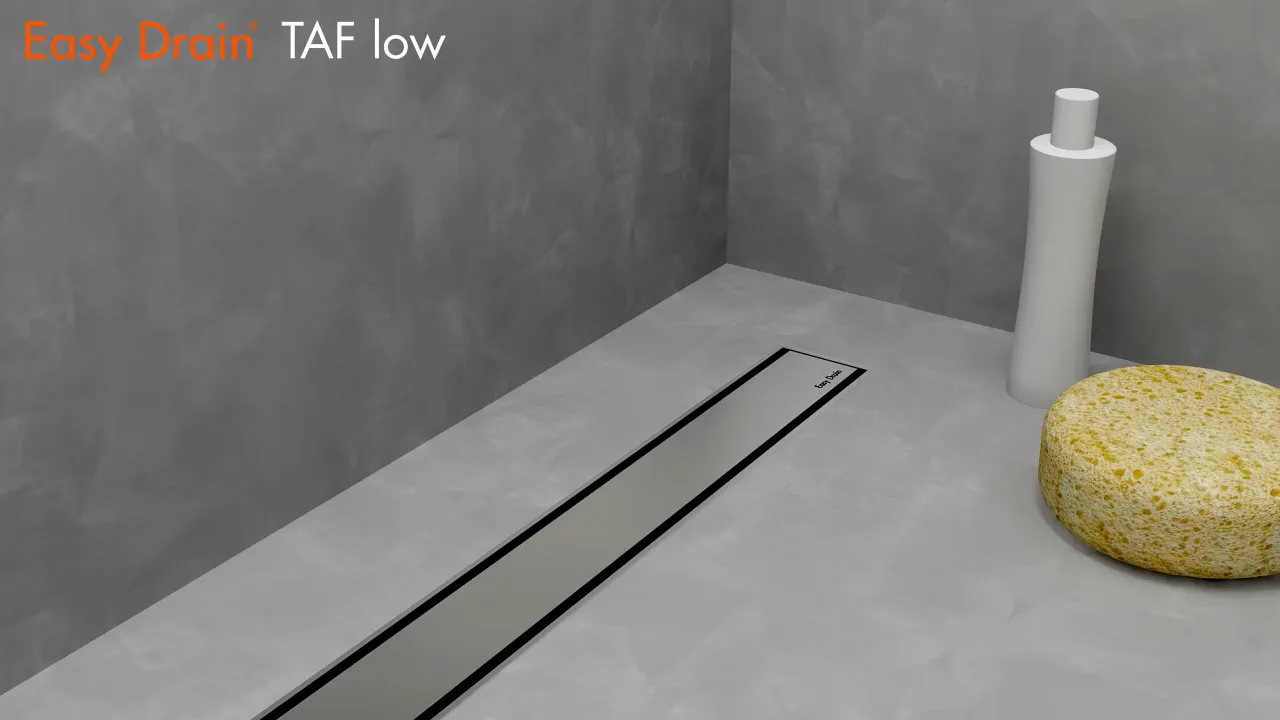
| Linear Drains | These drains feature a long, narrow profile that allows for a sleek and seamless appearance. They are commonly installed at the edge of the shower or along the shower wall. |
| Point Drains | Also known as center drains, these drains are positioned in the center of the shower floor. They are typically circular or square-shaped and offer a classic and symmetrical look. |
| Tile Insert Drains | These drains have a unique design that allows you to insert a tile or stone directly into the top of the drain, creating a seamless and concealed look. |
Each of these drain types has its own advantages and can be chosen based on personal preference and the desired aesthetic effect. It is important to consult with a professional or plumber to determine the best type of drain for your specific shower and tile installation.
By taking into consideration the factors mentioned above and understanding the different types of shower drains suitable for tile installation, you can make an informed decision and ensure a successful and visually appealing shower drain installation.

Gathering The Necessary Tools And Materials
In order to successfully install a shower drain for tile, you will need to gather a variety of tools and materials. Having everything on hand before you begin the installation process will make the project go more smoothly and efficiently. Let’s take a look at the essential tools and required materials you’ll need for this project.
Essential Tools for a Successful Installation
Having the right tools is crucial when it comes to installing a shower drain for tile. Here are the essential tools you’ll need:
- A screwdriver – used to remove any screws or fittings.
- A pair of pliers – perfect for tightening and loosening various components.
- A hacksaw – necessary for cutting through any pipes or fittings as needed.
- A utility knife – useful for cutting and trimming materials such as silicone or rubber.
- A level – ensures that the drain is installed correctly and doesn’t cause water pooling.
- A tape measure – helps to accurately measure various dimensions.
- A caulking gun – necessary for applying silicone or other sealants.
- A rubber mallet – used to securely fit the drain into place.
Required Materials for the Project
In addition to the essential tools, you’ll also need certain materials for a successful shower drain installation. Here is a list of the required materials:
- A shower drain kit – typically includes the drain body, strainer, and any necessary gaskets or seals.
- PVC pipes and fittings – used to connect the drain to the existing plumbing system.
- Silicone or plumber’s putty – creates a watertight seal between the drain and the shower base.
- Tile adhesive – secures the tiles to the shower base and provides a strong bond.
- Grout – fills the gaps between tiles and provides a finished look.
- Tile spacers – help to maintain consistent spacing between the tiles.
- A sponge or cloth – used to clean up excess grout or adhesive.
By gathering all of the necessary tools and materials before you begin, you’ll save yourself the hassle of having to pause the installation process to acquire missing items. It’s always better to be prepared in advance, ensuring a smoother and more efficient installation.

Removing The Existing Drain And Surrounding Tile
When it comes to renovating your bathroom, installing a new shower drain for tile can be a challenging yet essential task. To ensure a proper installation, it’s important to begin by removing the existing drain and the surrounding tiles with utmost care. Taking this step-by-step approach will help you prevent any potential damage and allow for a seamless transition to your new shower drain.
Step-by-Step Guide to Removing the Old Drain
- Start by removing the screws or bolts that hold the drain cover in place using a screwdriver or pliers. Be gentle to avoid any scratches or dents.
- Taking a putty knife, gently pry up the drain cover to expose the drain and its components. Make sure to remove any dirt or debris that may have accumulated over time.
- Next, locate the screws or bolts that secure the flange of the drain to the shower base. Using the appropriate tool, loosen and remove them carefully.
- Once the screws or bolts are removed, lift the drain assembly straight up and out of the shower base. Be cautious not to damage the surrounding tiles during this process.
Ensuring Proper Removal of Surrounding Tiles without Damage
When removing the tiles surrounding the drain, it’s essential to proceed with caution to prevent any unnecessary damage. Follow these steps to ensure a clean removal:
- Start by covering the surrounding area with a drop cloth or tarp to protect it from debris and falls.
- Using a grout saw or utility knife, carefully score the grout around the set of tiles you plan to remove. This will help to loosen the adhesive and make it easier to remove the tiles.
- Once the grout is scored, gently pry the tiles loose using a putty knife or a pry bar. Apply even pressure to avoid cracking or breaking the tiles.
- Continue this process until all the tiles surrounding the drain have been removed.
- Remember to clean any remaining grout or adhesive from the shower base to ensure a smooth surface for the new shower drain installation.
By following this step-by-step guide, you can confidently remove the existing drain and surrounding tiles without causing any damage. This will set the stage for a successful installation of your new shower drain for tile, ensuring a beautiful and functional bathroom space.

Cleaning And Inspecting The Drain Pipe
Cleaning and inspecting the drain pipe is a crucial step when installing a shower drain for tile. It ensures that the drain is free from any debris or residue that could potentially cause clogs in the future. Additionally, inspecting the drain pipe allows you to identify any existing issues that might require repair or replacement. In this section, we will explore how to clear debris and residue from the drain pipe as well as how to inspect it for any potential problems.
Clearing Debris and Residue from the Drain Pipe
To start the cleaning process, it’s important to remove any visible debris or residue from the drain pipe. This can be achieved by following these simple steps:
- Use a pair of tongs or tweezers to carefully reach into the drain opening and remove any hair or larger particles that are easily accessible.
- For smaller debris or residue, you can create a mixture of hot water and mild dish soap. Pour this solution down the drain and let it sit for a few minutes to loosen the build-up.
- After allowing the solution to work its magic, use a plunger to create suction and dislodge any remaining debris. Be sure to cover the overflow drain opening with a wet cloth to prevent any water from splashing out.
By following these steps, you can effectively clear the drain pipe of any debris or residue that may hinder its proper functioning.
Inspecting the Drain Pipe for Any Existing Issues
Once you have cleared the drain pipe of debris, it’s time to inspect it for any potential issues that may require attention. Here are a few things to check for:
- Look for any signs of corrosion or rust on the drain pipe. This can indicate leakage or damage that needs to be addressed.
- Check the connections between the drain pipe and the shower pan or floor. Ensure that they are properly sealed and secure.
- Examine the pipe for any cracks, fractures, or misalignments. These issues can lead to water leaks or inefficient drainage.
If you notice any of these problems during the inspection, it’s important to address them before proceeding with the installation. This may involve repairing the pipe or replacing damaged components.
By cleaning and inspecting the drain pipe before installing a shower drain for tile, you can prevent future clogs and ensure a smooth functioning drainage system. Taking the time to clear debris and residue, as well as identifying and resolving any existing issues, will help to create a reliable and efficient shower drainage solution.

Preparing The Subfloor For Installation
Before installing a shower drain for tile, it is essential to prepare the subfloor properly. This step ensures the stability and longevity of your shower installation. Here are some crucial steps to follow:
Ensuring a Level and Stable Subfloor
A level and stable subfloor is the foundation of any successful shower drain installation. To ensure this, follow these steps:
- Start by inspecting the subfloor for any damage or unevenness. If you notice any issues, address them before proceeding.
- Use a level tool to check if the subfloor is level. This will help prevent any water pooling or drainage problems in the future.
- If the subfloor is not level, make necessary adjustments by adding shims or leveling compounds. This will create a smooth and even surface for the shower drain.
Remember, a level and stable subfloor is crucial to prevent water damage and ensure proper functioning of the shower drain.
Installing the Subfloor Reinforcement if Needed
In some cases, your shower drain installation may require additional reinforcement for extra stability. Follow these steps to install subfloor reinforcement:
- Identify the areas that need reinforcement. This is often determined by the size and weight of the shower base.
- Measure the dimensions of the reinforcement material needed.
- Cut the reinforcement material according to the measurements.
- Place the reinforcement material on the subfloor in the identified areas.
- Secure the reinforcement material to the subfloor using nails, screws, or adhesive, ensuring it is firmly in place.
Installing subfloor reinforcement provides additional support and prevents sagging or flexing, especially for larger or heavy shower bases.
By ensuring a level and stable subfloor, and installing reinforcement when necessary, you are setting the stage for a successful shower drain installation. These steps are crucial to ensure the long-lasting performance and durability of your tiled shower. Now that your subfloor is ready, you can move on to the next steps of installing the shower drain.
Placing The Drain Base
Positioning the drain base correctly is crucial for a successful shower drain installation. Improper placement can lead to water pooling and leakage, which can result in costly repairs down the line. To ensure optimal placement and functionality, follow these steps:
Positioning the Drain Base for Optimal Placement
- Start by determining the ideal location for your shower drain base. Consider factors like the shower size, shape, and where the water flow will be directed towards.
- Clear any debris or material from the subfloor to create a clean working area. This will provide a solid foundation for the drain base and prevent any future issues.
- Measure the depth of the drain pipe to ensure it fits snugly with the drain base. This will ensure a secure connection and prevent any leakage.
- Place the drain base in the chosen position, making sure it aligns perfectly with the drain pipe below. Ensure that it is level and flush with the surrounding subfloor.
- Check if the positioning of the drain base allows for adequate slope towards the drain pipe. This slope is essential to ensure proper water drainage and prevent any pooling.
Securing the Drain Base to the Subfloor
After positioning the drain base correctly, the next step is to secure it to the subfloor. This will ensure stability and prevent any movement or displacement during use. Follow these steps to securely fasten the drain base:
- Apply a layer of waterproof sealant around the drain base flange to create a watertight seal.
- Position the drain base onto the subfloor, ensuring it aligns perfectly with the drain pipe below.
- Insert screws or nails through the designated holes on the drain base flange and into the subfloor. Use a screwdriver or hammer to tighten them securely.
- Check for any signs of movement or instability in the drain base. If necessary, adjust the screws or nails to ensure a tight fit and stability.
- Once the drain base is securely fastened, test it by pouring water into the shower area. Check for any leaks or improper drainage. Make adjustments if needed before continuing with the tile installation process.
By positioning the drain base correctly and securing it well, you can ensure a functional and leak-free shower drain installation. Following these steps will provide a solid foundation for your tile installation, creating a beautiful and efficient shower space.
Connecting The Drain Pipe
Connecting the drain pipe to the drain base is a crucial step in the installation process. It ensures that water is efficiently directed away from your shower and prevents any leaks or water damage. Following these steps will help you properly attach the drain pipe to the drain base and ensure a tight connection.
Attaching the Drain Pipe to the Drain Base
The first step is to attach the drain pipe to the drain base. The drain pipe is typically a PVC pipe that connects to the bottom of the drain base. Here’s how you can do it:
- Apply PVC primer to the end of the drain pipe. This will help loosen any dirt or debris and prepare the surface for the adhesive.
- Apply PVC adhesive to both the inside of the drain base and the end of the drain pipe.
- Insert the drain pipe into the drain base, ensuring that it goes in smoothly.
- Twist and hold the drain pipe for a few seconds to allow the adhesive to bond.
Ensuring Proper Alignment and Tight Connection
Once the drain pipe is attached to the drain base, it’s essential to ensure proper alignment and a tight connection. This will prevent any leaks and ensure that water flows smoothly. Here are some tips to help you achieve this:
- Check the alignment of the drain pipe to ensure it is centered and level. You can use a level or measuring tape to verify this.
- Tighten the compression nut on the drain pipe using a wrench. Ensure that it is securely fastened but avoid overtightening, which can damage the pipe or drain base.
- Apply a small amount of plumber’s putty around the drain flange to create a watertight seal. This will prevent any water from seeping through the gaps.
- Test the connection by pouring water down the drain. Check for any leaks or water seepage around the drain pipe and base. If you notice any issues, tighten the connection further or consult a professional plumber for assistance.
By following these steps, you can confidently connect the drain pipe to the drain base during your shower drain installation. Remember to take your time, double-check everything, and seek professional help if needed. With a properly connected drain pipe, you can enjoy a worry-free shower experience without the risk of water leaks or damage.
Waterproofing The Shower Base
One crucial step in installing a shower drain for tile is waterproofing the shower base. This process ensures that water is adequately contained within the shower area, preventing leaks and potential damage to the underlying structure. To achieve a water-tight seal and protect the longevity of your shower installation, it is essential to properly apply waterproofing membrane and seal all edges and corners. In this guide, we will walk you through each step to help you achieve maximum protection for your shower base.
Applying Waterproofing Membrane to the Shower Base
The first step in waterproofing your shower base is to apply a waterproofing membrane. This thin, flexible material acts as a barrier against water penetration, ensuring that any moisture is contained within the designated shower area. There are different types of waterproofing membranes available in the market, such as liquid or sheet membranes. Follow these steps to correctly apply the waterproofing membrane:
- Prepare the shower base by ensuring it is clean, dry, and free of any debris.
- If using a liquid membrane, use a brush or roller to apply an even coat to the entire shower base, including walls and corners. Pay special attention to the drain area, as it is a common spot for water to seep through.
- If using a sheet membrane, carefully measure and cut it to fit the shower base. Apply adhesive or a suitable bonding agent to the shower base and press the membrane firmly onto it, ensuring there are no wrinkles or air pockets.
- Allow the membrane to cure or adhere as per the manufacturer’s instructions before proceeding to the next step.
Sealing All Edges and Corners for Maximum Protection
To further enhance the waterproofing of your shower base, it is crucial to seal all edges and corners. These are prime areas where water can potentially find its way out of the shower and cause damage. Follow these steps to seal the edges and corners effectively:
- Inspect the edges and corners of the shower base for any gaps or cracks.
- Using a suitable waterproof sealant or caulk, carefully fill in any gaps or cracks along the edges and corners, ensuring a continuous and tight seal.
- Smooth the sealant or caulk with a caulk tool or your finger to create a neat finish.
- Allow the sealant or caulk to fully dry and cure as per the manufacturer’s instructions before proceeding with the tiling process.
By following these steps to apply waterproofing membrane and seal all edges and corners, you can ensure maximum protection for your shower base. Taking the time to properly waterproof your shower installation will not only prevent potential leaks and damage but also provide you with peace of mind and a long-lasting showering experience.
Preparing The Tile Layout
Before installing a shower drain for tile, it is crucial to meticulously prepare the tile layout. Planning the tile placement around the drain and ensuring proper spacing and alignment are key factors in achieving an attractive and functional shower floor. In this section, we will discuss these steps in detail.
Planning the Tile Placement Around the Drain
When planning the tile placement around the shower drain, it is essential to consider the drain’s location and dimensions. The drain should be positioned in the center of the shower floor to ensure proper water flow and drainage. To achieve this, measure the dimensions of the drain and mark the center point on the shower floor.
Using a chalk line, create a grid pattern around the center point to guide the placement of the tiles. The grid lines should be evenly spaced to maintain symmetry and aesthetic appeal. This step is crucial for achieving a seamless and well-organized tile layout.
Ensuring Proper Spacing and Alignment
Proper spacing and alignment of the tiles are vital to prevent water leakage and ensure a professional-looking finish. To achieve this, use tile spacers to create consistent gaps between each tile. These spacers maintain a uniform distance and allow room for grout. Choosing the right size of tile spacers depends on your desired grout line width.
When laying the tiles, make sure to align them carefully with the grid lines. Use a spirit level to check for any unevenness or inconsistencies. Adjust the tiles as needed to achieve a level and flush surface. Pay attention to the edges of the drain, ensuring that the tiles are cut precisely to fit around it.
To summarize, the key to installing a shower drain for tile lies in thorough preparation of the tile layout. By planning the tile placement around the drain and ensuring proper spacing and alignment, you can achieve a visually appealing, durable, and leak-free shower floor.
Cutting And Installing The Tile
When it comes to installing a shower drain for tile, one crucial step is cutting and installing the tile. This is the stage where you measure, cut, and apply tile adhesive to ensure a perfect fit around the drain. In this guide, we will walk you through the process with two essential steps: measuring and cutting tiles for a perfect fit and applying tile adhesive and installing tiles around the drain.
Measuring and Cutting Tiles for a Perfect Fit
Before you begin cutting the tiles, it’s crucial to measure the area around the drain accurately. Take precise measurements and account for any irregularities or angles in the space. Remember, a perfect fit is essential for a professional-looking finish.
Once you have measured the area, transfer the measurements onto the tile and mark the cutting line. It’s essential to double-check your measurements before cutting the tile to avoid any errors. For smaller cuts or intricate shapes, you can use a tile cutter or nippers. However, for larger, straight cuts, a tile saw may be necessary.
When cutting the tile, ensure you follow the marked line precisely. Take your time and use steady, even pressure to avoid chipping the edges. Remember to use appropriate safety precautions, such as wearing safety goggles and gloves.
Applying Tile Adhesive and Installing Tiles Around the Drain
Once you have cut the tiles to the correct size and shape, it’s time to apply tile adhesive and install them around the shower drain. Here’s how:
- Clean the area around the drain thoroughly to remove any dust, debris, or grease. A clean surface will ensure better adhesion.
- Using a notched trowel, apply a thin, even layer of tile adhesive to the floor. Make sure to cover the entire area where the tiles will be installed.
- Place the first tile near the drain and press it firmly into the adhesive, ensuring it aligns with your measurements. Tap the tile gently with a rubber mallet to ensure it is securely set.
- Continue applying adhesive and installing the remaining tiles, working your way out from the drain. Make sure to maintain consistent spacing between the tiles for a professional finish.
- As you install each tile, periodically check for levelness using a spirit level. Adjust as necessary to ensure the tiles are evenly aligned.
- After completing the tile installation, allow the adhesive to dry according to the manufacturer’s instructions. This typically takes 24 to 48 hours.
Once the adhesive is fully dry, you can proceed with grouting and sealing the tiles to complete the shower drain installation. Remember to follow the specific instructions for grouting and sealing products and allow sufficient time for drying and curing.
Cutting and installing the tile around a shower drain requires precision and attention to detail. By accurately measuring and cutting the tiles and applying the adhesive correctly, you can achieve a professional and visually appealing result. Take your time, follow the steps outlined above, and enjoy your beautifully tiled shower.
Grouting And Finishing Touches
Now that you have successfully installed the shower drain for tile, it’s time to focus on the grouting and finishing touches. This is a crucial step that will not only ensure a polished look but also help to protect your shower from water damage. In this section, we will guide you through two important steps: filling the gaps between tiles with grout and cleaning and sealing the grout for a polished look.
Filling the Gaps Between Tiles with Grout
Filling the gaps between tiles with grout is an essential step to achieve a professional and finished appearance for your shower. Before you begin the grouting process, make sure the tile adhesive has fully cured. This usually takes around 24 to 48 hours, depending on the type of adhesive used. Once the adhesive is cured, follow these steps to fill the gaps with grout:
- Clean the tile surfaces to remove any dust or debris. You can use a damp sponge or cloth to wipe the tiles.
- Prepare the grout mixture according to the manufacturer’s instructions. It’s important to mix the grout to the right consistency to ensure smooth application.
- Using a grout float, spread the grout diagonally across the tile joints.
- Work the grout into the gaps by holding the float at a 45-degree angle and applying firm pressure.
- Remove any excess grout from the tiles’ surface by holding the float at a steeper angle and scraping off the excess.
- Let the grout set for the recommended time specified by the manufacturer.
Remember to work in small sections at a time to prevent the grout from drying out. Once the grout has set, use a damp sponge to wipe off any grout haze from the tile surfaces. Repeat this process until all the gaps are filled with grout.
Cleaning and Sealing the Grout for a Polished Look
Cleaning and sealing the grout is the final step to ensure a polished look and protect the grout from stains and water damage. Here’s what you need to do:
- Once the grout has fully cured, use a grout cleaner to remove any remaining residue or haze on the tile surfaces. Apply the cleaner and scrub gently with a grout brush or sponge.
- Rinse the tiles thoroughly with clean water to remove any traces of the grout cleaner.
- After the grout and tiles have dried, it’s time to seal the grout. Choose a high-quality grout sealer that is suitable for your shower environment. Apply the sealer according to the manufacturer’s instructions, making sure to cover all the grout lines.
- Allow the sealer to dry completely before using the shower.
By following these steps, you can achieve a professional-looking shower with perfectly filled grout lines. The grout sealer will help to maintain the longevity and appearance of your shower, ensuring that it stays beautiful for years to come.
Conducting A Water Test For Draining Efficiency
Conducting a water test for draining efficiency is a crucial step in the installation of a shower drain for tile. This test will help you ensure that water flows properly and efficiently through the drain, preventing any potential issues in the future. By following a few simple steps, you can easily check for proper water flow and drainage, as well as identify and address any potential issues.
Checking for Proper Water Flow and Drainage
After installing the shower drain for tile, it’s important to check for proper water flow and drainage. To do this, follow these steps:
- Ensure that the shower floor is clean and free from any debris or obstructions.
- Next, make sure the drain is properly connected and securely fastened.
- Pour a bucket of water into the shower floor, allowing it to flow directly into the drain.
- Observe how the water flows through the drain. It should flow smoothly and quickly without any pooling or backup.
- Check that the water is drained completely and efficiently, leaving the shower floor dry.
By checking for proper water flow and drainage, you can ensure that your shower drain is working effectively, preventing any potential issues such as clogs or leaks.
Identifying and Addressing Any Potential Issues
If you notice any issues during the water test, it’s important to identify and address them promptly. Here are some potential issues you may encounter:
| Potential Issue | Possible Cause | Solution |
|---|---|---|
| Slow Drainage | Clogged drain or improperly installed drain | Clean the drain or re-install it |
| Water Backup | Insufficient slope or improper installation | Reconfigure the slope or re-install the drain at the correct angle |
| Water Pooling | Drain cover obstructing water flow or incorrect drain size | Remove any obstructions or replace the drain cover |
By identifying and addressing any potential issues, you can ensure that your shower drain functions properly and prevents any future drainage problems.
Conducting a water test for draining efficiency is a necessary step in the installation of a shower drain for tile. By checking for proper water flow and drainage, as well as identifying and addressing any potential issues, you can ensure that your shower drain operates effectively and efficiently.
Securing The Drain Cover
Securing the drain cover is an essential step in the installation process to ensure both a finished appearance and a functional shower drain. This step involves properly attaching the drain cover to the drain body, providing a secure seal and preventing any water leakage. In this section, we will discuss the steps to install the drain cover and the importance of ensuring its secure attachment.
Installing the Drain Cover for a Finished Appearance
Installing the drain cover correctly is crucial for achieving a polished and visually appealing shower floor. When it comes to securing the drain cover, you need to pay attention to alignment and positioning. Start by placing the drain cover on top of the drain body, ensuring that it is centered and in line with the surrounding tile or flooring. This will help create a seamless look and prevent any uneven gaps.
To secure the drain cover, you will need to follow the specific instructions provided by the manufacturer. Typically, drain covers are designed to snap or screw into place. Some drain covers also come with adhesive strips that help hold them securely in position. Regardless of the type of drain cover you have, it is important to ensure that it is firmly attached and does not wobble or move.
Ensuring a Secure and Functional Cover
Ensuring a secure and functional drain cover is essential to prevent any issues such as water leakage or debris accumulation. Here are a few important tips to follow:
- Check for proper alignment: Before fully securing the drain cover, double-check its alignment to ensure it sits flush with the surrounding flooring. This will prevent any areas where water can pool or debris can collect.
- Tighten screws or snap firmly: If your drain cover requires screws or snaps, make sure to tighten them firmly. This will provide a secure attachment and ensure that the cover does not shift or come loose over time.
- Apply silicone sealant: To create a watertight seal around the edges of the drain cover, you can apply a thin bead of silicone sealant. This will help prevent any water from seeping between the drain cover and the drain body.
- Wipe off excess sealant: After applying the silicone sealant, make sure to wipe off any excess using a clean cloth or paper towel. This will give the drain cover a clean and finished appearance.
By following these steps, you can ensure that your shower drain cover is securely attached, providing both a visually appealing finish and a functional barrier against water leakage. Taking the time to properly secure the drain cover will contribute to the overall longevity and performance of your shower drain.
Frequently Asked Questions
What Kind Of Drain Do You Need For A Tile Shower?
For a tile shower, you’ll need a drain that is specifically designed for use with tiles. These drains have special features like a tile insert or a linear design to allow water to flow smoothly while keeping the tiles intact.
How High Should Shower Drain Be For Tile?
The shower drain for tile should ideally be positioned around 2 inches above the subfloor to accommodate the thickness of the tile and allow proper water drainage.
How Do You Install A Shower Drain?
To install a shower drain, first, locate the drain hole in the shower base. Remove the strainer cover and insert the drain flange into the hole. Secure it with screws or adhesive. Connect the drainpipe to the flange and attach the P-trap.
Finally, test for leaks and ensure proper drainage.
How Do You Lay Tile Around A Shower Drain?
To lay tile around a shower drain, first, clean and prepare the area. Then, apply a thinset mortar using a trowel. Next, set the tiles in the mortar, ensuring they are level and aligned. Cut tiles as needed to fit around the drain.
Finally, fill the spaces between tiles with grout and let it dry.
Conclusion
Installing a shower drain for tile is a straightforward process that can be accomplished with a few simple steps. By following the guidelines outlined in this blog post, you can ensure a proper installation that will prevent any water damage and provide a long-lasting, functional shower.
Remember to take your time, use the right tools, and consult a professional if needed. Happy showering!