To install a shower cartridge, turn off the water supply, remove the handle and trim plate, unscrew the retaining nut, pull out the old cartridge, and insert the new one before reassembling the parts. Welcome to our guide on how to install a shower cartridge.
Over time, shower cartridges can become worn out or damaged, causing leaks or temperature control issues. By replacing the cartridge, you can restore your shower’s functionality. We will walk you through the step-by-step process of installing a shower cartridge. By following our instructions, you will be able to complete the installation successfully, ensuring your shower operates smoothly and efficiently.
So, let’s get started and learn how to replace a shower cartridge in a few simple steps.
Gathering The Necessary Tools And Materials
Before you start the installation of a shower cartridge, it’s important to gather all the tools and materials you need. This will ensure a smooth and hassle-free installation process. In this section, we’ll provide an overview of the tools and materials you’ll need for the job.
List of Tools Needed for the Installation Process
To install a shower cartridge, you’ll need the following tools:
- Adjustable wrench
- Phillips screwdriver
- Flathead screwdriver
- Needle-nose pliers
- Hex key or Allen wrench
- Plumber’s putty knife
- Teflon tape
Having these tools at your disposal will make the installation process much more efficient and ensure that you have everything you need to complete the job.
Overview of the Materials Required for the Installation
In addition to the tools listed above, you’ll also need the following materials for the installation:
| Materials | Description |
|---|---|
| Replacement shower cartridge | This is the most crucial material you’ll need. Make sure to purchase the correct cartridge that is compatible with your shower. |
| Plumber’s putty | This waterproof sealant will help prevent leaks and ensure a tight seal around the cartridge. |
| Shower valve grease | This lubricant is used to ensure smooth operation of the cartridge and to prevent any sticking or binding. |
It’s important to have all these materials on hand before you begin the installation. This will save you time and effort in running back and forth to the hardware store.
Now that you have a comprehensive list of the tools and materials you’ll need, you’re ready to move on to the next step: Removing the old shower cartridge.
Turning Off The Water Supply
Step-by-step guide on how to turn off the water supply
Turning off the water supply is an essential step before beginning the installation process of a shower cartridge. This crucial step ensures that you can work safely and effectively without any water leakage or accidents. Here’s a step-by-step guide on how to turn off the water supply:
- Locate the main water shut-off valve: The main water shut-off valve is typically found near the water meter or where the main water line enters your home. Common locations include the basement, utility room, or near the water heater.
- Turn off the main water supply: Once you’ve located the main water shut-off valve, use a wrench or pliers to turn the valve clockwise until it is tightly closed. This will shut off the water supply to your entire home.
- Drain the remaining water: To ensure that there is no water left in the pipes, open all the faucets in your home and flush the toilets. This will help drain the remaining water and relieve any pressure in the plumbing system.
Importance of shutting off the water before starting the installation process
Shutting off the water supply before starting the installation process is of utmost importance. Here’s why:
- Prevents water leakage and damage: By turning off the water supply, you eliminate the risk of water leakage during the installation process. This helps prevent potential water damage to your bathroom or surrounding areas, saving you from costly repairs.
- Ensures safety: Working with water and plumbing can be dangerous when the water supply is not shut off. By shutting off the water, you reduce the risk of accidental flooding, electrocution, or injury from pressurized water.
- Allows for accurate installation: With the water supply turned off, you can focus on accurately installing the shower cartridge without any distractions. This ensures a precise installation, minimizing the chances of leaks or malfunctions.
Remember, always turn off the water supply before starting any plumbing project, including the installation of a shower cartridge. This simple precautionary step will save you time, money, and hassle in the long run.
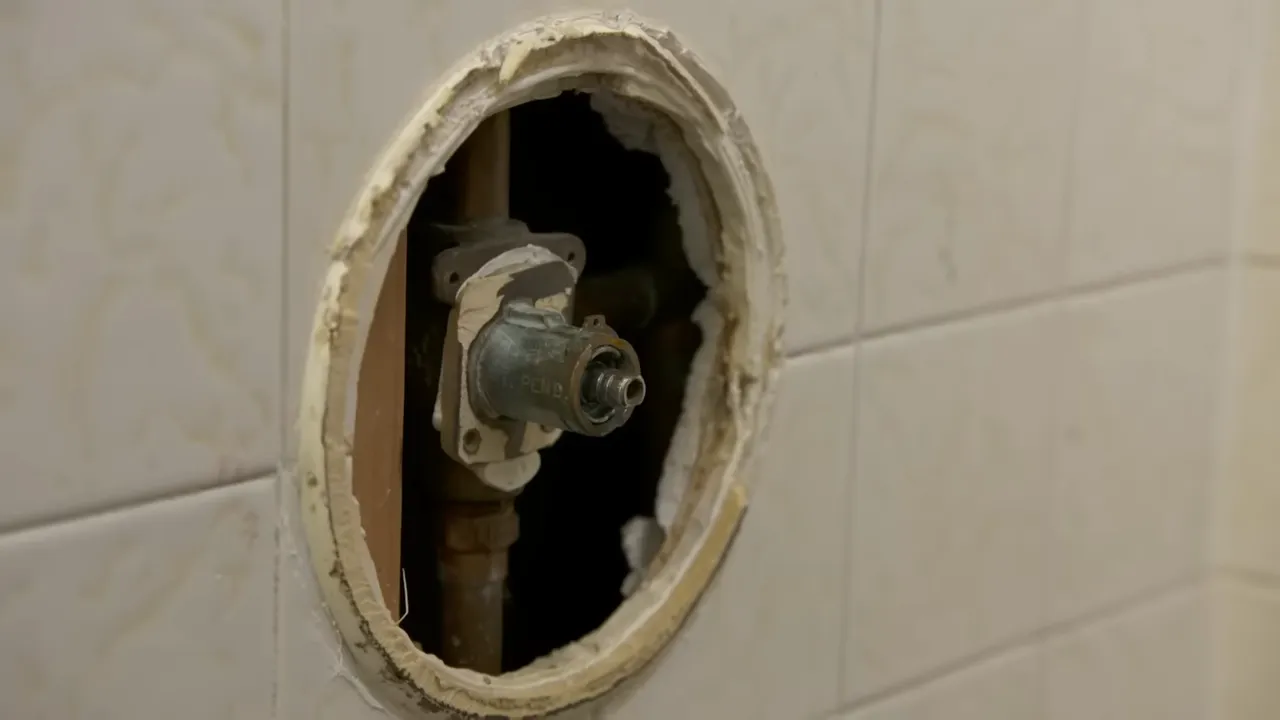
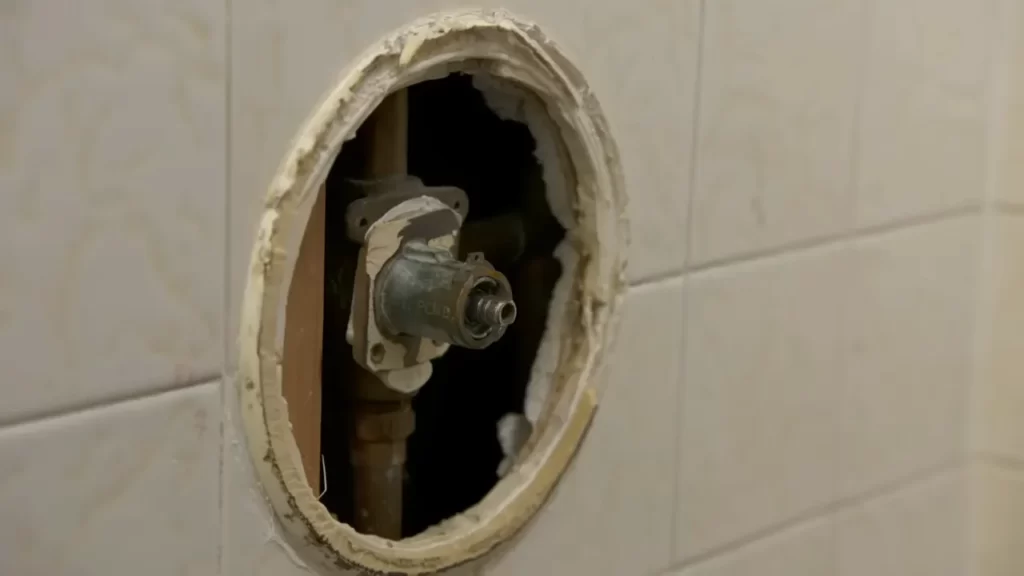
Locating The Shower Cartridge
As an essential component of a shower system, the shower cartridge is responsible for controlling the flow and temperature of water in your shower. Over time, cartridges can wear out or become clogged, leading to issues like leaking or inconsistent water temperature. When you encounter such problems, it becomes necessary to locate the shower cartridge in order to replace or repair it. In this article, we will provide you with some useful tips for identifying the location of the shower cartridge in different shower systems.
Tips for identifying the location of the shower cartridge in different shower systems
1. Single-handle Shower Systems:
In single-handle shower systems, locating the shower cartridge is relatively straightforward. Start by removing the handle cover or trim plate by unscrewing any screws or prying it off with a flat-head screwdriver. Once the cover is off, you should be able to see the shower cartridge, which is typically located behind the handle.
2. Double-handle Shower Systems:
If you have a double-handle shower system, the cartridges for the hot and cold water may be located in different places. To find them, start by removing the handles. This can usually be done by unscrewing a setscrew or removing a small cap to access the screw. Once the handles are off, you can locate the cartridges. In most cases, they will be found by following the water supply lines leading from the handles.
3. Thermostatic or Pressure-Balanced Shower Systems:
Thermostatic and pressure-balanced shower systems have more complex designs. The shower cartridge in these systems is typically located in the valve body, which is usually concealed behind a cover plate or trim. To locate the cartridge, you will need to remove any screws or clips securing the cover plate. Once the cover plate is removed, you should be able to see the valve body and the cartridge inside.
Recognizing the different types of shower cartridges
1. Ceramic Shower Cartridges:
Ceramic cartridges are commonly used in modern shower systems. These cartridges are durable and provide smooth operation. They are often found in single-handle showers and have a ceramic disc that rotates to control the flow and temperature of water. To identify a ceramic cartridge, look for a circular or cylindrical shape made of ceramic material.
2. Compression Shower Cartridges:
Compression cartridges are typically found in older shower systems. They consist of a rubber stem washer that moves up and down to control water flow. These cartridges are identifiable by the presence of a rubber washer on the stem, which is compressed against a valve seat to stop the water flow.
3. Thermostatic Shower Cartridges:
Thermostatic cartridges are designed to maintain a constant water temperature regardless of changes in water pressure. These cartridges are often used in thermostatic or pressure-balanced shower systems to prevent sudden temperature fluctuations. They usually feature a wax or temperature-sensitive element that expands or contracts to adjust the hot and cold water mix.
By using these tips and recognizing the different types of shower cartridges, you can successfully locate the shower cartridge in your shower system. Remember to always consult the manufacturer’s instructions for specific details about your shower model and cartridge replacement. Stay tuned for our upcoming articles, where we will guide you through the process of removing and installing a new shower cartridge.
Removing The Shower Handle
Removing the shower handle is an essential step in accessing the cartridge and performing a successful installation. Whether you’re dealing with a leaking or malfunctioning cartridge, following the correct procedure will ensure a swift and effective fix. In this section, we will guide you through the instructions for removing the shower handle and highlight the safety precautions you should keep in mind.
Instructions on removing the shower handle to access the cartridge
Before starting the process, gather the necessary tools for the task. You will need an adjustable wrench, screwdriver, and possibly an Allen wrench, depending on the handle type. With these tools at hand, follow the steps below:
- Turn off the water supply to prevent any leakage or accident during the removal process. Look for the shut-off valve near the shower and rotate it clockwise until it is fully closed. This will ensure a safe working environment.
- Inspect the shower handle for any visible screws or caps. Some handles may have a decorative cap covering the screw, which can be gently pried off using a flathead screwdriver.
- Once you have located the screws, use the appropriate screwdriver or Allen wrench to remove them. Be sure to hold onto the handle securely, as it may come loose when the screws are removed.
- After removing the screws, pull the handle straight outwards towards you. Apply steady pressure and avoid twisting or jiggling excessively, as this could potentially damage the handle or surrounding fixtures.
- If the handle seems stuck, carefully use a wrench to loosen it by turning it counterclockwise. Exercise caution to prevent any undue force that may cause harm to the handle or the plumbing components.
Once the shower handle is successfully removed, you can proceed to the next step of replacing the shower cartridge. Following these instructions diligently will help you avoid any unnecessary complications and ensure a smooth installation process.
Safety precautions to consider during this step
It is crucial to prioritize safety while removing the shower handle. Here are some safety precautions to keep in mind:
- Always wear protective gloves to prevent any injuries or potential exposure to harmful chemicals or sharp edges.
- Turn off the water supply completely to reduce the risk of accidental flooding and water damage.
- Use caution when handling tools to avoid accidental slips or injuries. Ensure a firm grip and maintain control over the tools throughout the process.
- If you encounter any resistance while removing the handle, avoid applying excessive force that could lead to damage. Instead, refer to the manufacturer’s instructions or seek professional assistance if needed.
- Keep a safe distance from electrical components or wiring to minimize the risk of electrical shocks.
By adhering to these safety precautions, you can carry out the removal of the shower handle confidently and mitigate potential risks.
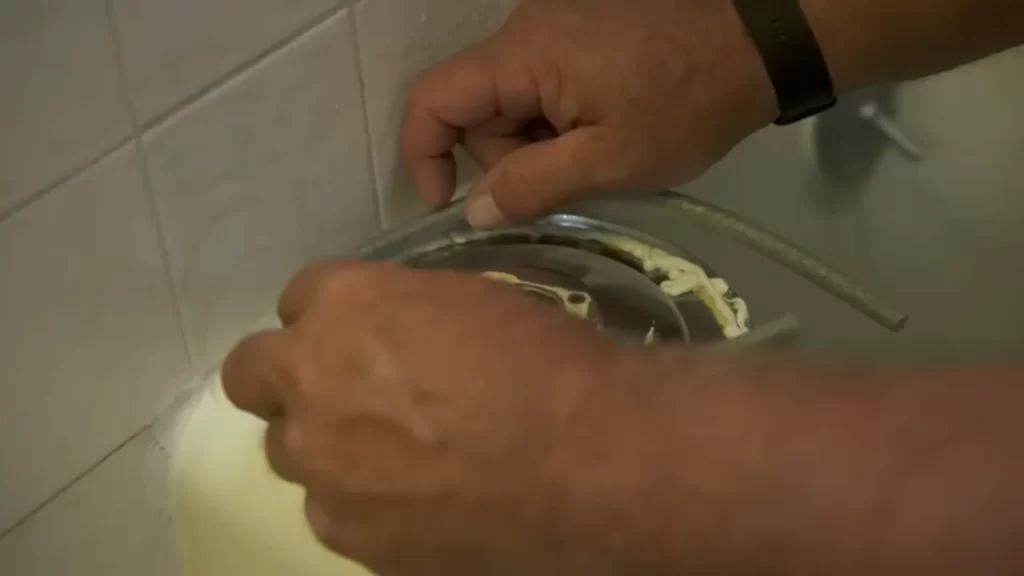
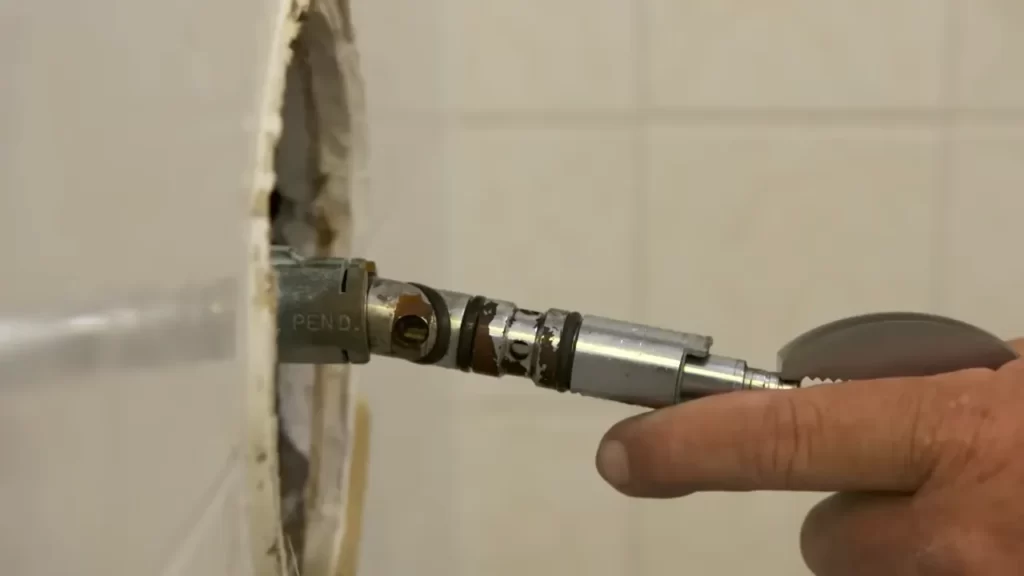
Removing The Old Cartridge
Removing the old shower cartridge is a crucial step when it comes to installing a new one. This process may seem daunting at first, but with the right tools and techniques, it can be done smoothly. In this step-by-step guide, we will walk you through the process of removing the old shower cartridge in a hassle-free manner.
Step-by-step guide on removing the old shower cartridge
To begin with, it is important to gather all the necessary tools for the task. You will need an adjustable wrench, pliers, and a screwdriver. Once you have these tools ready, follow the steps below to remove the old cartridge.
1. Start by turning off the water supply to your shower. Locate the main water shut-off valve and close it to prevent any water leakage during the process. This step is crucial to ensure your safety and avoid unnecessary damage.
2. Once the water supply is turned off, you may need to remove the shower handle or trim. This can usually be done by removing the screws or cover plate that holds it in place. Use a screwdriver or pliers, depending on the type of fasteners used.
3. With the handle or trim removed, you will now have access to the shower cartridge. **Inspect the cartridge carefully** to identify any specific locking mechanisms or retaining clips that need to be removed. These may vary depending on the make and model of your shower.
4. Use an adjustable wrench or pliers to carefully detach the cartridge. Grip it firmly and give it a gentle counterclockwise twist to loosen it. Depending on how old the cartridge is, you may encounter some resistance. If this is the case, try applying some penetrating oil to loosen the cartridge.
5. If the cartridge still proves difficult to remove, you may need to use a cartridge removal tool. These tools are specifically designed to fit over the cartridge, providing extra leverage and making removal easier. Follow the manufacturer’s instructions when using these tools for optimal results.
6. Once the resistance has been overcome, continue twisting the cartridge counterclockwise until it is completely loose. Pull the cartridge straight out to remove it from the valve body. **Inspect the valve body for any debris or buildup** that may hinder the installation of the new cartridge. Clean the valve body thoroughly before proceeding further.
7. Congratulations! You have successfully removed the old shower cartridge. Before proceeding to the next step, take a moment to ensure the valve body is clean and ready for the new cartridge.
Dealing with any resistance or difficulty in removing the old cartridge
Sometimes, the old shower cartridge may be stubborn and not willing to come out easily. This is common, especially if the cartridge has been in place for a long time. To deal with any resistance or difficulty in removing the old cartridge, follow these tips:
– Apply some penetrating oil around the cartridge to help loosen it. Allow the oil to penetrate for a few minutes before attempting to remove the cartridge again.
– Use a cartridge removal tool for added leverage and easier removal. These tools are specifically designed to make the removal process smoother.
– If the cartridge remains stuck, do not forcefully yank or twist it, as this may cause damage to the valve body. Instead, seek professional assistance or contact the manufacturer for further guidance.
By following these step-by-step instructions and the tips provided, you should be able to remove the old shower cartridge without any major difficulties. Remember to exercise caution and seek professional help if needed.
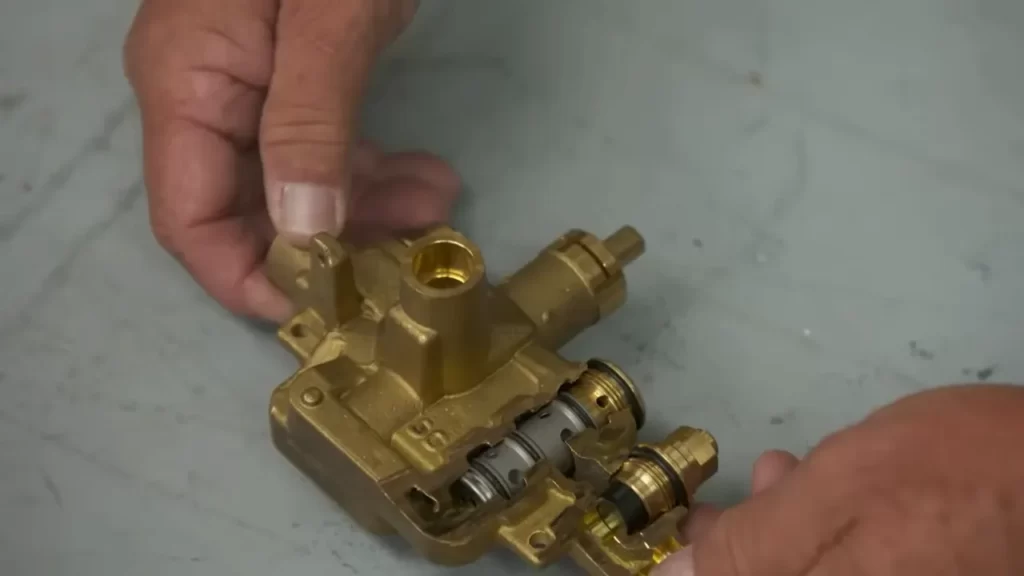
Choosing The Right Replacement Cartridge
Sometimes, the performance of your shower can be compromised due to a faulty shower cartridge. The shower cartridge is an essential component that controls the flow and temperature of water in your shower. When it starts to malfunction, it may result in inconsistent water temperature or low water pressure. In such cases, it becomes necessary to replace the cartridge to restore the optimal functioning of your shower. Here are some important factors to consider when selecting a new shower cartridge:
Factors to consider when selecting a new shower cartridge
When choosing a replacement cartridge for your shower, there are a few key factors to keep in mind. Consider these factors to ensure you select the right cartridge for your specific shower system:
- Shower System Compatibility: Before purchasing a replacement cartridge, you need to determine the specific make and model of your shower system. Different shower systems require different types of cartridges, so it’s crucial to choose a cartridge that is compatible with your specific system. To find out the make and model of your shower system, you can check the manufacturer’s label or consult the user manual.
- Water Pressure: Another important factor to consider is the water pressure in your home. Some shower cartridges are designed to work optimally with high water pressure, while others are better suited for low water pressure. Understanding the water pressure in your home will help you determine which type of cartridge will provide the best performance.
- Material and Durability: Shower cartridges are available in different materials, such as brass or plastic. Brass cartridges are known for their durability and longevity, whereas plastic cartridges are often more affordable. Consider the lifespan you desire for your replacement cartridge and choose a material accordingly.
- Budget: Like with any home improvement project, budget plays a role in selecting a replacement cartridge. Decide on a budget that you are comfortable with and look for cartridges that meet your requirements within that price range. Remember to consider the long-term cost, as a higher-quality cartridge may be a more cost-effective option due to its durability.
Recommended brands and types of cartridges for different shower systems
Now that you are aware of the important factors to consider, let’s take a look at some recommended brands and types of cartridges for different shower systems:
| Shower System | Recommended Cartridge Brands |
|---|---|
| Single-handle showers | Moen, Delta |
| Double-handle showers | Kohler, American Standard |
| Thermostatic showers | Grohe, Hansgrohe |
These brands are known for manufacturing high-quality cartridges that ensure reliable performance and durability. However, it’s always recommended to check with your shower system’s manufacturer or consult a professional before making a final purchase decision.
By considering the factors mentioned above and exploring the recommended brands, you can confidently choose the right replacement cartridge for your shower system. With a properly installed and compatible cartridge, you can enjoy a refreshing and hassle-free shower experience for years to come.
Installing The New Cartridge
Once you have successfully removed the old shower cartridge, it’s time to install the new one. Follow these step-by-step instructions to ensure a seamless installation process.
- Gather the necessary tools: Before you begin, make sure you have all the tools you’ll need for this task. This may include an adjustable wrench, pliers, screwdriver, and a new shower cartridge.
- Prepare the cartridge: Remove the new shower cartridge from its packaging and inspect it for any defects or damage. Ensure that it is the correct replacement for your specific shower model.
- Position the cartridge: Carefully align the new cartridge with the corresponding slots in the valve system. Be sure to match the hot and cold water labels on the cartridge with the appropriate sides of the valve.
- Secure the cartridge: Once the cartridge is properly aligned, use your fingers to tighten it in place. You can then use an adjustable wrench or pliers to gently tighten it further, making sure not to overtighten as it may cause leaks or damage.
- Reassemble the shower handle: With the cartridge securely in place, reattach the shower handle. Follow the manufacturer’s instructions for your specific model, but typically this involves sliding the handle onto the cartridge stem and securing it with screws or a retaining nut.
- Test for proper functioning: Turn on the water supply to check if the new cartridge is functioning correctly. Ensure that both hot and cold water flow smoothly and that there are no leaks around the valve or handle.
By following this step-by-step guide, you can easily install a new shower cartridge and restore optimal functionality to your shower. Remember to exercise caution, and if you encounter any difficulties during the process, it’s always a good idea to consult a professional plumber for assistance.
Reassembling The Shower Handle
Instructions for reattaching the shower handle after installing the new cartridge
Once you have successfully replaced the old shower cartridge with a new one, it’s time to reassemble the shower handle. This step is crucial to ensure that your shower functions properly and you can enjoy a relaxing bathing experience. Reassembling the shower handle requires following a few simple instructions. Let’s dive right in!
- Firstly, locate the square or hex-shaped hole on the shower cartridge stem. This is where the handle will attach. Take note of the size and shape of the hole, as it will determine the type of handle you need.
- Align the newly replaced cartridge with the hole on the shower valve. Carefully insert it, making sure it fits snugly and securely. This will prevent any leaks or malfunctions later on.
- Once the cartridge is in place, it’s time to reattach the handle. Take the handle and position it over the hole of the cartridge stem. Ensure it aligns perfectly.
- Depending on the design of your shower handle, you may need to use a screwdriver or an Allen wrench to secure it in place. Insert the screw or bolt provided with the handle into the hole, and tighten it until it is firmly attached. Be careful not to overtighten, as it may damage the cartridge or handle.
Testing the handle’s functionality before finishing the installation
Once you have reassembled the shower handle, it’s essential to test its functionality before completing the installation process. This step ensures that your new shower cartridge is properly installed and functioning correctly. Here’s how to perform a quick test:
- Turn on the water supply to the shower. Slowly open the faucet, allowing the water to flow. Check for any leaks around the handle or cartridge area.
- Rotate the handle to adjust the water temperature. Ensure it moves smoothly and without any resistance. If you encounter any difficulty or stiffness, double-check the handle’s alignment and attachment to the cartridge.
- Finally, test the shower’s different settings, such as the water flow and spray options if applicable. Pay attention to any irregularities or unusual noises. If everything appears to be in good working order, you’ve successfully reassembled the shower handle and completed the installation of the new cartridge!
By following these straightforward instructions and testing the handle’s functionality before finishing the installation, you can ensure a hassle-free showering experience. So go ahead, take the plunge, and enjoy your revitalized shower!
Turning On The Water Supply
Steps to turn the water supply back on after completing the installation
Now that you have successfully installed a new shower cartridge, it’s time to turn on the water supply and enjoy your refreshed shower experience. Follow these simple steps to get the water flowing and ensure everything is in working order:
- Locate the main water shutoff valve. This valve is usually found near the water meter or inside a utility room. It is important to know the location of the valve beforehand, as it will save you time and effort when you need to turn off or on the water.
- Turn the valve counterclockwise to open it and allow water to flow through the pipes. Use a wrench if necessary, but be careful not to apply too much force.
- Once the valve is fully open, listen for any sounds indicating that water is flowing. You should hear a steady flow of water.
- Check for any leaks or issues with the water flow. Inspect the area around the shower cartridge for any signs of water leakage. Pay attention to any unusual sounds or fluctuations in water pressure.
- If you notice any leaks or problems, tighten any loose connections or consult a professional plumber for assistance. It’s better to address these issues early on to prevent further damage.
- Test the water flow by turning on the shower. Start with a slow trickle and gradually increase the water pressure. Ensure that both hot and cold water are flowing smoothly and evenly.
By following these steps, you can confidently turn on the water supply after installing a shower cartridge and enjoy a refreshing shower without any worries. Remember to regularly inspect your plumbing system for any leaks or maintenance needs to keep everything in top condition.
Testing The Shower Operation
Instructions on Testing the Shower to Ensure Proper Functionality
Testing the shower after installing a new cartridge is crucial to ensure that it functions properly. Follow these instructions to test the shower and make sure everything is in working order:
- Turn on the water supply: Start by turning on the main water supply valve to allow water to flow into the shower. This will ensure a consistent water pressure throughout the testing process.
- Check for leaks: Inspect the shower system for any signs of leaks. Look for water drips, moisture on the wall or floor, or any other indication of a leak. If you notice any leaks, tighten the connections and ensure that everything is properly sealed.
- Test the hot and cold water: Turn on the hot water faucet and let it run for a few minutes. Check if the water temperature is at the desired level. Repeat the same process with the cold water faucet. Adjust the temperature as needed by using the shower’s mixer valve.
- Check water pressure: Evaluate the water pressure coming out of the showerhead. It should be consistent and adequate for a satisfying shower experience. If the water pressure is too low, you may need to clean or replace the showerhead.
- Test the diverter: If your shower has a diverter knob or lever to switch between the showerhead and the bathtub spout, check if it functions correctly. Activate the diverter and ensure that water flows properly from the desired outlet.
- Test different spray functions: If your showerhead has multiple spray functions, test each one to verify that they work as intended. This includes adjusting the water flow from a wide spray to a focused stream or any other desired settings.
Addressing Any Problems or Adjustments that May Arise During Testing
While testing the shower operation, you may encounter a few issues or adjustments that require your attention. Here are some common problems and how to address them:
- Uneven water temperature: If you notice that the water temperature fluctuates between hot and cold during your test, there may be an issue with the shower valve or cartridge. Check for any obstructions or debris that may be causing the problem. If necessary, disassemble the cartridge and clean or replace it.
- Low water pressure: If the water pressure is too low, it could be due to a clogged showerhead or a problem with the plumbing system. Remove the showerhead and clean it thoroughly to remove any mineral deposits or sediment. If the issue persists, consult a professional plumber to assess and fix any plumbing problems.
- Leaking connections: If you notice leaks at any connection points, such as the showerhead, valve, or water supply lines, ensure that they are tightly secured. Apply plumber’s tape or use a wrench to tighten any loose connections. If the leaks continue, consider replacing any damaged or worn-out parts.
- Diverter issues: If the diverter does not function properly, it may be due to a faulty diverter valve or cartridge. Disassemble and inspect the diverter mechanism for any signs of damage or debris. Clean or replace the parts as needed to restore proper functionality.
- Unsatisfactory spray patterns: If the spray patterns from the showerhead are not satisfactory, it could be due to mineral deposits or clogs. Soak the showerhead in a vinegar solution or a commercial descaler to remove any buildup. Rinse it thoroughly before reattaching it to the shower arm.
By following these instructions and addressing any problems or adjustments that may arise, you can ensure that your newly installed shower cartridge provides optimal performance and a refreshing shower experience.
Troubleshooting Common Issues
As with any home improvement project, installing a shower cartridge may present some common issues. It’s important to anticipate these problems and learn how to troubleshoot them effectively. In this section, we will discuss the common problems that may occur during or after the shower cartridge installation, and provide you with troubleshooting tips and solutions. By following these steps, you will be able to resolve any issues that may arise, ensuring a successful installation and a satisfying shower experience.
Common problems that may occur during or after the shower cartridge installation
When installing a shower cartridge, you may encounter various issues that can hinder the proper functioning of your shower. Here are some common problems you may come across:
- Leaking shower:
- Inconsistent water temperature:
- Reduced water pressure:
- Difficulty in turning the shower handle:
- Unpleasant odors or tastes in the water:
A leaking shower is a frustrating issue that can occur due to a faulty installation or a worn-out cartridge. This can result in water wastage and potential damage to your bathroom. It is important to identify the source of the leak and take appropriate action to fix it.
If you notice that the water temperature in your shower fluctuates or doesn’t stay consistent, it may be due to an improperly installed or malfunctioning shower cartridge. This problem can be annoying, especially during colder months when you rely on a warm shower.
If your showerhead starts to produce weak water pressure after installing a new cartridge, it could be due to debris or mineral buildup in the cartridge or showerhead. This can restrict the flow of water and affect your showering experience.
If you find it challenging to turn the shower handle after installing a new cartridge, it may indicate a misalignment or improper installation. This can be caused by incorrect cartridge positioning or loose connection with the shower handle.
In some cases, installing a new shower cartridge can lead to unpleasant odors or unusual tastes in the water. This could be due to residual chemicals or materials from the cartridge. While this issue is not common, it is essential to address it to ensure a comfortable showering experience.
Troubleshooting tips and solutions for resolving these issues
Now that we have identified the common problems that may occur during or after the shower cartridge installation, let’s discuss some troubleshooting tips and solutions to help you handle these issues effectively:
- Leaking shower:
- Inconsistent water temperature:
- Reduced water pressure:
- Difficulty in turning the shower handle:
- Unpleasant odors or tastes in the water:
To fix a leaking shower, start by checking the cartridge installation for any loose or damaged parts. Ensure that all connections are tight and secure. If the leak persists, you may need to replace the cartridge with a new one.
If you experience inconsistent water temperature, verify that the cartridge is correctly aligned and installed. Check the temperature limit stops on the cartridge and make necessary adjustments. If the issue continues, consult a professional plumber for further assistance.
To address reduced water pressure, remove the showerhead and clean it thoroughly to eliminate any debris or mineral buildup. Additionally, inspect the cartridge for any blockages or buildup. If the problem persists, consider replacing the showerhead or contacting a plumber for further inspection.
If you are having trouble turning the shower handle, ensure that the cartridge is properly aligned and positioned. Tighten any loose connections between the cartridge and the handle. If the issue persists, seek professional help to avoid causing any further damage.
If you encounter unpleasant odors or strange tastes in the water after installing a new shower cartridge, flush the system by running the water for a few minutes. This will help remove any residual chemicals or materials. If the problem persists, consider using a water filter or consult a professional for a thorough inspection.
By following these troubleshooting tips and solutions, you can overcome common issues that may occur during or after a shower cartridge installation. Remember, if you feel uncomfortable or unsure about handling any of these issues, it’s always best to seek professional help to avoid any further damage or complications.
Frequently Asked Questions
Can I Replace A Shower Cartridge Myself?
Yes, you can replace a shower cartridge yourself. Just follow the instructions provided with the replacement cartridge. It’s a simple and doable DIY project that doesn’t require professional assistance.
Do You Have To Turn Off Water To Replace Shower Faucet Cartridge?
Yes, you need to turn off the water before replacing a shower faucet cartridge
What Happens If You Dont Replace A Shower Cartridge?
Not replacing a shower cartridge can cause leakages, reduced water pressure, and poor water quality. Regular replacements ensure a functioning shower system, preventing costly repairs and maintaining a comfortable shower experience. Don’t delay, replace the cartridge for optimal performance and durability.
How Do I Know If My Shower Cartridge Is Bad?
To determine if your shower cartridge is bad, look for signs like a decrease in water pressure, inconsistent water temperature, or leaks. If you experience these issues, it’s likely time to replace the shower cartridge for optimal performance.
Conclusion
To sum up, installing a shower cartridge is a straightforward process that can be done with a few basic tools and some patience. By following the step-by-step instructions mentioned in this guide, you can successfully replace a faulty cartridge and restore the functionality of your shower.
Remember to always turn off the water supply and take necessary precautions. With a little effort and knowledge, you can easily complete this DIY project and enjoy a fully functional shower.