
To install a shower base, first, ensure that the floor is level and there are no leaks. Then, position the base in place and secure it using screws or adhesive.
Installing a shower base is a crucial step in creating a functional and secure shower area. Whether you’re renovating an existing bathroom or starting from scratch, proper installation ensures a sturdy and watertight foundation for your shower. We will guide you through the process of installing a shower base with clear and concise instructions.
By following these steps, you can successfully install a shower base and create a beautiful and functional shower space in your home. So, let’s jump right into it!
Why Choose A Shower Base
Why Choose a Shower Base
Are you considering installing a new shower in your bathroom? One of the first decisions you’ll need to make is whether to install a shower base or go with traditional tile flooring. While both options have their merits, there are several reasons why a shower base may be the best choice for you. In this article, we’ll explore the advantages of using a shower base, including their functionality and durability.
Pros of Using a Shower Base
Shower bases offer several benefits that make them an appealing option for many homeowners. Let’s take a closer look at some of the advantages:
- Easy Installation: One of the biggest advantages of using a shower base is the ease of installation. Unlike traditional tile flooring, which requires meticulous planning and labor-intensive process, a shower base can be quickly and easily installed. This is especially useful if you’re looking for a hassle-free bathroom renovation project.
- Waterproofing: Shower bases are designed to be completely waterproof, preventing water from seeping into the subfloor and causing structural damage. By creating a watertight seal, shower bases offer long-lasting protection against leaks and rot, ensuring the structural integrity of your bathroom for years to come.
- Low Maintenance: When it comes to cleaning and maintenance, shower bases are a breeze. Their smooth, non-porous surface resists dirt, grime, and mold, making them incredibly easy to clean. No more spending hours scrubbing grout lines or worrying about mold growth in hard-to-reach corners.
- Aesthetic Appeal: Shower bases come in a wide range of colors, styles, and materials, allowing you to choose one that complements your bathroom’s overall design. Whether you prefer a sleek, modern look or a more traditional aesthetic, there’s a shower base option to suit your personal taste and style.
- Durability: Functionality and durability go hand in hand when it comes to shower bases. Made from sturdy materials like fiberglass, acrylic, or solid surface, shower bases are built to withstand daily wear and tear. They are resistant to chipping, cracking, and fading, ensuring that your shower will maintain its beauty and performance for years to come.
With their easy installation, waterproofing capabilities, low maintenance requirements, aesthetic appeal, and durability, shower bases make a compelling choice for any bathroom renovation project. Whether you’re looking to upgrade your existing shower or starting from scratch, consider the many benefits that a shower base can offer.
Materials Needed For Installation
When installing a shower base, having the right materials is essential for a successful and long-lasting installation. By gathering all the necessary materials beforehand, you can save time and ensure a hassle-free installation. In this section, we will discuss the list of necessary materials and tools as well as the importance of choosing the right shower base material.
List of Necessary Materials and Tools
Before diving into the installation process, it’s crucial to have all the required materials and tools readily available. This will help streamline the process and make it more efficient. Below, we have compiled a comprehensive list of the necessary materials and tools you will need:
Choosing the Right Shower Base Material
When it comes to selecting the ideal shower base material, there are a few factors to consider. The choice of material can impact the durability, aesthetics, and overall performance of your shower base. Here are some materials commonly used for shower bases:
| Material | Advantages | Disadvantages |
|---|---|---|
| Ceramic Tile | 1. Versatile design options 2. Easy to clean and maintain 3. Resistant to stains and chemicals |
1. Requires proper waterproofing 2. Grout lines may need regular upkeep 3. Higher installation cost compared to other materials |
| Fiberglass | 1. Lightweight and easy to handle 2. Affordable price 3. Resistant to chips and scratches |
1. Limited design options 2. May develop cracks over time 3. Less durable compared to other materials |
| Acrylic | 1. Sleek and modern appearance 2. Excellent durability 3. Warm to the touch |
1. Requires additional support for heavy loads 2. Prone to scratching 3. Can be more expensive than other options |
| Stone Resin | 1. Luxurious and elegant look 2. High durability and strength 3. Heat and stain-resistant |
1. Heavier than other materials 2. More expensive upfront investment 3. May require professional installation |
Each shower base material has its own pros and cons. Consider your budget, design preferences, and maintenance requirements when choosing the most suitable material for your shower base installation.
By understanding the list of necessary materials and tools, as well as the importance of choosing the right shower base material, you are now ready to proceed with the installation process. With proper preparation, your shower base installation will be smooth and successful, resulting in a functional and visually appealing addition to your bathroom.
Preparing The Installation Area
Preparing the Installation Area
Before you start installing a shower base, it’s crucial to properly prepare the installation area. This step is essential to ensure a successful and long-lasting installation. In this section, we will cover two important steps: assessing the existing shower area condition and taking appropriate measurements and marking the area.
Assessing the existing shower area condition
The first step in preparing the installation area is to assess the condition of the existing shower area. This will help you identify any potential issues that need to be addressed before proceeding with the installation. Here are a few key points to consider:
- Inspect for leaks: Check the area for any signs of water leaks. Look for water stains, mold growth, or soft spots on the floor. If you notice any of these signs, it’s vital to fix the leaks before installing the shower base.
- Evaluate the floor: Determine the condition of the floor beneath the existing shower. Ensure that the flooring is sturdy and level. If you notice any unevenness or damage, you may need to repair or replace the floor before proceeding.
- Check the plumbing: Examine the plumbing connections and fixtures in the shower area. Make sure there are no issues with the pipes, drains, or faucets. If any plumbing problems are detected, it’s advisable to fix them beforehand.
Taking appropriate measurements and marking the area
Once you have assessed the existing shower area, it’s time to take accurate measurements and mark the installation area. This ensures that the shower base fits perfectly and aligns with the existing plumbing. Follow these steps:
- Measure the dimensions: Use a tape measure to measure the width, length, and depth of the shower area. Record these measurements accurately to ensure a proper fit of the shower base.
- Mark the drain location: Identify the position of the drain and mark it on the floor. This will help you align the shower base correctly later on.
- Outline the installation area: Use masking tape or a marker to outline the exact dimensions of the shower base on the floor. This will serve as a guide during the installation process.
By properly assessing the existing shower area condition and taking accurate measurements, you are laying the foundation for a successful shower base installation. These preparatory steps will help you avoid potential pitfalls and ensure a smooth installation process. In the next section, we will discuss how to install the shower base itself.
Removing The Old Shower Base
When it’s time to give your bathroom a fresh look, removing the old shower base is an essential step. Whether you want to replace it with a new one or create a whole new shower setup, proper removal of the existing base is crucial. In this section, we will outline the steps to safely remove the old shower base, including dealing with any plumbing connections or fixtures.
Steps to Safely Remove the Existing Shower Base
Removing the old shower base requires careful planning and execution. Follow these steps to ensure a safe and efficient removal process:
- Turn off the water supply: Before starting the removal process, it’s important to turn off the water supply to the shower. Locate the main water valve and shut it off to avoid any mishaps during the removal process.
- Disconnect the plumbing connections: Begin by disconnecting any plumbing connections leading to the shower base. This may include the drainpipe, water supply lines, and any other fixtures attached to the base. Use appropriate tools like a wrench or pliers to loosen the connections and carefully remove them.
- Remove the shower base: Once all the plumbing connections are disconnected, it’s time to remove the shower base itself. Start by taking off any surrounding panels or tiles that may be covering the base. Then, identify the screws or fasteners holding the base in place. Loosen them using a screwdriver or appropriate tools and carefully lift the base away from the floor. If the base is attached with adhesives, make sure to gently pry it off using a putty knife.
- Clean the area: After successfully removing the old shower base, take the time to thoroughly clean the area. Remove any debris, adhesive residues, or caulking that may be present. This will ensure a smooth installation process for the new shower base.
Dealing with Any Plumbing Connections or Fixtures
During the removal process, it’s important to pay attention to the plumbing connections and fixtures attached to the shower base. Here are some key points to keep in mind:
- Inspect the plumbing connections: Before disconnecting any plumbing connections, carefully inspect them for any signs of damage or leaks. If you notice any issues, it’s recommended to replace or repair them before proceeding with the installation of the new shower base.
- Label the connections: To make the reinstallation process easier, it’s helpful to label each plumbing connection as you disconnect it. This will ensure that you reconnect everything correctly and prevent any potential plumbing problems down the line.
- Consider updating fixtures: If you’re removing an old shower base, it might be a good opportunity to update the fixtures as well. Check for any outdated or worn-out fixtures and consider replacing them with newer, more stylish options. This can give your bathroom a fresh and modern look.
By following these steps and addressing any plumbing connections or fixtures properly, you’ll be well on your way to successfully removing the old shower base. Take your time and work carefully to ensure a smooth transition to the next phase of your bathroom renovation project.
Installing The New Shower Base
Installing the New Shower Base
Installing a new shower base can be a challenging but rewarding task. It’s an important step in creating a stable and watertight shower enclosure. Before you begin the installation process, there are a few crucial steps you need to follow to ensure the job is done correctly. In this section, we will discuss two important aspects of installing the shower base: checking the subfloor for stability and levelness, and positioning the shower base correctly. By following these steps, you can ensure a successful installation that will last for years to come.
Checking the subfloor for stability and levelness
One of the key factors in a secure shower base installation is having a stable and level subfloor. Before proceeding with the installation, it is important to thoroughly inspect the subfloor to ensure it is capable of supporting the weight of the shower base and the individuals using it. Here’s a step-by-step guide on how to check the subfloor:
- Start by removing any existing flooring material to gain access to the subfloor.
- Visually inspect the subfloor for signs of water damage, rot, or structural issues. Address any problems before proceeding.
- Use a level tool to check the levelness of the subfloor. A level subfloor is essential for ensuring proper drainage and preventing water pooling.
- If the subfloor is uneven, use a floor leveling compound to level it out. Follow the manufacturer’s instructions for mixing and application.
- Allow the leveling compound to cure completely before moving on to the next step.
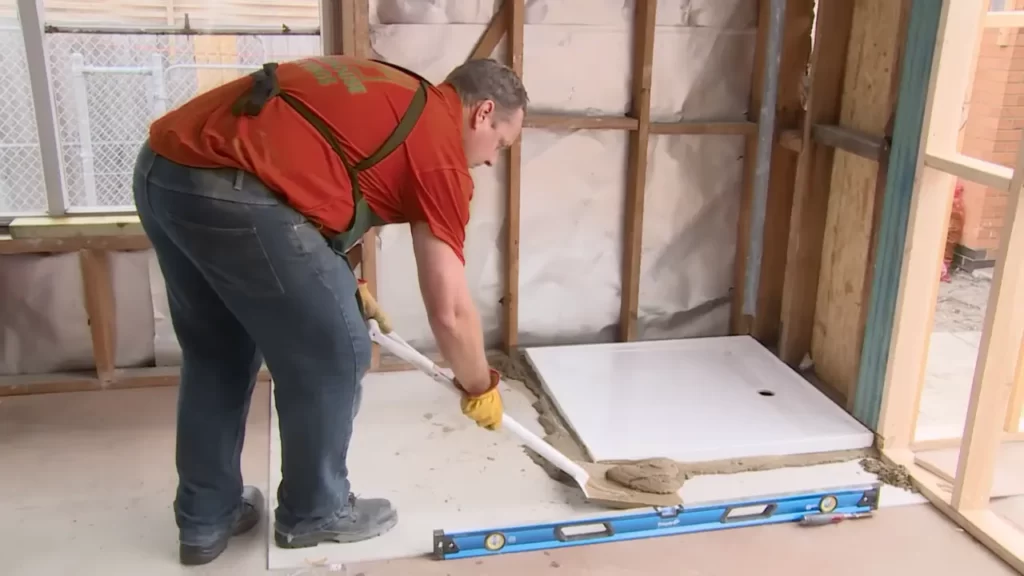
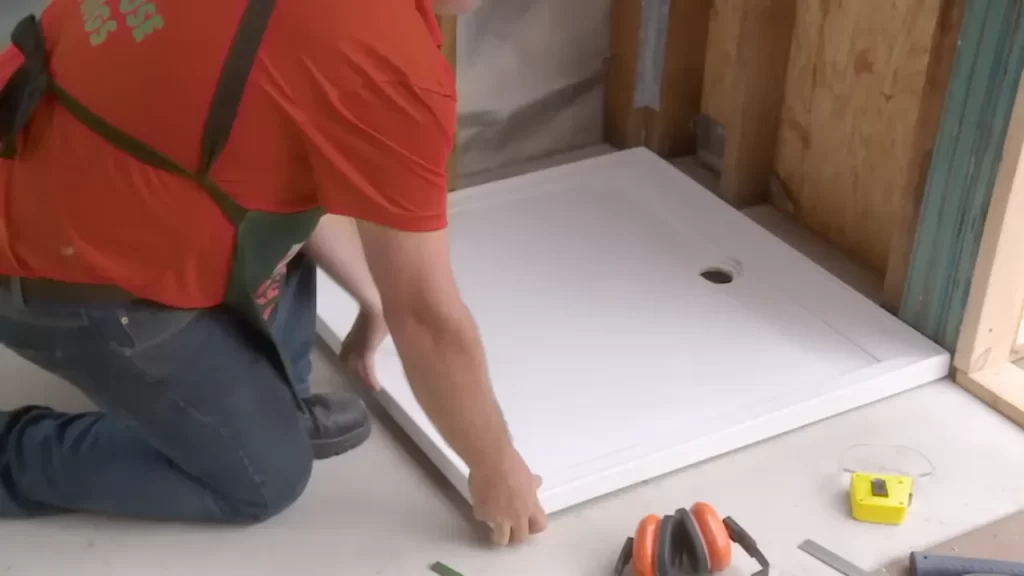
Positioning the shower base correctly
Once you have confirmed the stability and levelness of the subfloor, it’s time to position the shower base correctly. Proper positioning is essential to ensure proper drainage and prevent leaks. Here are the steps to follow:
- Place the shower base in the desired location, making sure it aligns with the existing drainpipe.
- Use a measuring tape to ensure the shower base is centered and aligned with the walls of the enclosure.
- Double-check the levelness of the shower base, using a level tool. Make any necessary adjustments to ensure it is perfectly level.
- Secure the shower base to the subfloor using screws or adhesive, following the manufacturer’s instructions.
- Apply a bead of silicone sealant around the edges of the shower base to create a watertight seal.
- Allow the sealant to dry completely before moving on to the next step.
By following these steps, you can install a shower base that is stable, level, and properly positioned. Taking the time to ensure these two aspects of the installation are done correctly will result in a shower that not only looks great but also functions properly. So, roll up your sleeves and get ready to enjoy the satisfaction of a DIY shower base installation!
Securing The Shower Base
Securing the Shower Base
After properly positioning your shower base in the designated area, the next crucial step is to ensure that it is securely fastened to the floor. This will prevent any movement or shifting that may lead to leaks or other potential issues. Follow these steps to securely secure your shower base:
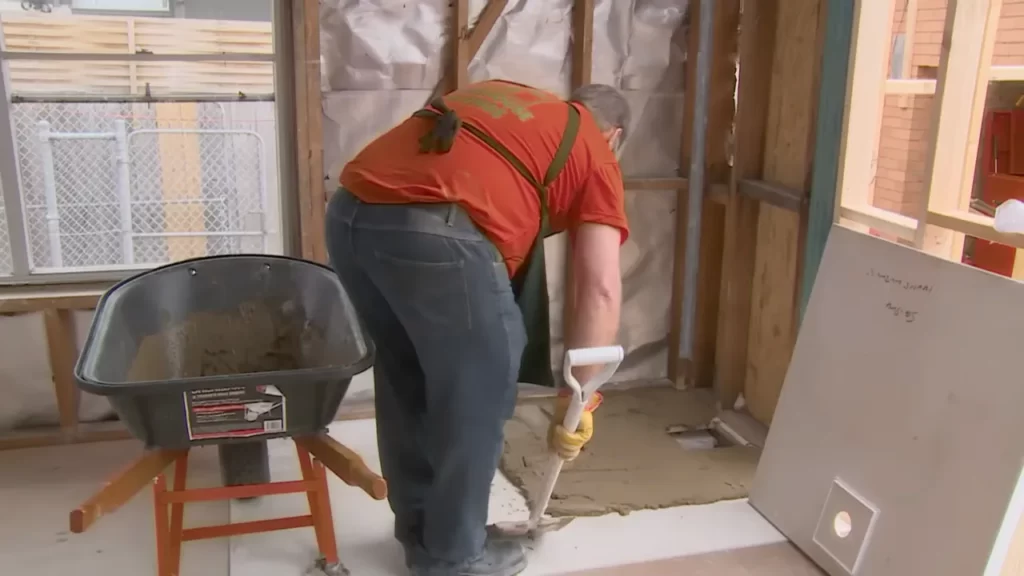
Applying sealant and adhesive for proper installation
Before securing the shower base, it is essential to apply a layer of sealant to create a watertight seal. This will help prevent any water from seeping through and causing damage. Here’s how to apply the sealant:
- Clean the area where the shower base will be installed, ensuring it is free from dust and debris.
- Apply a continuous bead of waterproof sealant around the perimeter of the base where it will come in contact with the floor.
- Use a caulk gun to carefully apply the sealant, ensuring a complete and even seal.
- Allow the sealant to dry according to the manufacturer’s instructions before proceeding.
Once the sealant has dried, it’s time to apply adhesive to ensure a robust and sturdy installation. Here’s how to do it:
- Select a high-quality adhesive specifically designed for shower base installations.
- Apply the adhesive evenly on the underside of the shower base, following the manufacturer’s recommended guidelines.
- Place the shower base carefully into position, ensuring that it is sitting flush against the floor.
- Press down firmly on the base to ensure optimal adhesion between the base and the floor.
- Wipe away any excess adhesive that may have seeped out from under the base.
- Allow the adhesive to cure fully according to the manufacturer’s instructions before proceeding with further installation steps.
Adjusting and leveling the shower base
Properly adjusting and leveling the shower base is vital to ensure a comfortable and safe showering experience. Here are the steps to follow:
- Using a spirit level, check the levelness of the base in all directions. Make any necessary adjustments to ensure it is perfectly level.
- If the shower base requires additional support to achieve the desired levelness, consider using shims to fill any gaps or uneven areas.
- Recheck the levelness once the shims are in place, adjusting as needed until the base is stable and level.
- Double-check that the shower base is still sitting flush against the floor and there are no gaps between the base and the floor.
- Take the time to ensure the base is level and secure, as this will contribute to the overall stability and quality of your shower installation.
By following these steps to securely secure your shower base with sealant, adhesive, and proper adjustment, you’ll be well on your way to a successful and durable shower installation. Make sure to allow adequate time for the sealant and adhesive to dry and cure before continuing with further installation steps.
Connecting The Drain
Once you have successfully installed the shower base and ensured a sturdy foundation, it’s time to connect the drain. This crucial step not only ensures proper drainage but also prevents leaks that can cause water damage to your bathroom. Follow these steps to connect the drain with precision.
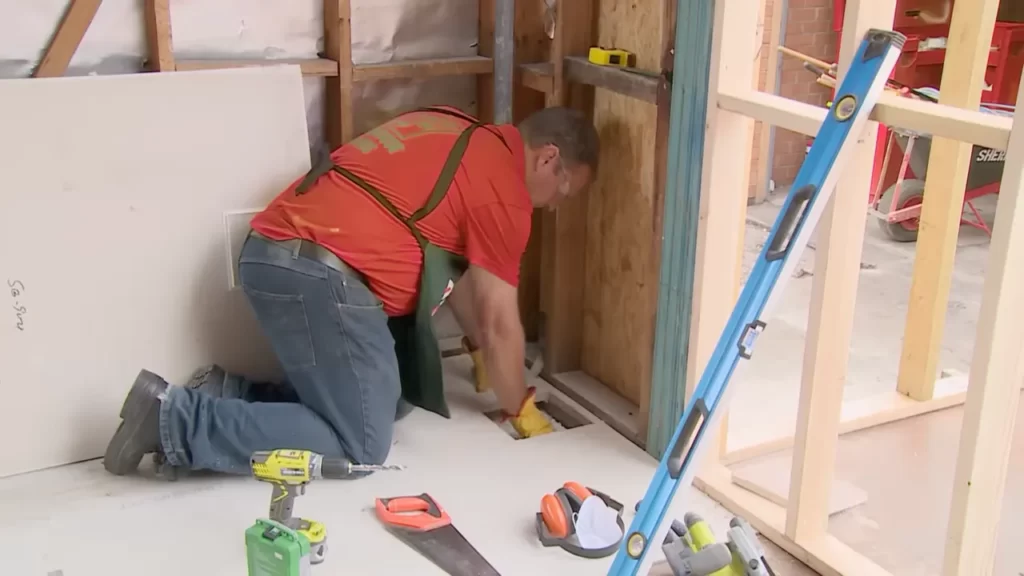
Installing and connecting the appropriate drain components
Before you begin connecting the drain, make sure you have all the necessary components. These include a drain flange, drain strainer, and an appropriate drain pipe. Measure the diameter of your drain pipe to ensure you purchase the correct size components.
To install the drain flange, apply a layer of plumber’s putty around the bottom edge of the flange. Then, insert it into the drain hole and press firmly to create a watertight seal. Make sure the flange is flush against the shower base surface.
Next, attach the drain strainer to the flange by screwing it in clockwise. Use a screwdriver or a wrench, depending on the type of strainer you have. Tighten it securely to prevent any potential leaks.
Ensuring proper drainage and leak prevention
Proper drainage is essential for a functional shower base, so it’s important to ensure that the drain components are aligned correctly. Make sure the drain pipe is lined up with the drain flange. It should fit snugly into the flange without any gaps or misalignment. Use a level to ensure that the drain pipe is straight and properly positioned.
To prevent leaks, apply a generous amount of plumber’s tape around the threads of the drain pipe. This will create a secure seal when you connect the drain pipe to the drain flange. Carefully screw the drain pipe clockwise into the flange until it is tight and secure.
Once the drain pipe is connected, it’s important to test for leaks. Turn on the water and allow it to flow into the shower base. Check the area around the drain for any signs of water leakage. If you notice any leaks, tighten the connections further or consider consulting a professional plumber.
Ensuring proper drainage and leak prevention is crucial when connecting the drain of your shower base. By following these steps and double-checking your work, you can enjoy a functional and leak-free showering experience.
Finalizing The Installation
Finalizing the Installation
Once you have completed the major steps of installing a shower base, it is time to move on to the final touches. This step is crucial as it ensures the stability and functionality of the shower base. In this section, we will guide you through the process of testing the shower base for stability and functionality, as well as cleaning up and adding those finishing touches to complete the installation.
Testing the shower base for stability and functionality
Before you can enjoy a refreshing shower, it is important to make sure that your shower base is stable and functioning properly. Testing the stability of the shower base is essential to avoid any accidents or leaks in the future. To ensure stability, follow these steps:
- Check for any wobbling or movement in the base by applying pressure to different areas. If you notice any instability, you may need to reinforce the base with additional support or consult a professional.
- Inspect the drain connection to ensure it is securely fastened. Any loose fittings should be tightened using a wrench.
- Fill the shower base with water and check for any leaks. If you notice any water seepage, it might indicate a problem with the installation. Address the issue immediately to prevent further damage.
By following these steps, you can ensure the stability and functionality of your shower base, providing you with a safe and enjoyable shower experience.
Cleaning up and final touches
After testing the shower base, it’s time to clean up the installation area and add those final touches that will enhance both the appearance and functionality of the shower. Here are some important steps to follow:
- Remove any debris or excess caulking from the installation area using a scraper or utility knife.
- Clean the shower base with a mild, non-abrasive cleaner to remove any dirt or grime.
- Install the shower head and any other fixtures, ensuring they are securely attached and functioning properly.
- Apply a final bead of silicone caulking around the edges of the shower base to seal any gaps and prevent water leakage.
Completing these final touches will not only improve the aesthetics of your shower but also ensure that everything is in proper working order.
With these steps, you can successfully finalize the installation of your shower base. By testing for stability and functionality and taking care of the finishing touches, you can enjoy a safe, secure, and stylish shower experience.
Frequently Asked Questions
Do You Need To Put Anything Under A Shower Base?
Yes, it is advisable to put something under a shower base. Adding a supportive material like mortar or a foam cushion will help level the base, provide stability, and prevent any potential damage to the subfloor. It also helps in proper drainage and reduces the chances of leaks or cracks in the shower base.
How Do You Install A Shower Base?
To install a shower base, follow these steps: 1. Prepare the area by removing the old base and cleaning it. 2. Position the new base in the desired location, making sure it is level. 3. Connect the drain to the plumbing system.
4. Apply a waterproofing membrane around the base edges. 5. Finish by sealing the seams and edges to prevent water leakage.
How Do You Connect A Shower Base To A Drain?
To connect a shower base to a drain, ensure that the drain hole in the shower base aligns with the drain pipe. Apply plumber’s putty around the drain hole, then insert the drain flange and tighten it securely. Connect the drain pipe to the flange and test for leaks.
What Is The Rough Opening For A Shower Base?
The rough opening for a shower base is the space needed to fit the base during installation. It typically measures slightly larger than the dimensions of the base itself. Proper measurement of the rough opening ensures a secure and aesthetic fit for the shower base.
Conclusion
Installing a shower base may seem daunting at first, but with the right tools and steps, it can be a straightforward process. By following our guide, you can confidently tackle this project on your own. Remember to carefully plan, measure, and prepare the area before installing the shower base.
Properly sealing and securing the base will ensure a watertight and long-lasting installation. With a little patience and attention to detail, you’ll have a beautiful and functional shower in no time. Happy installing!