
To install a rear discharge toilet, follow these steps: remove the old toilet, prepare the floor flange, install the wax ring, position and secure the toilet to the flange, connect the tank and bowl, attach the water supply line, and test for leaks. Installing a rear discharge toilet requires a few simple steps, and with the right tools and materials, you can complete the installation process efficiently and effectively.
By following these steps, you’ll have a properly installed rear discharge toilet in no time.
Understanding Rear Discharge Toilets
When it comes to bathroom renovations or new construction, one crucial aspect that often gets overlooked is the choice of toilet. While most people are familiar with traditional floor discharge toilets, have you ever considered the benefits of a rear discharge toilet? In this section, we will dive into the details of rear discharge toilets, explaining what they are, how they work, and the advantages they offer.
What is a Rear Discharge Toilet?
A rear discharge toilet, as its name suggests, is a type of toilet that discharges waste through a pipe located at the back of the toilet, rather than through the floor. Unlike standard toilets, which have a visible discharge outlet at the bottom, rear discharge toilets have their plumbing connection hidden behind the ceramic tank. This clever design allows for a more streamlined appearance and offers flexibility in bathroom layout.
How does a Rear Discharge Toilet Work?
The functioning of a rear discharge toilet is quite similar to that of a traditional toilet. When you flush the toilet, the water from the tank rushes down into the bowl, forming a powerful siphon. This siphon then carries the waste through the rear waste pipe and into the main drain pipe, effectively disposing of it.
The rear discharge pipe connects to the main drain pipe using a flange or a connector, which ensures a secure and leak-free connection. The toilet bowl’s rim is specifically designed to direct the flushing water towards the waste outlet, maximizing the efficiency of the waste removal process.
Advantages of Installing a Rear Discharge Toilet
Installing a rear discharge toilet brings several advantages that are worth considering:
- Space Saving: Rear discharge toilets are particularly beneficial for bathrooms with limited space. Since the toilet protrudes less from the wall, it allows for more room and makes cleaning around it easier.
- Flexible Installation: Thanks to their unique design, rear discharge toilets offer installation flexibility. You can easily position them against the wall, eliminating the need for an extra trench in the floor for the waste pipe.
- No Floor Drilling: Rear discharge toilets eliminate the need for drilling through the floor to install the waste pipe. This not only reduces the complexity of installation but also prevents potential damage to existing flooring.
- Enhanced Aesthetics: Due to the hidden plumbing connection, rear discharge toilets provide a sleek and modern appearance. This seamless look complements contemporary bathroom designs and creates an overall more polished aesthetic.
Whether you’re remodeling your bathroom or constructing a new one, a rear discharge toilet is a fantastic option to consider. It offers space-saving benefits, installation flexibility, and an appealing appearance, all while providing efficient waste disposal. With its unique design and advantages, a rear discharge toilet is definitely worth exploring for your next bathroom project.
Tools And Materials Needed
Tools and Materials Needed
When it comes to installing a rear discharge toilet, having the right tools and materials is crucial for a successful and hassle-free installation process. Being prepared with the essential tools and recommended materials not only ensures a smooth installation but also saves time and effort. In this section, we will discuss the tools and materials you need to have before you begin the installation.
Essential tools for the installation
To get started with the installation of a rear discharge toilet, you will need the following essential tools:
1. Wrench: A wrench is necessary for tightening and loosening nuts and bolts. Make sure to have an adjustable wrench that can fit different sizes.
2. Screwdriver: A screwdriver is essential for tightening and loosening screws during the installation process. Opt for a screwdriver with a comfortable grip for better control.
3. Plunger: A plunger is a handy tool to have in case of any clogs or blockages in the toilet drain. Choose a plunger with a sturdy handle for effective unclogging.
4. Teflon tape: Teflon tape is used to seal the threads on plumbing connections. It helps prevent leaks and ensures a tight seal. Make sure to have a roll of Teflon tape handy for the installation.
Recommended materials for a successful installation
In addition to the essential tools, there are certain materials that are recommended for a successful rear discharge toilet installation. These materials include:
1. Toilet wax ring: A toilet wax ring is used to create a watertight seal between the toilet base and the flange on the floor. It helps prevent any leaks or odors. Ensure you have a high-quality wax ring that is compatible with your toilet model.
2. Flexible supply line: A flexible supply line connects the water supply to the rear discharge toilet. Opt for a stainless steel or braided flexible supply line for durability and ease of installation.
3. Toilet flange: A toilet flange is a plumbing fitting that connects the toilet to the floor and secures it in place. It is important to choose a flange that is compatible with your floor and toilet drain size.
4. Silicone caulk: Silicone caulk is used to seal the gap between the toilet base and the floor. It helps provide additional protection against leaks and keeps the installation secure. Select a high-quality silicone caulk that is specifically designed for bathroom use.
5. Safety gloves: Safety gloves are essential to protect your hands during the installation process. Opt for gloves that provide a good grip and are comfortable to wear for an extended period.
By having the essential tools and recommended materials on hand, you will be well-prepared to tackle the installation of a rear discharge toilet. Remember to follow the manufacturer’s instructions and take necessary safety precautions while working. With these tools and materials, you can ensure a successful and efficient installation that will stand the test of time.
Pre-Installation Preparation
Before you can begin installing a rear discharge toilet, there are a few important steps you need to take to ensure a smooth and successful installation. Pre-installation preparation is crucial to avoid any potential issues and to ensure that your new toilet fits properly and functions effectively. In this section, we will walk you through the steps you need to take for a seamless pre-installation process.
Measuring the Available Space and Clearances
Measuring the available space and clearances is the first step in your pre-installation preparation. This will help you determine if the rear discharge toilet you have selected will fit properly in your bathroom. Incorrect measurements can lead to an ill-fitting toilet, which can create a host of problems down the line.
To measure the available space, grab a tape measure and measure the width, depth, and height of the area where the toilet will be installed. Pay close attention to any obstructions such as walls or fixtures that might limit the available space.
Moreover, it is essential to measure the clearances around the toilet. These clearances include the distances from the toilet to the walls, nearby fixtures, and other bathroom elements. These clearances are necessary to ensure proper functionality and accessibility.
Once you have all the measurements, make sure to note them down accurately. Having these measurements on hand will help you select the right rear discharge toilet that fits perfectly into your bathroom space.
Evaluating the Existing Plumbing System
Another crucial step in your pre-installation preparation is evaluating the existing plumbing system. This involves examining the drainage pipes and connections to ensure that they are compatible with a rear discharge toilet.
Start by locating the main drainpipe. This is typically located near the floor, usually against a wall. You will need to assess whether the main drainpipe is positioned in a way that allows for the installation of a rear discharge toilet. Additionally, check for any signs of damage or blockages in the drainpipe that might need to be addressed before installing the new toilet.
Furthermore, inspect the flange and the wax ring, which create a watertight seal between the toilet and the drainpipe. Ensure that these components are in good condition and functioning properly. If any issues are identified, such as a cracked flange or a damaged wax ring, it is important to replace them before proceeding with the installation.
By carefully evaluating the existing plumbing system, you can address any potential compatibility or damage issues before installing the rear discharge toilet. This will help prevent future leaks or other problems that could arise from an incompatible or compromised plumbing system.
Removing The Old Toilet
If you’re planning to install a rear discharge toilet, the first step is to remove the old toilet. This process can seem a bit intimidating, but with the right tools and knowledge, it can be a relatively simple task. In this guide, we’ll walk you through the steps of removing your old toilet in three main parts: shutting off the water supply, draining the tank and bowl, and finally, removing and disposing of the old toilet.
Shutting off the water supply
The first step in removing your old toilet is to shut off the water supply. This is important to prevent any water from flowing into the tank or bowl while you work on removing it. Locate the shut-off valve, which is typically located near the bottom left side of the toilet tank. Turn the valve clockwise until it is tightly closed, effectively stopping the flow of water. Once the water supply is shut off, you can move on to the next step.
Draining the tank and bowl
Before you can remove the old toilet, it’s essential to drain the tank and bowl completely. To do this, you’ll first need to flush the toilet to remove as much water as possible. Once the majority of the water is gone, you’ll want to remove any remaining water from the tank and bowl using a sponge or towels. Place the sponge or towels inside the tank and bowl, soaking up the water until it is completely dry. Take your time with this step to ensure that no water is left behind.
Removing the old toilet and disposing of it
Once the water has been drained, it’s time to remove the old toilet. Begin by disconnecting the water supply line from the bottom of the tank. Use an adjustable wrench to unscrew the nut connecting the supply line to the fill valve. Once disconnected, set the supply line aside. Next, remove the nuts attaching the toilet to the floor bolts. These nuts are usually located at the base of the toilet near the floor. Loosen and remove these nuts, and carefully lift the toilet off the floor bolts.
With the toilet removed, you’ll need to dispose of it properly. Depending on your local regulations, you may be required to take it to a recycling center or waste management facility. Check with your local authorities to determine the best method of disposal for your old toilet. Alternatively, you may consider donating it if it is still in good condition.
Removing the old toilet is an important step in the process of installing a rear discharge toilet. By following these steps, you’ll be well on your way to a successful installation. Stay tuned for our next guide, where we’ll cover the installation process in detail.
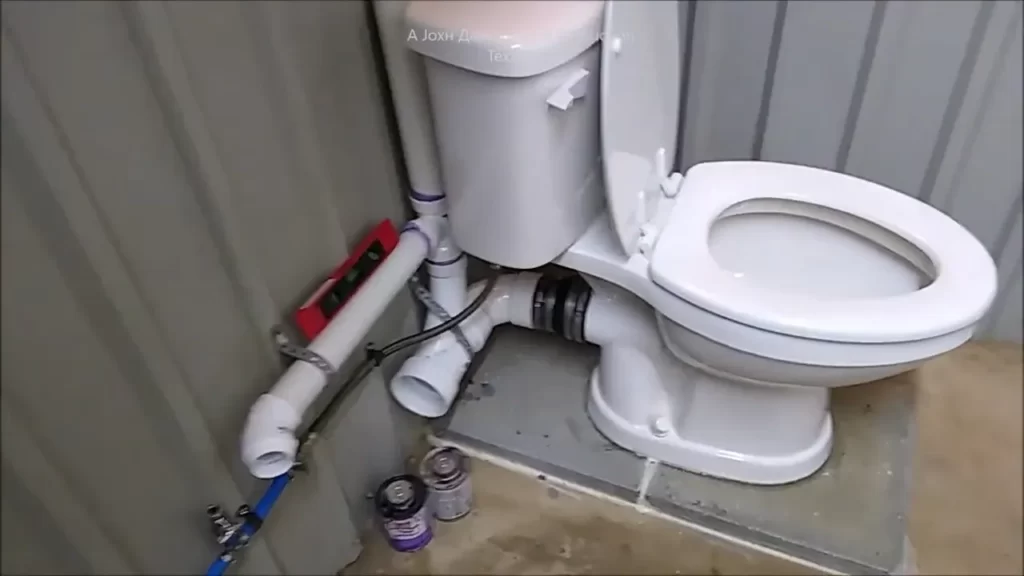
Installing A Rear Discharge Toilet
Installing a rear discharge toilet in your bathroom can provide a sleek and modern look, while also offering a practical space-saving solution. However, it’s important to ensure that the installation process is done correctly to avoid any potential issues down the line. In this guide, we’ll walk you through the steps of installing a rear discharge toilet, focusing on three key areas: positioning the toilet flange correctly, connecting the drain pipe to the flange, and securing the toilet to the floor.
Positioning the Toilet Flange Correctly
The first step in installing a rear discharge toilet is to correctly position the toilet flange. The flange connects the toilet bowl to the floor drain pipe, creating a secure and watertight seal. To position the flange correctly:
- Ensure that the flange is centered over the floor drain pipe. This will allow for proper waste disposal and prevent any potential leakage.
- Use a measuring tape to determine the distance from the back wall to the center of the flange. This measurement will be important when it comes to positioning the toilet bowl.
- Secure the flange to the floor using screws or bolts, making sure it is level and flush with the surrounding flooring.
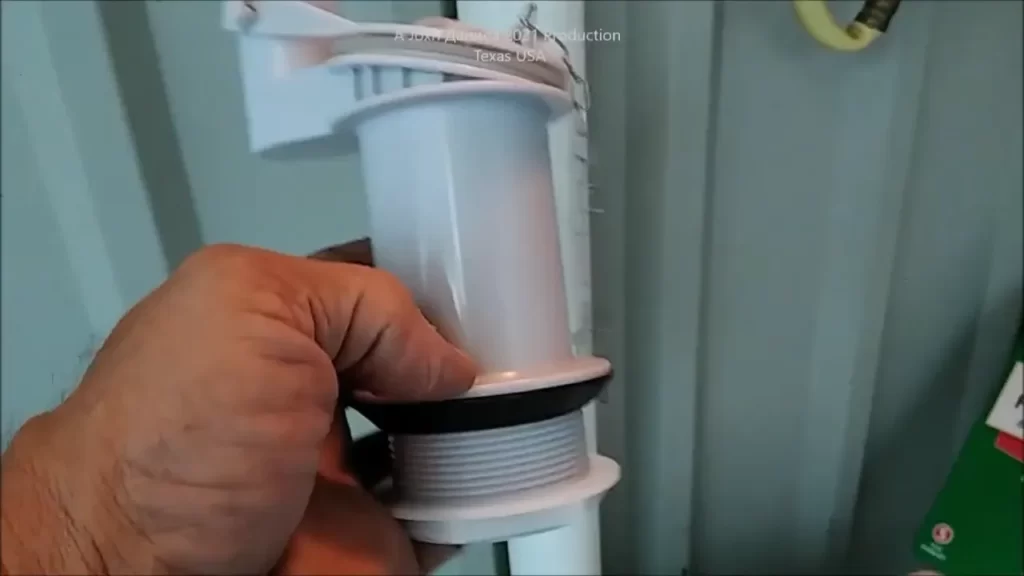
Connecting the Drain Pipe to the Flange
Once the toilet flange is properly positioned, the next step is to connect the drain pipe to the flange. This will create a direct pathway for waste disposal. To connect the drain pipe:
- Apply a layer of plumber’s putty or silicone sealant around the inside of the flange to create a watertight seal.
- Insert the drain pipe into the flange, ensuring a snug fit.
- Use a coupling or connector to secure the drain pipe to the flange, following the manufacturer’s instructions.
Securing the Toilet to the Floor
After the drain pipe is connected to the flange, the final step is to secure the toilet to the floor, ensuring a stable and sturdy installation. To secure the toilet:
- Place a wax ring or wax gasket onto the toilet flange. This will create a seal between the toilet and the flange, preventing any potential leakage.
- Carefully lower the toilet bowl onto the wax ring, aligning the holes on the base of the toilet with the bolts on the flange.
- Tighten the nuts onto the bolts, gradually and evenly, using a wrench or pliers. Be careful not to overtighten, as this can damage the toilet or the flange.
- Check for any wobbling or movement of the toilet bowl. If necessary, adjust the tightness of the nuts.
By following these steps, you can successfully install a rear discharge toilet in your bathroom. Remember to always refer to the manufacturer’s instructions for any specific guidelines or recommendations. Now that you’re equipped with the knowledge and steps to install a rear discharge toilet, you can enjoy the benefits of a sleek and space-saving bathroom fixture.
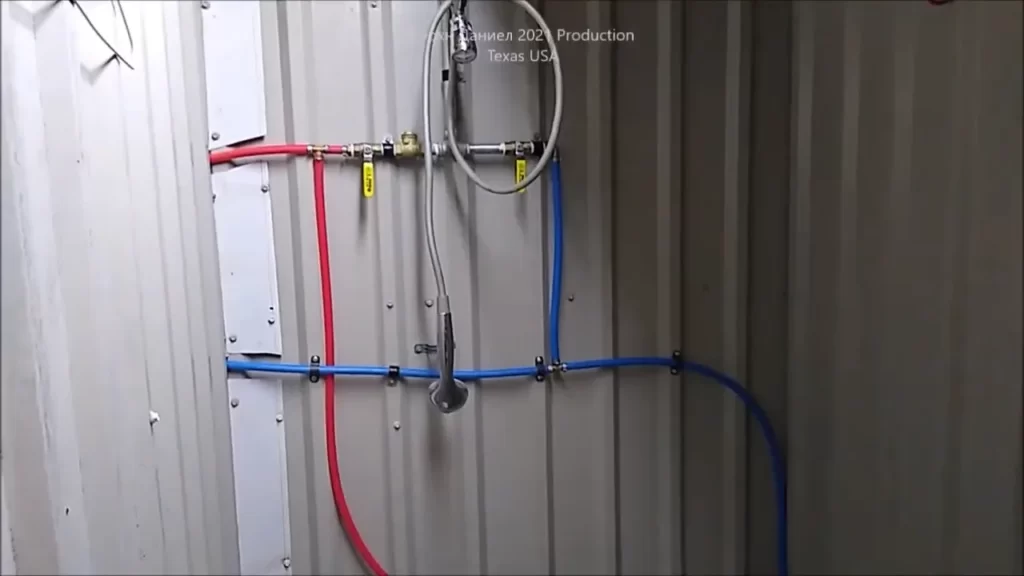
Connecting The Water Supply
Once you have successfully installed the rear discharge toilet and have it in place, the next step is to connect the water supply. This crucial step ensures that water flows into the toilet tank, allowing it to function properly. Here’s how you can connect the water supply to your rear discharge toilet:
Installing a new water supply line
The first thing you need to do is install a new water supply line. This line connects the supply valve on your wall to the fill valve on the toilet tank. Follow these steps to get it set up:
- Before you begin, make sure to turn off the water supply at the main shut-off valve.
- Measure and cut the new supply line to the appropriate length.
- Attach one end of the supply line to the fill valve on the toilet tank.
- Attach the other end of the supply line to the supply valve on your wall. Make sure to use a wrench to secure the connection.
- Once the supply line is securely connected, turn on the water supply at the main shut-off valve.
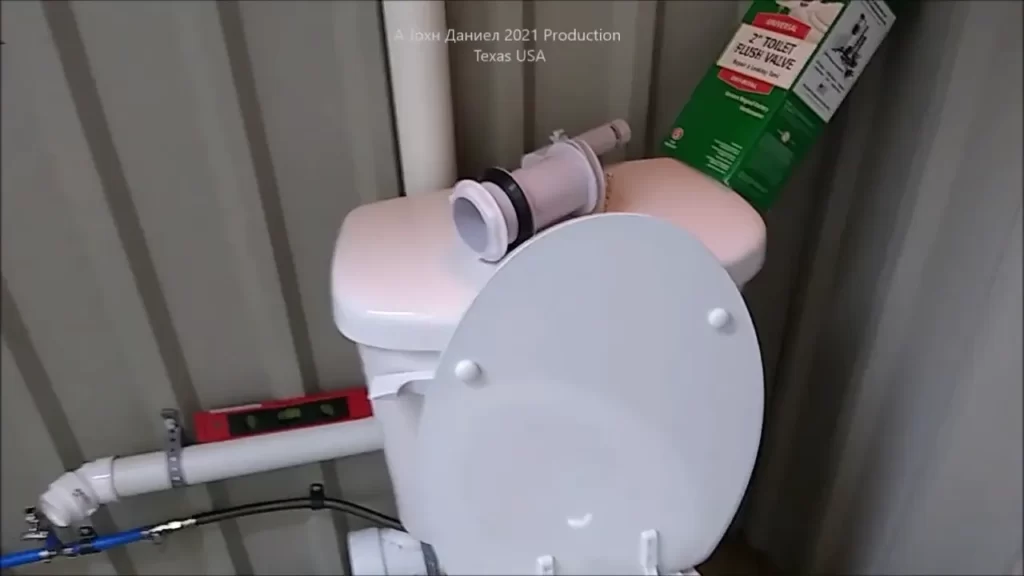
Adjusting the water level and flushing mechanism
Once the water supply is connected, you’ll need to adjust the water level and flushing mechanism to ensure optimal performance. Here’s what you need to do:
- Remove the toilet tank lid to access the flushing mechanism.
- Locate the water level adjustment screw on the fill valve. This screw allows you to adjust the height of the water in the tank.
- Turn the adjustment screw clockwise to raise the water level or counterclockwise to lower it. Aim for a water level that is about ½ inch below the top of the overflow tube.
- Test the flushing mechanism by flushing the toilet and observing the water flow. Make adjustments as necessary to ensure a proper flush.
- Once you’re satisfied with the water level and flushing mechanism, replace the toilet tank lid and make sure it is securely in place.
By following these steps, you can successfully connect the water supply to your rear discharge toilet. This ensures that your toilet functions properly and provides efficient flushing with each use.
Testing And Troubleshooting
Once you have successfully installed your rear discharge toilet, it’s crucial to perform a series of tests and troubleshooting steps to ensure it is functioning properly. This will help to prevent any future issues and ensure the longevity of your toilet’s performance. In this section, we will cover the essential steps of testing for leaks and ensuring proper functionality.
Checking for leaks
After the installation is complete, you must conduct a thorough check to ensure there are no leaks. Even the smallest leak can cause significant damage over time. Here’s how to check for leaks:
- Inspect the water supply line connections. Ensure that the connections are tightly secured and free from any signs of leakage.
- Look for any water puddles around the base of the toilet. If you notice any water on the floor, it could indicate a leak.
- Examine the wax ring seal between the toilet and the drain flange. Make sure there are no visible gaps or signs of water leakage.
- Check the tank and bowl for any cracks or damage. Even the smallest crack can lead to leaks. Give extra attention to the tank, as it holds a significant amount of water.
If you find any leaks during the inspection, it’s important to resolve them promptly. Leaks can lead to water damage, increased water bills, and even mold growth. Depending on the severity of the leak, you might need to replace faulty seals, tighten connections, or consult a professional plumber.
Testing the flush and ensuring proper functionality
Proper functionality of your rear discharge toilet relies on a smooth and efficient flushing system. Follow these steps to test the flush and ensure everything is in working order:
- Remove the tank lid and examine the flapper valve. Ensure it is properly aligned and seated on the flush valve.
- Flush the toilet several times to observe the water flow. The water should evacuate the bowl swiftly and completely without any obstruction or backup.
- Listen for any unusual sounds during the flushing process, such as gurgling, hissing, or water hammer. Such sounds might indicate an issue with the flushing mechanism or water pressure.
- Inspect the refill tube and the float valve in the toilet tank. The refill tube should be securely attached, and the float valve should shut off the water flow when the tank is full.
If you encounter any problems during the flush test or discover that something is not working as it should, there are a few possible solutions. First, check if there are any clogs or blockages in the drain line. If necessary, use a plunger or a drain snake to remove the obstruction. If the issue persists, it could be related to the flapper valve, tank components, or water supply. Consulting a professional plumber might be necessary to resolve the problem.
Tips And Best Practices For Maintenance
Maintaining a rear discharge toilet is essential to keep it functioning properly and ensure its longevity. By following these tips and best practices, you can keep your toilet in top shape and avoid common issues. In this section, I will cover regular cleaning and maintenance tips, as well as troubleshooting common problems.
Regular Cleaning and Maintenance Tips
- Regularly cleaning your rear discharge toilet is crucial in maintaining its performance. Use a mild cleaner and a soft cloth to clean the external surfaces of the toilet.
- Pay special attention to cleaning the discharge outlet and the nozzle, as these areas can get clogged over time. Use a toilet brush or a soft bristle brush to remove any debris.
- Inspect the flapper valve regularly to ensure it is functioning properly. If you notice any signs of wear or damage, consider replacing it to prevent leaks.
- Check the water level in the tank to ensure it is properly adjusted. The water level should be 1 inch below the overflow tube. Adjust the float or fill valve if necessary.
- Test the flush mechanism periodically to make sure it is working smoothly. If you experience any issues, such as weak flushing or incomplete flushes, check for any blockages and clean the toilet thoroughly.
- Consider using a toilet bowl cleaner specifically designed for rear discharge toilets. These cleaners can effectively remove stains and bacteria without damaging the toilet’s surfaces.
Troubleshooting Common Issues
Despite regular maintenance, issues may arise with your rear discharge toilet. Here are some common problems and their solutions:
| Issue | Solution |
|---|---|
| The toilet is not flushing properly. | Check for any blockages in the discharge outlet and clean it thoroughly. If the issue persists, there might be a problem with the flush valve or the flush handle mechanism. Contact a professional plumber for assistance. |
| The toilet is leaking. | Inspect all the connections, including the toilet tank bolts and the water supply line. Tighten any loose connections or replace faulty parts if necessary. If the leak persists, seek professional help to identify the source of the leakage. |
| The toilet is constantly running. | Check the toilet flapper and adjust or replace it if needed. Ensure that the chain connecting the flapper to the flush handle is properly adjusted. If the issue continues, there may be a problem with the fill valve, requiring professional attention. |
By following these maintenance tips and troubleshooting common issues, you can maintain the performance and durability of your rear discharge toilet. Remember to regularly check and clean the toilet, and promptly address any problems that arise to prevent further damage and ensure a properly functioning toilet for years to come.
Frequently Asked Questions
How Do Rear Discharge Toilets Work?
Rear discharge toilets work by flushing waste out through an outlet located at the back of the toilet bowl. This design allows for easier installation in spaces where a traditional floor-mounted toilet is impractical. The waste is directed horizontally through a waste pipe, which connects to the plumbing system.
Do You Use A Wax Ring On A Rear Discharge Toilet?
Yes, a wax ring is typically used on rear discharge toilets to create a watertight seal between the toilet and the floor. It helps prevent leaks and ensures proper functioning.
Can You Have A Toilet Without A Waste Pipe?
Yes, you can have a toilet without a waste pipe. There are alternative systems like composting toilets that don’t require a waste pipe. These toilets use natural processes to break down waste into compost, making them suitable for areas without access to traditional plumbing.
What Is The Pipe At The Back Of The Toilet?
The pipe at the back of the toilet is called the water supply line. It connects the toilet tank to the water source, allowing water to flow into the tank for flushing.
Conclusion
Installing a rear discharge toilet may seem like a daunting task, but with the right tools and a step-by-step guide, it can be a successful DIY project. By following the instructions provided in this blog post, you can ensure that your bathroom remains clean and free from any plumbing issues.
The rear discharge toilet offers a convenient and efficient solution for those looking to optimize their bathroom space. Don’t hesitate to give it a try and enjoy the benefits it brings!