
To install a prehung interior door, first measure and mark the height and width of the door frame, then attach the hinges and insert the door into the opening.
Understanding The Basics Of Prehung Doors
Understanding the Basics of Prehung Doors
When it comes to installing a new interior door, understanding the basics of prehung doors is crucial. Prehung doors come as a complete unit, including the door slab, frame, hinges, and hardware, making the installation process much easier and more efficient. In this article, we will explore the definition and features of prehung interior doors, the advantages they offer over traditional doors, and the common materials and styles available.
Definition and Features of Prehung Interior Doors
A prehung interior door is a door that is already attached to its frame and pre-drilled for the hinges and hardware. This means that when you purchase a prehung door, you receive the door slab, frame, hinges, and hardware all in one package. The frame is typically made of wood or composite material and comes with pre-cut holes for the hinges and hardware, ensuring a perfect fit.
By opting for a prehung door, you save time and effort in measuring, cutting, and attaching the frame to the door. The door is ready to install straight out of the box, making it an ideal choice for both DIY enthusiasts and professionals.
Advantages of Using Prehung Doors over Traditional Doors
There are several advantages to choosing prehung doors over traditional doors:
- Easy Installation: With a prehung door, installation becomes a breeze. The door is already aligned and attached to the frame, reducing the risk of misalignment.
- Time-Saving: Installing a prehung door takes significantly less time compared to traditional doors. The pre-made frame eliminates the need for measuring and cutting, allowing for a faster installation process.
- Improved Insulation: Prehung doors provide better insulation compared to traditional doors. The tight fit between the door slab and frame helps to minimize drafts and increase energy efficiency.
- Enhanced Appearance: Prehung doors offer a seamless and professional look, thanks to the precise construction and alignment. The frame and door come together seamlessly, providing an aesthetically pleasing finish.
Common Materials and Styles of Prehung Doors
Prehung doors are available in various materials and styles to suit different preferences and design aesthetics. Here are some common options to consider:
| Material | Features |
|---|---|
| Wood | Classic and timeless appearance with natural beauty. Can be stained or painted to match any interior style. |
| Fiberglass | Durable and low-maintenance. Resistant to dents, warping, and moisture. Ideal for high-traffic areas. |
| Hollow Core | Lightweight and cost-effective option. Provides basic insulation and is commonly used for interior applications. |
| Solid Core | Heavy and offers better soundproofing and insulation. Suitable for bedrooms, offices, or areas that require more privacy. |
When it comes to style, prehung doors are available in various designs such as panel, glass, or flush doors. Panel doors have raised or recessed panels that add depth and character to a room. Glass doors allow for natural light to flow while maintaining privacy, and flush doors offer a sleek and modern look.
Measuring And Ordering The Right Door Size
Accurate measuring techniques and ordering the correct size are crucial steps when it comes to installing a prehung interior door. Taking precise measurements ensures a proper fit, while ordering the correct door size guarantees a smooth installation process. In this section, we will explore the accurate measuring techniques for prehung interior doors and share some tips for ordering the correct door size.
Accurate Measuring Techniques for Prehung Interior Doors
Before ordering your prehung interior door, it’s essential to measure the door opening accurately. By following these accurate measuring techniques, you can ensure a perfect fit for your new door:
- Measure the width: Use a tape measure to measure the width of the door opening. Measure the distance between the two sides of the door frame, including any trim or casing.
- Measure the height: Measure the height of the door opening from the top of the floor to the underside of the door frame header. Again, include any trim or casing in your measurement.
- Measure the depth: Measure the depth of the wall from the existing door frame to the next wall stud. You will need this measurement to determine the jamb depth needed for your prehung door.
By taking accurate measurements of the width, height, and depth of your door opening, you can ensure that the prehung interior door you order will fit perfectly.
Tips for Ordering the Correct Door Size
Ordering the correct door size is crucial for a hassle-free installation process. Here are some tips to keep in mind when ordering your prehung interior door:
- Double-check your measurements: After taking accurate measurements, double-check them to ensure their accuracy. Even a small measurement error can lead to an ill-fitting door.
- Consider the door swing: Determine whether you need a left-handed or right-handed door based on the swing direction. Stand inside the room and imagine the door swinging towards you. If the hinges are on the left side, you need a left-handed door, and vice versa.
- Account for flooring thickness: If you are installing new flooring, consider its thickness when ordering your door. This is important to ensure that the bottom of the door clears the flooring once installed.
- Consult a professional if unsure: If you are unsure about the measurements or any other aspect of ordering the right door size, it’s always a good idea to consult a professional. They can provide guidance and help you make the best selection.
By following these tips, you can be confident that you are ordering the correct door size for your prehung interior door installation.
Gathering The Necessary Tools And Materials
Before you begin the installation process of a prehung interior door, it’s important to gather all the necessary tools and materials. Having everything you need in one place will make the process smoother and ensure a professional installation. In this section, we will discuss the essential tools needed for installing a prehung interior door and additional materials required for a professional installation.
Essential tools needed for installing a prehung interior door
To install a prehung interior door successfully, you will need the following tools:
- Tape measure
- Level
- Hammer
- Screwdriver
- Chisel
- Power drill
- Door knob and lockset installation kit
- Safety goggles and gloves
These tools are essential for measuring the door frame, ensuring it is level, and making necessary adjustments for a proper fit. Additionally, the door knob and lockset installation kit will come in handy for attaching the necessary hardware to the door.
Additional materials required for a professional installation
Aside from the tools mentioned above, you will also need the following materials:
- Prehung interior door
- Shims
- Screws
- Nails
- Wood filler
- Paint or stain
The prehung interior door is obviously the main component of the installation process. Shims are used to ensure the door is leveled and properly aligned within the frame. Screws and nails will be necessary for securing the door and attaching any necessary hardware. Wood filler will come in handy for filling any gaps or holes, creating a seamless appearance. Lastly, you may need paint or stain to finish the door according to your desired aesthetics.
By gathering all the necessary tools and materials beforehand, you can save time and avoid any interruptions during the installation of your prehung interior door. With a properly equipped toolbox, you’ll be ready to embark on this DIY project confidently.
Removing The Old Door And Preparing The Opening
When it’s time to update the look of your home or replace a damaged interior door, installing a prehung interior door is a great option. One of the first steps in this process involves removing the old door and preparing the opening for the new one. This crucial step ensures that the installation will go smoothly and the door will fit properly. In this guide, we will walk you through the steps to remove an existing door and door frame and prepare the doorway for the prehung door installation.
Steps to Remove an Existing Door and Door Frame
Before installing the new prehung interior door, you need to remove the old door and door frame. Here are the steps to follow:
- Begin by opening the door and removing any hardware attached to it, including hinges, doorknobs, and strike plates. This can be done using a screwdriver or a power drill.
- Once the door is free from hardware, carefully remove the hinge pins by tapping them upwards with a hammer and flathead screwdriver. This will loosen the hinges and allow you to remove the door.
- Next, locate the nails or screws that secure the door frame to the wall. This may involve removing trim or molding around the frame. Use a pry bar or a hammer to gently remove the nails or screws, taking care not to damage the surrounding wall.
- Once the door frame is free from the wall, use a pry bar to carefully pry it away from the opening. Start at the top and work your way down, taking care not to damage the wall or surrounding trim.
- With the door frame removed, inspect the opening for any remaining nails, screws, or debris. Clean out the opening thoroughly to ensure a clean and smooth surface for the new prehung door.
Preparing the Doorway for the Prehung Door Installation
Now that you’ve successfully removed the old door and door frame, it’s time to prepare the doorway for the prehung door installation. Follow these steps:
- Measure the height, width, and depth of the doorway to ensure that the new prehung door will fit properly. Take into account any variations in floor level or wall thickness.
- If necessary, adjust the size of the opening by trimming the drywall or adding shims to create a level and plumb surface. This will ensure that the new prehung door fits snugly in the doorway.
- Before installing the new prehung door, remove any existing insulation or weatherstripping from the door frame. This will allow for a clean and secure fit.
- Inspect the door frame for any damage or rot. If necessary, repair or replace the door frame to ensure a sturdy and secure installation.
- Clean the opening and remove any dust or debris. A clean surface will help the new prehung door fit properly and ensure a smooth installation.
Following these steps will help you successfully remove an existing door and door frame, as well as prepare the doorway for the installation of a prehung interior door. With the old door removed and the opening properly prepared, you are now ready to move on to the next step in the installation process. Stay tuned for our next blog post, where we will walk you through the steps to install the prehung door and complete the project.
Installing The Door Frame And Frame Components
Installing the Door Frame and Frame Components
When it comes to installing a prehung interior door, one of the most crucial steps is to properly install the door frame and its components. The door frame provides the structure and support for the door, ensuring a secure and proper fit. In this section, we will guide you through the process of securing the door frame to the opening, attaching door jamb extensions, and using shims for a precise fit.
Securing the door frame to the opening
To begin with, you will need to position the prehung door frame into the opening. This can be done by sliding the frame into the opening and ensuring that it is centered and level. Once you have achieved the desired position, it’s time to secure the frame in place.
1. Screw in the hinges: Using a screwdriver or a drill, secure the hinges to the door jamb. Ensure that the screws are long enough to reach the framing behind the jamb for added stability. This step will help keep the door in place while you continue with the installation process.
Attaching door jamb extensions and shims for a proper fit
After securing the door frame, you might need to attach door jamb extensions and use shims to achieve a proper fit. These components play a vital role in ensuring that the door fits snugly and functions correctly. Here’s how you can do it:
1. Door jamb extensions: Measure the distance between the door frame and the wall, and cut the jamb extension to fit this measurement. Attach the jamb extension to the door frame, making sure it is flush with the edge. Use screws to secure the extension in place. Repeat this step for each side of the door frame.
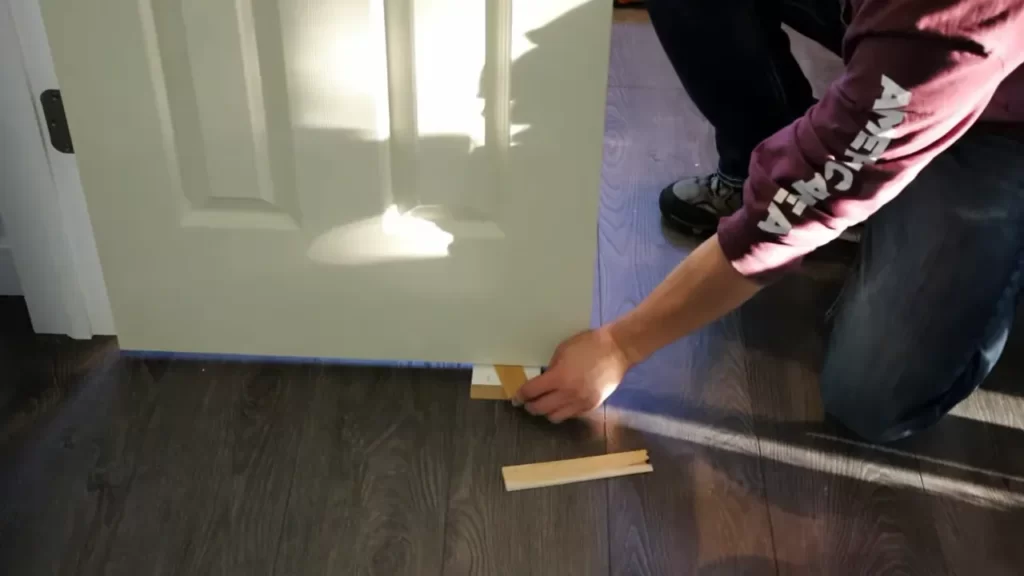
2. Shimming the door frame: Shims are used to adjust the alignment and plumbness of the door frame. Start by inserting shims between the door frame and the rough opening, placing them at strategic points such as near the hinges and strike plate area. Gradually adjust the shims until the door frame is plumb and square. Use a level to ensure it is aligned correctly.
In conclusion, properly installing the door frame and its components is crucial for a successful prehung interior door installation. By securing the door frame to the opening and using door jamb extensions and shims for a proper fit, you can ensure a sturdy and functional door that enhances the aesthetics of your space. Follow these steps diligently, and you’ll be on your way to enjoying a beautifully installed prehung interior door in no time.
Hanging And Adjusting The Prehung Door
Positioning the door in the frame and attaching hinges
Once you have prepared the doorway by removing the old door and cleaning the opening, it’s time to hang the prehung interior door. This process involves positioning the door in the frame and attaching the hinges. Let’s dive into the steps:
- Start by positioning the door in the doorway, ensuring that it is centered and plumb. You can use shims to level the door if necessary. A well-aligned door will not only look aesthetically pleasing but also function properly.
- Secure the prehung door in place using temporary nails or clamps to keep it steady during the installation process. This will prevent any unwanted movement while attaching the hinges.
- Attach the hinges to the door frame by aligning them with the corresponding hinge mortises on the door. Start by inserting the screws through the hinge holes and tightening them gradually. Ensure that the hinges are fully flush with the door frame to maintain stability.
- Pay attention to the positioning and alignment of the hinges. They should be evenly spaced and positioned at the same height to ensure proper door functioning.
Adjusting the doors for proper alignment and operation
After attaching the hinges, the next step is to adjust the prehung door to ensure proper alignment and operation. This step is crucial for the door to open and close smoothly without any binding or sticking. Here’s how you can do it:
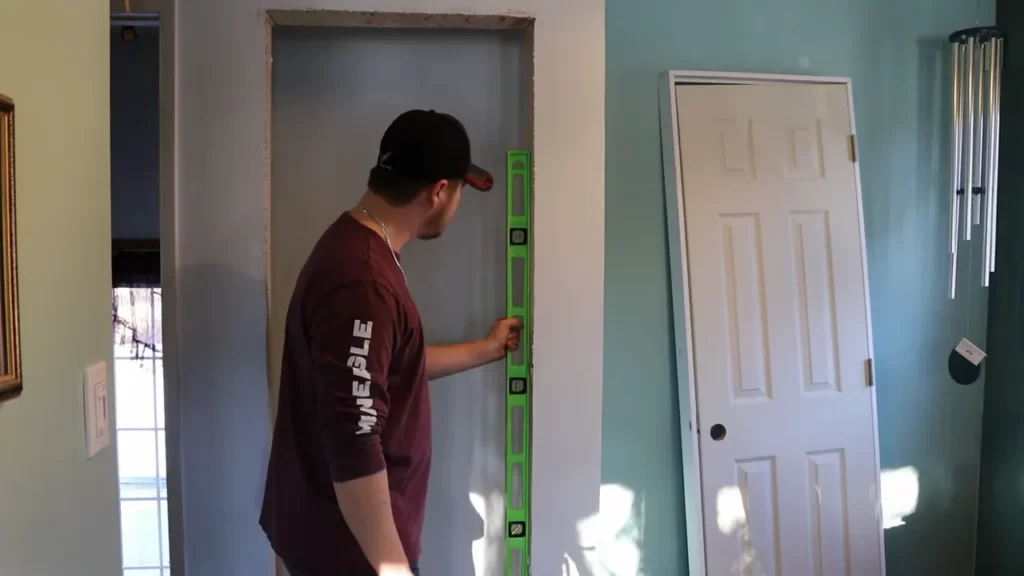
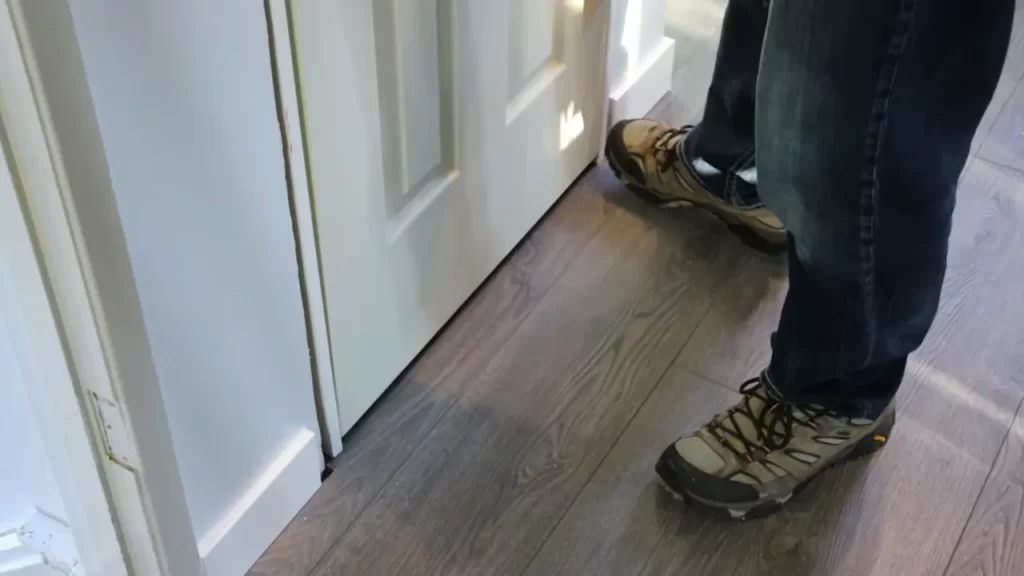
- Check the clearance between the door and the frame. The gap around the door should be consistent and equal on all sides. Adjust the positioning of the shims if necessary to achieve even spacing.
- Test the door’s swing by slowly opening it. Make sure it opens and closes smoothly without any resistance. If you notice any rubbing or sticking, adjust the hinges and shims accordingly to eliminate the issue.
- Use a level to check the vertical alignment of the door. It should be perfectly plumb. Adjust the shims as needed to achieve optimal alignment.
- Verify that the door latches properly by closing it and checking for any gaps between the door and the strike plate. If there is a gap, adjust the strike plate or latch assembly until the door latches securely.
- Lastly, make any final adjustments to ensure the prehung door is aligned, operates smoothly, and fits snugly within the door frame. Take your time during this step to ensure a properly installed and functioning interior door.
By carefully following these steps to position, attach, and adjust the prehung interior door, you can achieve a professional-looking installation that enhances the overall appearance and functionality of your space.
Installing The Door Hardware And Finishing Touches
Installing the Door Hardware and Finishing Touches
Once you have successfully hung your prehung interior door, it’s time to move on to the final steps of the installation process. This involves installing the door handle, lockset, and other hardware, as well as adding finishing touches such as trim and weatherstripping. These steps are crucial in ensuring your door not only functions properly but also enhances the overall aesthetic of your interior space.
Installing the door handle, lockset, and other hardware
To complete your prehung interior door installation, you’ll need to install the necessary hardware components. This includes the door handle, lockset, and any additional hardware specific to your door, such as hinges or a doorstop. Here’s a simple step-by-step guide to help you with this process:
- Start by placing the strike plate on the door jamb, making sure it aligns properly with the door latch. Secure it in place using the provided screws.
- Next, attach the door handle and lockset to the door using the manufacturer’s instructions. Make sure the components are installed securely and function smoothly.
- If your door requires additional hardware, such as hinges or a doorstop, install them according to the manufacturer’s instructions as well. Ensure that these components are firmly attached and properly aligned.
Remember, it’s crucial to follow the manufacturer’s instructions for your specific door and hardware components to ensure a proper and secure installation. Taking the time to install the door handle, lockset, and other hardware correctly will save you from any future headaches and ensure your door functions smoothly.
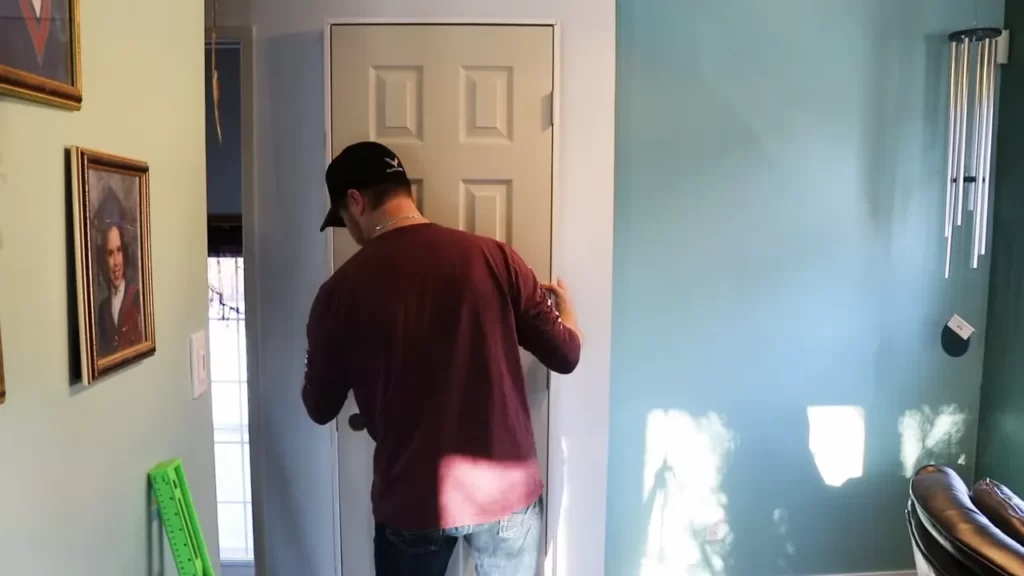
Adding finishing touches such as trim and weatherstripping
Once the door hardware is in place, it’s time to add those final touches that will elevate the look and functionality of your prehung interior door. This includes installing trim and adding weatherstripping. Here’s how you can complete these finishing touches:
- Measure and cut your trim pieces to fit around the door frame. Use a miter saw to achieve clean and precise cuts.
- Attach the trim pieces to the door frame using a nail gun or finishing nails. Make sure they are flush with the door frame for a seamless and professional look.
- Add weatherstripping to the door frame to improve energy efficiency and reduce drafts. Measure the lengths needed and cut the weatherstripping accordingly. Attach it to the door jamb using adhesive or nails, ensuring a tight seal.
By adding the finishing touches of trim and weatherstripping, you not only create a polished and refined look but also improve the door’s insulation properties. This will help keep your interior space comfortable and energy-efficient.
In conclusion, installing the door handle, lockset, and other hardware, as well as adding finishing touches such as trim and weatherstripping, are crucial steps in completing the installation of a prehung interior door. By following the manufacturer’s instructions and taking the time to ensure proper alignment and secure attachment, you’ll enjoy a functional and visually appealing door that enhances your interior space.
Best Practices For A Smooth And Efficient Installation
Installing a prehung interior door may seem like a daunting task, but with the right techniques and attention to detail, you can achieve professional results. To help you along the way, here are some best practices that will ensure a smooth and efficient installation process.
Common mistakes to avoid during the installation process
While installing a prehung interior door, it’s important to be aware of common mistakes that can compromise the quality of the finished result. By avoiding these mistakes, you can save time and effort while achieving a professional-looking outcome:
- Rushing through the measurements: Properly measuring the doorway is crucial for a snug fit. Take your time to ensure accurate measurements before proceeding with the installation.
- Neglecting to check the rough opening: Before installing the door, inspect the rough opening to ensure it is level, plumb, and square. Any discrepancies can cause the door to operate improperly.
- Forgetting to reinforce the area around the hinges: Reinforcing the area around the hinges will prevent them from sagging over time. This step is often overlooked but can significantly improve the door’s longevity and performance.
- Using the wrong type of screws or nails: Choosing the correct fasteners is essential for securely attaching the door frame. Be sure to use screws or nails specifically designed for this purpose.
- Skipping the weatherstripping: Installing weatherstripping helps insulate the room and reduces drafts. Don’t forget this essential step for a more energy-efficient interior door.
Tips for ensuring a professional finish and long-lasting results
To achieve a professional finish and ensure long-lasting results, follow these helpful tips:
- Prepare the door and frame properly: Prior to installation, remove any protective packaging and inspect the door for any defects or damage. Sand down any rough edges and apply a coat of primer or paint if desired.
- Secure the hinges: Ensure that the hinges are properly aligned and securely tightened. This will prevent the door from sagging or sticking, ensuring smooth operation.
- Use shims effectively: Properly placed shims can help ensure a plumb and level installation. Take your time to adjust the shims as necessary, making small adjustments as needed to achieve a perfect fit.
- Check the swing direction: Confirm that the door swings in the desired direction before securing it in place. This will prevent the need for any last-minute adjustments once the door is installed.
- Apply a finishing touch: After the door is installed, add the finishing touches such as installing trim and any additional hardware. This will give the door a polished and professional appearance.
By following these best practices and avoiding common mistakes, you can confidently install a prehung interior door that not only enhances the aesthetics of your space but also functions flawlessly for years to come. Take your time, pay attention to detail, and enjoy the satisfaction of a job well done.
Troubleshooting Common Door Installation Issues
Installing a prehung interior door can be a satisfying DIY project, but it’s not uncommon to encounter some challenges along the way. Fortunately, most common door installation issues can be easily addressed with a little know-how. In this section, we’ll explore solutions to common problems like sticking doors or misaligned frames, as well as how to address issues with door hardware or accessories. By following these troubleshooting tips, you’ll be well-equipped to tackle any hurdles that may arise during your door installation process.
Solutions to Common Problems like Sticking Doors or Misaligned Frames
Sticking doors and misaligned frames are two common issues that can hinder the smooth operation of your newly installed door. If you find that your door is sticking or doesn’t open and close properly, it’s important to identify the root cause in order to find an appropriate solution. Here are some troubleshooting tips for these common problems:
Sticking Doors
- Check for any obstructions that may be preventing the door from fully closing, such as loose screws, debris, or weatherstripping. Remove any obstructions and ensure the door swings freely without any resistance.
- Inspect the door and frame for any signs of warping or swelling, which can cause the door to stick. If you notice any issues, you may need to sand down the affected areas or make adjustments to the frame to ensure a proper fit.
- Apply a lubricant, such as silicone spray or graphite powder, to the hinges, latch, and strike plate to reduce friction and help the door open and close smoothly.
Misaligned Frames
If the door frame is not properly aligned, it can result in a door that doesn’t close properly or has gaps along the edges. Here are a couple of solutions to address misaligned frames:
- Use shims to adjust the position of the frame. Insert shims between the frame and the rough opening to ensure it is plumb, level, and square. This will help to align the door properly within the frame.
- Check the hinges to ensure they are properly installed and securely attached to the frame. If necessary, adjust the position of the hinges to align the door properly within the frame.
How to Address Issues with Door Hardware or Accessories
In addition to problems with the door itself, you may also encounter issues with door hardware or accessories during the installation process. Here are some troubleshooting tips to help you address these common problems:
Door Hardware
- If the door handle or lockset is loose or not functioning properly, tighten the screws or replace any worn-out components. Ensure that the hardware is installed correctly according to the manufacturer’s instructions.
- If the door doesn’t latch properly, check the alignment of the strike plate. If needed, adjust the position of the strike plate to ensure a proper latch.
Accessories
- If you’re installing a door with additional accessories, such as a peephole, doorstop, or kick plate, ensure that they are properly aligned and securely attached to the door.
- If the door closer doesn’t function properly, check the installation and adjust the tension according to the manufacturer’s instructions.
By following these troubleshooting tips, you’ll be able to overcome common door installation issues and ensure a successful and functional installation of your prehung interior door. Remember to take your time, read the manufacturer’s instructions carefully, and seek professional help if needed. Happy door installing!
Benefits Of Diy Installation Vs. Hiring A Professional
Installing a prehung interior door can be a rewarding and cost-effective project for homeowners. While hiring a professional installer may seem like the most convenient option, there are several benefits to consider when opting for a DIY installation. In this section, we will explore the pros and cons of DIY door installation as well as instances where it may be advisable to hire a professional.
Pros and cons of DIY door installation
Pros:
- Cost savings: One of the main advantages of DIY door installation is the potential for significant cost savings. By eliminating the need for professional labor, homeowners can allocate their budget towards purchasing higher quality doors or other home improvement projects.
- Sense of accomplishment: Installing a prehung door on your own can be a rewarding experience. It allows homeowners to take pride in their handiwork and gain valuable DIY skills.
- Flexibility and convenience: DIY installations offer the flexibility to work at your own pace and schedule. You can also make adjustments or modifications during the installation process to ensure the door fits perfectly in your space.
Cons:
- Time and effort: DIY door installation requires time and physical effort. It involves measuring, cutting, leveling, and fastening, which can be time-consuming and labor-intensive.
- Learning curve: If you have little to no experience with door installations, there may be a learning curve associated with the project. It is important to carefully follow installation instructions and seek assistance if needed.
- Potential mistakes: Without professional expertise, there is a higher risk of making mistakes during installation. These errors could result in poor functionality, aesthetic flaws, or the need for additional repairs down the line.
When it may be advisable to hire a professional installer
While DIY installation has its advantages, there are circumstances where hiring a professional may be the smarter choice:
- Complex installations: If the project involves complex features such as customizations, unusual door sizes, or intricate hardware installations, it may be best to hire a professional who has the expertise and tools to handle these challenges effectively.
- Time constraints: If you have a tight schedule and cannot dedicate sufficient time to the installation process, hiring a professional can save you valuable time and help ensure the job is completed quickly and efficiently.
- Physical limitations: Some homeowners may have physical limitations or health conditions that make it difficult to perform the physical tasks associated with door installation. Hiring a professional can help avoid unnecessary strain or injury.
- Warranty and guarantees: Professional installers often provide warranties or guarantees on their work, providing added peace of mind and protection for homeowners.
Ultimately, the decision to tackle a DIY prehung interior door installation or hire a professional boils down to your comfort level, budget, and the complexity of the project. Assessing the pros and cons, as well as considering the specific circumstances, will help you make an informed choice that suits your needs.
Frequently Asked Questions
Are Prehung Doors Easy To Install?
Yes, prehung doors are easy to install. They come with the frame and hinges already attached, making installation straightforward. By following the provided instructions, even DIY beginners can successfully install prehung doors without too much difficulty.
Should You Screw Or Nail A Prehung Door?
Screw the Prehung door. Fastening with screws provides better stability and security than nails.
Does A Prehung Door Include The Frame?
Yes, a Prehung door does include the frame.
How To Install A Home Depot Prehung Door?
To install a Home Depot prehung door, follow these steps: 1. Measure the door opening and ensure it fits the door dimensions. 2. Remove the old door and frame if necessary. 3. Insert the new prehung door into the opening.
4. Shim and level the door, ensuring it is plumb and square. 5. Secure the door with screws, install the hardware, and test it for smooth operation.
Conclusion
Installing a prehung interior door may seem daunting at first, but with the right tools and steps, it can be a relatively straightforward process. By following the guidelines in this guide, you can save money and time by installing the door yourself.
Remember to measure carefully, make necessary adjustments, and secure the door properly. With a little patience and attention to detail, you’ll have a beautiful, functional interior door that enhances the look and functionality of your home. Happy installing!