To install a pop-up sink drain, start by removing the old drain assembly. Then, apply plumber’s putty to the new drain and insert it into the sink drain hole.
Finally, connect the drain pipe to the new assembly and tighten the connections. Are you tired of dealing with a leaky sink drain or simply want to upgrade your current one? Installing a pop-up sink drain is a straightforward process that can be done in a few simple steps.
By following these steps, you can have a functional and stylish sink drain in no time. We will guide you through the installation process, from removing the old drain assembly to connecting the new one. So, let’s get started and make your sink drain installation a breeze.
Things To Consider When Selecting A Pop Up Sink Drain
When it comes to installing a pop up sink drain, it’s essential to choose the right one that not only fits seamlessly with your sink but also offers durability and style. With numerous options available in the market, selecting the perfect pop up sink drain can seem overwhelming. To make your decision easier, consider the following factors:
Material and Durability
One of the important factors to consider when choosing a pop up sink drain is the material it is made of and its durability. The material used will determine the product’s longevity and resistance to corrosion and discoloration. Common materials for sink drains include stainless steel, brass, and plastic. Stainless steel is a popular choice for its strength and resistance to rust, while brass offers durability and an attractive appearance. On the other hand, plastic drains are more affordable but may not offer the same level of durability as metal options. Consider your budget and preferences when selecting the material for your pop up sink drain.
Size and Compatibility with Your Sink
Ensuring the pop up sink drain you choose is the right size and compatible with your sink is crucial. Measure the drain opening to determine the correct size you need. It’s important to select a drain that fits snugly into the opening to prevent leaks and ensure proper functionality. Additionally, consider the type of sink you have, whether it’s a bathroom sink or a kitchen sink, as the sizes and designs may vary. It’s always a good idea to check the manufacturer’s specifications to determine compatibility and ensure a proper fit.
Style and Design Options
A pop up sink drain not only serves a functional purpose but can also enhance the aesthetic appeal of your sink area. When selecting a drain, consider the style and design options available. There are various finishes to choose from, such as chrome, brushed nickel, and oil-rubbed bronze, each offering a distinct look. Additionally, consider the design of the drain, whether you prefer a sleek and modern style or a more traditional and ornate design. The right choice will complement your overall bathroom or kitchen decor, creating a cohesive look.

Gathering The Necessary Tools And Materials
Before you start installing a pop-up sink drain, it’s important to gather all the necessary tools and materials. Having everything at your fingertips will make the installation process much smoother and hassle-free. Here are the tools and materials you’ll need:
Adjustable Wrench
An adjustable wrench is an essential tool for installing a pop-up sink drain. It allows you to tighten or loosen nuts and fittings with ease. Make sure you have a quality adjustable wrench that fits securely around the various components of the drain.
Plumber’s Putty
To create a watertight seal between the sink and the pop-up drain, you’ll need plumber’s putty. This soft and moldable material is perfect for filling gaps and preventing water leakage. Be sure to choose a plumber’s putty that is specifically designed for sink installations.
Silicone Sealant
In addition to plumber’s putty, silicone sealant is another crucial component for a leak-free installation. Apply a thin bead of silicone sealant around the edges of the sink drain to ensure a tight seal. This will help prevent water from seeping into the cabinet below the sink.
Plumbers Tape
Plumbers tape, also known as Teflon tape, is a highly versatile tool that can come in handy during a pop-up sink drain installation. It is used to create a watertight seal on threaded fittings. Wrap a few layers of plumbers tape around the threads to prevent leaks and ensure a secure connection.
By gathering these tools and materials before you begin, you’ll be well-prepared to tackle the installation process. Having everything you need will save you time and frustration, allowing you to complete the project smoothly and with confidence.
Removing The Old Drain Assembly
Turning off the Water Supply
Before starting the process of removing the old drain assembly, it is important to turn off the water supply. This step is crucial to prevent any leaks or water damage during the installation process.
Removing the Existing Drain
Now that the water supply has been safely turned off, it’s time to remove the existing drain assembly. Follow these steps:
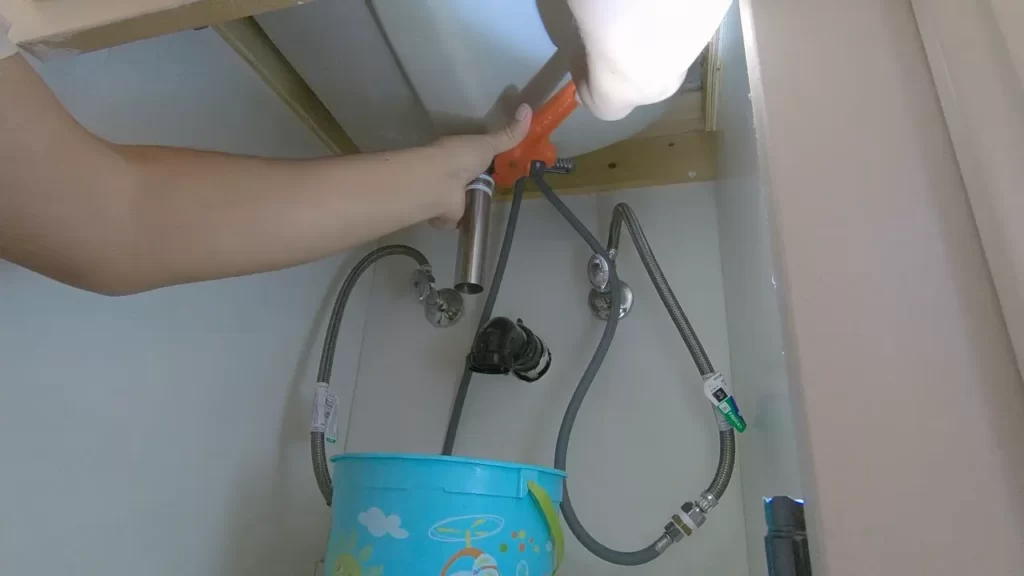
- Place a bucket or basin underneath the sink to catch any water that may still be in the pipes.
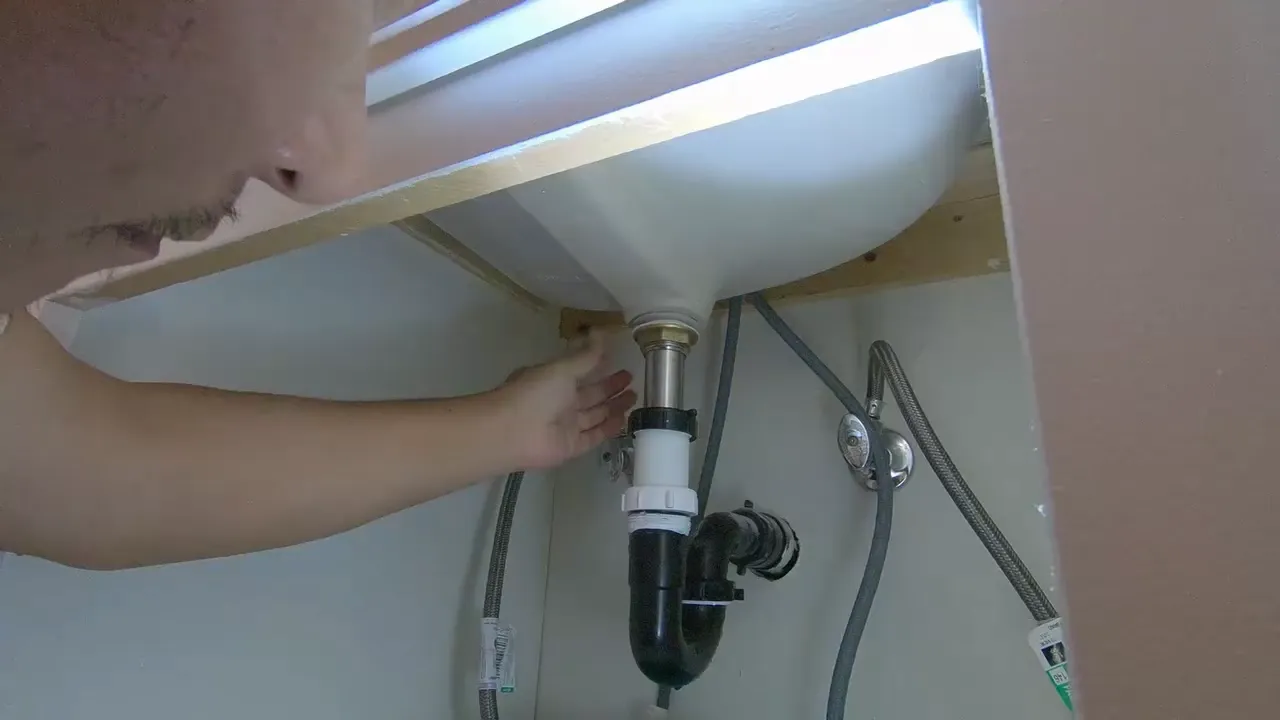
- Locate the nut connecting the drain tailpiece to the sink basket. It is typically found underneath the sink, near the bottom of the drain pipe.
- Using a wrench or pliers, loosen the nut in a counterclockwise direction. Be gentle to avoid damaging the drain pipe or other components.
- Once the nut is loosened, carefully pull the drain tailpiece away from the sink basket.
- Next, remove the nut connecting the sink basket to the bottom of the sink. This can also be done with a wrench or pliers.
- With the nut removed, gently lift the sink basket out of the sink.
- Inspect the drain opening in the sink and remove any old plumber’s putty or silicone sealant. Use a scraper or putty knife to scrape away any residue.
Cleaning the Sink Surface
Before proceeding with the installation of the new pop up sink drain, it is essential to clean the sink surface thoroughly. This will ensure proper adhesion and a watertight seal. Follow these simple steps:
- Use a mild, non-abrasive cleaner to remove any dirt, grime, or soap scum from the sink.
- Rinse the sink with warm water and dry it thoroughly with a clean cloth.
- Inspect the sink surface for any cracks or damage. If any issues are found, address them before installing the new drain assembly.
- Apply a bead of silicone sealant or plumber’s putty around the drain opening. This will help create a watertight seal and prevent leaks.
- Spread the sealant or putty evenly around the opening using your finger or a putty knife.
By following these steps, you can successfully remove the old drain assembly and prepare the sink for the installation of a new pop up sink drain. Remember to turn off the water supply, remove the existing drain components carefully, and thoroughly clean the sink surface for a smooth installation process.
Installing The New Pop Up Sink Drain
Installing the New Pop Up Sink Drain
Applying Plumbers Putty
To begin installing the new pop up sink drain, you will first need to apply plumbers putty. Plumbers putty is a soft, pliable substance that helps to create a watertight seal between the sink and the drain assembly. This prevents any leaks from occurring.
To apply plumbers putty, follow these steps:
1. Start by taking a small amount of plumbers putty and rolling it into a thin rope shape.
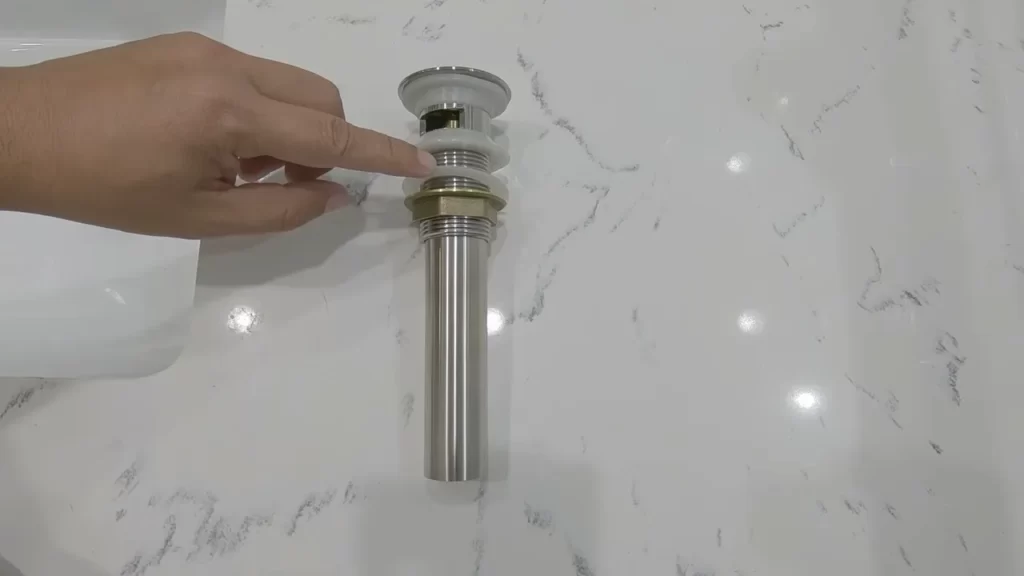
2. Next, place the putty around the base of the drain assembly where it will come into contact with the sink.
3. Gently press the drain assembly into the sink, ensuring that it fits securely.
4. Wipe away any excess putty that may have squeezed out around the edges.
Inserting the Drain into the Sink Hole
After applying the plumbers putty, you can now insert the drain into the sink hole. This step is crucial in ensuring the proper installation and function of the pop-up sink drain.
Follow these steps to insert the drain:
1. Position the drain assembly above the sink hole, ensuring that it is aligned properly.
2. Insert the drain into the sink hole and push it down firmly until it is flush with the sink surface.
3. If needed, use a wrench to tighten the locknut underneath the sink to secure the drain assembly in place.
4. Make sure the drain is centered in the hole to prevent any unwanted leaks.
Tightening the Drain Assembly
After inserting the drain into the sink hole, the next step is to tighten the drain assembly. This step helps to ensure that the drain is securely fastened to the sink, preventing any loosening or potential leaks.
Follow these steps to tighten the drain assembly:
1. Locate the tailpiece of the drain assembly underneath the sink.
2. Use an adjustable wrench to tighten the nut connecting the tailpiece to the drain assembly. Ensure it is tight enough to prevent any movement but be careful not to overtighten and cause damage.
3. Check the drain assembly for any wobbling or loosening. If necessary, tighten any other fittings or connections to ensure stability.
By following these steps, you have successfully installed a new pop-up sink drain. Remember to double-check for any leaks after completing the installation. If you notice any leaks, tighten the connections further or seek professional help if needed.
In conclusion, installing a new pop-up sink drain requires applying plumbers putty to create a watertight seal, inserting the drain into the sink hole, and tightening the drain assembly securely. By following these steps, you can ensure a properly functioning and leak-free sink drain in your home.
Connecting The Drain Pipe
Connecting the drain pipe is a crucial step in installing a pop-up sink drain. This involves applying plumbers tape to the drain pipe threads, attaching the drain pipe to the drain assembly, and checking for leaks. Follow these steps carefully to ensure a proper and leak-free installation.
Applying Plumbers Tape to the Drain Pipe Threads
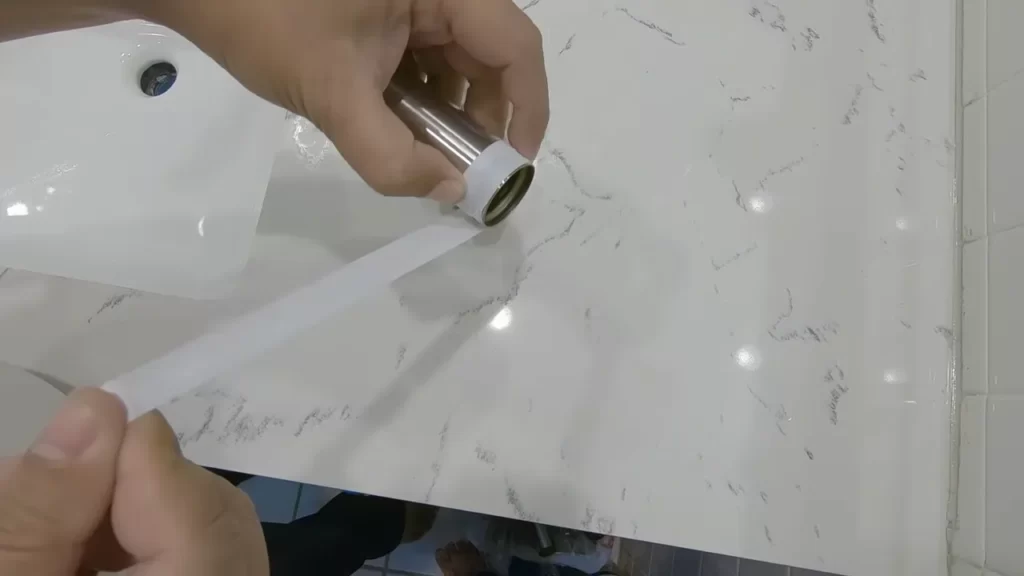
Before connecting the drain pipe, it’s important to apply plumbers tape to the drain pipe threads. Plumbers tape, also known as Teflon tape, helps create a tight seal between the threads and prevents leaks.
To apply plumbers tape:
- Start by cleaning the drain pipe threads to remove any dirt or debris.
- Hold the end of the plumbers tape and wrap it clockwise around the drain pipe threads.
- Wrap the tape around the threads 2-3 times, ensuring it overlaps slightly for a secure seal.
- Once wrapped, press the tape firmly against the threads to ensure it adheres properly.
Attaching the Drain Pipe to the Drain Assembly
After applying plumbers tape, it’s time to attach the drain pipe to the drain assembly. This step connects the sink basin to the plumbing system.
To attach the drain pipe:
- Apply a small amount of plumber’s putty around the drain opening on the sink basin. This helps create a watertight seal.
- Insert the drain pipe into the drain opening in the sink basin, aligning it properly.
- Tighten the drain nut by hand, making sure it is secure but not over-tightened.
- If necessary, use a pair of pliers to tighten the drain nut further, but be cautious not to damage the drain pipe or the sink basin in the process.
Checking for Leaks
Once the drain pipe is securely attached to the drain assembly, it’s important to check for leaks. This ensures that water will flow properly and prevent any potential water damage.
To check for leaks:
- Turn on the water and let it run for a few minutes.
- Inspect the connections between the drain pipe and the drain assembly for any signs of leaks.
- If you notice any leaks, tighten the connections slightly using pliers. Be careful not to overtighten, as this can cause damage.
- Continue checking for leaks until you are satisfied that everything is properly sealed and there are no leaks.
By following these steps and checking for leaks, you can ensure a successful installation of your pop-up sink drain. With proper installation, you can enjoy a functional and leak-free sink that adds convenience to your daily routine.
Troubleshooting Common Issues
<h2>Troubleshooting Common Issues</h2>
Installing a pop-up sink drain may seem like a straightforward task, but occasionally, you might encounter some common issues that can hinder the installation process. In this section, we will address these issues and provide you with simple troubleshooting tips to resolve them.
Leaks at the Connections
One of the most common issues when installing a pop-up sink drain is experiencing leaks at the connections. This can be a frustrating problem, but it is usually caused by minor mistakes that can be easily fixed. Here are a few troubleshooting steps to help you:
- Double-check the connections: Ensure that all the connections made during the installation are tightened properly. Use pliers or a wrench to tighten the nuts if needed. Avoid overtightening as it can damage the components.
- Inspect the rubber gaskets: Leaks can occur if the rubber gaskets are worn out or not properly seated. Inspect the gaskets and replace them if necessary. Make sure to position them correctly to create a watertight seal.
- Apply plumber's tape: If the connections still leak, you can try applying plumber's tape to the threaded areas. This tape helps to create a better seal and prevents water from escaping.
Difficulty in Tightening the Drain Assembly
Tightening the drain assembly can sometimes be challenging, especially if the components don't align properly or if the threads are not smooth. If you encounter this issue, follow these troubleshooting tips:
- Check for proper alignment: Make sure that all the components of the drain assembly are aligned correctly before attempting to tighten them. Misalignment can prevent the parts from fitting together snugly.
- Clean the threads: If the threads are dirty or damaged, it can make tightening difficult. Clean the threads thoroughly using a brush or cloth to remove any debris or buildup.
- Apply lubricant: To ease the tightening process, you can apply a small amount of lubricant, such as WD-40, to the threads. This will reduce friction and make it easier to tighten the drain assembly.
Drain Not Seating Properly
If you find that the drain is not seating properly in the sink, causing water to drain slowly or creating an uneven surface, try the following troubleshooting steps:
- Remove any debris: Sometimes, debris or residue can prevent the drain from seating properly. Clean the sink thoroughly and remove any buildup or obstructions that may be interfering with the installation.
- Adjust the stopper height: The stopper should be positioned at the correct height to ensure a proper seal. Adjust the height according to the manufacturer's instructions to ensure a snug fit.
- Inspect the drain flange: Check the drain flange for any damage or irregularities that might be preventing it from seating properly. If necessary, replace the drain flange to ensure a proper fit.
By following these troubleshooting tips, you should be able to overcome common issues that may arise during the installation of a pop-up sink drain. Remember to take your time, follow the manufacturer's instructions, and don't hesitate to seek professional help if needed.
Avoiding Common Mistakes
When it comes to installing a pop-up sink drain, there are a few common mistakes that can easily be made. By understanding and avoiding these mistakes, you can ensure a hassle-free and leak-free installation. In this section, we will discuss three of the most common mistakes and how to avoid them.
Using Too Much Plumbers Putty
One of the most common mistakes people make when installing a pop-up sink drain is using too much plumbers putty. Plumbers putty is used to create a watertight seal between the sink and the drain assembly. However, if too much putty is applied, it can cause excess putty to squeeze out, creating a messy and ineffective seal.
To avoid this mistake, apply a thin, even layer of plumbers putty around the underside of the drain flange. Make sure to leave a small gap around the edges to prevent excess putty from escaping. This will ensure a proper seal without any messy residue.
Over-Tightening the Drain Assembly
Another common mistake is over-tightening the drain assembly. While it’s important to secure the drain assembly tightly, over-tightening can cause damage to the sink and the drain components. This can lead to leaks and other issues down the line.
To avoid this mistake, tighten the drain assembly until it is snug, using a wrench or pliers if necessary. Be careful not to put too much pressure, as this can cause the parts to crack or break. Remember, a secure but not overly tight connection is key for a successful installation.
Incorrectly Aligning the Drain Pipe with the Trap
The final common mistake to avoid is incorrectly aligning the drain pipe with the trap. The trap is designed to prevent sewer gases from entering your home and also allows for easy cleaning and maintenance. If the drain pipe and the trap are not properly aligned, it can lead to leaks and an inefficient drainage system.
To ensure a proper alignment, make sure that the drain pipe lines up with the trap in a straight and level manner. Take the time to double-check the alignment before tightening any connections. If needed, use a level or tape measure to ensure everything is in proper alignment.
By avoiding these common mistakes – using too much plumbers putty, over-tightening the drain assembly, and incorrectly aligning the drain pipe with the trap – you can achieve a successful and leak-free installation of your pop-up sink drain. Take your time, follow the instructions, and remember that a little attention to detail goes a long way in the world of plumbing.
Keeping The Drain Clean And Clog-Free
Keeping the Drain Clean and Clog-Free
Installing a pop-up sink drain can greatly improve the functionality and aesthetic appeal of your bathroom. However, it is important to keep the drain clean and clog-free to ensure smooth drainage and prevent unpleasant odors. In this section, we will discuss some effective methods to help you maintain a clean and well-functioning pop-up sink drain.
Regularly Removing Hair and Debris
Hair and debris are major culprits when it comes to clogged drains. Over time, they can accumulate in the drain, leading to slow draining and potential blockages. To prevent this, it is essential to regularly remove hair and debris from your pop-up sink drain.
Here are some simple steps to keep your drain clear:
- Use a drain cover: Placing a drain cover over the sink drain will catch most debris and prevent it from entering the plumbing system.
- Remove visible debris: After using the sink, take a moment to remove any visible hair or debris that has collected on the drain cover or around the sink area. You can wipe it away with a paper towel or tissue or use gloves to pick up larger pieces.
- Clean the drain stopper: If your pop-up sink drain has a stopper, remove it and clean it thoroughly. Make sure to remove any hair or residue that has accumulated on the stopper. Rinse it with warm water and soap, and then reinstall it.
Using Natural Cleaning Solutions
Harsh chemicals can damage pipes and cause harmful fumes, so it is advisable to opt for natural cleaning solutions that are safe for both your drain and the environment. Here are a few effective options:
| Natural Cleaning Solutions | Instructions |
|---|---|
| Vinegar and Baking Soda | Mix equal parts vinegar and baking soda. Pour the mixture down the drain and let it sit for 30 minutes. Rinse with hot water. |
| Lemon and Salt | Cut a lemon in half and sprinkle salt onto the cut side. Rub the lemon halves on the drain to remove any odors or buildup. |
| Boiling Water | Boil a kettle of water and carefully pour it down the drain in slow, steady streams. This can help dissolve grease and flush away minor blockages. |
Avoiding Harsh Chemicals
It is crucial to avoid using harsh chemicals such as drain cleaners that contain caustic substances like bleach, sulfuric acid, or lye. These chemicals can corrode the pipes over time and cause harm to the environment.
Instead, opt for natural cleaning solutions, as mentioned above, or consider using enzyme-based drain cleaners that are specifically designed to break down organic matter without causing damage.
By regularly removing hair and debris, using natural cleaning solutions, and avoiding harsh chemicals, you can keep your pop-up sink drain clean and clog-free. Incorporating these simple habits into your cleaning routine will not only enhance the longevity of your drain but also prevent plumbing issues and maintain a pleasant bathroom environment.
Preventing Any Potential Issues
Installing a pop-up sink drain can significantly improve the functionality and aesthetic appeal of your bathroom. However, like any other plumbing fixture, it requires regular maintenance to ensure it stays in perfect working condition. By taking a few preventative measures, you can avoid potential issues and enjoy a hassle-free experience with your pop-up sink drain.
Checking for Leaks Regularly
Regularly inspecting your pop-up sink drain for leaks is crucial in preventing any potential issues. Leaks can lead to water damage, mold growth, and even structural problems. To check for leaks, follow these simple steps:
- Fill the sink basin with water and let it sit for a few minutes.
- Observe the area around the drain pipe for any signs of leakage, such as water drops or moisture.
- If you notice any leaks, tighten the connections or replace any damaged parts as necessary.
By promptly addressing leaks, you can prevent further damage and ensure the longevity of your pop-up sink drain.
Inspecting and Cleaning the Drain Stopper
The drain stopper plays an essential role in keeping your sink free from clogs and blockages. Regular inspection and cleaning of the drain stopper can help prevent potential issues. Here’s what you need to do:
- Remove the drain stopper by unscrewing it counterclockwise or following the manufacturer’s instructions.
- Inspect the stopper for any debris or buildup that might hinder its proper functioning.
- Clean the stopper thoroughly using warm water and a mild detergent or vinegar solution.
- Once clean, reattach the stopper by screwing it back in place.
Regularly inspecting and cleaning the drain stopper will ensure smooth water flow and prevent unwanted clogs in your pop-up sink drain.
Clearing Any Clogs as Soon as They Arise
Clogs are a common issue in sink drains, and if left unattended, they can cause water backup and unpleasant odors. Clearing clogs as soon as they arise is the key to preventing any potential issues. Follow these steps to clear a clog effectively:
- Use a plunger to create a seal over the drain opening and apply firm, even pressure to dislodge the clog.
- If the plunger doesn’t work, try using a drain snake to break up the clog and remove it.
- Run hot water down the drain to flush out any remaining debris.
Regularly clearing any clogs that arise will maintain the proper functioning of your pop-up sink drain and prevent more severe issues down the line.
By following these preventative measures, you can ensure a trouble-free experience with your pop-up sink drain. Remember to check for leaks regularly, inspect and clean the drain stopper, and clear any clogs promptly. With proper maintenance, your pop-up sink drain will continue to provide efficient drainage and enhance the functionality of your bathroom for years to come.
Frequently Asked Questions
How Do You Install A Push Pop Up Sink Drain?
To install a push pop up sink drain, follow these steps: 1. Remove the old drain by unscrewing the nut at the bottom. 2. Apply plumber’s putty to the new drain’s flange. 3. Insert the flange into the sink’s drain hole and hand-tighten the nut underneath.
4. Attach the push pop up mechanism to the drain assembly. 5. Test the drain by filling the sink with water and checking for leaks.
How Do You Install A Pop Up Drain Stopper In A Bathroom Sink?
To install a pop-up drain stopper in a bathroom sink, follow these steps: 1. Remove the old stopper. 2. Clean the drain opening. 3. Apply plumber’s putty to the bottom of the new stopper. 4. Insert the stopper into the drain opening.
5. Tighten the retaining nut underneath the sink. Enjoy your new pop-up drain stopper!
Do Pop Up Drains Need Plumbers Putty?
Yes, pop up drains commonly require the use of plumbers putty.
How Do I Install A Pop Up Drain Without Overflow?
To install a pop-up drain without overflow, first, remove the old drain assembly. Apply plumber’s putty around the new drain’s flange and place it into the sink’s drain hole. Tighten the locknut underneath the sink. Connect the drain pipe to the drain assembly using a compression nut.
Test for leaks and adjust if necessary.
Conclusion
Installing a pop-up sink drain may seem daunting at first, but with the right tools and steps, it can be an easy and rewarding DIY project. By following this guide, you have learned the necessary steps to remove the old drain, assemble the new one, and ensure a proper tight fit.
Remember to check for any leaks and make adjustments if needed. With your newly installed pop-up sink drain, you can enjoy a fully functioning and leak-free sink for years to come. Happy plumbing!