
To install a Pex plumbing system, you need to start by turning off the main water supply and draining any existing water from the pipes. Then, measure and cut the Pex tubing to the required length, making sure to deburr the ends.
Next, secure the tubing to fittings using crimp or clamp rings, ensuring a tight seal. Finally, connect the Pex system to fixtures and appliances, and check for any leaks or issues before turning the water supply back on. Pex plumbing systems provide a reliable and cost-effective solution for water supply in residential and commercial buildings.
With their flexibility, durability, and ease of installation, Pex systems have gained popularity among homeowners and professionals alike. Whether you’re renovating an existing property or involved in new construction, understanding how to install a Pex plumbing system is essential. This guide will walk you through the step-by-step process to ensure a successful and leak-free installation. By following these instructions, you’ll be equipped with the knowledge to undertake this project confidently and efficiently.
Before You Begin
Installing a Pex plumbing system is a great way to update your home’s plumbing network. This versatile and easy-to-use system is a popular choice among homeowners and professionals alike.
Understanding the Basics of Pex Plumbing
Pex plumbing is a reliable and flexible alternative to traditional copper and PVC pipe systems. It is made of cross-linked polyethylene, which makes it resistant to temperature extremes and corrosion. Understanding the basics of Pex plumbing is crucial before you begin the installation process.
Gathering the Necessary Tools and Materials
Before diving into the installation, you’ll need to gather all the necessary tools and materials. Having everything on hand will help streamline the process and ensure a smooth installation. Here’s a list of some essential tools and materials you’ll need:
| Tools | Materials |
|---|---|
|
|
Assessing Your Plumbing Needs
Prior to installing a Pex plumbing system, it’s essential to assess your plumbing needs. Take the time to evaluate the current state of your plumbing network and determine what changes or upgrades you want to make.
Here are a few questions to consider:
- Do you need to replace existing pipes or install new ones?
- Where will you be installing the Pex system?
- What fixtures and appliances will be connected to the Pex system?
- What is the estimated length of the Pex tubing required?
Answering these questions will help you determine the scope of the project and ensure you gather the right tools and materials.
Now that you have a clear understanding of the basics of Pex plumbing, have gathered the necessary tools and materials, and assessed your plumbing needs, you are ready to move on to the next step: planning your installation process.
How To Select The Right Pex Tubing
When it comes to installing a Pex plumbing system, selecting the right Pex tubing is a crucial step. The tubing you choose should be durable, flexible, and compatible with your specific project requirements. In this section, we will guide you through the process of comparing different types of Pex tubing, understanding Pex tubing sizes and ratings, and choosing the appropriate tubing for your project.
Comparing Different Types of Pex Tubing
There are three main types of Pex tubing available in the market: Pex-A, Pex-B, and Pex-C. Each type has its own advantages and is suitable for different applications.
| Type | Advantages |
|---|---|
| Pex-A | 1. Offers the highest level of flexibility, making it easier to work with. |
| Pex-B | 1. Provides excellent resistance to chlorine and other chemicals. 2. Affordable and widely used in residential plumbing systems. |
| Pex-C | 1. Cost-effective option. 2. Ideal for budget-conscious projects with moderate flexibility requirements. |
Understanding Pex Tubing Sizes and Ratings
Pex tubing comes in various sizes, typically denoted by different colored bands or markings. The most commonly used sizes are 3/8″, 1/2″, 5/8″, 3/4″, and 1″. It’s important to choose the correct size that matches the flow rate and pressure requirements of your plumbing system.
In addition to sizes, Pex tubing also has different ratings for temperature and pressure. The two main rating systems are ASTM and Wirsbo. ASTM ratings are a combination of a letter and a number, with PEX tubing typically rated as PEX-A, PEX-B, or PEX-C. Wirsbo ratings are based on color-coding, with red, white, and blue denoting different temperature and pressure ratings.
Choosing the Appropriate Pex Tubing for Your Project
Now that you have a better understanding of the different types, sizes, and ratings of Pex tubing, you can select the appropriate tubing for your project. Consider the following factors:
- The level of flexibility required for your plumbing system.
- The chemical resistance needed for the specific application.
- The temperature and pressure ratings required to ensure safe and efficient operation.
By taking these factors into account, you can confidently choose the right Pex tubing that will meet your project needs and provide reliable performance for years to come.
Installing Pex Plumbing System
Installing a Pex plumbing system is a great way to upgrade your home’s plumbing and ensure better water flow and efficiency. Pex, or cross-linked polyethylene, is a flexible and durable material that’s more resistant to freezing and bursting compared to traditional copper or PVC pipes. In this guide, we’ll walk you through the steps of installing a Pex plumbing system, from preparing the work area to planning the Pex layout. So, let’s get started!
Preparing the Work Area
Before you can install your Pex plumbing system, it’s important to prepare the work area properly. This involves clearing any clutter or obstacles that may hinder your progress and ensuring that you have easy access to the existing plumbing.
Here are some key steps to follow:
- Clear the work area of any furniture, appliances, or other objects that may get in your way.
- Remove any drywall or flooring materials that may obstruct your access to the existing plumbing.
- Ensure that you have all the necessary tools and materials at hand, such as Pex pipes, fittings, crimp rings, and a Pex crimping tool.
Shutting Off the Water Supply
Before you start any plumbing work, it’s crucial to shut off the water supply to prevent any accidents or water damage. Follow these steps to shut off the water supply:
- Locate the main water shut-off valve in your home. It’s usually located near the water meter or where the main water line enters your house.
- Turn the valve clockwise until it’s fully closed. This will cut off the water supply to your entire house.
- Open a faucet or valve to relieve any pressure in the plumbing system and ensure that the water is completely shut off.
Draining the Existing Plumbing System
Before installing the Pex plumbing system, you’ll need to drain the existing plumbing to avoid any water spillage and make the installation process easier. Follow these steps to drain the existing plumbing system:
- Open all faucets and valves in your home to let the water drain out. Start with the highest floor and work your way down to the lowest.
- If you have a basement or crawl space, use a sump pump or a wet/dry vacuum to remove any remaining water.
- Flush all toilets multiple times to empty the water from the tanks and bowls.
- Check the plumbing system to ensure that all water has been drained and no residual water is left.
Planning the Pex Layout
Planning the Pex layout is a crucial step in ensuring an efficient plumbing system. This involves determining the locations where you’ll install the Pex pipes and where you’ll have connections to fixtures and appliances throughout your home. Here’s how you can plan the Pex layout:
- Create a plumbing blueprint or diagram that illustrates your entire home’s plumbing system, including the location of fixtures, appliances, and main supply lines.
- Measure and mark the areas where you’ll be installing the Pex pipes, ensuring that they are properly supported and secured.
- Consider factors such as pipe length, diameter, and the number of fittings required to optimize water flow and minimize pressure drops.
By following these steps, you’ll be well-prepared to install a Pex plumbing system in your home. Remember to consult local plumbing codes and regulations, and if you’re unsure about any step, it’s always best to seek professional assistance. Happy plumbing!
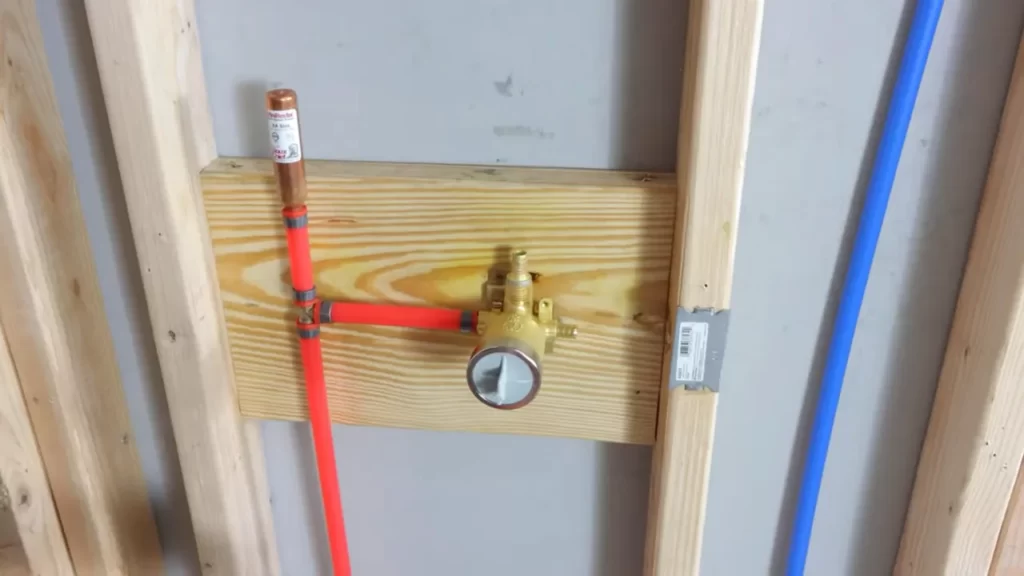
Installing The Pex Manifold
Determining the Ideal Location for the Manifold
Before we dive into the process of installing the Pex manifold, it’s crucial to determine the ideal location for it in your plumbing system. The manifold serves as the central control point where all the individual Pex lines are connected. So, you want to ensure it is conveniently placed, easily accessible, and in a location that maximizes efficiency.
One important consideration when determining the location of the manifold is to place it near the main water supply line. This will minimize the distance the water needs to travel, reducing the chances of pressure drops and maximizing water flow throughout your home.
Another aspect to consider is to identify a wall space where the manifold can be mounted securely. Keep in mind that the manifold needs to be at a height that allows for easy access to the individual lines and valves, so choose a location that is neither too high nor too low.
Mounting the Manifold on the Wall
Once you have determined the ideal location, it’s time to mount the Pex manifold on the wall. This step requires precision and attention to detail to ensure a secure and stable installation.
- Begin by marking the positions for the mounting brackets on the wall. Use a level to ensure they are perfectly aligned.
- Drill pilot holes at the marked positions, and then secure the mounting brackets using screws suitable for your wall type.
- Place the Pex manifold onto the mounting brackets and make sure it is level. Use a level tool to ensure accurate positioning.
- Secure the manifold to the mounting brackets using the provided screws or brackets that came with the manifold.
Connecting the Pex Tubing to the Manifold
Now that the manifold is securely mounted, it’s time to connect the Pex tubing to the manifold. This will allow water to flow through the system and reach various fixtures in your home.
- Start by cutting the Pex tubing to the desired lengths, ensuring that you have enough tubing to reach each fixture in your plumbing system.
- Insert one end of the tubing into the appropriate port on the manifold. Make sure it is fully seated and secure.
- Use a crimp ring tool to secure the tubing to the manifold by applying uniform pressure around the connection point. This will create a tight, leak-proof seal.
- Repeat the process for each individual line, connecting them to the corresponding ports on the manifold.
It’s important to check each connection for any leaks before proceeding with the rest of the installation. This can be done by applying pressure to the system and observing for any signs of water leakage or drips.
With the manifold securely mounted and the Pex tubing connected, you’re well on your way to installing a efficient and reliable Pex plumbing system. The manifold serves as the heart of the system, allowing you to control and distribute water flow with ease. Now, it’s time to move on to the next steps in your Pex installation journey.

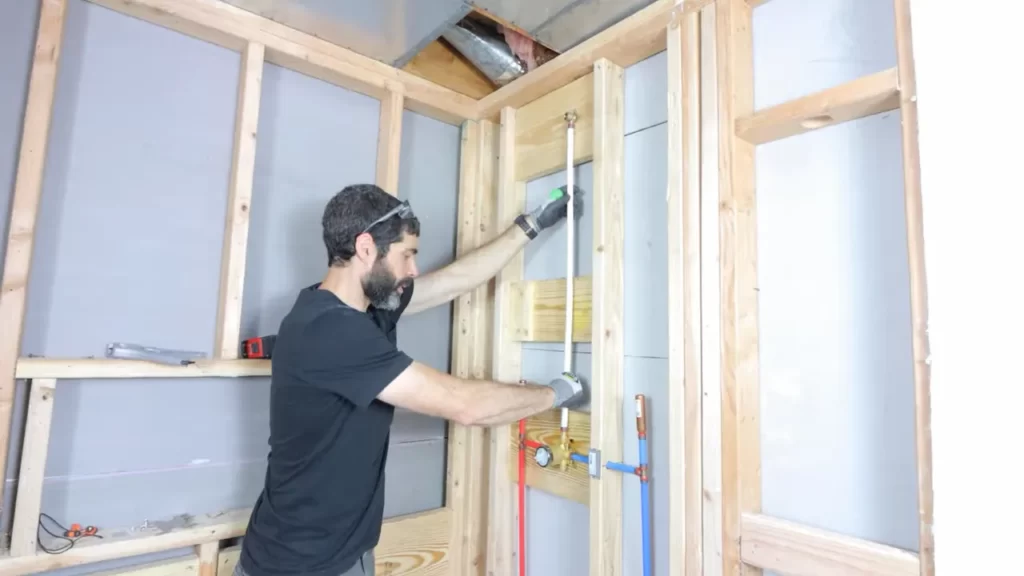
Running Pex Lines
Running Pex lines is an essential step in installing a Pex plumbing system. This process involves marking the route for your Pex lines, cutting and preparing Pex tubing, installing Pex fittings and connectors, and securing the Pex lines to the structure. Let’s take a closer look at each of these steps:
Marking the Route for Your Pex Lines
Before you start running Pex lines, it’s important to plan the layout and mark the route where the lines will be installed. By carefully considering the locations of fixtures, hot water heaters, and supply lines, you can determine the most efficient path for your Pex lines. Take into account any obstacles such as walls, joists, and other plumbing lines that you may need to work around. By marking the route beforehand, you can ensure a smooth installation process.
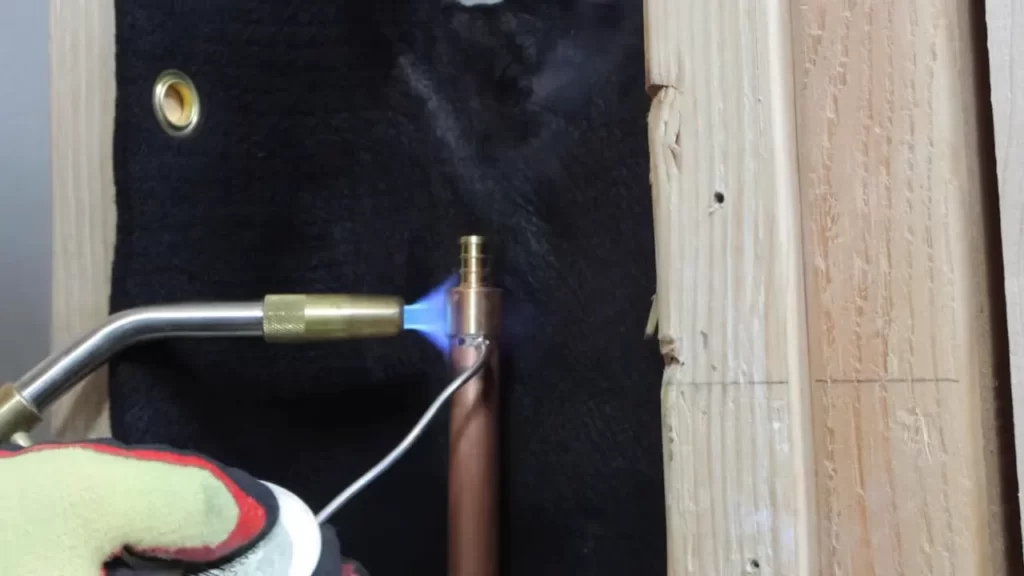
Cutting and Preparing Pex Tubing
Once you have marked the route for your Pex lines, it’s time to cut and prepare the Pex tubing. Start by measuring the required length of tubing for each section of the route. Use a Pex tubing cutter to make precise and clean cuts. Remember to leave some extra length for any necessary adjustments. After cutting the tubing, remove any burrs or rough edges with a deburring tool. This will ensure a proper and secure fit when connecting the Pex lines.
Installing Pex Fittings and Connectors
After preparing the Pex tubing, the next step is to install the necessary fittings and connectors. Pex fittings come in various types, such as elbow fittings, tee fittings, and couplings. These fittings are designed to create connections at corners, junctions, and transitions between different sections of Pex tubing. Before installing the fittings, make sure to check that they are compatible with the type and size of Pex tubing you are using. Apply pressure using a Pex crimping tool or a Pex clamp tool to secure the fittings and ensure a leak-free connection.
Securing Pex Lines to the Structure
Lastly, it’s important to secure the Pex lines to the structure to prevent any movement or damage. Use Pex clips or straps to secure the lines at regular intervals along the route. These clips can be attached to walls, studs, or any other stable surface. By securing the Pex lines properly, you not only ensure their stability but also protect them from potential damage caused by vibration or contact with other objects.
By following these steps for running Pex lines, you can successfully install a Pex plumbing system. Proper planning, precise cutting, secure fitting installation, and secure line fastening are key to a reliable and efficient Pex system.
Connecting Pex To Fixtures And Appliances
When it comes to installing a Pex plumbing system, one crucial step is connecting the Pex tubing to the various fixtures and appliances in your home. This ensures a secure and leak-free connection, allowing for proper water flow throughout your plumbing system. In this section, we will guide you through the process of connecting Pex to faucets, showers, toilets, water heaters, and other appliances.
Installing Pex Adapter Fittings
To connect Pex tubing to fixtures and appliances, you will first need to install Pex adapter fittings. These fittings act as the intermediary between the Pex tubing and the specific fixture or appliance you are connecting it to. Here’s how to install Pex adapter fittings:
- Ensure the Pex tubing is cut to the appropriate length.
- Slide a Pex crimp ring onto the tubing.
- Insert the Pex adapter fitting into the end of the tubing.
- Position the crimp ring about 1/8 inch from the end of the tubing.
- Using a Pex crimp tool, crimp the ring securely around the tubing and fitting.
By following these steps, you will have successfully installed Pex adapter fittings, preparing the Pex tubing for connection to faucets, showers, toilets, and other fixtures and appliances.
Connecting Pex to Faucets, Showers, and Toilets
Now that you have the Pex adapter fittings in place, it’s time to connect the Pex tubing to faucets, showers, and toilets. The following steps will guide you through this process:
- First, identify the correct Pex adapter fitting for the specific fixture or appliance you are connecting.
- Apply a small amount of plumber’s tape to the threaded end of the fitting.
- Hand tighten the Pex adapter fitting onto the fixture or appliance.
- Using a wrench, carefully tighten the fitting until it is snug and secure.
With these steps, you have successfully connected the Pex tubing to faucets, showers, and toilets, ensuring a tight and reliable connection for water supply.
Attaching Pex to Water Heaters and Appliances
In addition to fixtures, Pex tubing can also be connected to water heaters and other appliances such as dishwashers and washing machines. Here’s how to attach Pex tubing to water heaters and appliances:
- Identify the appropriate Pex adapter fitting for the specific appliance you are connecting.
- Ensure the appliance’s inlet or outlet is clean and free of any debris or residue.
- Apply a small amount of plumber’s tape to the threaded end of the fitting.
- Screw the Pex adapter fitting onto the appliance’s inlet or outlet.
- Using a wrench, securely tighten the fitting.
By following these steps, you can confidently attach Pex tubing to your water heaters and appliances, ensuring a reliable and efficient water supply.
Pressure Testing the Pex System
Once you have connected the Pex tubing to all the fixtures and appliances, it’s crucial to perform a pressure test to check for any potential leaks. Here is how to pressure test your Pex system:
- Close all the faucets and valves connected to the Pex system.
- Connect a pressure testing gauge to a nearby hose bib or other suitable connection point.
- Gradually increase the pressure until it reaches the recommended level for your specific Pex system.
- Monitor the pressure gauge for any signs of pressure loss. If the pressure drops significantly, there may be a leak that needs to be addressed.
By pressure testing your Pex system, you can ensure that all connections are secure and that your plumbing system is ready for use.
In conclusion, connecting Pex tubing to fixtures and appliances requires the proper installation of Pex adapter fittings and secure connections. Following the steps outlined in this section will enable you to successfully connect Pex to faucets, showers, toilets, water heaters, and other appliances, ensuring a reliable and efficient plumbing system in your home.
Managing Pex Plumbing System
When it comes to managing a Pex plumbing system, there are a few key factors to consider. Preventing freeze and corrosion issues, insulating Pex tubing in cold areas, maintaining and repairing Pex connections, and troubleshooting common Pex plumbing problems are all crucial aspects of ensuring the longevity and efficiency of your plumbing system.
Preventing Freeze and Corrosion Issues
One of the main concerns with Pex plumbing systems is the potential for freezing and corrosion. These issues can lead to costly repairs and damage to your system. Therefore, it is essential to take proactive steps to prevent them.
The first step in preventing freeze and corrosion issues is to insulate your Pex tubing in cold areas. By adding insulation, you provide an extra layer of protection against freezing temperatures.
Additionally, using a corrosion-resistant material for your Pex connections can help prevent corrosion-related problems. For example, brass fittings are commonly used as they are less prone to corrosion compared to other materials like iron or steel.
Insulating Pex Tubing in Cold Areas
In cold areas, it is crucial to properly insulate your Pex tubing to prevent freezing and potential pipe bursts. Insulation acts as a barrier against the cold temperatures, ensuring that your plumbing system functions optimally.
There are various insulation options available for Pex tubing, including foam pipe insulation, which can be easily wrapped around the tubing. This type of insulation helps to maintain the temperature of the water inside the pipes, preventing it from freezing.
When installing insulation, it is important to pay special attention to areas such as crawl spaces, basements, and exterior walls, as these are more susceptible to colder temperatures. By insulating these areas properly, you can minimize the risk of freezing and potential damage to your plumbing system.
Maintaining and Repairing Pex Connections
To ensure the longevity of your Pex plumbing system, it is essential to regularly maintain and repair Pex connections. Proper maintenance can help prevent leaks and other problems from occurring.
Regularly inspecting your connections for any signs of wear or damage is a good practice. If you notice any leaks or loose connections, it is crucial to address them promptly to prevent water damage and further complications.
Repairing Pex connections involves tightening loose fittings or replacing damaged ones. It is important to follow the manufacturer’s instructions and use the appropriate tools and materials for the job.
Troubleshooting Common Pex Plumbing Problems
While Pex plumbing systems are generally reliable, occasional problems may arise. Knowing how to troubleshoot common issues can help you identify and resolve them quickly.
Some common problems include leaks, reduced water flow, and bursting pipes. If you notice a leak, carefully inspect the affected area and identify the source. Depending on the severity of the leak, you may need to tighten fittings or replace damaged pipes.
Reduced water flow can be caused by various factors, such as mineral buildup or blockages. Flushing the affected pipes or removing any obstructions can help restore water flow.
In the case of bursting pipes, it is important to turn off the water supply immediately and contact a professional plumber to assess and repair the damage.
By understanding these troubleshooting techniques, you can confidently address common Pex plumbing problems to keep your system running smoothly.
Frequently Asked Questions
Is Pex Plumbing Easy To Install?
Yes, PEX plumbing is easy to install. Its flexible nature allows for easier maneuverability, reducing the need for extensive cutting and soldering. With its user-friendly connections and simplified installation process, PEX plumbing offers a convenient option for homeowners and professionals alike.
Do You Run Pex Through Joists Or Under?
PEX is typically run through joists or under them, depending on the specific plumbing layout. This decision is made based on factors like accessibility, convenience, and local building codes. It’s important to consult with a professional plumber to determine the best approach for your specific project.
Where Should You Not Use Pex?
Avoid using PEX in exposed outdoor areas, as it may not withstand UV radiation. Additionally, do not use it in areas with a high risk of rodent infestation, as PEX is susceptible to damage. It is also not recommended for use with hot water systems above 140°F.
Lastly, avoid using PEX for water supplies to steam rooms, as it cannot withstand high temperatures.
How Do You Install Pex Plumbing?
To install PEX plumbing, first, prepare the necessary tools and materials. Then, shut off the water supply and drain the system. Measure and cut the PEX tubing to the desired length. Use a fitting to connect the tubing to the water source.
Secure the connections with appropriate crimp rings or clamps. Finally, turn on the water supply to check for leaks.
Conclusion
Installing a Pex plumbing system is a practical and reliable solution for your plumbing needs. With its flexibility, durability, and ease of installation, Pex is a popular choice among homeowners and professionals alike. By following the step-by-step guide provided in this blog post, you can confidently take on this project and enjoy the benefits of a well-functioning plumbing system.
Remember to prioritize safety, and don’t hesitate to seek professional assistance if needed. Trust the reliability and efficiency of Pex for a seamless plumbing experience.