
Installing a pegboard wall involves measuring, marking, and attaching the pegboard securely to the wall.
Materials Needed
Installing a pegboard wall is a fantastic way to organize your tools, maximize space, and add a touch of style to your workshop or garage. But before you start this DIY project, it’s important to gather all the necessary materials. In this section, we will discuss the materials you’ll need to complete the job seamlessly.
Pegboard
The first item on your list is, of course, the pegboard itself. A pegboard is a perforated board made of wood or metal that allows you to hang tools and other items by inserting pegboard hooks into the holes. When choosing a pegboard, make sure it is sturdy and of the appropriate size for your needs. Consider the available space and the number of tools you plan to hang. Additionally, you may want to select a pegboard with a finish that complements the overall aesthetic of your workspace.
Wall Anchors
Wall anchors are essential for securing the pegboard to your wall. These small devices provide extra support and stability, preventing the pegboard from pulling away from the wall when loaded with tools. There are various types of wall anchors available, such as plastic anchors, toggle bolts, and molly bolts. The type of wall anchor you choose will depend on the type of wall you have and the weight of the items you plan to hang on the pegboard. It’s important to select wall anchors that are suitable for your specific wall type to ensure a secure installation.
Mounting Screws
Mounting screws are used to attach the pegboard to the wall anchors. It’s crucial to choose screws of the appropriate length and thickness to ensure a secure and stable installation. The length of the screws should be determined by the thickness of the pegboard and the wall anchor combined. Be sure to select screws that are suitable for the material of your wall, whether it’s drywall, plaster, or another surface.
Screwdriver
To attach the pegboard to the wall, you’ll need a screwdriver. A manual screwdriver will work, but using a power drill with a screwdriver bit will speed up the process significantly. Make sure the screwdriver is compatible with the type of screws you have selected.
Level
A level is crucial to ensure that your pegboard hangs straight on the wall. It will help you achieve a professional-looking installation that is both functional and visually appealing. A bubble level or a laser level can be used to check the horizontal and vertical alignment of the pegboard.
Pencil
A pencil is essential for marking the location of the wall anchors and any adjustments needed for the placement of the pegboard. Use a pencil to make clear, visible marks on the wall and the pegboard, ensuring accuracy and precision during installation.
Stud Finder
A stud finder is a handy tool that helps identify the location of wall studs behind the drywall. Knowing the position of the studs is crucial for secure and stable mounting of the pegboard. Use the stud finder to locate the studs and mark their positions with a pencil or tape measure.
Locating The Perfect Spot For Your Pegboard Wall
When it comes to optimizing your space and organizing your tools, a pegboard wall is a game-changer. But before you can start hanging and arranging your tools, you need to find the perfect spot for your pegboard wall. In this section, we will guide you through the process of choosing the right wall, determining the ideal height for your pegboard, and ensuring proper support.
Choosing the Right Wall
Before you dive into the installation process, take a moment to consider which wall in your workspace would be most suitable for your pegboard. Here are a few factors to keep in mind:
- Accessibility: Choose a wall that is easily accessible and within reach of your work area. This will ensure that your tools and supplies are always within arm’s reach when you need them.
- Sturdiness: Look for a wall that can support the weight of your pegboard and the items you plan to hang on it. Avoid walls with weak or crumbling surfaces.
- Size: Assess the available space on the wall and choose a size for your pegboard that fits well without overwhelming the area.
Ideal Height for the Pegboard
To determine the ideal height for your pegboard, consider the following:
- Ergonomics: Install the pegboard at a height that allows you to comfortably reach the tools and supplies you use most frequently. This will minimize strain on your body and make your work area more efficient.
- Visibility: Make sure the pegboard is clearly visible and easily accessible. Avoid installing it too high or too low, as it may become difficult to locate and retrieve items.
As a general guideline, a height of around 4 to 5 feet from the floor is commonly recommended. However, you can adjust this based on your personal preference and the specific needs of your workspace.
Ensuring Proper Support
Proper support is crucial to ensure the stability and durability of your pegboard. Here’s how you can ensure your pegboard is well-supported:
- Locate the wall studs: Use a stud finder to locate the wall studs behind the chosen wall. These studs provide the necessary strength to support the weight of the pegboard and the items you plan to hang.
- Mark the stud locations: Once you have located the studs, mark their positions on the wall using a pencil.
- Pre-drill pilot holes: Before attaching the pegboard, pre-drill pilot holes at the marked stud locations. This will make it easier to screw the pegboard securely into place.
- Attach the pegboard: Align the pegboard with the pre-drilled holes and screw it into place using appropriate screws. Be sure to use screws that are long enough to penetrate both the pegboard and the wall studs for maximum stability.
By following these steps, you can ensure that your pegboard wall is securely installed and ready for organizing your tools and supplies.
Preparing Your Pegboard For Installation
Before you can begin installing a pegboard wall, it’s important to properly prepare the pegboard for a successful and durable installation. This involves measuring and cutting the pegboard to fit your desired space, adding reinforcements for added stability, and sanding and priming the surface for a smooth finish. Here’s a step-by-step guide on how to prepare your pegboard:
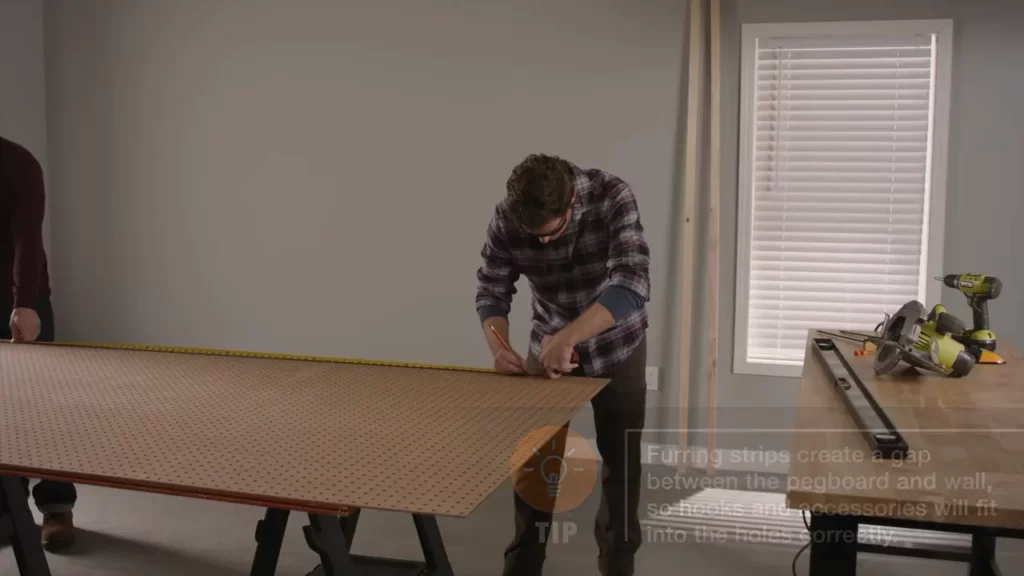
Measuring and cutting the pegboard
The first step in preparing your pegboard wall is to accurately measure the area where you plan to install it. Measure the height and width of the space, making sure to account for any outlets, switches, or obstructions that may need to be avoided or cut out on the pegboard.
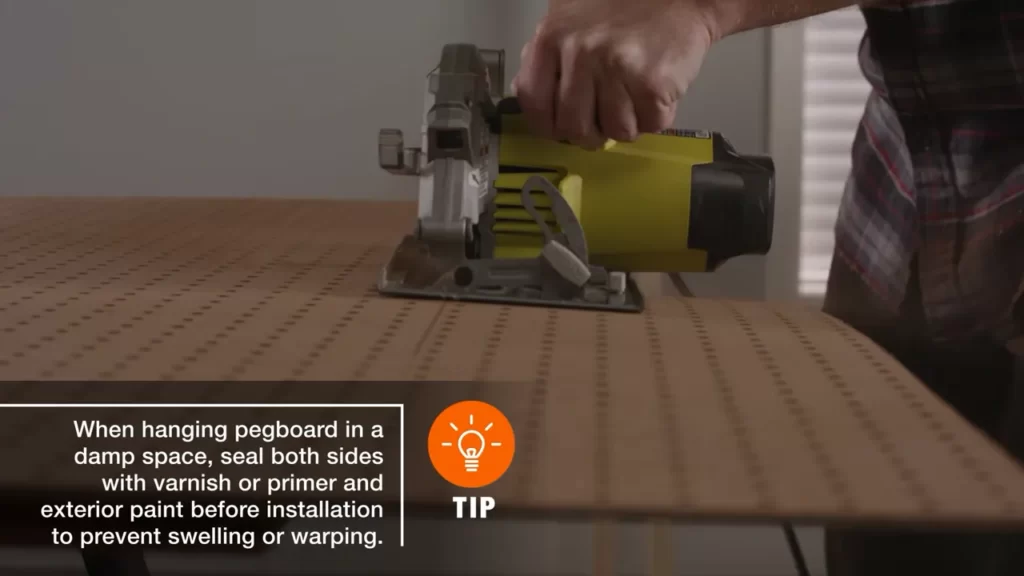
With your measurements in hand, it’s time to cut the pegboard to the proper size. Using a circular saw or a jigsaw, carefully cut along the measured lines to create your custom-sized pegboard panels. Remember to wear protective goggles and gloves during this process to ensure safety.
Adding reinforcements
Once you have your pegboard panels cut to size, it’s essential to add reinforcements to increase their strength and durability. Start by measuring and cutting 1×2 or 2×2 wooden strips to fit the edges of each pegboard panel. These strips will serve as framing and help prevent the pegboard from warping or sagging over time.
Apply a bead of construction adhesive along the back of each wooden strip, then firmly press them onto the edges of the pegboard panels. Use clamps to hold the strips in place while the adhesive dries. Make sure the strips are flush with the edges of the pegboard for a seamless appearance.
Sanding and priming the pegboard
Before you proceed with the installation, it’s important to sand and prime the surface of the pegboard for optimal paint adhesion and a professional finish. Begin by sanding the entire surface with medium-grit sandpaper to smooth out any imperfections or rough areas.
After sanding, wipe away any dust or debris with a clean cloth or tack cloth. Then, apply a coat of primer specifically formulated for use on wood or hardboard surfaces. Use a paintbrush or roller to evenly cover the entire pegboard, paying attention to the edges and corners.
Allow the primer to dry completely according to the manufacturer’s instructions before proceeding with the installation. This will ensure a solid base for your chosen paint color and promote long-lasting adherence to the pegboard surface.
By carefully measuring and cutting the pegboard, adding reinforcements for stability, and sanding and priming the surface, you’ll be well on your way to a successful and durable pegboard wall installation. Now that your pegboard is prepared, it’s time to move on to the next step: installation!
Mounting The Pegboard To The Wall
Installing a pegboard wall in your workspace or garage can be a game-changer when it comes to organizing your tools and equipment. In this section, we’ll walk you through the steps of securely mounting the pegboard to the wall, ensuring it stays in place for years to come.
Finding studs
Before attaching the pegboard to the wall, it’s crucial to locate the studs. Studs are the vertical wooden beams that provide structural support to your walls. Finding and marking the stud locations will ensure that your pegboard is securely anchored.
Marking the stud locations on the pegboard
With a pencil, mark the locations of the studs on your pegboard. This step will allow you to align the holes on the pegboard with the studs on the wall, ensuring maximum stability. Take measurements from the floor or ceiling to accurately mark the stud locations on the pegboard.
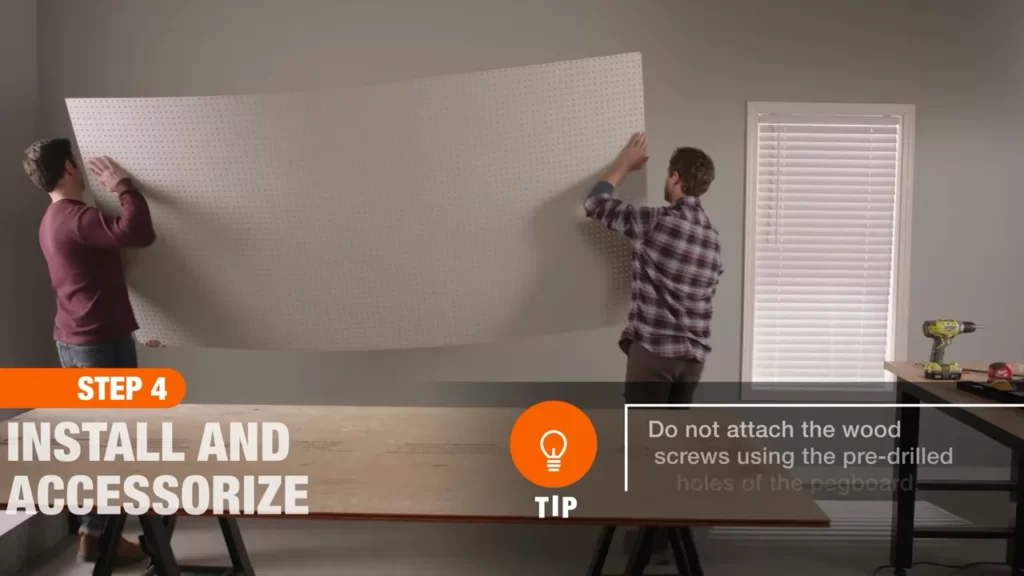
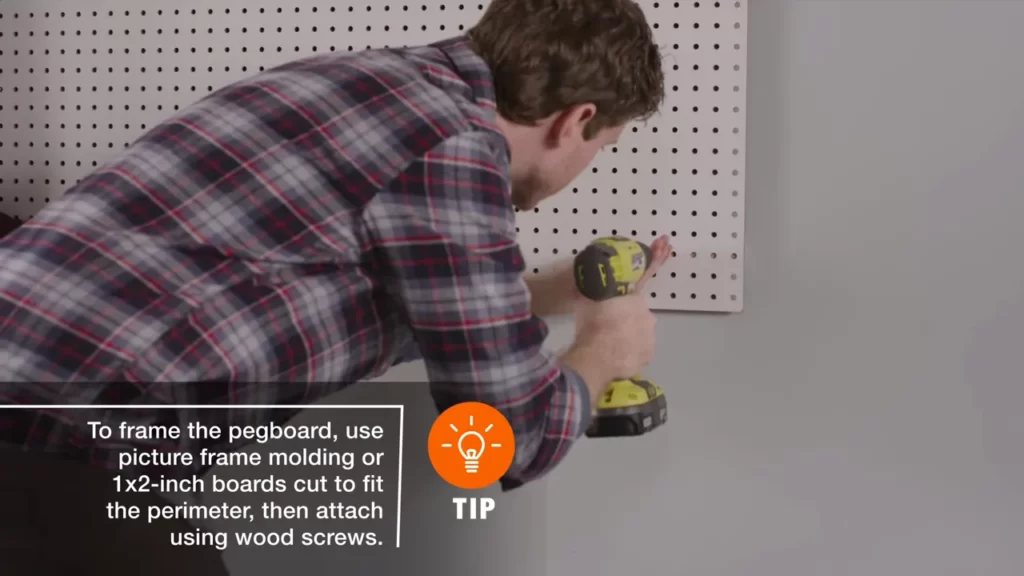
Attaching the pegboard to the wall
Once the stud locations are marked, it’s time to attach the pegboard to the wall. Start by positioning the pegboard against the wall, making sure the marked stud locations align with the actual studs. Use a level to ensure the pegboard is straight.
If your wall has drywall covering the studs, you can use wood screws to secure the pegboard directly into the studs. Position the screws along the edge of the pegboard and drive them through the holes, making sure they go into the studs behind the wall. Use a power drill for efficiency.
Securing with wall anchors
If you’re mounting your pegboard on a concrete or masonry wall, you’ll need to use wall anchors for additional support. Wall anchors are designed to provide stability and prevent the pegboard from pulling away from the wall.
To secure the pegboard with wall anchors, begin by pre-drilling holes into the pegboard at the marked stud locations. Then, insert the wall anchors into the holes, tapping them gently with a hammer until they are flush with the surface of the pegboard.
Finally, position the pegboard against the wall, aligning the holes on the pegboard with the wall anchors. Insert screws through the pegboard holes and into the wall anchors, tightening them until the pegboard is securely fixed in place.
By following these steps, you can confidently mount your pegboard to the wall, ensuring a sturdy and functional organization system for all your tools and equipment.
Organizing Tools And Accessories On Your Pegboard Wall
Deciding on layout and design
If you’ve decided to install a pegboard wall to optimize your tool storage and keep your accessories within easy reach, the next step is to determine the layout and design that works best for you. Consider the available space, your specific needs, and the types of tools and accessories you plan to hang on the pegboard.
It’s a good idea to start by measuring the available wall space and sketching out a basic layout. This will help you visualize how the pegboard will fit in your garage, workshop, or any other designated area. Take into account any existing shelves, cabinets, or workbenches that may already be in place.
Once you have a rough idea of the layout, think about the types of tools and accessories you want to hang on the pegboard. Are you mainly storing hand tools, power tools, or a combination of both? Do you have long-handled tools, such as rakes or shovels, that will require specific hanging arrangements? By considering these factors, you can create a functional and visually appealing design.
Choosing the right hooks and accessories
When it comes to organizing your tools and accessories on the pegboard wall, choosing the right hooks and accessories is crucial. This will ensure that everything is securely stored and easily accessible when you need it.
Before venturing out to purchase hooks and accessories, take inventory of your tools and accessories. Make a list of what you have and what you plan to hang on the pegboard. This will help you determine the sizes and types of hooks you need.
There are various types of hooks and accessories available, each designed for different purposes. For small hand tools, consider using single hooks or multi-tool holders. These hooks can accommodate wrenches, screwdrivers, pliers, and other similar tools. If you have larger or heavier tools, such as hammers or drills, opt for sturdy pegboard hooks or specialty tool holders that provide better support.
Additionally, consider incorporating accessories such as bins and baskets to conveniently store smaller items like nails, screws, or drill bits. These accessories can help keep your pegboard wall organized and prevent smaller items from getting lost.
Hanging and arranging tools, ensuring
Once you’ve decided on the layout, design, and hooks for your pegboard wall, it’s time to hang and arrange your tools and accessories. Properly arranging and organizing them will make it easier for you to locate and retrieve items.
Start by installing the pegboard on your wall according to the manufacturer’s instructions. Make sure to secure it firmly to the wall to ensure stability and safety. Once the board is in place, begin hanging your hooks and accessories.
Consider grouping similar tools together for easier organization. For example, hang all your screwdrivers on one section and your pliers on another. This will make it more efficient when you need a specific tool.
To further enhance organization, use a combination of hooks and accessories to create a customized setup that suits your needs. Utilize bins or baskets for storing small items, and use specialty hooks or holders for larger tools.
Finally, step back and evaluate your arrangement to ensure everything is within reach and visually appealing. Make adjustments if necessary to achieve optimal functionality and aesthetics.
In conclusion, organizing tools and accessories on your pegboard wall is a practical and efficient way to keep your workspace tidy. By deciding on the layout and design, choosing the right hooks and accessories, and hanging and arranging your tools properly, you can create a functional and organized pegboard wall that not only optimizes space but also enhances productivity.
Adding Finishing Touches
Filling in any visible screws or holes
After you have successfully installed your pegboard wall, it’s time to add those important finishing touches to make it look professional and polished. One of the first things you’ll want to do is fill in any visible screws or holes. This step is vital because it not only enhances the appearance of your pegboard wall but also prevents any items from snagging or catching on these imperfections. You can easily fill in screws or holes by using a wood filler or putty that matches the color of your pegboard. Simply apply a small amount to each screw or hole, allowing it to dry completely. Once dry, gently sand it down until it’s smooth and flush with the surface. This simple step will give your pegboard wall a flawless and seamless finish.
Painting or staining the pegboard
Another crucial step in adding those finishing touches to your pegboard wall is painting or staining it. This step allows you to customize the look and feel of your pegboard, making it blend seamlessly with the rest of your workspace. Before you paint or stain your pegboard, make sure to give it a thorough cleaning to remove any dust or debris that may have accumulated during the installation process. Once clean, you can apply a coat of paint or stain using a brush or roller. Be sure to choose a paint or stain that is suitable for the material of your pegboard. You may also consider using a primer before applying the paint or stain to ensure better adherence and a longer-lasting finish. Allow the paint or stain to dry completely before proceeding to the next step.
Cleaning up and organizing the workspace
Now that your pegboard wall is looking pristine and beautiful, it’s time to focus on cleaning up and organizing your workspace. One of the main advantages of a pegboard wall is its versatility in holding various tools, accessories, and supplies. Take the time to sort and arrange your items in a manner that makes them easily accessible and visually appealing. You can do this by placing frequently used tools and items within arm’s reach, while arranging less frequently used items on higher or lower pegs. Consider using hooks, baskets, and shelving to maximize the storage capabilities of your pegboard wall. Additionally, take the opportunity to remove any clutter or unnecessary items from your workspace, creating a clean and uncluttered environment that promotes productivity and efficiency. With a well-organized and tidy workspace, you’ll be able to tackle any project with ease and confidence.
In conclusion, adding finishing touches to your pegboard wall is a crucial step in creating a functional and visually appealing workspace. By filling in any visible screws or holes, painting or staining the pegboard, and cleaning up and organizing your workspace, you can transform a simple pegboard installation into a professional and efficient system. Remember to take your time and pay attention to detail, as these small touches can make a significant difference in the overall appearance and functionality of your pegboard wall. So go ahead, apply these finishing touches and enjoy the benefits of a well-designed and organized workspace.
Maintenance And Troubleshooting Tips
Keeping your pegboard wall clean and organized is crucial to its functionality and longevity. In this section, we will provide some easy maintenance tips to ensure your pegboard wall remains in top condition. We will also guide you on how to replace damaged hooks or accessories, as well as address the common issue of pegboard sag and how to rectify it.
Keeping the pegboard clean and organized
Maintaining a clean and organized pegboard wall not only enhances its appearance but also makes it easier to find and access your tools and accessories. Here are a few simple steps you can follow to keep your pegboard clean:
- Dust the pegboard regularly using a soft cloth or a duster to remove any accumulated dirt or debris.
- Periodically wipe the pegboard with a mild soapy solution to remove any stubborn stains or grease. Avoid using harsh chemicals that may damage the surface.
- Arrange your tools and accessories in a logical order, grouping similar items together. This will make it easier to locate them when needed.
- Consider using a variety of hooks, holders, and baskets to keep your tools neatly organized and within reach.
Replacing damaged hooks or accessories
Over time, hooks and accessories on your pegboard wall may become worn out or damaged. Here’s a step-by-step guide on how to replace them:
- Identify the damaged hook or accessory that needs to be replaced.
- Remove the damaged hook by lifting it upwards or unscrewing it, depending on the type of attachment.
- Choose a suitable replacement hook or accessory that matches the size and weight requirements of your tools.
- Insert the replacement hook or accessory into the same slot or hole on the pegboard. Make sure it is securely attached and can hold the weight of the tool.
- Repeat the process for any additional damaged hooks or accessories.
Dealing with pegboard sag
Pegboard sag is a common issue that occurs when the weight of the tools pulls the pegboard away from the wall, causing it to bow in the middle. To address this problem, follow these steps:
- Remove all items from the affected section of the pegboard to relieve the weight.
- Inspect the supporting hooks or brackets to ensure they are securely attached to the wall.
- If necessary, reinforce the wall by adding additional supporting brackets or hooks. Make sure they are evenly distributed to provide adequate support.
- Reattach the pegboard to the supporting hooks or brackets, ensuring it is level and flush against the wall.
- Gradually reorganize and redistribute the tools on the pegboard, making sure not to overload any one section.
Regular maintenance and troubleshooting will help you make the most of your pegboard wall for years to come. By keeping it clean and organized, replacing damaged hooks, and addressing any sagging issues promptly, you can enjoy a functional and efficient workspace.
Frequently Asked Questions
How Much Space Is Needed Behind Pegboard?
Typically, a space of about 2-3 inches is recommended behind a pegboard for proper installation and to ensure hooks and accessories can be easily added and removed.
What Do You Put Behind Pegboard?
You can put hooks, shelves, and baskets behind pegboard to maximize storage and organization. These accessories allow you to hang tools, store small items, and keep your workspace neat and tidy.
Can You Put Pegboard Over Drywall?
Yes, you can install pegboard over drywall. It is a simple and effective way to organize your tools and other items. Just make sure to use the appropriate fasteners and anchors to securely attach it to the drywall.
How Do You Attach Pegboard To Wall Without Drilling?
To attach pegboard to a wall without drilling, you can use adhesive hooks or double-sided tape specifically designed for heavy-duty applications. Simply stick the hooks or tape onto the back of the pegboard and press firmly against the wall. This provides a secure attachment without the need for drilling holes.
Conclusion
Installing a pegboard wall is a practical and efficient way to organize your space. By following the step-by-step process outlined you can easily set up a pegboard wall in your home or workspace. With its versatility and customizability, a pegboard wall offers endless possibilities for storage and display.
So, why wait? Start transforming your space and enjoy the benefits of a neatly organized environment today.