To install a niche in a shower, mark the location, cut the hole, install the niche, and secure it with screws or adhesive. This ensures a seamless and functional storage space in your shower.
Welcome to our guide on how to install a niche in a shower! A niche is a great addition to any shower as it provides storage space for your toiletries and keeps them within easy reach. Whether you’re renovating your bathroom or adding a niche to an existing shower, the installation process is relatively straightforward.
We’ll walk you through a step-by-step guide on how to install a niche in your shower, ensuring a seamless and functional storage solution. So let’s dive in and get started on transforming your shower into a practical and organized oasis!
Factors To Consider For A Seamless Fit
When it comes to installing a niche in a shower, several factors need to be considered to achieve a seamless fit. These factors include shower size and layout, design aesthetic and style, and functionality and storage needs. By carefully evaluating these aspects, you can ensure that your niche not only blends seamlessly with the overall design of the shower but also provides practical storage solutions for all your shower essentials.
Shower Size and Layout
One of the first factors to consider when installing a niche in a shower is the size and layout of the shower space. The size of your niche should be proportionate to the overall dimensions of the shower to create a balanced and harmonious look. If your shower is spacious, you may have the flexibility to install a larger niche that can accommodate multiple items. On the other hand, if your shower is smaller, you might need to consider a more compact niche that maximizes the available space.
Design Aesthetic and Style
The design aesthetic and style of your shower should also play a significant role in selecting a niche. Your niche should complement the existing design elements, such as the tiles, fixtures, and overall theme of the shower. If your shower has a modern and minimalist aesthetic, a sleek and understated niche design might be the ideal choice. Alternatively, if your shower features a more traditional or eclectic style, you might opt for a niche with decorative accents or unique patterns.
Functionality and Storage Needs
Functionality and storage are essential considerations when installing a niche in a shower. Determine what items you need to store in the niche and how accessible they should be. If you have a large collection of bottles, shampoos, and soaps, you might require a niche with multiple shelves to accommodate all your essentials. Additionally, consider the depth of the niche to ensure that it can hold tall bottles without toppling over. Remember to install your niche at a convenient height that allows easy access to your items, whether you prefer them at eye level or within reach.
By paying attention to these factors, you can successfully install a niche in your shower that seamlessly fits in with the overall design, enhances the functionality of the space, and provides ample storage for all your shower essentials.

Gathering The Right Tools And Materials
Gathering the right tools and materials is the first step to successfully installing a niche in your shower. Without the proper tools, you may find yourself struggling to complete the installation or even causing damage to the surrounding area. Similarly, selecting the right materials for your niche is crucial in ensuring its longevity and durability. In this section, we will explore the essential tools for the job, the different types of niches and their pros and cons, as well as how to select the right niche material.
Essential tools for the job
Before starting the installation process, it is important to gather the essential tools that will help you complete the job efficiently and effectively. Here is a list of the tools you will need:
- Tape measure – essential for accurately measuring the dimensions of the niche and determining the size of the materials needed.
- Pencil – used for marking the area where the niche will be installed.
- Level – ensures that the niche is installed perfectly straight, avoiding any crooked or uneven appearance.
- Tile saw or wet saw – necessary for cutting tiles to fit around the niche.
- Notched trowel – used to spread the adhesive evenly on the back of the tiles.
- Grout float – helps with applying the grout to the tiled area.
- Grout sponge – used for wiping away excess grout and cleaning the tiles.
- Drill – required for installing screws or brackets to secure the niche in place.
- Screwdriver – needed for tightening screws or adjusting brackets.
Types of niches and their pros and cons
There are different types of niches available in the market, each with its own set of pros and cons. Here are a few popular options:
| Type of Niche | Pros | Cons |
|---|---|---|
| Recessed niche | Creates a seamless and integrated look | Requires cutting into the wall |
| Surface-mounted niche | Easy to install without any major modifications to the wall | May protrude slightly from the wall |
| Corner niche | Optimal use of available space | Can be challenging to tile around the corners |
Selecting the right niche material
Choosing the right material for your niche is essential in ensuring its longevity and aesthetic appeal. Here are a few popular niche material options:
- Porcelain – known for its durability and resistance to moisture, making it a suitable choice for bathroom environments.
- Ceramic – offers a wide range of designs and finishes, but may be less durable compared to porcelain.
- Marble – provides an elegant and luxurious look, but requires regular sealing to prevent staining.
- Glass – creates a modern and sleek appearance, but can be more prone to chipping or cracking.
Before selecting a niche material, consider factors such as your desired aesthetic, maintenance requirements, and budget to ensure you make the right choice for your shower.
Gathering the right tools and materials is the first step towards a successful niche installation. By having the essential tools and selecting the appropriate niche material, you can create a functional and visually appealing addition to your shower. In the next section, we will dive into the detailed steps of installing a niche in your shower.
Measuring And Marking The Shower Wall
Before installing a niche in your shower, it is crucial to measure and mark the shower wall to ensure accurate placement and a clean installation. This step-by-step guide will walk you through the process of determining the ideal location and height for your niche, marking the area, and ensuring level and plumb lines. Let’s get started!
In order to determine the ideal location and height for your niche, there are a few things you should consider. Firstly, think about your own personal preference and the functionality of the niche. How often will you be using it? Will it be within easy reach? Take these factors into account to find the perfect spot.
Next, consider the overall design and layout of your shower. Will the niche be visible and aesthetically pleasing? It’s important to find a balance between functionality and visual appeal. You may want to consult with a professional or do some research to gather inspiration and ideas.
Once you have determined the location, measure the height where you want the bottom of the niche to be. This will serve as a reference point and ensure consistency throughout the installation process.
Marking the area for installation
Now that you have determined the ideal location and height, it’s time to mark the area for installation. Start by using a level and a pencil to draw a horizontal line at the height you measured earlier. This line will serve as a guide when positioning the bottom of the niche.
Next, measure the width of your niche and mark the center point on the horizontal line. Use a level and a vertical line to connect the center point with the top and bottom of the horizontal line. This will create a cross, indicating the exact area where your niche will be installed.
| Materials needed: | Tools needed: |
|---|---|
|
|
Make sure to double-check your measurements and use a level to ensure the vertical and horizontal lines are perfectly straight. This will ensure that your niche is installed properly and looks seamless.
Ensuring level and plumb lines
Before moving forward, it is crucial to ensure that the lines you have marked are level and plumb. Use a level to check the horizontal line for accuracy. Adjust as necessary, making small pencil marks to indicate any deviations.
Similarly, check the vertical line for plumbness. Use a level to ensure it is perfectly straight. Any variations can be corrected by adjusting the line accordingly.
By taking the time to measure and mark the shower wall accurately, you are setting yourself up for a successful installation. Keep these instructions in mind as you progress through the rest of the installation process, and you will be on your way to enjoying a stylish and functional niche in your shower!
Cutting And Preparing The Wall Opening
Establishing the dimensions for the niche
Before you can start cutting the wall opening for your shower niche, it’s important to establish the dimensions for the niche itself. This will help ensure that the niche is the perfect size and shape for your shower.
Begin by measuring the height, width, and depth of the niche you want to create. Take into consideration any plumbing or electrical obstacles that may affect the dimensions. Once you have these measurements, mark them on the wall using a pencil or marker.
Consider the overall design and aesthetics of your shower when determining the ideal location for the niche. It’s important to find a spot that is easily accessible and visually pleasing.
Using a tile saw or oscillating tool for precise cuts
Once you have established the dimensions for the niche, it’s time to cut the wall opening. There are a few different tools you can use for this job, but the most common options are a tile saw or an oscillating tool.
To cut the tiles:
- Place a piece of masking tape on the tile to mark where you want to make the cut.
- Using a tile saw, carefully cut along the marked line. Make sure to wear safety goggles and gloves to protect yourself from flying debris.
- Repeat this process for all the tiles that need to be cut to create the wall opening for the niche.
To cut through the wall:
- If you’re using an oscillating tool, attach the appropriate cutting blade for the material you’re working with.
- Starting at the top of the marked wall opening, carefully guide the oscillating tool along the lines.
- Move slowly and steadily, applying gentle pressure to ensure a clean and precise cut.
- Continue cutting until you have created the entire wall opening for the niche.
Sanding and cleaning the edges
Once you have cut the wall opening for the niche, it’s important to sand and clean the edges to ensure a smooth and professional-looking finish.
To sand the edges:
- Use a fine-grit sandpaper or a sanding block to gently sand the cut edges of the tiles and the wall.
- Move the sandpaper or sanding block in small, circular motions to smooth out any rough or uneven areas.
- Wipe away any dust or debris with a clean cloth before proceeding to the next step.
To clean the edges:
- Dampen a clean cloth with warm water and mild soap.
- Gently scrub the cut edges of the tiles and the wall to remove any dirt or residue.
- Rinse the cloth and wring out excess water, then use it to wipe away any soapy residue.
By sanding and cleaning the edges, you will ensure that the niche fits seamlessly into the wall and enhances the overall look of your shower.
Installing The Niche Into The Wall
Applying waterproof membrane or backer board
Before installing the niche into the wall, it is important to ensure that the surrounding area is properly prepared to prevent any water damage. One way to achieve this is by applying a waterproof membrane or backer board.
A waterproof membrane acts as a barrier, preventing any moisture from seeping into the walls. This is particularly important in shower areas where water is constantly present. To apply a waterproof membrane, follow these steps:
- Ensure that the wall surface is clean and free from any debris.
- Cut the waterproof membrane to fit the area where the niche will be installed.
- Apply a layer of waterproofing adhesive to the wall using a trowel.
- Press the waterproof membrane onto the adhesive, ensuring that it adheres firmly.
- Smooth out any wrinkles or air bubbles using a wallpaper smoother or a similar tool.
- Allow the adhesive to dry according to the manufacturer’s instructions.
Setting the niche into the prepared opening
Once the waterproof membrane is in place, it’s time to set the niche into the prepared opening. Follow these steps for a seamless installation:
- Measure the opening to ensure that the niche will fit properly.
- Apply a layer of thinset mortar onto the back of the niche.
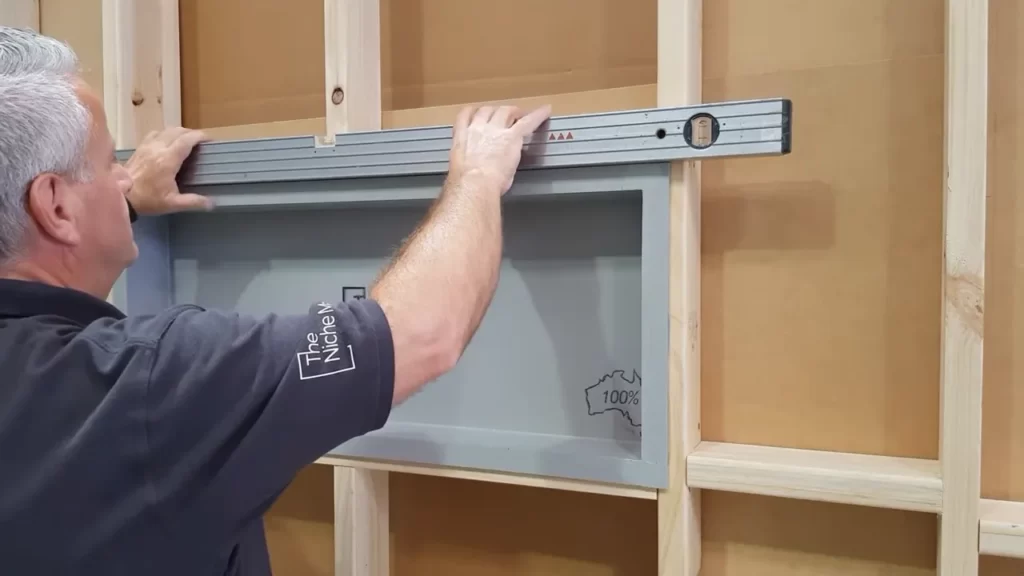
- Place the niche into the opening, making sure it is centered and level.
- Press firmly on the niche to ensure it is securely set into the wall.
- Use a level to double-check that the niche is straight.
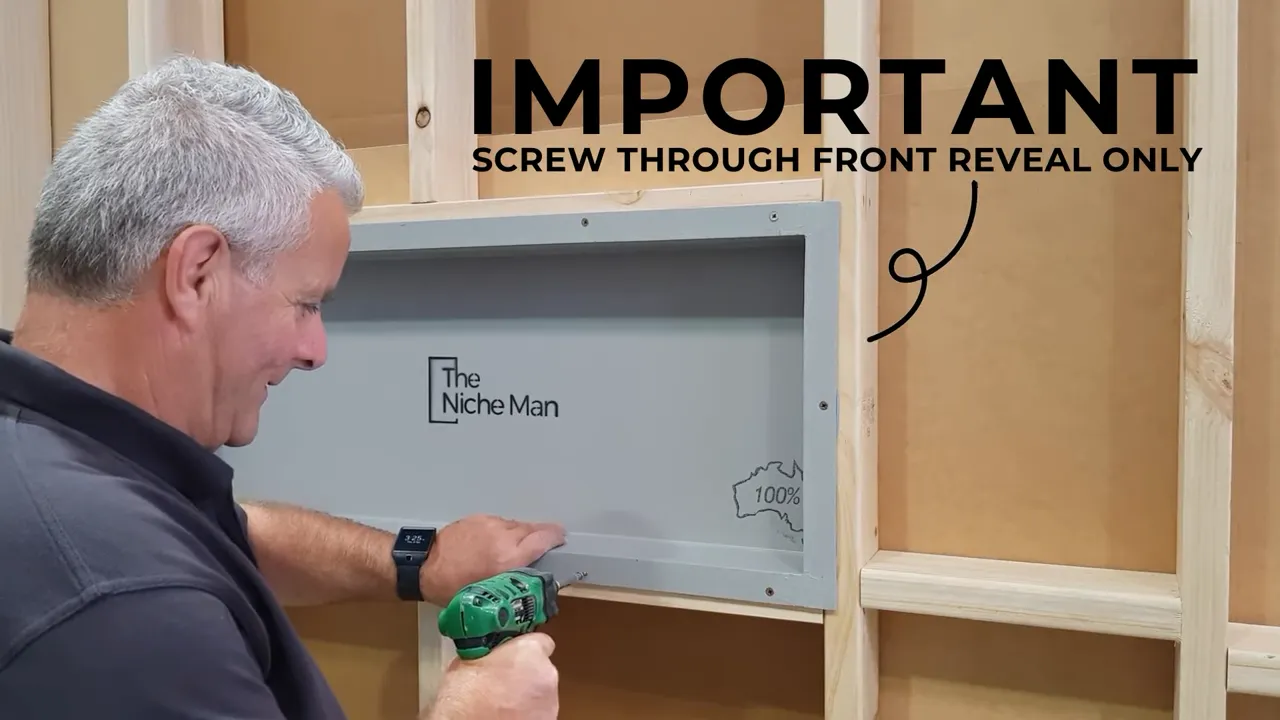
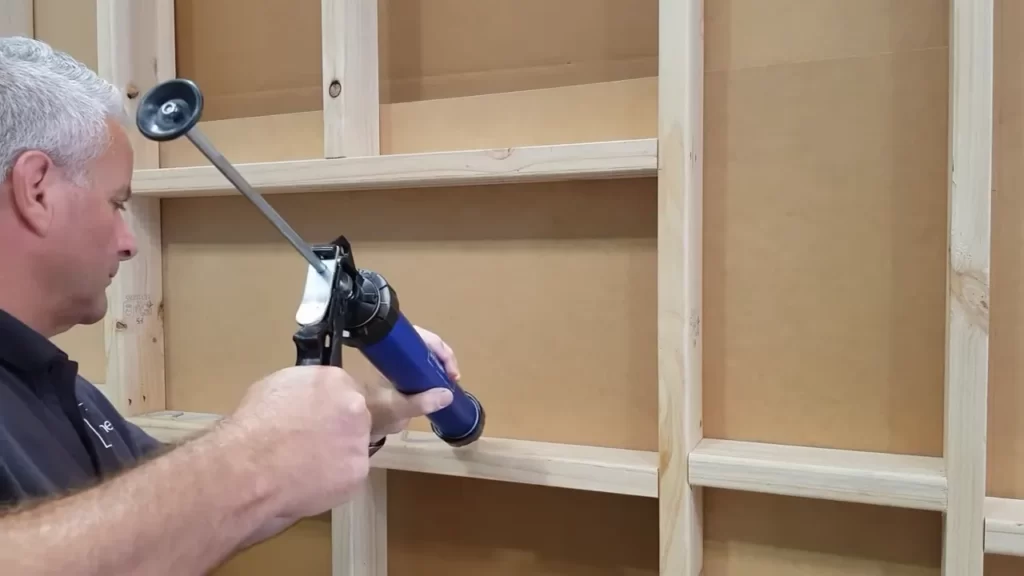
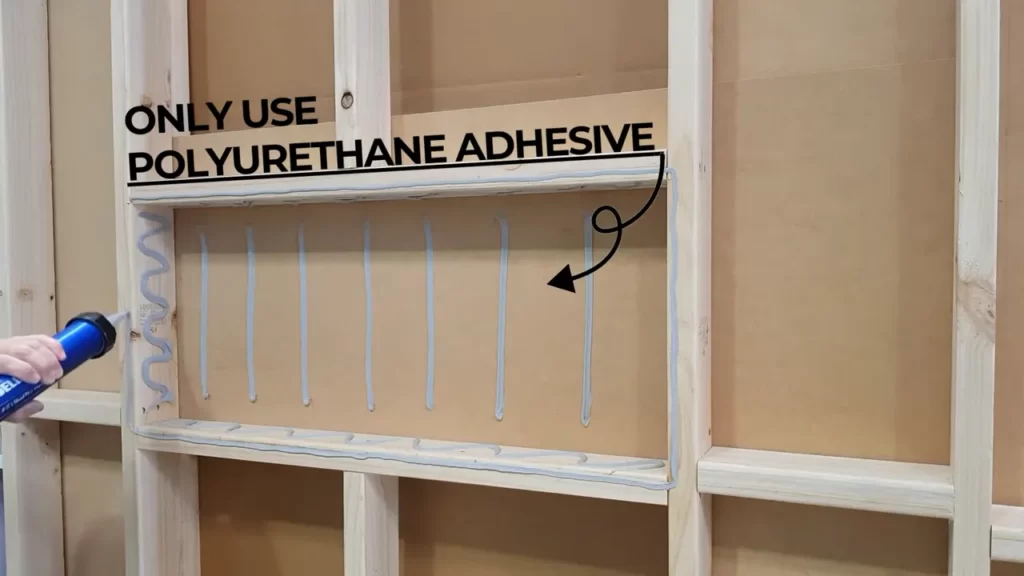
Ensuring a secure and level fit
It is crucial to ensure that the niche is securely and levelly fitted into the wall to prevent any future issues. Here are some tips to achieve this:
- Use shims if necessary to adjust the niche’s position and make it level.
- Secure the niche in place by screwing it into the wall studs or using appropriate construction adhesive.
- Double-check the levelness by using a spirit level.
- Make any necessary adjustments before the mortar or adhesive dries.
Waterproofing the niche and surrounding area
Now that the niche is securely set and level, it’s time to waterproof the niche and the surrounding area to ensure long-lasting protection against water damage. Here’s how:
- Apply a layer of waterproofing membrane to the niche and the edges of the niche opening.
- Ensure that the membrane overlaps with the previous waterproof layer.
- Use a trowel to smooth out the membrane and remove any air pockets.
- Allow the membrane to dry according to the manufacturer’s instructions.
- Apply a second coat of waterproofing membrane for added protection.
- Ensure that all seams and corners are properly sealed to prevent any potential leaks.
By following these steps, you can install a niche properly and ensure that it is secure, level, and waterproofed. This will not only enhance the functionality of your shower but also add an elegant touch to your bathroom space.
Finishing Touches And Grouting
Applying Mortar or Adhesive to Secure the Niche
Once you have positioned the niche in your shower, it’s time to securely fasten it in place. To ensure a strong and durable bond, you will need to apply mortar or adhesive to the back of the niche. Follow these steps to complete this crucial step:
- Prepare the mortar or adhesive mixture according to the manufacturer’s instructions.
- Using a trowel, spread a thick and even layer of mortar or adhesive onto the back of the niche.
- Press the niche firmly against the wall, ensuring that it is level and aligned properly.
- Allow the mortar or adhesive to dry completely, as per the instructions provided.
By effectively applying mortar or adhesive, you can be confident that your niche will be securely affixed to the shower wall, providing you with a reliable storage solution that stands the test of time.
Filling Any Gaps or Spaces with Grout
Once the niche is securely in place, it’s time to give it a finished look by filling any gaps or spaces between the niche and the surrounding tiles with grout. Here’s a step-by-step guide to complete this part of the installation:
- Mix the grout according to the manufacturer’s instructions, ensuring it reaches the desired consistency.
- Using a grout float, scoop up a generous amount of grout and spread it over the gaps and spaces, working it into the crevices.
- Using the grout float at a 45-degree angle, remove any excess grout from the surface while ensuring the gaps are fully filled.
- Allow the grout to set for the recommended time before proceeding to the next step.
Filling the gaps and spaces with grout not only enhances the visual appeal of your shower niche but also helps to protect the edges from moisture and potential damage, prolonging the life of your installation.
Smoothing and Wiping off Excess Grout
After the grout has had sufficient time to set, it’s time to give your shower niche a polished appearance by smoothing and wiping off any excess grout. Follow these simple steps to complete this final touch:
- Dampen a grout sponge with water.
- Gently press the sponge against the tiled surfaces, smoothing the grout lines as you go.
- Repeat this process with a rinsed sponge until the grout lines are neatly defined.
- Wipe away any remaining grout residue from the tile surfaces with a clean, damp sponge.
- Allow the grout to cure fully, as recommended by the manufacturer, before using the shower.
By carefully smoothing and wiping off excess grout, you can achieve a professional look for your shower niche, leaving you with a stunning and functional addition to your bathroom.
Sealing And Protecting The Niche
Sealing and Protecting the Niche
Properly sealing and protecting the niche in your shower is crucial to ensure its durability and longevity. By taking the necessary steps to seal and waterproof the niche, you can prevent any potential water damage and keep your shower looking beautiful for years to come.
Regularly inspecting for any damage or deterioration
To ensure the integrity of your niche, it’s essential to regularly inspect it for any signs of damage or deterioration. By catching any issues early on, you can prevent further damage and avoid costly repairs down the line.
- Check for cracks or chips in the niche’s structure.
- Pay attention to any discoloration or staining that might indicate water damage.
- Inspect the sealant around the edges of the niche for any signs of peeling or mold.
By being proactive and conducting these regular inspections, you can address any problems promptly and keep your niche in optimal condition.
Applying sealant to keep the niche waterproof
Applying sealant is a crucial step in keeping your niche waterproof. The sealant acts as a barrier, preventing any water from seeping into the walls and causing damage. Here’s how you can effectively apply sealant to your niche:
- Clean the niche thoroughly with a mild detergent and allow it to dry completely.
- Apply a bead of silicone sealant along the edges of the niche, ensuring full coverage.
- Smooth out the sealant using your finger or a caulking tool to create a seamless finish.
- Remove any excess sealant before it dries to achieve a neat and professional look.
It’s important to note that different types of niches may require specific sealants, so make sure to read the manufacturer’s instructions and choose a sealant that is compatible with your niche material.
By following these steps, you can effectively seal and protect your niche, ensuring its longevity and preventing any potential water damage. Regular inspections and proper application of sealant are key to maintaining a beautiful and functional shower for years to come.
Cleaning And Preventing Mold Or Mildew
Mold and mildew can be common problems in showers, particularly in areas where moisture tends to accumulate. Proper cleaning and preventative measures are essential to keep your shower niche free from mold and mildew. In this section, we’ll discuss the proper cleaning techniques for the niche surface, the use of mildew-resistant products, and how to promote ventilation to prevent moisture buildup.
Proper cleaning techniques for the niche surface
Cleaning the niche surface regularly is crucial to prevent mold and mildew growth. Follow these steps for a thorough cleaning:
- Start by removing any items or products from the niche.
- Mix a solution of equal parts water and white vinegar in a spray bottle.
- Spray the solution onto the niche surface and let it sit for a few minutes.
- Scrub the surface using a soft-bristle brush or sponge, focusing on any areas with visible mold or mildew.
- Rinse the surface with clean water.
- Dry the niche with a clean towel or allow it to air dry completely.
- For stubborn stains, you can use a mild bleach solution, following the instructions on the product label. However, exercise caution when using bleach, as it can damage certain materials.
By following these proper cleaning techniques, you can effectively remove mold and mildew from your shower niche, maintaining its cleanliness and preventing further growth.
Using mildew-resistant products
Another proactive step to prevent mold and mildew is to invest in mildew-resistant products for your shower niche. These products are specially formulated to inhibit the growth of mold and mildew, reducing the need for frequent cleaning. Look for sealants, grouts, and caulk that are specifically labeled as mildew-resistant. When applying them to the niche, make sure to follow the manufacturer’s instructions carefully to ensure maximum effectiveness.
Promoting ventilation to prevent moisture buildup
Adequate ventilation is crucial in preventing moisture buildup, as mold and mildew thrive in damp environments. Here are some ways to promote ventilation in your shower area:
- Leave the bathroom door or window open after showering to allow fresh air circulation.
- Consider installing an exhaust fan in your bathroom, specifically near the shower area.
- Make sure the shower curtains or doors are properly sealed to prevent water from escaping and causing excess moisture.
By promoting proper ventilation, you can minimize the chances of mold and mildew growth in your shower niche.
Remember, regular cleaning, the use of mildew-resistant products, and promoting ventilation are essential steps in maintaining a mold and mildew-free shower niche. By implementing these preventative measures, you can enjoy a clean and healthy showering experience.
Enjoying Your New Shower Niche
Now that you have successfully installed a niche in your shower, it’s time to start enjoying the benefits it brings to your daily routine. With a well-organized space and the ability to showcase your personal style, your shower niche will enhance your shower experience. Let’s explore how you can make the most out of your new shower niche.
Organizing shower essentials for convenience
A shower niche serves as the perfect spot to keep your shower essentials neatly organized and easily accessible. Say goodbye to cluttered shower shelves or bottles scattered on the floor. With an organized niche, you will have a dedicated space to place your shampoo, conditioner, body wash, and other essentials.
Consider grouping your items by category. For example, keep all your hair care products together and place your body wash and loofah in a separate section. You can also use small baskets or containers to further divide and organize your items. This way, you’ll always know where to find what you need, making your showers more efficient and enjoyable.
Showcasing your personal style and flair
Your shower niche not only serves a functional purpose but can also be a reflection of your personal style and flair. Whether you prefer a sleek and modern look or a more eclectic design, you can customize your niche to match your bathroom decor.
Consider the material, color, and shape of your niche. You can opt for classic ceramic tiles for a timeless appeal, or choose glass mosaic tiles for a glamorous touch. If you want to add a pop of color, consider using colored tiles or even painting the niche itself. The possibilities are endless, allowing you to infuse your personal style into your shower space.
In addition to the tiles, you can also enhance the aesthetic appeal of your niche by adding decorative elements. Consider placing small plants or succulents in your niche for a touch of greenery. Alternatively, you can add small LED lights to create a soothing ambiance. It’s all about showcasing your unique style and creating a shower space that reflects your individuality.
Now that you know how to enjoy your new shower niche, it’s time to put these tips into action. Organize your shower essentials and let your personal style shine through in your shower space. With a well-designed and functional niche, you’ll never look back at traditional shower storage solutions.
Frequently Asked Questions
How Is A Shower Niche Installed?
To install a shower niche, mark the location, remove tiles, cut the hole, reinforce the wall, and install the niche.
Can You Add A Niche To An Existing Shower?
Yes, you can add a niche to an existing shower. It is possible to install a niche in an existing shower to provide storage space for toiletries and other bathroom accessories.
What Is The Easiest Shower Niche To Install?
The easiest shower niche to install is a pre-fabricated niche that requires no cutting or tiling. It can be easily mounted onto the shower wall and provides a ready-made storage space for toiletries.
How Much Does It Cost To Install A Shower Niche?
The cost of installing a shower niche can vary depending on factors such as size, material, and labor. On average, you can expect to pay between $150 to $500 for the installation. Factors like tile choice or customization may increase the cost.
It’s best to consult with a professional for an accurate estimate.
Conclusion
To sum up, installing a niche in a shower is a practical and aesthetically pleasing addition to any bathroom. By following the step-by-step process outlined in this guide, you can confidently take on this DIY project. Remember to carefully measure, use the right tools and materials, and ensure proper waterproofing.
With patience and attention to detail, you can transform your shower into a functional and stylish space. Start your project today and enjoy the benefits of a well-organized shower area.