
To install a new toilet wax ring, first, turn off the water supply and flush the toilet to empty the tank and bowl completely. Remove the old wax ring from the toilet flange and clean the flange and bottom of the toilet thoroughly.
Place the new wax ring onto the toilet flange, aligning it properly. Lower the toilet bowl onto the wax ring, making sure it sits evenly. Secure the toilet to the floor by tightening the bolts on each side, alternating between them to ensure even pressure.
Finally, reconnect the water supply, turn it on, and test the toilet for any leaks.
Gathering The Necessary Tools And Materials
Ensuring you have the right tools and materials
Gathering the necessary tools and materials is the first step to successfully installing a new toilet wax ring. Having the right tools will make the installation process smooth and efficient, ensuring a proper seal and preventing any potential water leaks.
Here are the essential tools and materials you will need:
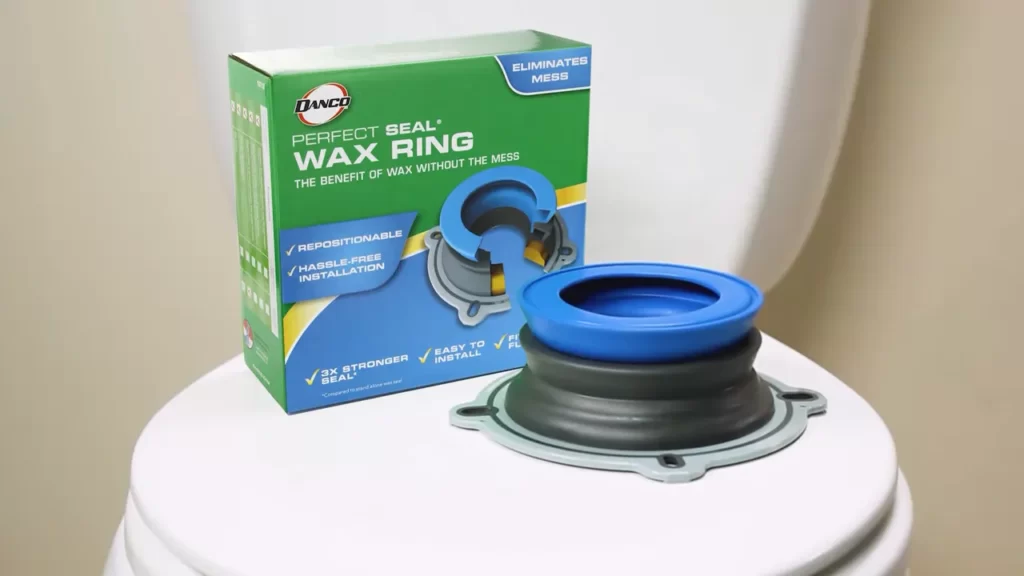
- Toilet wax ring
- Adjustable wrench
- Screwdriver (flathead or Phillips, depending on your toilet’s bolts)
- Towel or rag
- Gloves
- Bucket
- Bowl or a container to catch water
- Putty knife or scraper
- New bolts and washers (if necessary)
- Plumber’s tape (Teflon tape)
Selecting the right wax ring for your toilet
Choosing the correct wax ring for your toilet is crucial to ensure a proper seal and avoid any future leakage. Wax rings come in different sizes and types, so it’s important to select the right one for your specific toilet model and installation requirements.
When selecting a wax ring, consider the following factors:
- Size: Measure the diameter of your toilet’s waste pipe to determine the size of the wax ring you need. It should fit snugly around the pipe.
- Type: There are standard wax rings as well as reinforced wax rings. Standard wax rings work well for most toilets, while reinforced wax rings provide extra strength and durability.
- Extra features: Some wax rings come with additional features like rubber gaskets or plastic spacers, which can help in certain installation scenarios.
Consult the manufacturer’s recommendations or seek advice from a professional if you’re unsure about the right wax ring for your toilet.
Removing The Old Wax Ring
Shutting off the water supply for the toilet
Before you can start removing the old wax ring from your toilet, it is important to shut off the water supply first. This will prevent any accidental water leaks or flooding during the removal process. The water supply valve is usually located near the base of the toilet, either on the wall or on the floor.
To shut off the water supply, turn the valve clockwise until it is fully closed. This will stop the flow of water to the toilet. Once the valve is closed, you can proceed to the next step of emptying the toilet reservoir and bowl.
Emptying the toilet reservoir and bowl
Now that the water supply is shut off, you need to empty the toilet reservoir and bowl to prepare for the removal of the old wax ring. Start by flushing the toilet once or twice to drain as much water as possible from the reservoir and bowl.
If the toilet doesn’t flush properly or there is still water in the bowl, you can use a plunger to force the water down the drain. Alternatively, you can use a bucket or a cup to scoop out the remaining water manually. Make sure to wear gloves and use a container that is suitable for holding and disposing of the wastewater.
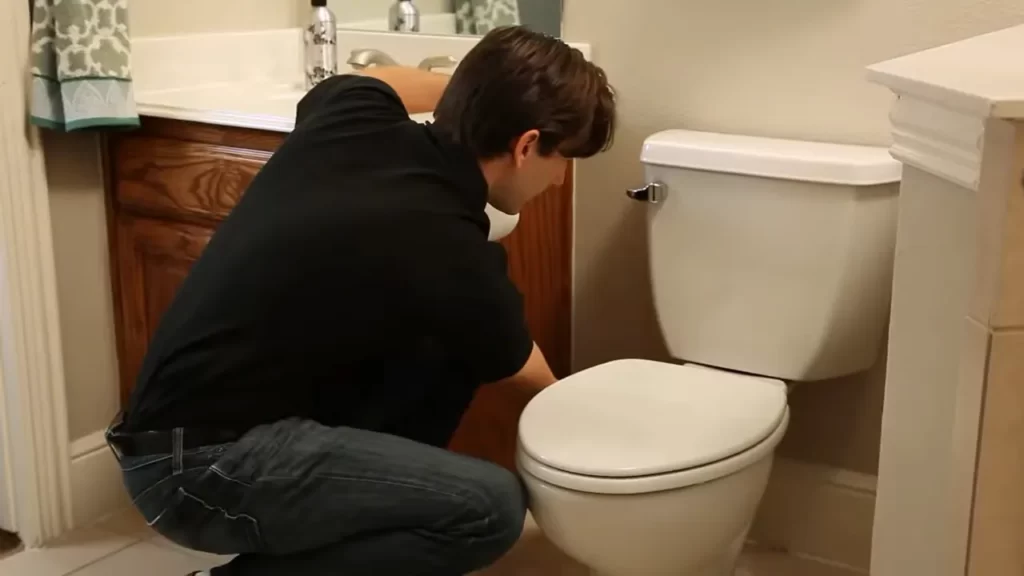
Removing the toilet carefully without damaging the floor
With the water emptied from the toilet, it’s time to remove the toilet carefully without causing any damage to the floor. Here’s how:
- Start by disconnecting the water supply line that connects the toilet to the water supply valve. Use an adjustable wrench to loosen the nut that secures the water supply line to the toilet.
- Next, remove the caps or covers that are hiding the bolts at the base of the toilet. These bolts secure the toilet to the floor. Use a screwdriver or a pry bar to carefully pry off the caps or covers.
- Once the caps or covers are removed, you can use a wrench to loosen the nuts that secure the toilet bolts. Loosen the nuts counterclockwise until they are completely removed.
- With the nuts removed, you can now lift the toilet straight up, being careful not to tilt it or apply too much force. If the toilet feels stuck, you can gently rock it back and forth to break the wax seal.
- Place the removed toilet on a protective surface or on old towels to prevent any spills or damage. Inspect the wax ring on the bottom of the toilet and remove any remnants of the old wax using a scraper or a putty knife.
Make sure to clean the area around the flange and inspect it for any damage. If the flange is damaged, you may need to replace it before installing the new wax ring.
Now that you have successfully removed the old wax ring and prepared the toilet for the installation of a new one, you can proceed to the next steps in the process of installing a new toilet wax ring.
Preparing The Toilet And Floor For Installation
Before you can install a new toilet wax ring, it’s important to properly prepare both the toilet and the floor. This step is crucial to ensure a secure and leak-free installation. In this section, we’ll cover the essential steps of cleaning the toilet flange and floor surface, inspecting the toilet flange for any damage or obstructions, and ensuring a level and stable flange.
Cleaning the toilet flange and floor surface
The first step in preparing for the installation is to clean the toilet flange and the floor surface. This will remove any debris, dirt, or old wax residue that may interfere with the proper installation of the new wax ring.
To clean the toilet flange, start by removing the toilet bowl by loosening the nuts on the bolts at the base of the toilet. Lift the toilet bowl and set it aside. With the toilet bowl removed, you can access the flange. Use a scraper or a putty knife to remove any old wax residue from both the flange and the toilet base. Make sure to clean thoroughly to ensure a smooth and secure fit for the new wax ring.
After cleaning the flange, proceed to clean the floor surface underneath the toilet bowl. Remove any dirt, debris, or residue that may have accumulated. A clean and level surface will help ensure a stable installation.
Inspecting the toilet flange for any damage or obstructions
Once the flange and floor surface are clean, it’s essential to inspect the toilet flange for any damage or obstructions. A damaged or improperly aligned flange can lead to leaks or an unstable toilet.
Start by visually inspecting the flange for any cracks, breaks, or signs of wear. Ensure that the flange is securely fastened to the floor and is level. A damaged flange should be replaced before proceeding with the installation. Additionally, check for any obstructions or debris that may prevent a proper seal between the flange and the new wax ring.
Ensuring a level and stable flange
An essential aspect of a successful toilet wax ring installation is ensuring a level and stable flange. A properly aligned flange will provide a secure and leak-free seal between the toilet bowl and the waste pipe.
To ensure a level flange, use a carpenter’s level and place it across the flange in both directions. Adjust the flange as needed to achieve a level position. This will help prevent any rocking or instability once the toilet bowl is installed.
Furthermore, check that the flange is securely fastened to the floor. Loose or wobbly flanges can result in leaks and other issues. If necessary, tighten the flange bolts to ensure a secure fit.
By properly preparing the toilet and floor for installation, you’ll set the foundation for a successful wax ring installation. Cleaning the flange and floor surface, inspecting for damage or obstructions, and ensuring a level and stable flange will help ensure a secure and leak-free toilet installation.
Installing The New Wax Ring
Positioning the new wax ring on the flange
When it comes to installing a new toilet wax ring, the proper positioning of the wax ring on the flange is crucial for a leak-free and secure installation. The wax ring acts as a seal between the toilet and the waste pipe, preventing any leakage and ensuring proper functioning of the toilet.
To begin, remove the old wax ring from the flange and clean the area thoroughly. Make sure there are no debris or residues left behind as they can affect the seal of the new wax ring. Once the flange is clean, it’s time to position the new wax ring.
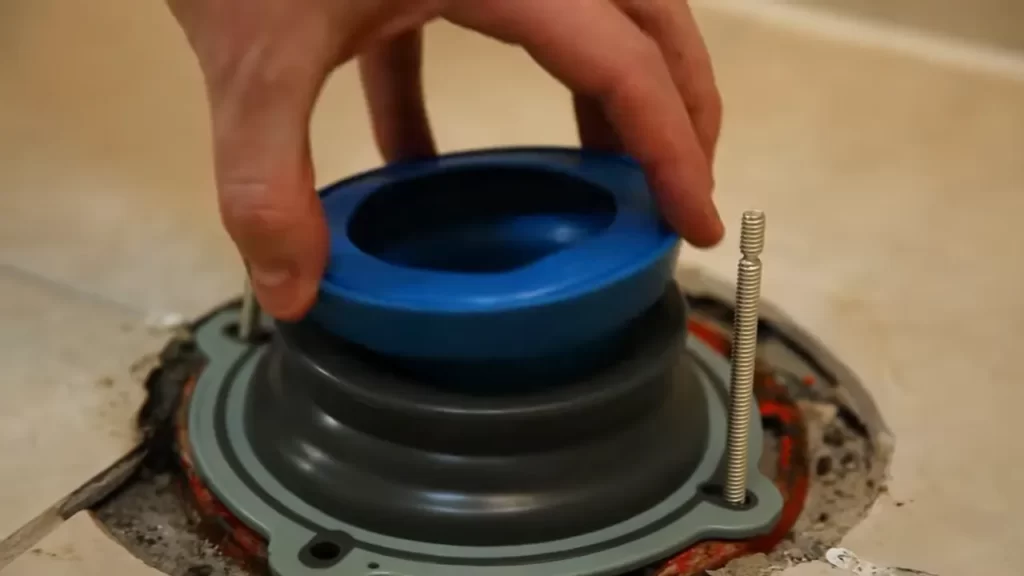
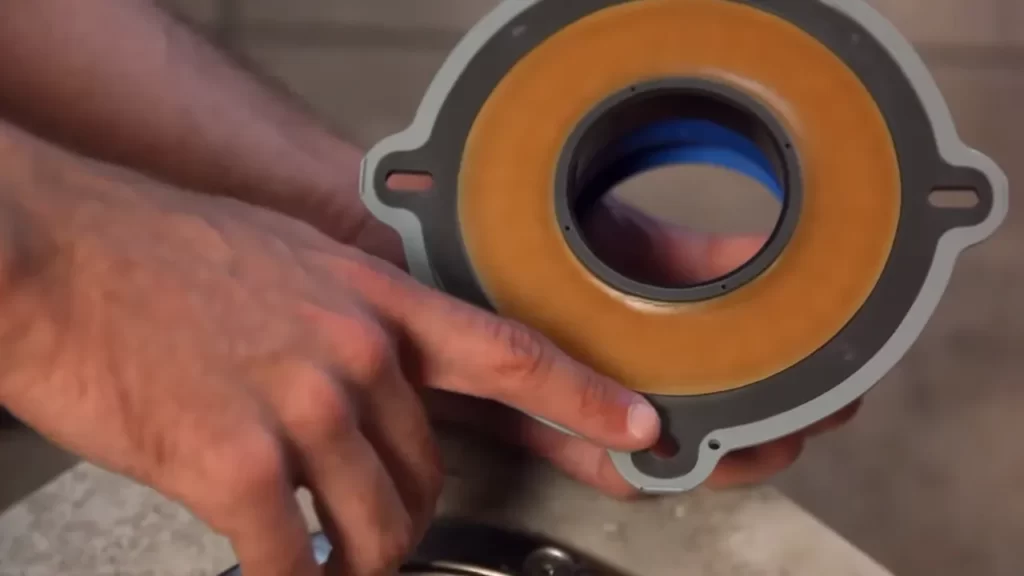
Carefully place the new wax ring on the flange, making sure it is centered and properly aligned with the flange opening. Pay attention to the shape of the wax ring and ensure that the tapered side is facing down towards the flange.
Ensuring proper alignment of the wax ring with the toilet outlet
Proper alignment of the wax ring with the toilet outlet is essential to ensure a good seal. The wax ring should fit snugly around the toilet outlet and create a watertight seal when the toilet is lowered onto the flange.
To ensure proper alignment, carefully lower the toilet bowl onto the flange, aligning it with the wax ring. The bolts on the flange should fit through the mounting holes on the toilet bowl. Make sure the toilet is positioned correctly and does not wobble or rock.
It’s a good idea to use a level to check the alignment of the toilet bowl. Adjust the position if necessary to ensure that the wax ring is aligned properly with the toilet outlet.
Lowering the toilet back onto the flange
Once the wax ring and toilet bowl are properly aligned, it’s time to lower the toilet back onto the flange. This step requires caution and precision to avoid damaging the wax ring or misaligning the toilet.
Carefully lower the toilet bowl onto the flange, ensuring that the bolts on the flange fit through the mounting holes on the toilet bowl. Apply gentle pressure to compress the wax ring, creating a tight seal between the toilet and the waste pipe.
Once the toilet is in position, make sure it sits evenly on the floor and does not wobble. Use a wrench to tighten the nuts on the flange bolts, securing the toilet firmly in place. Be careful not to overtighten the nuts as it may crack the toilet bowl.
Finally, reconnect the water supply line, turn on the water, and test the toilet for any leaks. If everything looks and functions properly, congratulations! You have successfully installed a new wax ring on your toilet.
Securing The Toilet And Testing For Leaks
After successfully installing a new wax ring on your toilet, it’s crucial to secure the toilet in place and thoroughly test for any potential leaks. This final step ensures that your toilet is stable, the seal is proper, and your bathroom remains leak-free. Here’s how to complete this essential task:
Tightening the Toilet Bolts Evenly
Start by tightening the toilet bolts evenly on both sides. This step is crucial as it ensures that the toilet sits securely on the wax ring and prevents any wobbling or instability. Begin by hand-tightening the nuts on the bolts, and then use a wrench to gently tighten them further. Avoid overtightening, as it may cause damage to the toilet base.
Checking for Proper Seal and Stability
Once the toilet bolts are tightened evenly, it’s important to check for a proper seal and stability. Gently press down on the toilet bowl, ensuring that it doesn’t move or shift. A stable toilet indicates that the wax ring is creating a reliable seal between the toilet and the floor drain, preventing any leaks.
If you notice any movement or instability, it might be an indication of an uneven wax ring or loose bolts. In that case, go back and tighten the bolts once again until the toilet sits firmly in place.
Turning on the Water Supply and Testing for Leaks
With the toilet securely in place, it’s time to turn on the water supply and test for leaks. Before proceeding, make sure the water supply valve is fully open. Slowly turn the valve counterclockwise until the water begins to flow.
Once the water is running, carefully inspect the area around the base of the toilet for any signs of water leakage. Check the floor, bolts, and the connection between the toilet tank and bowl. Remember, even the smallest drip of water can worsen with time and cause damage to your bathroom floor.
If you observe any leaks, immediately shut off the water supply and assess the cause. It may be necessary to double-check the tightness of the toilet bolts or adjust the wax ring to ensure a proper seal. Only proceed with using the toilet when you’re confident that there are no leaks present.
By following these steps to secure the toilet and test for leaks, you can ensure a stable and leak-free installation. Your newly installed wax ring and toilet will serve you reliably for years to come.
Troubleshooting Common Issues And Tips For Success
Dealing with a misaligned toilet flange
One common issue that can arise during the installation of a new toilet wax ring is a misaligned toilet flange. The flange is the part of the toilet that connects it to the waste pipe in the floor. If the flange is not aligned properly, it can lead to leaks and an unstable toilet.
If you encounter a misaligned toilet flange, there are a few steps you can take to address the issue:
- Check the alignment: Begin by checking the alignment of the flange. Make sure it is centered over the waste pipe and aligned properly with the toilet bolts. If the flange is not level, it may need to be adjusted or replaced.
- Use shims: If the flange is slightly misaligned, you can use plastic shims to correct the problem. Place the shims under the toilet flange to level it out and ensure a proper seal.
- Adjust the mounting bolts: If the toilet flange is misaligned, you may need to adjust the mounting bolts. Loosen the bolts and reposition the toilet to align it with the flange. Tighten the bolts securely once the toilet is properly aligned.
By addressing a misaligned toilet flange promptly, you can avoid leaks and ensure a stable and secure toilet installation.
Addressing leaks or uneven seating of the toilet
Another common issue that can occur when installing a new toilet wax ring is leaks or an uneven seating of the toilet. This can lead to water damage and discomfort when using the toilet.
If you notice leaks or an uneven seating, try the following tips:
- Check the wax ring: First, check if the wax ring is properly installed. Ensure that it is sitting securely on the toilet flange and that it creates a seal between the toilet and the waste pipe. Replace the wax ring if necessary.
- Tighten bolts: If the toilet is uneven, check if the mounting bolts are loose. Use a wrench to tighten them carefully, making sure not to overtighten and risk damaging the toilet or flange.
- Inspect the toilet base: Inspect the base of the toilet for any cracks or damage that could be causing leaks or an uneven seating. If you find any issues, it may be necessary to replace the toilet entirely.
Remember, addressing leaks or an uneven seating of the toilet is essential to prevent water damage and to ensure a comfortable and functional bathroom experience.
Following best practices for a successful installation
To ensure a successful installation of a new toilet wax ring, it is crucial to follow best practices. These tips will help you achieve a secure and leak-free installation:
- Prepare the area: Before beginning the installation, make sure the floor around the toilet flange is clean and free from any debris. This will ensure a proper seal and prevent leaks.
- Center the wax ring: When placing the wax ring on the toilet flange, make sure it is centered properly. This will ensure an even distribution of pressure and a tight seal.
- Align the toilet: When lowering the toilet onto the wax ring, align it carefully with the mounting bolts and the flange. Ensure that the toilet sits evenly and securely on the floor.
- Tighten bolts evenly: When securing the toilet to the floor, tighten the mounting bolts evenly. This will prevent the toilet from being uneven and causing leaks.
- Test for leaks: After the installation is complete, test for leaks by flushing the toilet and checking for any water seepage around the base. If you notice any leaks, address them immediately.
By following these best practices, you can ensure a successful installation of a new toilet wax ring and enjoy a reliable and leak-free toilet for years to come.
Maintenance And Care Tips For The New Wax Ring
Keeping the Wax Ring Clean and Free from Debris
One of the key maintenance tasks for your new toilet wax ring is to keep it clean and free from debris. Over time, dirt, dust, and other particles can build up around the wax ring, which can compromise its effectiveness and cause leaks. To prevent this, make sure to regularly clean the area around the wax ring. Here’s a simple step-by-step guide:
- Begin by turning off the water supply to the toilet and flushing it to drain the water.
- Wear gloves to protect your hands and use a mild detergent or a toilet cleaner specifically designed for removing stains and build-up.
- Using a sponge or a soft cloth, apply the cleaner to the area around the wax ring, making sure to remove any visible dirt or debris.
- Rinse the area thoroughly with water and dry it completely.
- Once the area is clean and dry, apply a thin layer of petroleum jelly or silicone grease to the top of the wax ring. This helps to keep the wax flexible and prevents it from drying out, ensuring a proper seal.
Regularly Inspecting for Signs of Wear or Damage
Regular inspections are crucial for identifying any signs of wear or damage to the wax ring. Over time, the wax ring can deteriorate due to constant exposure to moisture, causing it to lose its effectiveness. To ensure that your toilet is functioning properly, it’s important to inspect the wax ring at least once every six months. Here’s what you should do:
- Turn off the water supply to the toilet and flush it to drain the water.
- Using a flashlight, carefully examine the area around the base of the toilet. Look for any cracks, gaps, or signs of deterioration in the wax ring.
- If you notice any damage to the wax ring, it’s important to replace it as soon as possible to prevent leaks and water damage.
- If the wax ring appears to be in good condition, but you notice a foul odor or water leaks around the base of the toilet, it may indicate that the wax ring is not forming a proper seal. In this case, it’s also recommended to replace the wax ring.
Replacing the Wax Ring When Necessary
Replacing the wax ring is necessary when you notice signs of wear, damage, or if you are experiencing water leaks around the base of the toilet. Replacing the wax ring is a relatively simple task that can be done by following these steps:
- Firstly, turn off the water supply to the toilet and drain the water by flushing it.
- Next, remove the toilet by disconnecting the water supply line and unscrewing the bolts that secure it to the floor.
- Gently lift the toilet off the flange and place it on a towel or a piece of cardboard.
- Remove the old wax ring and any residue left on the flange or the base of the toilet.
- Clean the area thoroughly and make sure it is dry before proceeding.
- Place the new wax ring onto the flange, making sure it is centered and properly aligned.
- Carefully lower the toilet onto the wax ring, ensuring that the bolts on the flange pass through the holes on the base of the toilet.
- Tighten the bolts securely, but be careful not to overtighten and crack the toilet.
- Reconnect the water supply line and turn on the water.
- Finally, flush the toilet a few times to ensure that the new wax ring is properly sealed and there are no leaks.
By following these maintenance and care tips for your new wax ring, you can ensure a proper seal and prevent any leaks or water damage. Taking the time to keep the wax ring clean, regularly inspect for wear or damage, and replace it when necessary, will help extend the lifespan of your toilet and keep it functioning efficiently for years to come.
Frequently Asked Questions
Do I Put The Wax Ring On The Toilet Or The Flange?
Place the wax ring on the flange, not the toilet, when installing it.
Is Changing Toilet Wax Ring Easy?
Changing a toilet wax ring is easy. It involves removing the toilet, scraping off the old wax ring, and replacing it with a new one. It’s a straightforward process that can typically be done in under an hour.
Can You Replace Wax Ring Without Replacing Toilet?
Yes, you can replace the wax ring without having to replace the toilet.
Which Way Does A Wax Ring On Toilet Go?
The wax ring on a toilet should be placed with the wax side facing down, onto the flange on the floor. Make sure to align the toilet bowl with the bolts on the flange before pressing it down to create a watertight seal.
Conclusion
Installing a new toilet wax ring is a simple and necessary task. With the right tools and proper steps, you can prevent leaks and ensure a secure seal. By following the guidelines outlined in this blog post, anyone can successfully complete this DIY project.
Remember to always consult the manufacturer’s instructions and take necessary safety precautions. So go ahead and confidently tackle this project, knowing that you have the knowledge and skills to get the job done right.