To install a motion sensor light switch, first turn off the power, remove the existing switch, connect the motion sensor wires, and secure the switch in place. Welcome to our guide on how to install a motion sensor light switch.
Motion sensor light switches are a convenient and energy-efficient solution for lighting up areas in your home. Whether you want to improve security or simply add convenience, installing a motion sensor light switch is a relatively simple process. We will walk you through the steps needed to install a motion sensor light switch in your home.
By following these instructions, you can successfully install a motion sensor light switch and enjoy its benefits. So, let’s get started!
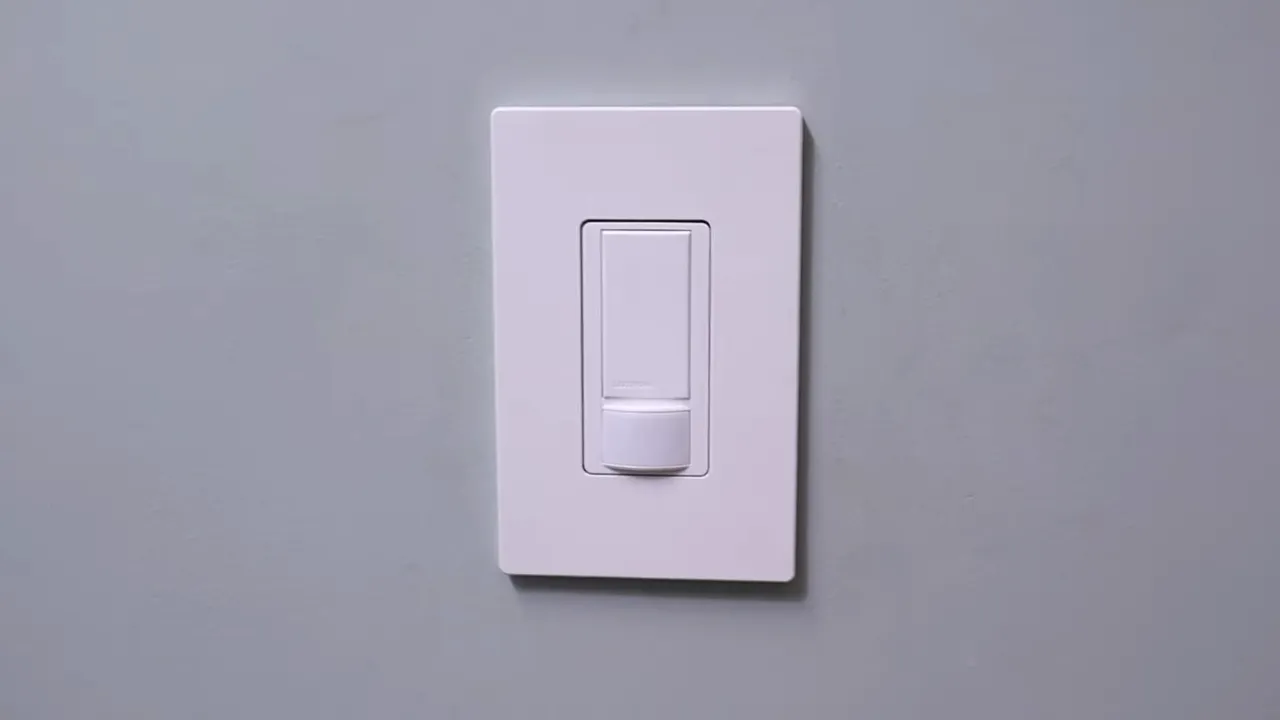
Choosing The Right Motion Sensor Light Switch
Different types and features of motion sensor light switches
When it comes to choosing the right motion sensor light switch for your home, there are several different types and features to consider. Let’s take a closer look at the options available:
1. Passive Infrared (PIR) motion sensor
The most common type of motion sensor light switch is the Passive Infrared (PIR) sensor. These switches detect changes in infrared energy, such as body heat, and activate the light accordingly. PIR sensors are known for their accuracy and are suitable for most residential applications.
2. Ultrasonic motion sensor
Ultrasonic motion sensor switches emit high-frequency sound waves and detect changes in the waves’ patterns caused by movement. These switches are highly sensitive and ideal for areas with obstructions or where a PIR sensor may not be as effective.
3. Dual technology motion sensor
Dual technology motion sensors combine PIR and ultrasonic technologies to provide enhanced accuracy and reduce false activations. These switches are ideal for critical areas where reliability is essential, such as corridors or staircases.
4. Outdoor motion sensor
If you are looking to install a motion sensor light switch outdoors, it’s important to choose a switch specifically designed for outdoor use. These switches are weatherproof and built to withstand the elements, ensuring durability and longevity.
5. Adjustable features
Some motion sensor light switches offer adjustable settings to tailor the switch’s sensitivity, range, and duration of illumination to your specific needs. These adjustable features provide flexibility and customization, allowing you to fine-tune the switch’s performance.
Factors to consider when selecting a motion sensor light switch
1. Detection range
The detection range of a motion sensor light switch determines how far it can detect movement. Consider the size of the area you want to illuminate and choose a switch with an appropriate detection range.
2. Sensitivity
Sensitivity refers to how easily the switch detects motion. A switch with adjustable sensitivity settings allows you to customize it to avoid false activations caused by small animals or other non-human movements.
3. Duration of illumination
Consider how long you want the light to stay on once motion is detected. Some switches offer adjustable timers, allowing you to set the duration of the illumination to suit your preferences.
4. Installation requirements
Check the installation requirements of the motion sensor light switch to ensure it is compatible with your existing wiring and switch setup. Some switches may require a neutral wire or specific wiring configurations.
5. Energy efficiency
Choose a motion sensor light switch that is energy-efficient to help lower your electricity bills. Look for switches with features such as daylight sensing and adjustable daylight sensor override to ensure the light only turns on when necessary.
6. Brand reputation
Consider the reputation and reliability of the brand before making your final decision. Research customer reviews and ratings to ensure you are selecting a motion sensor light switch from a reputable manufacturer.
By considering these factors and understanding the different types and features of motion sensor light switches, you can make an informed decision and choose the right switch for your specific needs. Remember to consult the manufacturer’s instructions and follow proper installation procedures for a successful installation.
Step-By-Step Guide To Wiring A Motion Sensor Light Switch
In this step-by-step guide, we will walk you through the process of wiring a motion sensor light switch. By installing a motion sensor light switch, you can enhance the security of your home, save energy, and enjoy the convenience of automated lighting.
Gathering the necessary tools and materials
Before you begin wiring your motion sensor light switch, make sure you have all the necessary tools and materials. Here’s what you’ll need:
- Flathead and Phillips screwdrivers
- Wire pliers
- Wire stripper
- Voltage tester
- Motion sensor light switch
- Electrical tape
- Wire connectors
- Electrical box
- Wire nuts
Turning off the power supply
Prior to any electrical work, it is crucial to turn off the power supply to avoid any accidents. Locate your home’s electrical panel and find the circuit breaker that controls the light switch you’re working on. Flip the corresponding circuit breaker to the “Off” position. To ensure that the power is indeed off, use a voltage tester to check for any live wires.
Removing the existing light switch
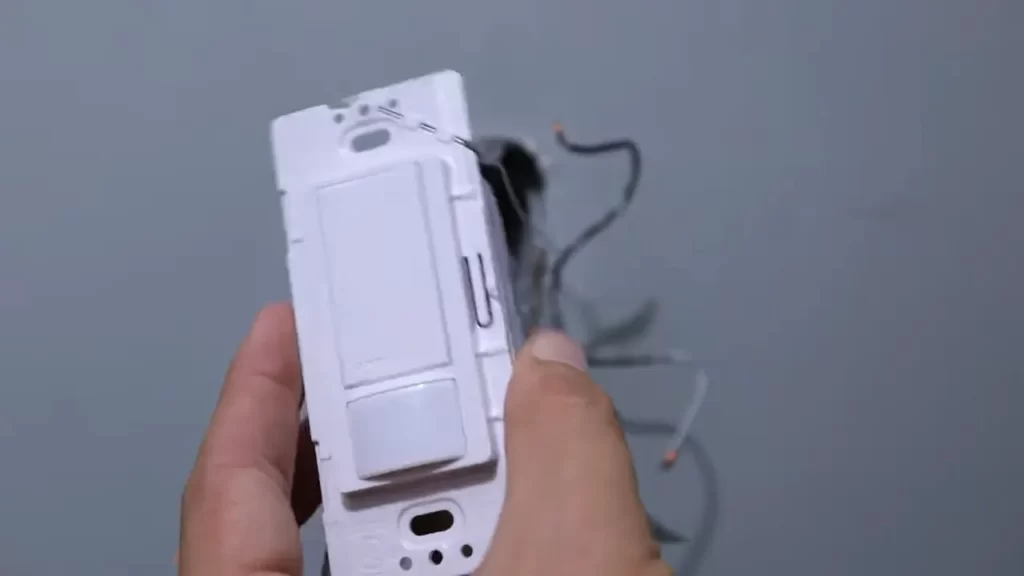
Once you have confirmed that the power is off, you can proceed to remove the existing light switch. Start by removing the cover plate with a screwdriver. Next, unscrew the mounting screws that hold the switch in place. Carefully pull the switch away from the wall, exposing the wiring behind it.
Wiring the motion sensor light switch
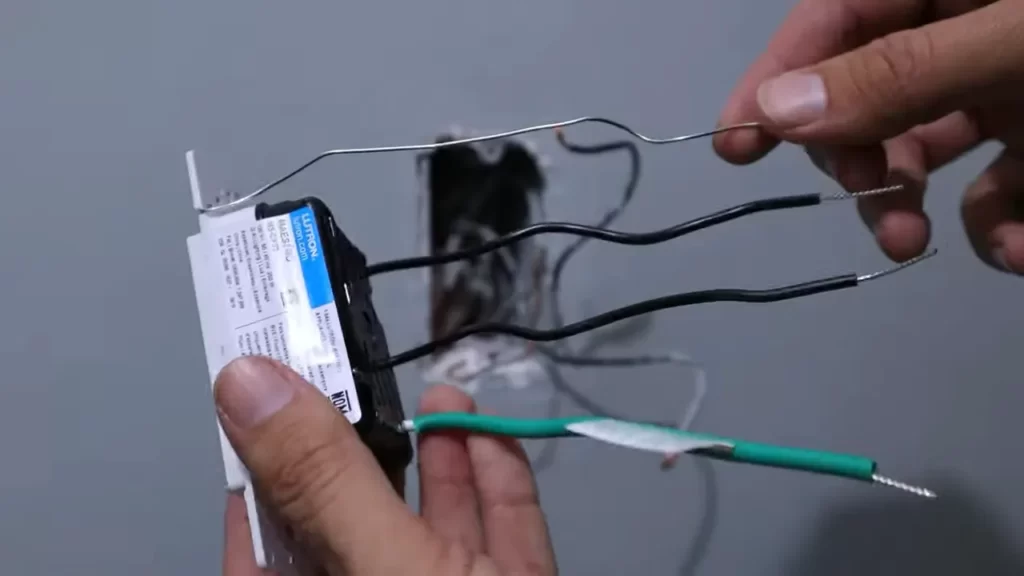
Now it’s time to wire the motion sensor light switch. Begin by identifying the “hot” wire, which is typically black or red. This wire will be connected to the “Line” or “Hot” terminal of the motion sensor switch. Connect the hot wire to the corresponding terminal by using a wire nut or wire connector.
Next, locate the wire going towards the light fixture and connect it to the “Load” terminal on the motion sensor switch. Again, use a wire nut or wire connector to secure the connection.
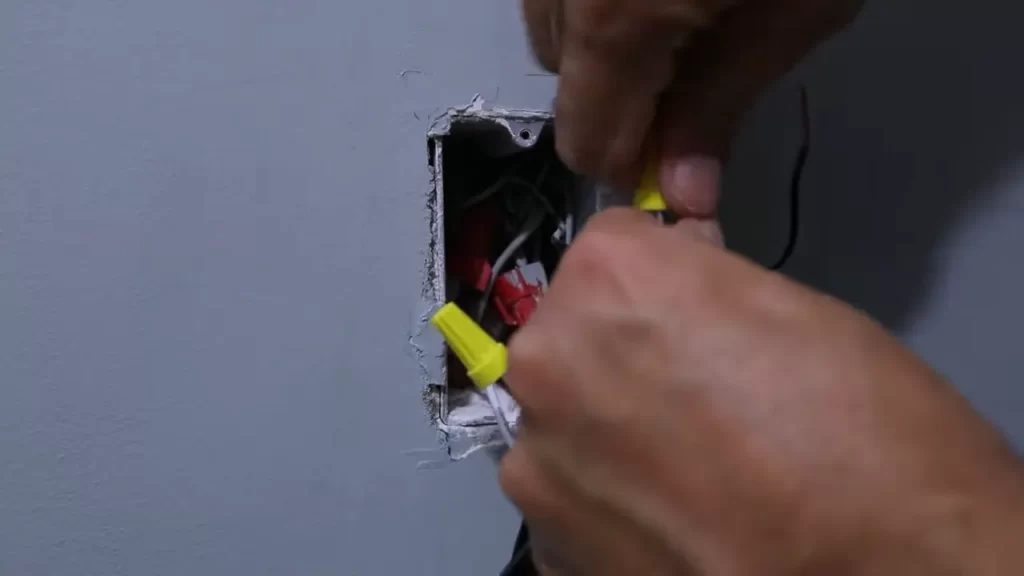
If your motion sensor light switch has a ground terminal, connect the bare copper wire from the electrical box to the ground terminal using a wire nut or wire connector. If there is no ground terminal, simply attach the bare copper wire to the metal electrical box itself.
Before proceeding further, wrap electrical tape around the wire connectors to ensure a secure connection and prevent any accidental live wires.
Installing the cover plate
After wiring the motion sensor light switch, it’s time to install the cover plate. Align the cover plate with the electrical box and secure it in place using the provided screws. Make sure the plate sits flush against the wall for a clean and finished look.
Congratulations! You have successfully wired and installed a motion sensor light switch. Remember to turn the power back on at the circuit breaker and test the switch to ensure it is functioning properly. Enjoy the added convenience and energy savings that come with automated lighting.
Programming And Adjusting The Motion Sensor
One of the key features of a motion sensor light switch is its ability to be programmed and adjusted to suit your specific needs. Understanding the motion sensor settings, programming the desired settings, and adjusting the sensor sensitivity and detection range are all important steps in ensuring optimal functionality. In this section, we will discuss these aspects in detail.
Understanding the motion sensor settings
Before you begin programming and adjusting the motion sensor, it is crucial to have a clear understanding of the available settings. These settings may vary depending on the brand and model of the motion sensor light switch you have purchased. However, some common settings include:
- Sensitivity: Determines how sensitive the motion sensor is to movement. Higher sensitivity settings will detect even the slightest motion, while lower sensitivity settings may require more movement to trigger the light.
- Time delay: Sets the duration for which the light will remain on after detecting motion. It can usually be adjusted to a range of a few seconds to several minutes.
- Detection range: Determines the area within which motion will be detected. The range is typically adjustable, allowing you to customize the coverage area.
By familiarizing yourself with these settings, you will be better equipped to program and adjust the motion sensor according to your preferences.
Programming the desired settings
Once you have a good grasp of the motion sensor settings, you can proceed to programming the desired settings. The programming process may differ slightly depending on the specific model of your motion sensor light switch. However, the general steps involved are as follows:
- Locate the programming button on the motion sensor light switch. This button is often found on the front or back of the device.
- Press and hold the programming button for a few seconds until the sensor enters programming mode. You may notice a confirmation light or hear a beep to indicate the mode change.
- Using the appropriate controls, navigate through the available settings and select the desired values for sensitivity, time delay, and detection range. Refer to the user manual for specific instructions on adjusting these settings.
- Once you have made your selections, press the programming button again to save the settings. The sensor will exit programming mode, and your desired settings will be applied.
Following these simple steps will allow you to program the motion sensor light switch with your preferred settings, ensuring it operates exactly as you need it to.
Adjusting the sensor sensitivity and detection range
After programming the initial settings, you may find that further adjustments are necessary to achieve the desired functionality. The sensor sensitivity and detection range can be fine-tuned to better suit your specific requirements. Here’s how:
- Start by experimenting with the sensitivity setting. If the sensor is detecting too much or too little motion, you can adjust the sensitivity level accordingly. Increase the sensitivity if the light is not triggering when you expect it to, and decrease it if the light is activating too frequently.
- To adjust the detection range, you may need to physically reposition the motion sensor. Refer to the user manual for specific instructions on adjusting the detection area. In some cases, there may be a range dial or similar mechanism that allows you to manually adjust the coverage area.
- Test the motion sensor light switch after each adjustment to ensure it is functioning as desired. It may take some trial and error to find the optimal sensitivity and detection range for your particular setup.
By taking the time to adjust the sensor sensitivity and detection range, you can maximize the effectiveness of your motion sensor light switch and create a lighting solution that fits your specific needs.
Troubleshooting Common Issues
Identifying and Fixing Wiring Problems:
One common issue you may encounter when installing a motion sensor light switch is wiring problems. These can prevent the switch from functioning properly, so it’s important to identify and fix them as soon as possible. Here are some steps you can take to troubleshoot wiring problems:
- Check for loose connections: Start by turning off the power to the switch at the circuit breaker. Then, remove the switch cover and check for any loose or disconnected wires. If you find any, tighten the connections or reconnect the wires using a wire nut.
- Inspect for damaged wires: Examine the wires for any signs of damage, such as fraying or exposed copper. If you spot any issues, you will need to replace the damaged wire with a new one of the same gauge.
- Ensure proper grounding: Make sure that the switch is properly grounded by ensuring the ground wire is securely connected to the grounding screw on the switch. This will help prevent electrical malfunctions.
- Check compatibility: Confirm that the motion sensor light switch is compatible with your electrical system. Some older homes may require additional wiring adjustments to accommodate the switch.
- Turn off the power: Begin by turning off the power to the switch at the circuit breaker.
- Locate the reset button: Look for a small reset button on the motion sensor light switch. It is usually located on the front or side of the switch.
- Press the reset button: Using a small pointed object like a paperclip or pen, press and hold the reset button for about 10 seconds.
- Power on the switch: Once you have held the reset button for the specified time, turn the power back on at the circuit breaker.
- Adjust the sensitivity settings: Many motion sensor light switches have adjustable sensitivity settings. Experiment with different sensitivity levels to find the one that works best for your needs.
- Check for obstructions: Make sure there are no objects blocking the motion sensor’s view. Even small obstructions, such as curtains or plants, can cause false triggers.
- Reposition the sensor: If possible, try repositioning the motion sensor to ensure it has a clear line of sight of the area you want to monitor.
- Upgrade to a dual-technology sensor: Consider upgrading to a dual-technology motion sensor light switch. These switches use a combination of infrared and ultrasonic technologies, providing more accurate detection and reducing false triggers.
Resetting the Motion Sensor Light Switch:
If your motion sensor light switch is not working as expected, resetting it may help resolve the issue. Follow these steps to reset the switch:
Dealing with False Triggers:
False triggers can be frustrating, but there are steps you can take to minimize them. Follow these tips to reduce false triggers with your motion sensor light switch:
By troubleshooting common issues like wiring problems, resetting the motion sensor light switch, and dealing with false triggers, you can ensure that your motion sensor light switch functions effectively, providing added convenience and security to your space.
Tips For Optimal Performance
If you are planning to install a motion sensor light switch, it is crucial to consider a few essential tips to ensure optimal performance. Proper placement of the motion sensor, regular maintenance and cleaning, as well as maximizing energy efficiency, are key factors that can significantly enhance the functionality of your motion sensor light switch. In this article, we will explore these tips in detail, helping you make the most of your investment.
Proper placement of the motion sensor
Choosing the right location to install your motion sensor is crucial for its overall performance. Here are a few guidelines to keep in mind:
- Position the motion sensor at a height of 6-8 feet above the ground for optimal detection range.
- Ensure that the sensor is not obstructed by any objects like furniture or curtains, as this could interfere with its detection capabilities.
- Avoid placing the motion sensor near heating vents, air conditioning units, or other sources of heat or cold, as temperature fluctuations can affect its functioning.
Maintenance and cleaning of the sensor
Regular maintenance and cleaning help to ensure the longevity and accuracy of your motion sensor. Here’s how you can keep your sensor in top shape:
- Remove any dust or debris from the sensor’s surface using a soft cloth or brush.
- Inspect the sensor for any signs of damage or wear regularly.
- Check the batteries or power source regularly to ensure they are functioning properly.
- Follow the manufacturer’s instructions for any specific cleaning or maintenance procedures.
Maximizing energy efficiency
Efficient energy usage is not only eco-friendly but also helps in optimizing the performance of your motion sensor light switch. Consider the following tips:
- Choose motion sensors with adjustable time settings to control how long the lights stay on after motion is detected.
- Select a sensor with a lux control feature to prevent unnecessary activation during daylight hours.
- Consider using LED light bulbs, as they consume less energy compared to traditional incandescent bulbs.
- Regularly check the settings on your motion sensor light switch and make adjustments if necessary.
By adhering to these tips, you can ensure that your motion sensor light switch operates at its best, providing you with enhanced security, convenience, and energy-efficiency. Take the time to install and maintain your motion sensor properly, and enjoy the benefits it brings to your home.
Using Google Home Or Alexa With Motion Sensor Light Switches
Integrating Motion Sensor Light Switches with Smart Home Devices
One of the greatest conveniences of technology today is the ability to control various aspects of our homes with just our voices. If you have a motion sensor light switch installed in your home, you can integrate it with smart home devices like Google Home or Alexa to take advantage of their advanced features. This means you can control your motion sensor lights with voice commands and even set up automation options for a truly seamless and hands-free experience.
Voice Commands and Automation Options
With the integration of motion sensor light switches and smart home devices, controlling your lighting has never been easier. Simply use your voice to command Google Home or Alexa to turn on or off the lights connected to your motion sensor switch. Whether you’re busy cooking in the kitchen or carrying your laundry up the stairs, a simple voice command will provide you with the perfect lighting ambiance you desire.
To take it a step further, automation options offer endless possibilities. By setting up routines or schedules in your smart home device’s app, you can have your motion sensor lights automatically turn on or off based on your daily routine. For example, you can program the lights to turn on as you enter a room and turn off after a set period of inactivity. This not only saves energy but also adds an extra layer of security to your home.
How to Integrate Motion Sensor Light Switches with Smart Home Devices
Integrating your motion sensor light switches with Google Home or Alexa is a straightforward process. Here’s a simple step-by-step guide on how to do it:
- Make sure your motion sensor light switch is compatible with your smart home device, and that it supports voice control or automation options.
- Download and install the app for your smart home device (Google Home or Alexa) from the respective app store.
- Follow the instructions in the app to set up your smart home device and connect it to your home’s Wi-Fi network.
- In the app, go to the settings or devices section and look for the option to add a new device.
- Choose the motion sensor light switch from the list of compatible devices.
- Follow the on-screen instructions to complete the pairing process. This usually involves pressing a button on the motion sensor light switch to put it in pairing mode and then confirming the connection in the smart home app.
- Once the pairing is complete, you can start using voice commands or setting up automation options to control your motion sensor lights.
With just a few simple steps, you can enjoy the convenience and automation that comes with integrating your motion sensor light switches with Google Home or Alexa. Say goodbye to fumbling for light switches in the dark or having to remember to turn off lights when you leave a room. Let technology do the work for you and create a smarter, more efficient home environment.
Frequently Asked Questions
Can I Install A Motion Sensor To An Existing Light Switch?
Yes, you can install a motion sensor to an existing light switch. Simply replace the existing switch with a motion sensor switch, and then follow the installation instructions provided with the switch. Enjoy the convenience and energy savings of automatic lighting control.
Do You Need An Electrician To Install A Motion Sensor Light?
No, you don’t need an electrician to install a motion sensor light. It’s a simple DIY project that you can do yourself. However, if you’re uncomfortable working with electricity, it’s best to hire a professional.
How Do You Attach A Motion Sensor To An Outdoor Light?
To attach a motion sensor to an outdoor light, first, turn off the power to the light. Then, remove the existing light fixture from the wall or ceiling. Connect the motion sensor’s wires to the corresponding wires on the light fixture.
Attach the sensor and secure the light fixture back in place. Finally, restore power and test the motion sensor.
Are Motion Sensor Lights Easy To Install?
Motion sensor lights are easy to install. They can be set up quickly without any hassle. Simply follow the instructions provided and you’ll have them up and running in no time.
Conclusion
Installing a motion sensor light switch is a simple and efficient way to enhance your home’s security and energy efficiency. With just a few steps, you can enjoy the convenience of automated lighting while reducing your electricity bills. Remember to follow the installation guide provided by the manufacturer and ensure proper wiring for optimal performance.
Upgrade your home with this modern and cost-effective solution today.