
To install a laundry chute, measure the desired location, cut a hole in the wall of the desired size, and secure the chute in place with screws and adhesive.
Factors To Consider In Selecting A Laundry Chute Spot
Factors to Consider in Selecting a Laundry Chute Spot
When it comes to installing a laundry chute, selecting the right spot is crucial for its functionality and convenience. Several factors should be taken into consideration to ensure that the chosen location meets your requirements. In this section, we will explore three key factors to consider: accessibility and convenience of the location, proximity to the laundry area, and structural requirements and limitations.
Accessibility and Convenience of the Location
The first factor to consider is the accessibility and convenience of the chosen location for your laundry chute. You want to ensure that the laundry chute is easily accessible from different areas of your home, making it hassle-free to dispose of dirty laundry. Ideally, the location should be strategically placed on each floor, ensuring seamless access for everyone in the household.
Additionally, consider the convenience factor. Choose a spot that is in close proximity to frequently used areas, such as bedrooms or bathrooms. This will make it easier to drop laundry into the chute without having to carry it across long distances. Take into account the flow of your daily routine and select a location that aligns with the natural movement within your home.
Proximity to Laundry Area
Another important factor to consider when selecting a laundry chute spot is its proximity to the laundry area. The purpose of a laundry chute is to eliminate the need to carry laundry up and down staircases or across long distances. Therefore, it is vital to choose a location that allows for easy and direct access to the laundry room or utility area.
Consider the layout of your home and find a spot that allows you to connect the laundry chute directly to the laundry area, eliminating the need for any detours or obstacles. This will save you time and effort in transferring the laundry from the chute to the washing machine.
Structural Requirements and Limitations
Lastly, when selecting a spot for your laundry chute, it is essential to consider the structural requirements and limitations of your home. Take into account the walls and floors where the chute will be installed. Ensure that they are sturdy enough to support the weight of the chute and the laundry being dropped into it.
Consider any existing features or obstacles, such as plumbing or electrical works, that may affect the installation process. Be aware of any structural limitations that may prevent you from placing the chute in your desired location. It is important to consult with a professional or an experienced contractor to ensure that the chosen spot meets all the necessary structural requirements and adheres to building regulations.
By carefully considering these factors: accessibility and convenience of the location, proximity to the laundry area, and structural requirements and limitations, you can select the perfect spot for your laundry chute installation. This will result in a functional and convenient addition to your home, making laundry chores a breeze.
Essential Materials For Laundry Chute Installation
Installing a laundry chute can make your life much easier by providing a convenient way to get dirty laundry from upper floors to the laundry room. To ensure a smooth installation process, it is important to gather the essential materials needed. Here are the key materials you will need:
Chute Ducting
The chute ducting is the main component that allows the laundry to slide down from one floor to another. It is typically made of rigid or semi-rigid material such as PVC or metal. The dimensions of the chute ducting may vary depending on your specific needs and the layout of your home. Ducting is available in various diameters, so be sure to measure the area where you plan to install the chute before purchasing.
Chute Door and Frame
The chute door and frame create the opening on each floor where the laundry will be inserted. This component must be sturdy and well-fitted to prevent any items from falling out. You can choose from a range of materials for the door and frame, including wood, metal, or plastic. Consider opting for a door with a locking mechanism to ensure the chute remains closed when not in use.
Mounting Brackets and Screws
For a secure installation, mounting brackets and screws are essential. These components will hold the chute ducting in place, ensuring it remains stable even with regular use. Depending on the type of ducting and wall structure, you may need different types of brackets and screws. Consult with a hardware expert or refer to the manufacturer’s instructions to ensure you choose the appropriate brackets and screws for your specific installation.
Duct Tape and Sealant
To ensure an airtight and secure installation, duct tape and sealant are crucial. Duct tape can be used to seal any joints or connections in the chute ducting, preventing any leakage or unwanted odors. Sealant is used to create a watertight seal around the chute door and frame, keeping water and moisture out of the surrounding walls.
Safety Precautions and Equipment
When working on any home improvement project, safety should always be a priority. Make sure to have the following safety equipment on hand for the installation process:
- Protective gloves
- Safety glasses
- Dust mask or respirator
- Utility knife
Additionally, it’s important to take the necessary precautions when working at heights or using power tools. Ensure you have a stable and secure ladder to reach the installation area and follow all safety guidelines provided by the manufacturer of the tools you will be using.
By gathering these essential materials and taking the necessary safety precautions, you will be well-prepared to install a laundry chute in your home. This convenience will make laundry days a breeze, saving you time and effort in the long run.

Investigation And Preparation Steps
Installing a laundry chute can bring convenience and efficiency to your home, but taking the time to properly investigate and prepare for the process is crucial. By following these steps, you can ensure a successful installation that meets all necessary requirements and fits seamlessly into your home.
Measuring the area for the chute
The first step in installing a laundry chute is accurately measuring the space where it will be located. Take careful measurements of the vertical and horizontal distance, ensuring there is enough room for the chute to be properly installed. Consider factors such as walls, plumbing, electrical outlets, and any potential obstacles that may affect the chute’s trajectory. By taking precise measurements, you can ensure that the chute will fit seamlessly into the designated space.
Determining the best chute type and size
Once you have measured the space, it’s important to determine the most suitable chute type and size for your specific needs. This will depend on factors such as the number of floors, the amount of laundry generated, and personal preferences. Research different chute options available in the market and consider factors such as durability, ease of maintenance, noise reduction, and safety features. Take into account the dimensions of the chute, as a larger chute may be needed for heavy loads.
Obtaining necessary permits and permissions
Prior to installing a laundry chute, it is important to check the local building codes and regulations to ensure compliance. Some areas may require permits or permissions for chute installations. Contact your local building department to check if any permits are needed and if there are any specific guidelines that need to be followed. By obtaining the necessary permits and permissions, you can avoid any legal issues in the future and ensure a smoother installation process.
Outlining a timeline and budget
Before starting the installation, it is essential to outline a realistic timeline and budget for the project. Determine how long the installation is expected to take and schedule the necessary tasks accordingly. Additionally, create a budget that includes all the materials, labor, and any additional costs that may arise during the installation process. By creating a timeline and budget, you can effectively manage the project and ensure that it is completed within the desired timeframe and financial constraints.
By following these investigation and preparation steps, you can ensure a smooth and successful installation of your laundry chute. Taking the time to measure the area, determine the best chute type and size, obtain necessary permits and permissions, and outline a timeline and budget will result in a convenient and efficient addition to your home.
Step-By-Step Instructions For Installation Process
Installing a laundry chute can be a convenient and practical addition to any home. It allows you to easily drop your dirty clothes straight into the laundry room, saving you time and effort in carrying heavy laundry baskets up and down the stairs. In this step-by-step guide, we will walk you through the process of installing a laundry chute, from marking and cutting a hole for the chute door, to sealing and insulating the installation properly.
Marking and cutting a hole for the chute door
The first step in installing a laundry chute is to carefully select a suitable location for your chute door. You’ll want to choose an area on an upper floor that is easily accessible and within close proximity to your laundry room. Once you have chosen the location, follow these steps:
- Measure the dimensions of the chute door frame, ensuring it will fit the desired location.
- Using a pencil, mark a rectangular outline on the wall where the chute door will be installed.
- Using a reciprocating saw or a jigsaw, carefully cut along the marked outline to create the hole for the chute door.
- Smooth out the edges of the hole using sandpaper, ensuring it is free from any rough edges or debris.
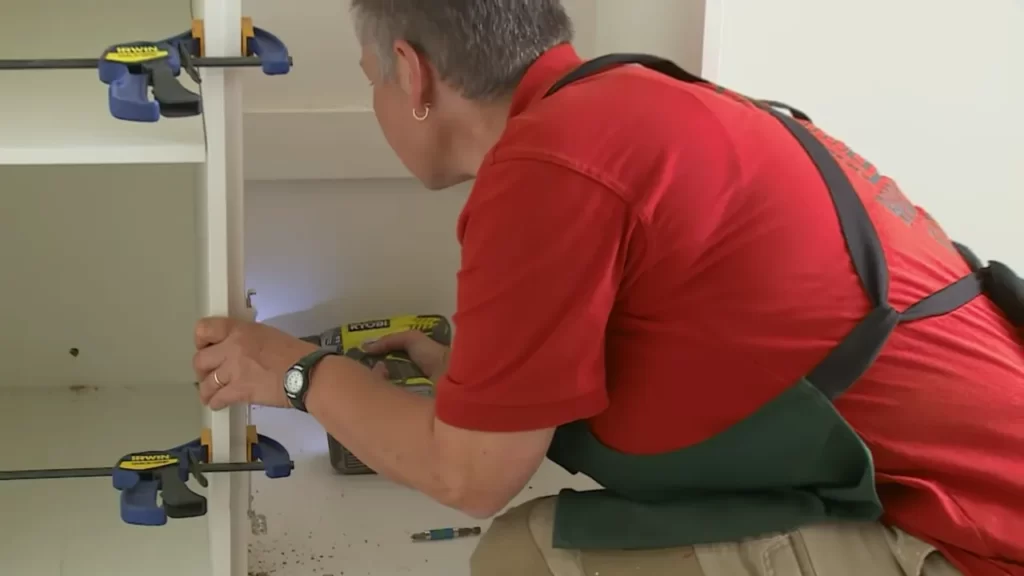
Assembling and securing the chute ducting
Now that you have created the hole for the chute door, it’s time to assemble and secure the chute ducting. This will provide a pathway for the laundry to travel from the chute door to the laundry room. Follow these steps:
- Measure the length of the chute ducting needed to connect the chute door to the laundry room.
- Cut the chute ducting to the appropriate length using a hacksaw or a pipe cutter.
- Assemble the chute ducting by connecting the sections together using duct tape or zip ties.
- Secure the assembled chute ducting to the wall or ceiling using brackets or straps, ensuring it is stable and properly aligned.
Mounting the chute door and frame correctly
With the chute ducting in place, it’s time to mount the chute door and frame correctly. This will provide a secure and functional entry point for your dirty laundry. Follow these steps:
- Position the chute door frame in the hole, ensuring it is centered and level.
- Secure the chute door frame to the wall using screws or nails, ensuring it is tightly fastened.
- Insert the chute door into the frame, ensuring it opens and closes smoothly.
- Test the chute door by dropping a small item through it to ensure it functions properly.
Sealing and insulating the installation properly
Lastly, it is essential to seal and insulate the installation properly to prevent any air leaks or heat loss. This will help maintain a comfortable and energy-efficient home. Follow these steps:
- Apply weatherstripping around the edges of the chute door frame to create a tight seal when closed.
- Inspect the chute ducting for any gaps or openings, and seal them using foil tape or duct sealant.
- Insulate the chute ducting with insulation material, such as foam or fiberglass, to prevent heat transfer.
- Ensure all connections, joints, and seams are securely sealed and insulated to optimize energy efficiency.
By following these step-by-step instructions, you can successfully install a laundry chute in your home. Remember to take all necessary safety precautions and consult with professionals if needed. Enjoy the convenience and efficiency that a laundry chute brings to your daily chores!
Tips To Prevent Accidents And Maximize Functionality
Tips to prevent accidents and maximize functionality
Installing a laundry chute can greatly simplify your household chores and save you time and effort. However, it is important to consider safety and efficiency when setting up this convenient feature in your home. By following these essential guidelines for chute door placement and height, regular cleaning and maintenance practices, and testing the chute for smooth and unobstructed operation, you can ensure a hassle-free and accident-free laundry chute experience.
Guidelines for chute door placement and height
When it comes to installing a laundry chute, careful consideration should be given to the placement and height of the chute door. Here are some guidelines to ensure optimal functionality and safety:
- Locate the chute door in a convenient area, such as a hallway, near bedrooms, or on each floor of your house.
- Ensure the chute door is easily accessible but out of reach for small children to prevent accidents.
- Place the chute door at a height that allows comfortable and effortless loading and unloading of laundry, typically around waist level.
Regular cleaning and maintenance practices
To maintain the functionality and hygiene of your laundry chute, it is important to establish regular cleaning and maintenance practices:
- Regularly clean the chute door and its surrounding area to prevent the accumulation of lint, dust, and debris.
- Use a vacuum cleaner or a damp cloth to remove any buildup of dirt or lint.
- Inspect the chute regularly for any loose or damaged parts, and promptly repair or replace them as necessary.
- Consider using a chute deodorizer or freshener to keep unpleasant odors at bay.
Testing the chute for smooth and unobstructed operation
Before relying on your laundry chute for regular use, it is crucial to test its operation to ensure smooth and unobstructed functionality:
- Begin by opening and closing the chute door multiple times to ensure it moves easily and without sticking.
- Check for any potential obstructions in the chute, such as loose clothing, toys, or other objects that could impede laundry flow.
- Test the chute by sending a few lightweight items through it to ensure they slide down effortlessly and reach their intended destination without any blockages.
- If you encounter any issues during the testing phase, carefully inspect the chute and its components to identify and address the problem.
Creative Ideas To Integrate The Chute Into The Room
A laundry chute is a convenient addition to any home, providing a quick and easy way to send dirty clothes straight to the laundry room. However, the installation of a laundry chute doesn’t have to be just functional – it can also be a design statement. Here are some creative ideas to integrate the chute into the room, making it not only practical but also aesthetically pleasing.
Incorporating the chute into existing cabinetry
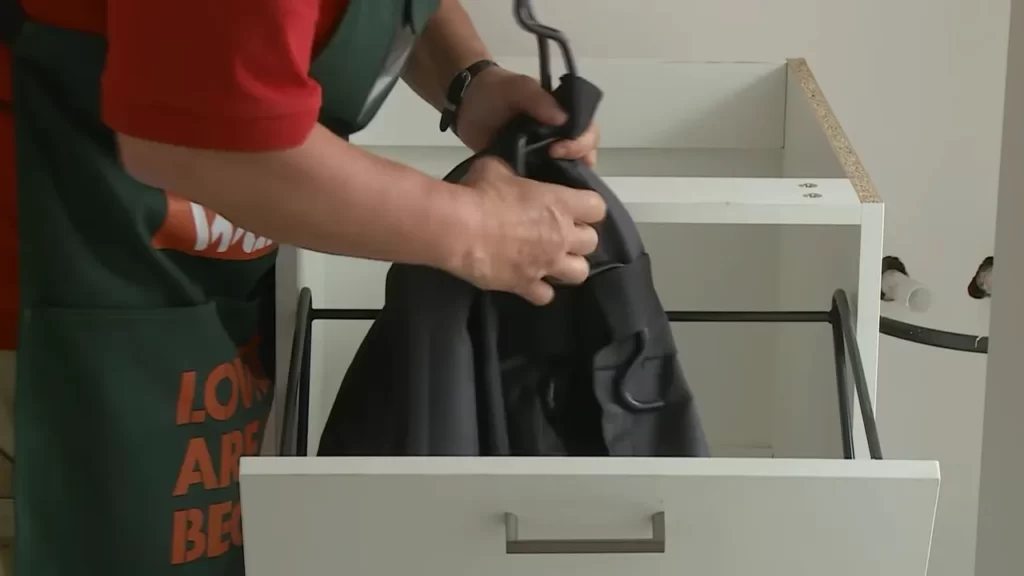
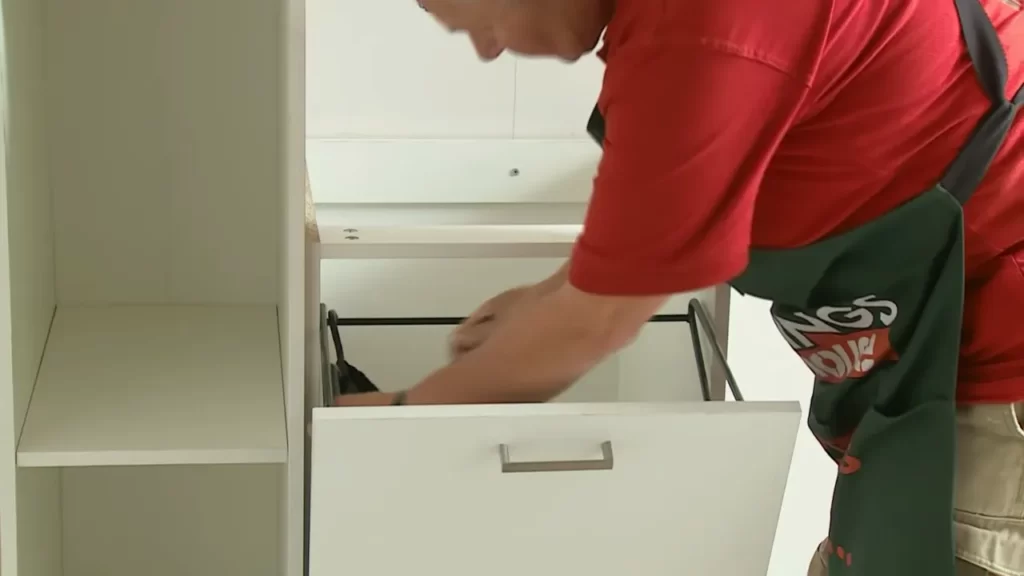
If you already have cabinetry in your laundry room or nearby, incorporating the laundry chute into the existing design can help it blend seamlessly into the space. One option is to remove a cabinet door and replace it with a chute opening. This allows you to maintain a cohesive look while still enjoying the convenience of a laundry chute. Another approach is to modify a lower cabinet or drawer by adding a discreet chute behind a panel. This not only disguises the chute but also provides additional storage space.
Using decorative panels or doors to conceal the chute
For those who prefer a more discreet laundry chute, decorative panels or doors can be used to conceal it. This allows the chute to blend in with the surrounding walls, cabinets, or furniture. You can choose panels or doors that match the existing decor or opt for contrasting materials for a visually striking effect. By camouflaging the chute, you maintain a clean and minimalistic look in your laundry room.
Blending the chute with the overall room design
To create a cohesive and cohesive room design, it’s important to consider the overall aesthetics of your space when installing a laundry chute. This can be achieved by using materials, colors, or patterns that complement the existing decor. For example, if your laundry room has a farmhouse style, you could use rustic wood for the chute surround. On the other hand, if your space has a modern or contemporary design, sleek and minimalist materials such as stainless steel or glass can add an elegant touch to the laundry chute.
By integrating the laundry chute into the room’s design, you not only enhance the functionality of your space but also elevate its visual appeal. Whether you choose to incorporate it into existing cabinetry, use decorative panels to conceal it, or blend it with the overall room design, the possibilities are endless. With a little creativity and attention to detail, your laundry chute can become a seamless part of your home.
Frequently Asked Questions
Is It Easy To Install A Laundry Chute?
Yes, installing a laundry chute is relatively easy. The process involves cutting a hole in the wall, attaching the chute, and connecting it to the upper and lower floors. It’s a convenient and efficient solution for transporting laundry from one level to another.
How Much Does It Cost To Install A Laundry Chute?
The cost of installing a laundry chute typically ranges from $500 to $2500, depending on factors such as the chute material, installation complexity, and additional features like doors or sorting hampers. Consulting with a professional installer can provide an accurate estimate for your specific requirements.
Is A Laundry Chute A Good Idea?
Yes, a laundry chute is a convenient and efficient solution for transporting laundry from different levels of a house. It saves time and energy, making laundry chores easier. With its simplicity and practicality, a laundry chute is definitely a good idea for many households.
Why Did They Stop Putting Laundry Chutes In Houses?
Laundry chutes are no longer included in houses due to safety concerns and changes in lifestyle. The risk of fire spread and injury prompted their removal. Additionally, modern homes often feature laundry rooms and appliances on the same floor, making laundry chutes less necessary.
Conclusion
Installing a laundry chute can bring convenience and functionality to your home. By following the step-by-step guide provided in this blog post, you can easily implement this useful feature. From choosing the right location to selecting the right materials, we have covered all the essential aspects.
Whether it’s improving your daily routine or adding value to your property, installing a laundry chute is a worthwhile investment. Start the process today and enjoy the benefits for years to come.