To install a large recessed medicine cabinet, first measure and mark the desired location on the wall. Then, cut an opening in the wall to fit the cabinet and secure it in place using screws or brackets.
Now you can enjoy the benefits of a spacious, hidden storage solution for your bathroom. A large recessed medicine cabinet can be a practical and stylish addition to any bathroom. Its concealed design not only maximizes storage space but also adds a sleek and seamless look to the room.
However, installing such a cabinet requires careful planning and precise execution. In this guide, we will walk you through the step-by-step process of installing a large recessed medicine cabinet, ensuring that you have all the necessary information to undertake this project confidently. So, without further ado, let’s dive into the details of how to install a large recessed medicine cabinet in your bathroom.
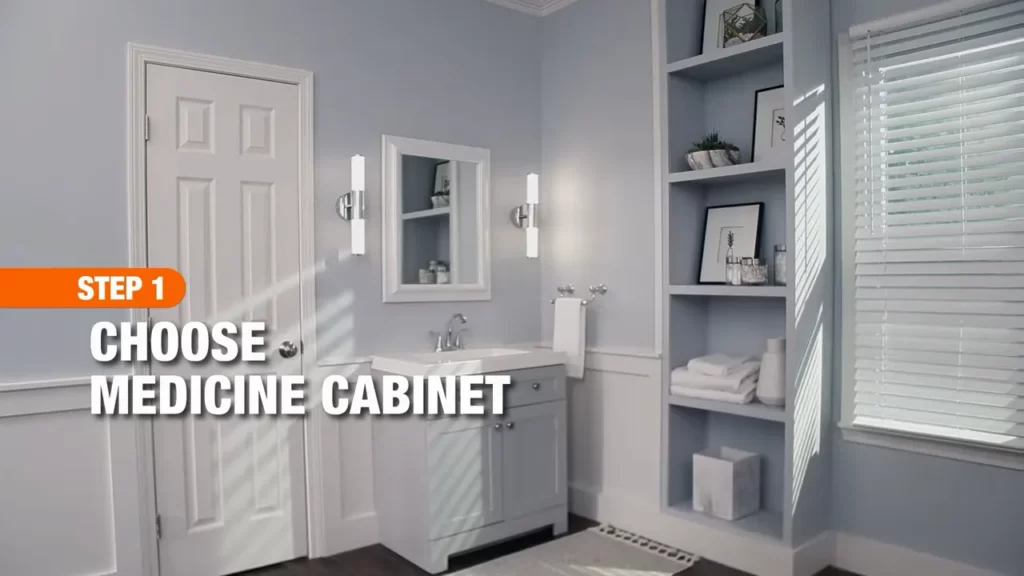
Factors To Consider When Selecting A Large Recessed Medicine Cabinet
When it comes to selecting a large recessed medicine cabinet for your bathroom, there are several factors that you should consider. From the size and dimensions to the material and durability, each aspect plays an important role in ensuring that the cabinet meets your needs and complements your bathroom’s aesthetics. Additionally, the style and design of the cabinet can enhance the overall look of your bathroom. In this section, we will explore these factors in detail to help you make an informed decision.
Size and Dimensions
One of the first factors to consider when selecting a large recessed medicine cabinet is its size and dimensions. You need to ensure that the cabinet fits perfectly into the allotted space in your bathroom. Measure the area where the cabinet will be installed and take note of the height, width, and depth requirements. This will help you narrow down your options and find a cabinet that fits seamlessly into your bathroom.
Material and Durability
The material and durability of the large recessed medicine cabinet are crucial factors to consider, especially considering its frequent use in a bathroom environment. Look for cabinets that are made of high-quality materials that can withstand moisture and daily wear and tear. Common materials used for medicine cabinets include stainless steel, aluminum, and wood. Each material has its own pros and cons, so consider your preferences and the level of maintenance required.
Style and Design
The style and design of the large recessed medicine cabinet should not be overlooked. After all, it will be a prominent feature in your bathroom. Consider the overall aesthetic of your bathroom and choose a cabinet that complements the existing fixtures and decor. Look for features such as mirrored doors, adjustable shelves, and integrated lighting to enhance the functionality and visual appeal of the cabinet. Whether you prefer a modern, minimalist design or a traditional, ornate look, there are plenty of options available to suit your personal style.
Tools And Materials Required For Installing A Large Recessed Medicine Cabinet
Measuring Tape
A measuring tape is an essential tool when it comes to installing a large recessed medicine cabinet. It allows you to accurately measure the dimensions of the cabinet and ensure that it will fit properly in the designated location. The measuring tape should be long enough to measure both the width and height of the cabinet.
Level
A level is crucial for ensuring that your recessed medicine cabinet is installed straight and level. It helps you avoid any unevenness or crookedness that could affect the appearance and functionality of the cabinet. Make sure to use a spirit level, also known as a bubble level, to achieve precise and accurate results.
Stud Finder
A stud finder is a handy tool that helps you locate the studs behind your wall. Since a large recessed medicine cabinet requires proper support, it is important to attach it securely to the studs. By using a stud finder, you can easily identify the vertical supports in the wall and ensure a sturdy installation.
Screwdriver
A screwdriver is necessary for removing any existing screws or fasteners and attaching the new ones during the installation process. It is recommended to use the appropriate screwdriver, such as a Phillips or flat-head screwdriver, depending on the type of screws provided with your medicine cabinet. This ensures a secure and stable installation.
Anchors and Screws
Depending on the type of wall material and the weight of your medicine cabinet, you may need anchors and screws to provide additional support. Anchors help to distribute the weight of the cabinet more evenly and prevent it from falling off the wall. Make sure to choose anchors and screws that are appropriate for your wall type and can support the weight of the cabinet.
Caulk and Caulking Gun
Caulk and a caulking gun are essential for achieving a professional and finished look for your recessed medicine cabinet. Once the cabinet is installed, caulking can be used to fill in any gaps between the cabinet and the wall, providing a seamless appearance. Additionally, caulking helps to prevent moisture and water from seeping behind the cabinet and causing damage.
In conclusion, the tools and materials required for installing a large recessed medicine cabinet include a measuring tape, level, stud finder, screwdriver, anchors and screws, as well as caulk and a caulking gun. These tools ensure a smooth installation process and a secure and aesthetically pleasing result.
Locating The Ideal Spot For Installation
Before installing a large recessed medicine cabinet in your bathroom, it’s crucial to determine the perfect spot for it. This step plays a critical role in ensuring functionality, accessibility, and overall aesthetics. By strategically selecting the location, you can make the most of your storage space while enhancing the visual appeal of your bathroom.
Assessing Wall Space
The first step in finding the ideal spot for your large recessed medicine cabinet is to assess the available wall space. Start by identifying a suitable area where the cabinet can be fitted without obstructing other bathroom fixtures. Measure the dimensions of the cabinet and compare them to the potential location on your wall. This will help you determine if the chosen spot is spacious enough to accommodate the cabinet comfortably.
Consider the overall layout of your bathroom and take into account factors such as plumbing, electrical wiring, and stud locations. It’s important to avoid areas that may interfere with these components. Additionally, make sure there are no structural obstacles, such as beams or pipes, behind the wall where you plan to install the cabinet.
Considering Accessibility and Visibility
When choosing the spot for your large recessed medicine cabinet, it’s crucial to consider both accessibility and visibility. Ideally, the cabinet should be easily accessible for everyday use, but also well-placed to complement the overall design of the bathroom.
To ensure accessibility, select a location that allows you to open the cabinet doors fully without any obstructions. Placing the cabinet at a convenient height, within easy reach of all family members, is also important. Consider the needs of children or individuals with mobility limitations in your household.
In terms of visibility, position the cabinet where it can serve as an attractive focal point in your bathroom. Choose a spot that allows the cabinet to blend seamlessly with the surrounding decor, whether it’s above a vanity, next to a mirror, or any other strategic location that complements the overall style of your bathroom.
| Tips: |
|---|
| 1. If you have limited wall space, consider placing the cabinet in a corner to maximize storage without overwhelming the room. |
| 2. Take into account the direction of natural light in your bathroom when choosing the spot for the cabinet. Avoid placing it in a location where it may cast shadows or obstruct light. |
| 3. Consider the height of your countertops or vanity when selecting the placement of the cabinet. You want to ensure that the cabinet is positioned at a height that is functional and aesthetically pleasing. |
| 4. Consult a professional if you are unsure about the structural integrity of the wall you plan to install the cabinet on. |
By carefully assessing wall space, considering accessibility and visibility, and following these tips, you can find the perfect spot to install your large recessed medicine cabinet. This ensures a seamless installation that combines functionality, accessibility, and aesthetic appeal, transforming your bathroom into a well-organized and visually pleasing space.
Measuring And Marking The Wall
Before installing a large recessed medicine cabinet, it is crucial to measure and mark the wall accurately. This step is essential to ensure the cabinet is positioned at the right height and width, providing optimal functionality and aesthetics to your bathroom.
Height Placement
The first aspect to consider is the height placement of the medicine cabinet. You want to position it at a convenient height that is easily accessible for all members of your household. To determine the appropriate height, follow these simple steps:
- Stand in front of the area where you plan to install the cabinet.
- Reach up and place your hand on the wall at a comfortable height for accessing the cabinet.
- Mark this height point using a pencil or tape measure.
By following these steps, you can ensure that the medicine cabinet is neither too high nor too low, providing easy access to its contents without straining or bending.
Width Placement
After determining the height placement, it’s time to move on to the width placement of the medicine cabinet. Proper width positioning is crucial for achieving a balanced and harmonious look in your bathroom. To achieve this, you can refer to the following guidelines:
- Measure the width of the vanity or sink below the cabinet area.
- Subtract about 2-3 inches from the width measurement to allow for a slight overlap.
- Mark the starting and ending points of the cabinet width on the wall using a pencil or tape measure.
Following these steps will ensure that the medicine cabinet is positioned in such a way that it complements the vanity or sink below, creating a visually appealing and cohesive look for your bathroom.
Measuring and marking the wall accurately is a crucial first step in the installation process of a large recessed medicine cabinet. By following the height and width placement guidelines, you can ensure that the cabinet is positioned at the perfect height and width, providing both functionality and aesthetic appeal to your bathroom.
Finding And Marking Wall Studs
If you’re planning to install a large recessed medicine cabinet in your bathroom, one of the most important steps is finding and marking the wall studs. Wall studs are vertical supports behind the drywall that provide a secure anchor for heavy items like cabinets. Here, we’ll guide you through the process of locating and marking the wall studs, ensuring a sturdy and durable installation for your medicine cabinet.
Using a Stud Finder
The easiest way to locate wall studs is by using a stud finder. These handheld devices use magnets or sensors to detect the presence of nails or screws in the wall, indicating the position of the studs. To use a stud finder:
- Turn on the stud finder and place it flat against the wall, ensuring it is calibrated and ready for use.
- Starting from the edge of the wall, slowly move the stud finder horizontally until it detects a stud. The device will beep or indicate when it senses a stud.
- Once a stud is located, mark the position on the wall using a pencil or masking tape. Repeat the process to find the adjacent studs.
Marking Stud Locations
After identifying the locations of the wall studs, it is essential to mark them clearly for the installation process. This will help ensure that the medicine cabinet is securely anchored to the studs, preventing any potential accidents or instability. Here are the steps to mark the stud locations:
- Using a pencil or a marker, draw a vertical line on the wall along each stud, starting from the floor and extending to the desired height of the medicine cabinet.
- Make sure the lines are straight and level, using a level tool if necessary.
- Double-check the stud locations by running the stud finder along the marked lines. Adjust the marks if needed.
- As an extra precaution, you can also place small strips of masking tape along each stud to provide a visual reference during the installation.
By using a stud finder and accurately marking the stud locations, you’ll ensure a secure and stable installation for your large recessed medicine cabinet. This step is crucial for the overall longevity and functionality of the cabinet and will give you peace of mind knowing that your bathroom storage is safely anchored to the wall.
Cutting The Opening In The Wall
When it comes to installing a large recessed medicine cabinet, one of the crucial steps is cutting the opening in the wall. This step ensures that the cabinet fits perfectly and is securely mounted. In this guide, we will outline the necessary steps to follow when cutting the opening in the wall.
Ensuring Proper Measurements
Before starting the cutting process, it is essential to ensure accurate measurements for the opening. Taking accurate measurements will guarantee that the recessed medicine cabinet fits snugly in the wall, providing a seamless and professional look.
To ensure proper measurements, follow these steps:
- Using a measuring tape, measure the width, height, and depth of the cabinet.
- Mark these measurements on the planned location of the cabinet on the wall.
- Double-check the measurements to ensure accuracy before proceeding.
Using a Drywall Saw
Once the measurements are in place, it’s time to cut the opening using a drywall saw. A drywall saw is a versatile tool designed specifically for cutting through drywall efficiently.
Here’s how to use a drywall saw:
- Put on safety goggles and a face mask to protect yourself from dust and debris.
- Starting from one of the marked measurements, carefully insert the drywall saw into the wall.
- Using firm and controlled movements, saw along the marked lines, ensuring that the cut is straight.
- Continue sawing until the entire outline of the opening is cut.
- Once the cutting is complete, remove the cut-out section from the wall.
Removing the Cut-out Section
After the cut-out section has been removed, it is essential to double-check the opening to ensure it aligns with the measurements and is ready for the installation of the recessed medicine cabinet.
Follow these steps to remove the cut-out section:
- Gently pull the cut-out section away from the wall, being cautious not to damage the surrounding area.
- Inspect the cut-out section to ensure all edges are smooth and even.
- Trim any rough edges using a utility knife if necessary.
- Clean up any debris or dust left from the cutting process.
By following these steps and ensuring accurate measurements, using a drywall saw correctly, and removing the cut-out section carefully, you are now ready to proceed with the installation of your new large recessed medicine cabinet.
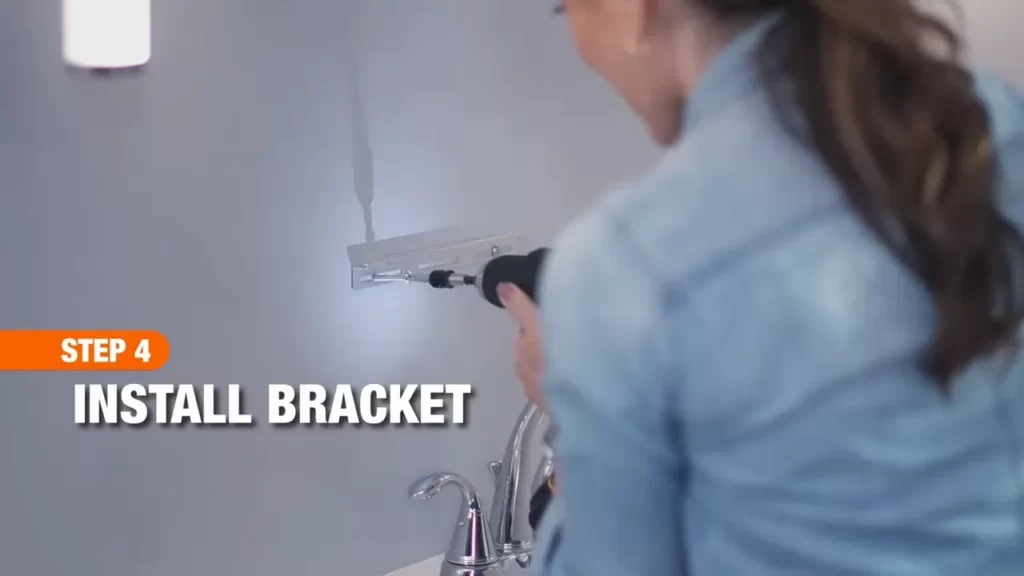
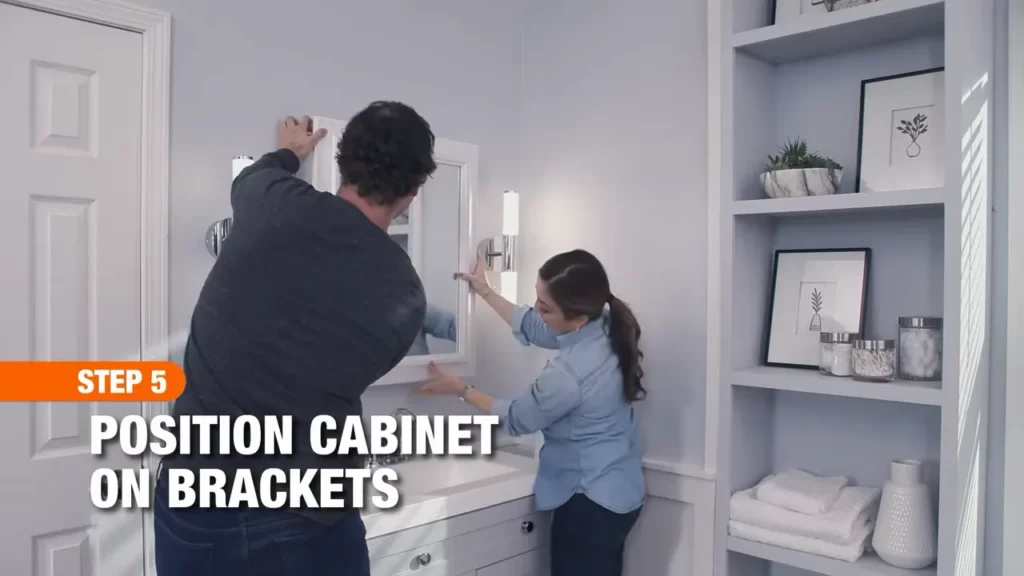
Securing The Cabinet Into The Wall
Installing a large recessed medicine cabinet is a great way to maximize storage space and add a sleek, modern touch to your bathroom. Once you have positioned and leveled the cabinet, the next step is to securely anchor it to the wall. This ensures that the cabinet remains stable and can withstand the weight of your toiletries and personal items for years to come.
Positioning the Cabinet
Before securing the cabinet into the wall, it’s crucial to ensure that it is positioned correctly. Use a measuring tape to determine the ideal height and distance from other fixtures. Once you have determined the desired position, mark it on the wall using a pencil or masking tape.
Leveling the Cabinet
Proper leveling is essential to ensure that your cabinet is securely installed and aesthetically pleasing. Use a level to check that the cabinet is perfectly horizontal. Adjust as necessary by shimming the bottom or sides until it is level.
Anchoring the Cabinet to the Wall Studs
Securing the cabinet to the wall studs is crucial for stability. Wall studs provide the necessary support to carry the weight of the cabinet and its contents. Use a stud finder to locate the studs behind the wall. Mark the stud locations lightly on the wall.
Next, drill pilot holes through the back of the cabinet using a drill bit slightly smaller than the diameter of the screws. Align these holes with the wall studs you marked earlier.
Using the appropriate length and size of screws for your cabinet, attach the cabinet to the wall studs. Start by placing the screws in the pilot holes and then tighten them using a screwdriver or drill. Be careful not to over tighten, as this can cause damage to the cabinet or wall.
For added security, consider using wall anchors for any areas that do not align with studs. Wall anchors provide stability in areas where studs may not be present, such as between two studs or near the top or bottom of the cabinet.
Securing the Cabinet Door
Once the cabinet is securely anchored to the wall, the final step is to secure the cabinet door. This ensures that it remains closed and securely holds your belongings inside.
Check that the cabinet door swings smoothly and aligns properly with the cabinet frame. Adjust the hinges as necessary to achieve proper alignment.
Tighten the screws on the hinges to secure the door in place. Use a screwdriver to ensure the screws are tightened enough that the hinges do not move but be careful not to overtighten and strip the screws.
Test the door by opening and closing it to verify that it operates smoothly and latches securely.
By following these steps and securing the cabinet into the wall properly, you can enjoy a sturdy and functional recessed medicine cabinet that enhances both the functionality and aesthetics of your bathroom for years to come.
Finishing Touches
Applying Caulk Around the Cabinet
Applying caulk is an essential step in installing a large recessed medicine cabinet. This helps to seal any gaps between the cabinet and the wall, preventing moisture from seeping in and causing damage. Follow these simple steps to apply caulk around your cabinet:
- Start by cleaning the surface area around the cabinet to ensure it is free from dust and debris. This will help the caulk adhere better.
- Using a caulk gun, apply a thin bead of caulk along the gap between the cabinet and the wall. Be sure to work carefully and slowly for a neat, even application.
- Once the caulk is applied, use a caulk smoothing tool or your finger to smooth and shape the caulk. This will create a clean, professional finish. Wipe away any excess caulk with a damp cloth.
- Allow the caulk to dry completely before moving on to the next step. This will ensure a secure seal that will last for years to come.
Painting or Finishing the Cabinet
Now that the cabinet is securely installed, it’s time to add the finishing touches. One popular option is to paint or finish the cabinet to match your bathroom decor. Follow these steps to paint or finish your recessed medicine cabinet:
- Start by lightly sanding the surface of the cabinet to create a smooth, even base for the paint or finish to adhere to. Remove any dust with a clean cloth.
- If you’re painting the cabinet, apply a coat of primer first to help the paint adhere better. Allow the primer to dry completely before applying the paint.
- Use a high-quality paint or finish suitable for the material of your cabinet. Apply thin, even coats, allowing each coat to dry before applying the next. This will help achieve a professional, streak-free finish.
- Once the paint or finish is dry, inspect the cabinet for any touch-ups or uneven areas. Use a small brush or sponge to touch up any imperfections.
Cleaning and Organizing the Medicine Cabinet
After installing and finishing your recessed medicine cabinet, it’s important to properly clean and organize its contents. Use these tips to create a functional and organized medicine cabinet:
- Start by taking everything out of the cabinet and wiping down the shelves with a gentle cleaner. This will help remove any dust or residue.
- As you put items back in the cabinet, check expiration dates and dispose of any expired medications or skincare products. This will ensure you only have safe and effective items on hand.
- Consider using organizers or dividers to separate different categories of items, such as medications, first aid supplies, and skincare products. This will make it easier to find what you need when you need it.
- Label shelves or containers to further enhance organization and make it easier for other household members to find what they’re looking for.
- Lastly, regularly clean and declutter your medicine cabinet to maintain a clean and organized space. This will help prevent expired or unnecessary items from accumulating.
Cabinet Not Level Or Flush With The Wall
Adjusting the Anchors
If you find that your large recessed medicine cabinet is not level or flush with the wall, it may be due to improper anchor placement. Adjusting the anchors can help ensure that your cabinet sits perfectly against the wall. Here is a step-by-step guide on how to adjust the anchors for a level and flush installation.
1. Start by removing the cabinet from the wall. Carefully detach it from any existing screws or brackets.
2. Once the cabinet is removed, take a closer look at the anchors. Are they securely fastened to the wall? If not, tighten them using a screwdriver or drill.
3. If the anchors are loose or not holding the cabinet in place, you may need to replace them with stronger ones. Consider using heavy-duty anchors specifically designed for large cabinets.
4. Once the anchors are secure, assess their placement. Are they evenly spaced and aligned? If not, you may need to adjust their positioning.
5. To adjust the anchor placement, mark the desired location for each anchor on the wall using a pencil or marker. Use a measuring tape to ensure accurate placement.
6. Check the levelness of the marks using a bubble level. Adjust the position of each mark as needed to ensure a level installation.
7. Once the marks are in the correct position, drill pilot holes for the anchors. Use a drill bit that matches the size of your anchors.
8. Insert the anchors into the pilot holes. Make sure they are snugly fit into the wall.
9. Once the anchors are in place, carefully lift the cabinet and align it with the anchor holes. Slowly lower the cabinet onto the anchors.
10. Double-check the levelness and flushness of the cabinet. If adjustments are needed, you can slightly lift the cabinet and make the necessary tweaks.
Reassessing Wall Stud Placement
If adjusting the anchors does not result in a level or flush cabinet, it is possible that the wall studs are not properly positioned. Reassessing the wall stud placement can help ensure a more secure and stable installation.
1. With the cabinet removed from the wall, locate the studs using a stud finder. Mark the center of each stud using a pencil or marker.
2. Measure the distance between the center of each stud to assess if they are evenly spaced. Adjust the positioning of the cabinet if needed.
3. If the studs are not centered or spaced evenly, you may need to consider adding additional support.
4. Using a measuring tape, determine the distance between the studs and mark the corresponding locations on the back of the cabinet. This will guide you on where to add additional support.
5. Measure the length of the additional support required and cut pieces of wood or metal brackets to fit.
6. Secure the additional support to the back of the cabinet using screws or brackets. Make sure they are firmly attached and will provide the necessary stability.
7. Once the additional support is in place, lift the cabinet and align it with the wall studs. Lower the cabinet onto the anchors, ensuring a level and flush installation.
By following these steps to adjust the anchors and reassess the wall stud placement, you can achieve a level and flush installation for your large recessed medicine cabinet. Taking the time to ensure proper alignment will not only enhance the aesthetic appeal of your bathroom but also provide a more secure and functional storage solution.
Cabinet Door Not Closing Properly
Checking for Interference
If your large recessed medicine cabinet door is not closing properly, the issue may be due to interference. Before making any adjustments, it’s important to identify the points at which the door is obstructed. This can be done by carefully examining the cabinet opening and the door itself.
First, check if there are any items inside the cabinet that may be blocking the door from closing fully. Remove any objects that could be causing the interference and try closing the door again. If the problem persists, move on to the next step.
Next, visually inspect the hinges and latches of the cabinet. Look for any signs of misalignment, loose screws, or damaged components. Make sure that the hinges and latches are properly aligned and securely tightened. If you notice any issues, proceed to the next section for instructions on adjusting hinges or latches.
Adjusting Hinges or Latches
If checking for interference did not solve the problem, it may be necessary to adjust the hinges or latches of your recessed medicine cabinet. Follow these steps for a properly adjusted cabinet door:
- Start by opening the door fully and examining if there is any horizontal or vertical misalignment between the door and the cabinet opening.
- If the door is misaligned, locate the adjustment screws on the hinges or latches. These screws are typically located on the side or bottom of the hinge or latch.
- Using a screwdriver or Allen wrench (depending on the type of screw), carefully tighten or loosen the adjustment screws. This will allow for precise alignment of the door.
- Make small adjustments at a time, checking the door’s movement after each adjustment. Continue to tighten or loosen the screws until the door aligns properly and closes securely.
- Once you have achieved the desired alignment, test the door by opening and closing it several times to ensure that it operates smoothly.
If adjusting the hinges or latches does not resolve the issue, it is recommended to consult the manufacturer’s instructions or contact a professional for further assistance. Misaligned hinges or damaged components may require replacement to ensure proper functioning of your large recessed medicine cabinet door.
Gaps Or Misalignment In The Cabinet
When it comes to installing a large recessed medicine cabinet, one common issue that homeowners may encounter is gaps or misalignment in the cabinet. These gaps can make the cabinet look unprofessional and may even affect its functionality. To ensure a seamless and well-aligned installation, here are some steps you can take to address this issue.
Reevaluating Measurements
The first step in addressing gaps or misalignment in the cabinet is to reevaluate your measurements. It’s possible that the wall opening was not properly measured, leading to an imperfect fit. Take the time to double-check your measurements and compare them to the dimensions of the cabinet. Measure the length, width, and depth of the cabinet, as well as the dimensions of the wall opening. This will help you identify any discrepancies and make the necessary adjustments.
Making Adjustments to the Wall Opening
If you find that the wall opening is slightly smaller or larger than the dimensions of the cabinet, you may need to make some adjustments. This can be done by carefully trimming or enlarging the opening to ensure a proper fit. Ensure you have the necessary tools and equipment for this process, such as a saw or a drill. Measure twice before making any cuts to avoid any irreversible mistakes. Remember, it’s always easier to trim more off than to try and add material back.
If you’re experiencing gaps around the edges of the cabinet, you can use shims or filler material to fill in these spaces. This will help create a snug fit and eliminate any unsightly gaps. Use caulking or a similar adhesive to secure the shims or filler material in place. Take your time in this process to ensure that the cabinet is level and properly aligned.
Additionally, if you notice any physical obstructions behind the wall, such as electrical wires or plumbing, it’s important to address these before proceeding with the installation. Consult a professional if necessary to ensure that you avoid any damage or safety hazards.
In conclusion, gaps or misalignment in a large recessed medicine cabinet can be addressed by reevaluating your measurements and making adjustments to the wall opening. By taking these steps, you can achieve a seamless and well-aligned installation that not only enhances the aesthetics of your space but also ensures the functionality of the cabinet.
Frequently Asked Questions
How Do You Hang A Large Medicine Cabinet?
To hang a large medicine cabinet, first, mark the desired position on the wall. Use a stud finder to locate the wall studs. Securely mount the cabinet to the studs using screws or heavy-duty wall anchors. Use a level to ensure it is straight.
Finally, double-check the stability and adjust as needed.
Can You Put A Recessed Medicine Cabinet In A Load Bearing Wall?
Yes, you can install a recessed medicine cabinet in a load bearing wall. By following proper installation procedures, you can safely integrate the cabinet into the wall without compromising its structural integrity. Make sure to consult a professional if you have any concerns.
How Deep Can A Recessed Medicine Cabinet Be?
A recessed medicine cabinet can typically be up to 4 inches deep to allow for storage of medication and toiletries. Make sure to measure the space available before purchasing.
What Is The Rough Opening For A Recessed Medicine Cabinet?
The rough opening for a recessed medicine cabinet is typically determined by the size of the cabinet itself. It should be slightly larger than the cabinet dimensions to allow for easy installation and adjustments. Usually, this would be around 14.
25 inches by 24. 25 inches.
Conclusion
Installing a large recessed medicine cabinet may seem daunting, but with the right tools and step-by-step instructions, it can be a straightforward process. By carefully measuring and preparing the wall, following the manufacturer’s guidelines, and utilizing the provided templates, you can successfully enhance your bathroom storage and organization.
Remember to take your time and double-check your work for optimal results. Happy installing!