
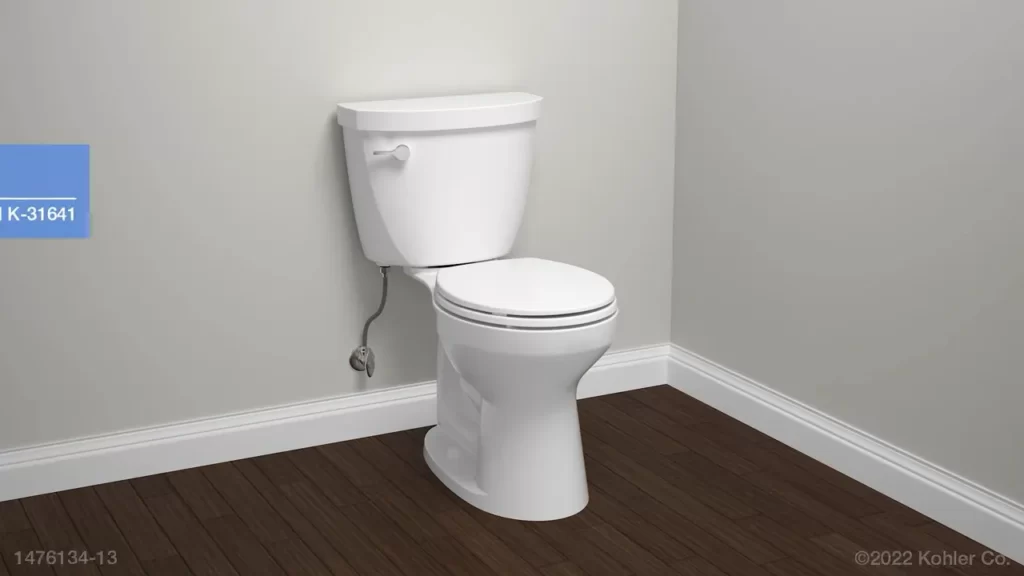
To install a Kohler toilet, follow these steps: 1. Remove the old toilet.
2. Install the wax ring and closet bolts. Are you looking to install a Kohler toilet in your bathroom? In this guide, we will walk you through the step-by-step process to ensure a successful installation. By following a few simple steps, you can remove your old toilet and replace it with a brand new Kohler model.
First, you will need to remove the old toilet, making sure to turn off the water supply and disconnect the plumbing. Then, install the wax ring and closet bolts to prepare for the new toilet. With this guide, you’ll have your new Kohler toilet up and running in no time.
Factors To Consider When Selecting A Kohler Toilet
Toilet bowl shape and size
When it comes to selecting a Kohler toilet, one of the key factors to consider is the shape and size of the toilet bowl. Kohler offers a variety of bowl shapes to suit different preferences and bathroom styles. The two main options are elongated and round bowls.
The elongated bowl provides more surface area and a larger seating area, making it suitable for individuals who prefer extra comfort. It also offers a sleeker and more modern look for your bathroom. On the other hand, the round bowl is a more compact option that is ideal for smaller bathrooms or powder rooms.
It is essential to measure the available space in your bathroom before selecting a Kohler toilet. This will help you determine the right bowl size that fits comfortably in your bathroom without feeling cramped. Keep in mind that the size of the toilet bowl can affect the overall aesthetics and functionality of your bathroom, so choose wisely.
Water-saving features
With a growing emphasis on environmental sustainability and water conservation, it is crucial to consider the water-saving features when selecting a Kohler toilet. Kohler offers various water-saving technologies that can significantly reduce water usage without compromising performance.
One such feature is the dual-flush system, which allows users to choose between a full flush or a partial flush depending on their needs. This feature is particularly beneficial in households with a higher water bill or areas facing water scarcity.
Another water-saving feature offered by Kohler is their efficient flushing system that uses less water but still ensures effective waste removal. These toilets are designed to maximize the flushing power while minimizing water consumption, resulting in lower water bills and reduced impact on the environment.
Flushing mechanism options
When it comes to the flushing mechanism, Kohler offers multiple options to cater to different preferences and requirements. One of the most popular ones is the gravity flush system, which utilizes the force of gravity to create a strong flushing action.
For those looking for a more powerful flushing experience, Kohler also offers pressure-assisted flush toilets. These toilets use compressed air to generate a forceful flush, ensuring efficient waste removal. This flushing mechanism is ideal for high-traffic areas or households with a large family.
In addition to the gravity flush and pressure-assisted flush systems, Kohler also provides innovative options such as touchless flush toilets. These toilets use sensor technology to detect when the user has finished and automatically flushes without the need for physical contact. This not only adds convenience but also promotes hygiene in your bathroom.
Before selecting a Kohler toilet, consider your specific needs, preferences, and the level of water pressure in your area. This will help you choose the flushing mechanism that best suits your requirements and ensures optimal performance.
Tools And Materials Needed
Before you dive into installing your new Kohler toilet, make sure you have all the necessary tools and materials ready. Having everything prepared beforehand will ensure a smooth and hassle-free installation process. Here are the tools and materials you will need:
Adjustable wrench
An adjustable wrench is an essential tool for toilet installation. It allows you to tighten and loosen nuts and bolts of various sizes. Make sure you have a good quality adjustable wrench that fits comfortably in your hand and is easy to operate.
Screwdriver
A screwdriver is another tool you’ll need during the installation process. It’s used for securing the seat and lid of the toilet. Choose a screwdriver with a comfortable grip that will make the task easier and less tiring.
Wax ring
A wax ring is a crucial component of toilet installation. It creates a watertight seal between the toilet base and the drainpipe, preventing leaks and odors. Buy a high-quality wax ring that is designed for your specific toilet model to ensure a proper fit.
Toilet bolts
Toilet bolts are used to secure the toilet to the floor. They come in various sizes, so make sure you have the right length and type of bolts for your toilet model. It’s always a good idea to purchase a complete toilet bolt kit that includes washers and nuts to avoid any last-minute trips to the hardware store.
Level
A level is important for ensuring that your toilet is installed correctly and is perfectly horizontal. It helps to prevent any wobbling or unevenness once the toilet is in place. Use a small handheld level or a digital level for accurate results.
Removing The Old Toilet
Before you can install your new Kohler toilet, you’ll need to remove the old one. This process may seem daunting at first, but with the right instructions, you’ll be able to tackle it with ease. In this section, we’ll walk you through each step of removing the old toilet, from shutting off the water supply to removing the old wax ring.
Shutting off the water supply
The first step in removing your old toilet is to shut off the water supply. Locate the shut-off valve, typically positioned near the base of the toilet, and turn it clockwise until it is completely closed. This will stop the flow of water to the toilet, preventing any potential mess during the removal process.
Emptying the tank and bowl
Once the water supply is shut off, it’s time to empty the tank and bowl of your old toilet. Flush the toilet, holding down the handle until all the water has been drained from the tank and bowl. You can speed up this process by using a plunger to push any remaining water down the drain.
Disconnecting the supply line
After emptying the tank and bowl, you’ll need to disconnect the supply line that connects the toilet to the water supply. Grab a wrench and loosen the nut that attaches the supply line to the bottom of the toilet tank. Once loosened, carefully remove the supply line from the tank and set it aside.
Removing the old wax ring
With the supply line disconnected, you can now remove the old wax ring. This ring creates a watertight seal between the toilet and the drainage pipe. To remove it, use a putty knife to gently scrape away any remaining wax from the base of the toilet and the flange on the floor. Be careful not to damage the flange, as this is where the new wax ring will be installed.
Once the old wax ring has been completely removed, you’re now ready to install your new Kohler toilet. The next section will guide you through the installation process. Stay tuned!
Placing The Toilet Bowl
Placing the toilet bowl correctly is a crucial step in installing a Kohler toilet. This ensures a secure and leak-free connection to the waste pipe. In this section, we will guide you through the process of positioning the wax ring correctly and lowering the toilet bowl onto the wax ring.
Positioning the wax ring
The wax ring is a crucial component that creates a watertight seal between the toilet bowl and the waste pipe. To position the wax ring correctly, follow these steps:
- Inspect the flange on the waste pipe to ensure it is clean and in good condition.
- Place the wax ring on the flange, ensuring the tapered side is facing up and the flat side is touching the flange.
- Gently press down on the wax ring to ensure it sticks to the flange.
By positioning the wax ring properly, you will create a tight seal that prevents any leakage from occurring.
Lowering the toilet bowl onto the wax ring
Now that the wax ring is in position, it’s time to lower the toilet bowl onto it. Follow these steps:
- Ensure the toilet bowl is properly aligned with the waste pipe.
- Carefully lower the toilet bowl onto the wax ring, ensuring it aligns with the flange.
- Apply gentle pressure to the toilet bowl to compress the wax ring and create a tight seal.
Take care not to apply excessive force or uneven pressure, as this could cause the wax ring to become misaligned and lead to leaks in the future.
By properly positioning the wax ring and lowering the toilet bowl onto it, you can ensure a secure and durable installation of your Kohler toilet. Follow these steps carefully, and you’ll have a toilet that functions flawlessly for years to come.
Securing The Toilet Bowl
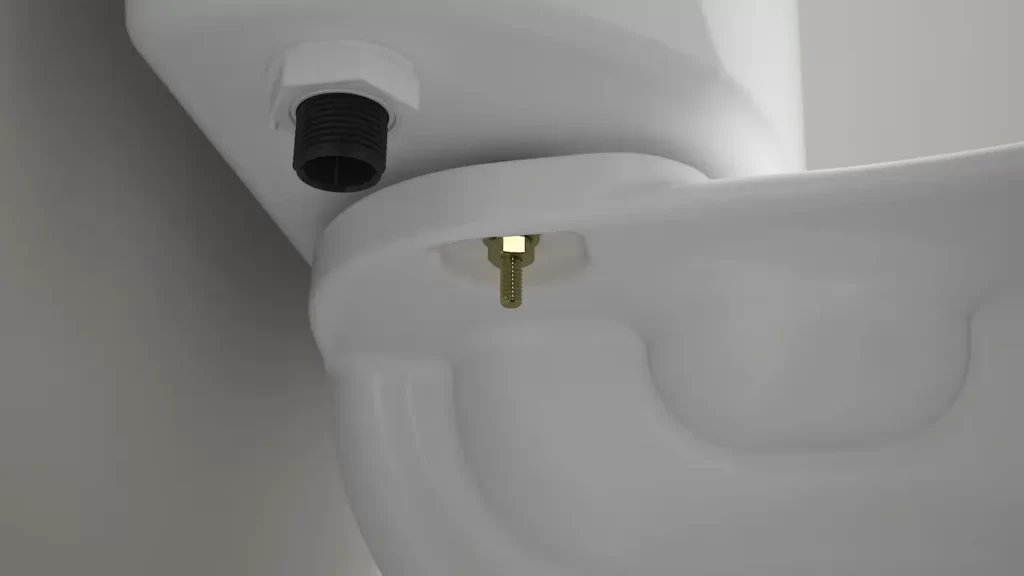
Attaching the Toilet Bolts
After successfully placing the wax ring on the flange, it’s time to move on to securing the toilet bowl. The first step is to attach the toilet bolts. These bolts act as anchors to hold the toilet firmly in place. Start by inserting the bolts into the flange slots, ensuring they are positioned evenly on both sides of the flange. Make sure the bolt heads are facing up.
Tightening the Nuts
Once the bolts are in place, it’s time to tighten the nuts to secure the toilet bowl. Using a wrench, start by tightening each nut alternately, ensuring that both sides are tightened evenly. Be careful not to overtighten, as this can crack the toilet bowl. Aim for a firm but gentle tightening.
To ensure a strong seal, apply pressure evenly on both sides. Keep in mind that the bolts should not be visible once the toilet is fully installed. This will ensure a clean and professional finish.
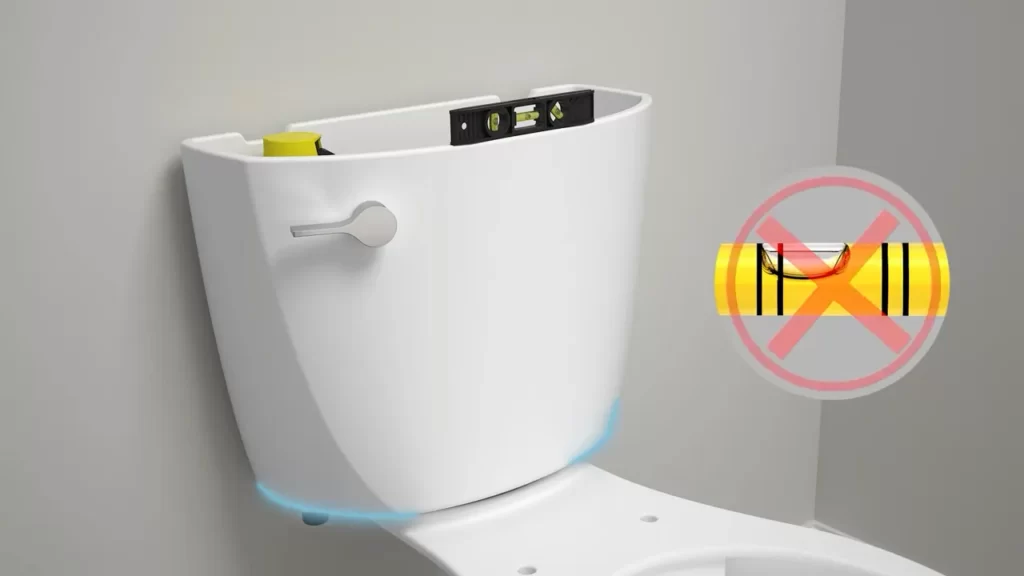
Confirming Level Placement
After tightening the bolts, it’s essential to confirm the level placement of the toilet bowl. A level placement ensures that the toilet sits evenly on the floor, preventing any wobbling or instability.
Before confirming the level placement, double-check that the toilet bowl is centered properly on the wax ring. Once confirmed, place a level across the toilet bowl, making sure it is level both from front to back and side to side. Adjust as necessary by using shims to create an even and stable surface.
Remember, a properly secured and level toilet bowl is not only aesthetically pleasing but also prevents future issues such as leaks and damage to the flange and surrounding flooring.
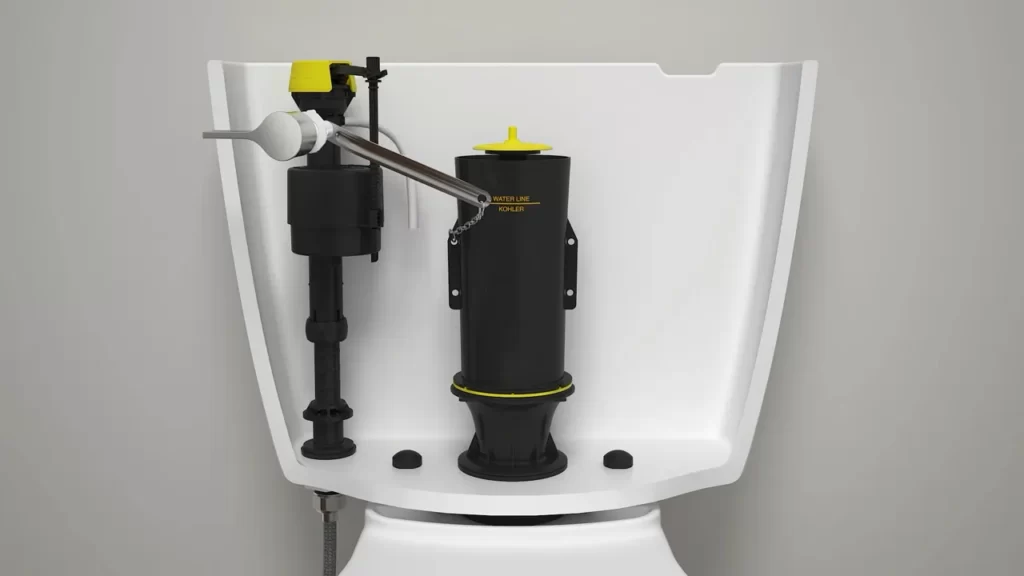
Installing The Toilet Tank
Connecting the tank to the bowl
Connecting the toilet tank to the bowl is a crucial step in installing a Kohler toilet. This ensures that the toilet functions properly and water is efficiently flushed into the bowl. Here are the steps to connect the tank to the bowl:
- Place the tank onto the bowl, aligning the mounting holes on the tank with the holes on the bowl.
- Insert the tank bolts through the mounting holes, making sure they are secure. These bolts will hold the tank in place.
- Tighten the nuts onto the tank bolts underneath the bowl using a wrench. Make sure to tighten them evenly to avoid any leaks.
Installing the tank bolts
To ensure the stability of the toilet tank, it is essential to properly install the tank bolts. These bolts secure the tank to the bowl and prevent any wobbling. Follow these steps to install the tank bolts:
- Insert the tank bolts through the mounting holes on the toilet bowl.
- Place a washer on each bolt, ensuring they are placed securely against the bowl.
- Thread a nut onto each bolt and tighten them with a wrench. Make sure they are snug but not over-tightened to avoid damaging the porcelain.
Attaching the supply line
Attaching the supply line ensures a steady flow of water into the toilet tank, enabling it to flush efficiently. Follow these steps to attach the supply line:
- Locate the water inlet valve at the bottom of the toilet tank.
- Connect one end of the supply line to the water inlet valve and tighten the nut securely.
- Connect the other end of the supply line to the water supply valve on the wall. Again, ensure that the nut is tightened securely to prevent any leaks.
Following these steps will ensure proper installation of the toilet tank in your Kohler toilet. Remember to check for any leaks and tighten all the connections before using the toilet. Now, you’re one step closer to enjoying a fully functioning and efficient toilet!
Testing The Toilet
Once you have successfully installed your Kohler toilet, it is important to thoroughly test it to ensure proper function and to address any potential issues. This step-by-step guide will help you test your toilet to make sure everything is working as it should. Follow these instructions for a hassle-free testing process.
Turning on the water supply
Before testing your Kohler toilet, make sure you have turned on the water supply. Locate the shut-off valve usually located near the base of the toilet. Turn the valve in a clockwise direction to open it and allow water to flow into the tank. Keep a close eye on the water supply line to ensure there are no leaks.
Checking for leaks
Once the water supply is turned on, carefully inspect the base of the toilet, the area around the supply line, and the tank for any signs of leakage. Look for any water puddling on the floor or dripping from any connections. If you notice any leaks, it is essential to address them promptly to prevent further damage. Tighten any loose connections and consider using plumber’s tape to seal any gaps or joints.
Flushing and ensuring proper function
Now it’s time to give your toilet a test flush to ensure proper function. Press the handle down firmly to initiate the flushing mechanism. Observe the flushing action and make sure the water drains completely from the bowl. Check if the toilet fills up properly and shuts off when the tank is full. If you notice any issues such as incomplete flushes or slow tank filling, you may need to adjust the flapper or the fill valve.
In addition to ensuring proper flushing, pay attention to other features of the toilet, such as the seat and cover. Check if they are securely attached and functioning correctly. Give the toilet a gentle shake to ensure it is stable and not wobbly. If you notice any problems, make the necessary adjustments or tighten any loose screws.
By following these simple steps, you can effectively test your Kohler toilet and make sure it is functioning as intended. Remember to always keep an eye out for any leaks and address them promptly to avoid any potential water damage. With a properly installed and tested toilet, you can enjoy its reliable performance for years to come.
Addressing Leaks
Dealing with leaks in your toilet can be frustrating and potentially damaging to your home. Whether you’re installing a new Kohler toilet or troubleshooting an existing one, it’s essential to address any leaks promptly. In this section, we’ll walk you through the steps to inspect the wax ring and tighten connections to prevent leaks.
Inspecting the Wax Ring
To begin addressing leaks, you’ll first need to inspect the wax ring. The wax ring is a crucial component that creates a watertight seal between the toilet and the floor. Over time, this ring can wear out or become misaligned, causing leaks. Here’s how you can inspect the wax ring:
- Turn off the water supply to the toilet by shutting off the valve located near the base.
- Flush the toilet to empty the tank and bowl, then use a sponge or towel to remove any remaining water.
- Remove the toilet by unscrewing the bolts securing it to the floor. Carefully lift the toilet and set it aside.
- Inspect the wax ring for any signs of damage, such as cracks or deformation. If the wax ring appears worn out, it should be replaced.
- Check the alignment of the wax ring with the toilet flange. Ensure that it is properly centered and sits flush against the flange.
By carefully inspecting the wax ring and addressing any issues, you can prevent leaks and ensure a watertight seal for your Kohler toilet.
Tightening Connections
Another common cause of leaks in toilets is loose connections between various components. These connections can become loose over time due to regular use or improper installation. Here’s how you can tighten the connections:
- Identify the connections that need to be tightened, such as the supply line connection, the tank bolts, or the flush valve.
- Use an adjustable wrench or pliers to tighten the connections. Be careful not to overtighten, as this can cause damage.
- Check for any remaining leaks after tightening the connections. If you still notice leaks, consider replacing faulty components or seeking professional assistance.
By ensuring that all connections are tightened properly, you can eliminate sources of leaks and enjoy a fully functional Kohler toilet.
Adjusting The Flush Mechanism
Checking the Flapper
To ensure that your Kohler toilet flushes properly and efficiently, it’s important to periodically check and adjust the flush mechanism. One crucial component of the flush mechanism is the flapper. The flapper is responsible for controlling the release of water from the tank into the bowl during flushing. Over time, the flapper can become worn or misaligned, leading to decreased flushing power and potential water leaks. Here’s how to check and adjust the flapper to optimize your toilet’s performance:
- Shut off the water supply: Before you begin tinkering with the flapper, turn off the water supply to the toilet. This can usually be done by twisting the shut-off valve located behind the toilet clockwise until it’s fully closed.
- Remove the tank lid: With the water supply turned off, carefully lift the tank lid and set it aside.
- Inspect the flapper: Take a close look at the flapper to see if there are any signs of damage or wear. Look for cracks, leaks, or build-up of mineral deposits. If you notice any issues, it’s time to replace the flapper.
- Adjust the chain: The chain connecting the flapper to the flush handle should have a slight slack but not be too loose. If the chain is too long, it can prevent the flapper from closing completely, causing water to continuously leak from the tank into the bowl. Adjust the chain length as needed.
- Test the flapper: Once you’ve adjusted the chain, flush the toilet and observe the flapper’s performance. It should stay open long enough to allow a sufficient amount of water to flow into the bowl and then close tightly after the flush. If the flapper doesn’t function properly, adjust the chain length further until it does.
Adjusting the Fill Valve
In addition to the flapper, the fill valve is another important component of the flush mechanism. The fill valve controls the water level in the toilet tank and ensures proper refilling after each flush. If your toilet is experiencing issues like insufficient water flow or continuous running, adjusting the fill valve can help resolve the problem. Here’s how to adjust the fill valve on your Kohler toilet:
- Shut off the water supply: Similar to adjusting the flapper, start by turning off the water supply by twisting the shut-off valve behind the toilet clockwise until it’s fully closed.
- Locate the fill valve: The fill valve is usually located on the left side of the toilet tank. It is connected to the water supply line.
- Adjust the water level: Look for a screw or adjustment knob on top of the fill valve. Using a screwdriver or your hand, turn the screw or adjust the knob to raise or lower the water level in the tank. The ideal water level should be marked on the inside of the tank.
- Test the water level: Once you’ve made the adjustment, turn on the water supply and let the tank fill up. Observe the water level and check if it aligns with the mark you identified earlier. Make further adjustments as necessary until you achieve the desired water level.
- Check for leaks: After adjusting the fill valve, closely inspect for any signs of leaks around the valve and supply line. Ensure all connections are tight and secure, and there are no water drips or puddles.
By regularly checking and adjusting the flapper and fill valve of your Kohler toilet, you can optimize its flushing performance, conserve water, and prevent potential leaks. Taking the time to maintain these vital components will ensure a reliable and efficient toilet system for years to come.
Regular Cleaning And Maintenance
Regular cleaning and maintenance of your Kohler toilet is essential to keeping it clean, fresh, and functioning properly. By following a few simple steps and using the right cleaning products, you can ensure that your toilet remains in optimal condition for years to come.
Choosing Appropriate Cleaning Products
When it comes to cleaning your Kohler toilet, it’s important to choose the right cleaning products. Harsh chemicals and abrasive cleaners can damage the finish of your toilet and negatively impact its performance. Instead, look for mild, non-abrasive cleaners that are specifically formulated for use on toilets. These products are designed to effectively remove dirt, stains, and bacteria without causing any harm.
Cleaning the Tank and Bowl
The tank and bowl of your Kohler toilet are the main areas where dirt, stains, and bacteria can accumulate. Regular cleaning of these areas is crucial for maintaining hygiene and preventing foul odors. Here’s a simple step-by-step guide to cleaning the tank and bowl:
- Start by turning off the water supply to the toilet and flushing it to drain the tank and bowl.
- Apply the chosen cleaning product to the inside of the bowl and scrub the surface using a toilet brush. Make sure to reach under the rim of the bowl to remove any hidden dirt.
- For the tank, remove the lid and pour the cleaning solution into the tank. Use a scrub brush or sponge to clean the walls and bottom of the tank.
- Flush the toilet a few times to rinse both the tank and bowl thoroughly.
- Finally, wipe the exterior surfaces of the toilet, including the seat, lid, and handles, with a clean cloth or sponge.
Inspecting and Replacing Parts as Needed
Toilet parts can wear out over time, leading to leaks, running water, or other issues. Regular inspection and replacement of faulty parts are essential for keeping your Kohler toilet in optimal condition. Here are a few key parts to inspect:
| Toilet Part | Signs of Damages | Replacement |
|---|---|---|
| Flush Valve | Constant water running or not flushing properly | Replace with a new flush valve |
| Fill Valve | Low water level or slow filling | Replace with a new fill valve |
| Flapper | Water leaking into the bowl or incomplete flush | Replace with a new flapper |
Regular maintenance and replacement of faulty parts can help prevent costly repairs down the line and ensure your Kohler toilet operates efficiently.
By following these simple steps for regular cleaning and maintenance, you can keep your Kohler toilet looking and performing its best. Remember to use the appropriate cleaning products, clean the tank and bowl regularly, and inspect and replace parts as needed. With a little effort, your Kohler toilet will continue to provide years of reliable use and comfort.
Frequently Asked Questions
How Do You Install A Kohler Toilet Lid?
To install a KOHLER toilet lid, follow these steps: 1. Remove the old lid by lifting it up and off the tank. 2. Position the new lid on the tank, making sure it lines up with the holes for the bolts.
3. Insert the bolts through the holes in the lid and tank. 4. Secure the bolts with the nuts provided, tightening them evenly. 5. Finally, test the lid by gently pressing down on it to ensure it is securely in place.
What Is The Proper Way To Install A Toilet?
To properly install a toilet, follow these guidelines: 1. Clear the area and assemble necessary tools. 2. Place a wax ring on the flange and align it with the drain. 3. Lower the toilet onto the wax ring and press down firmly.
4. Secure the toilet with bolts and nuts. 5. Connect the water supply and test for leaks. Proper installation ensures functionality and prevents water damage.
How Do You Attach A Toilet Bowl To The Base?
To attach a toilet bowl to the base, follow these steps: 1. Place the wax ring onto the drain opening. 2. Lower the toilet bowl onto the wax ring, aligning the bolts with the mounting holes. 3. Tighten the nuts onto the bolts, alternating sides to ensure even pressure.
4. Attach the water supply line to the fill valve. 5. Turn on the water supply and check for leaks.
How Can I Tell Which Kohler Toilet Seat I Have?
To determine the type of KOHLER toilet seat you have, look for a model number underneath the lid or on the back of the seat. Compare this number with KOHLER’s product database for a match.
Conclusion
Installing a Kohler toilet is a straightforward process that can be completed with a few simple steps. By following the instructions provided in this guide, you can easily tackle the installation process. Remember to gather all the necessary tools and materials before starting, take your time, and be patient.
With proper installation, you can enjoy the functionality and convenience of your new Kohler toilet for years to come. Happy installing!