To install a glass rinser, simply follow these steps: first, position the rinser over your sink or countertop; then, attach the rinser’s water supply tube to a water line or faucet connection.
Understanding The Benefits Of A Glass Rinser
A glass rinser is an essential tool in any bar or restaurant setting. It provides a convenient and efficient way to clean and sanitize glassware, ensuring a hygienic and enjoyable drinking experience for patrons. In this section, we will delve into the various benefits of installing a glass rinser in your establishment.
Efficient cleaning process
One of the key benefits of a glass rinser is its efficient cleaning process. With just a simple push or pull of a glass against the rinser, it quickly sprays a burst of water or sanitizing solution into the glass, effectively removing any residue or contaminants. This saves valuable time for bartenders and staff, allowing them to focus on serving customers and keeping up with the demands of a busy establishment.
Improved productivity
By incorporating a glass rinser into your bar or restaurant workflow, you can significantly improve productivity. Bartenders can now swiftly rinse glasses between each use, without the need for complicated and time-consuming hand washing. This means more glasses can be cleaned in a shorter amount of time, reducing the need for a large inventory of glassware and ensuring a continuous supply of clean glasses for customers. With increased productivity, your staff can efficiently handle the peak hours and serve customers promptly and hassle-free.
Enhanced customer experience
Providing a memorable customer experience is paramount in the hospitality industry. A glass rinser contributes to this by ensuring that each glass served is properly cleaned and free from any impurities that may affect the taste or presentation of the drink. Customers will appreciate the attention to detail and the high-quality standards maintained by your establishment. A glass rinser not only enhances the overall drinking experience but also shows your commitment to providing a hygienic and enjoyable environment for your patrons.
Installing a glass rinser in your bar or restaurant has numerous benefits, from streamlining the cleaning process to improving productivity and enhancing customer satisfaction. By investing in this simple yet effective device, you can elevate your establishment’s bar service and set yourself apart from the competition.
Selecting The Right Glass Rinser For Your Needs
When it comes to installing a glass rinser, selecting the right one for your needs is essential. A glass rinser is a convenient and efficient tool for quickly and effortlessly rinsing glasses before use. Whether you own a bar, restaurant, or simply enjoy hosting gatherings at home, having a glass rinser can greatly enhance the cleanliness and presentation of your glassware. In this guide, we will explore the key considerations for choosing a glass rinser that is perfect for your specific requirements.
Considerations for choosing a glass rinser
When looking for a glass rinser, there are several key factors to consider. By carefully evaluating these factors, you can ensure that you select a glass rinser that meets your specific needs and preferences.
Size and capacity requirements
The first consideration is the size and capacity of the glass rinser. It is important to choose a size that fits within the available space in your kitchen or bar area. Additionally, you need to consider the number of glasses you typically need to rinse at a given time. If you have a high volume of glassware to rinse, you may want to opt for a larger capacity rinser. On the other hand, if space is limited or you have lower volume needs, a smaller rinser may be more suitable.
Material and durability factors
Another crucial factor to consider is the material and durability of the glass rinser. Glass rinsers are typically made from stainless steel or plastic. Stainless steel glass rinsers are known for their durability and resistance to rust and corrosion. They are also easy to clean and maintain. Plastic glass rinsers, on the other hand, are often more affordable and lightweight. However, they may not be as durable as stainless steel options. When choosing a material, it is important to consider your specific usage and durability requirements.
In addition to material, it is also important to consider the durability of the glass rinser. Look for features such as sturdy construction, reinforced components, and reliable mechanisms. Investing in a durable glass rinser ensures that it will withstand frequent use and last for years to come.
By carefully considering the size and capacity requirements, as well as the material and durability factors, you can select the perfect glass rinser that meets your specific needs. Remember to measure the available space, estimate the volume of glasses you need to rinse, and evaluate the material and durability requirements. With the right glass rinser, you can enjoy clean and spotless glassware, while enhancing the overall efficiency and presentation of your establishment.
Assessing Your Bar Setup And Layout
Assessing your bar setup and layout is an important step before installing a glass rinser. By analyzing available space, determining the optimal location, and considering plumbing and electrical requirements, you can ensure a smooth and efficient installation. In this post, we will discuss these factors in detail to help you make informed decisions about incorporating a glass rinser into your bar.
Analyzing available space
Analyzing the available space in your bar is crucial to determine the feasibility of installing a glass rinser. Measure the countertops and identify where you have enough room to accommodate the rinser. Consider the shape and size of your bar area to assess potential locations.
Here are a few points to consider when analyzing available space:
- Measure the length and width of the countertop where the rinser will be installed.
- Take note of any obstacles or fixtures that may restrict the placement of the rinser.
- Consider the proximity to the drink preparation area for easy access.
Determining the optimal location
Once you have analyzed the available space, it’s time to determine the optimal location for the glass rinser. The ideal location will depend on various factors, including workflow efficiency and customer accessibility.
Consider the following when determining the optimal location:
- Place the rinser near the service area to minimize unnecessary trips for rinsing glasses.
- Ensure adequate countertop space around the rinser for seamless workflow.
- Consider customer visibility, as a glass rinser can be an attractive feature.
Considering plumbing and electrical requirements
Before installing a glass rinser, it is essential to consider the plumbing and electrical requirements to ensure proper functionality. The rinser will need access to both water and power sources.
Take the following factors into account when considering plumbing and electrical requirements:
- Ensure convenient access to a water line for both hot and cold water.
- Ensure that a power outlet is available near the installation location for the rinser.
- If necessary, consult a professional plumber or electrician for proper installation.
By carefully assessing your bar setup and layout, analyzing available space, determining the optimal location, and considering plumbing and electrical requirements, you can effectively install a glass rinser that enhances the efficiency and convenience of your bar operations.
Preparing The Installation Area
Before installing a glass rinser, it is important to properly prepare the installation area. This includes clearing and cleaning the workspace, ensuring proper ventilation and safety measures, and gathering the necessary tools and equipment. Following these steps will help ensure a smooth and successful glass rinser installation.
Clearing and cleaning the workspace
Start the installation process by clearing and cleaning the workspace. Remove any unnecessary items, such as utensils, glasses, or debris, from the area where the glass rinser will be installed. This will provide ample space to work and prevent any obstructions or accidents during the installation.
Next, thoroughly clean the area to remove any dust, dirt, or grease. Use a damp cloth or mild cleaning solution to wipe down countertops, sinks, or any other surfaces that may come in contact with the glass rinser. Keeping the workspace clean will ensure a hygienic environment for your glass rinser.
Ensuring proper ventilation and safety measures
Proper ventilation is vital during the glass rinser installation process. Ensure that the installation area has sufficient air circulation to prevent the buildup of fumes or odors. Open windows or use fans to improve airflow if necessary. Adequate ventilation will keep the installation area fresh and free from any lingering smells or hazardous fumes.
In addition to ventilation, it is crucial to take appropriate safety measures while installing the glass rinser. Wear protective gloves and goggles to safeguard yourself from any potential hazards or accidents. Follow the manufacturer’s instructions and guidelines carefully to ensure a safe and secure installation.
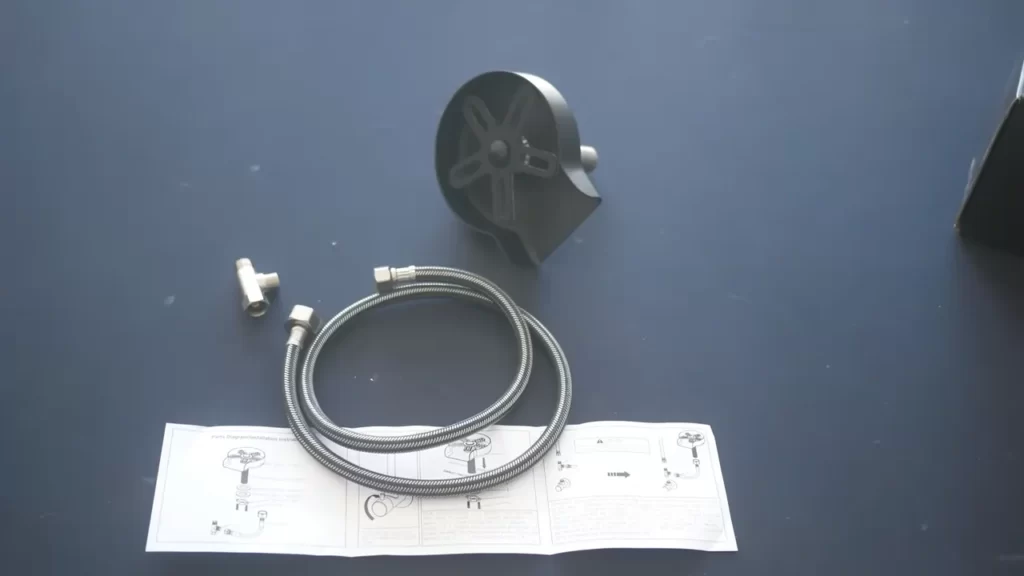
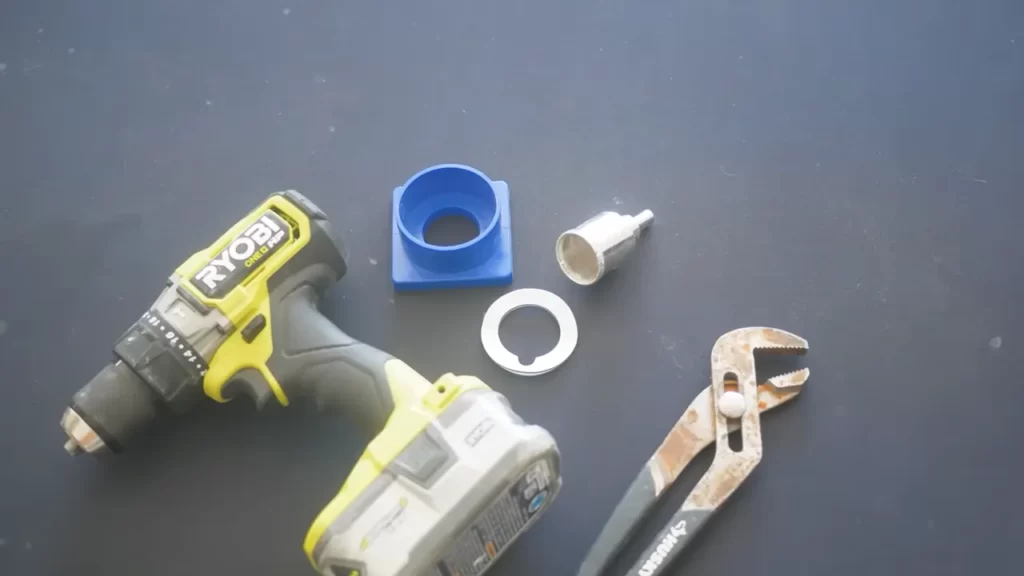
Gathering necessary tools and equipment
Before starting the installation, gather all the necessary tools and equipment required for the job. These may include a screwdriver, adjustable wrench, plumber’s tape, mounting hardware, and any other components provided with the glass rinser. Having everything ready beforehand will make the installation process more efficient and prevent any delays or interruptions.
Ensure that each tool is in proper working condition and readily accessible during the installation. Keep them organized and nearby to avoid wasting time searching for the required tool. Taking these small but essential steps will save time and energy during the glass rinser installation process.
By following these steps in preparing the installation area for your glass rinser, you will be well on your way to a successful installation. Clearing and cleaning the workspace, ensuring proper ventilation and safety measures, and gathering the necessary tools and equipment are crucial for a hassle-free and efficient installation experience.
Installing The Glass Rinser Unit
Installing a glass rinser unit is a great addition to any bar or kitchen. Not only does it provide a convenient way to quickly rinse glasses, but it also adds a touch of elegance to your space. Follow these simple steps to install a glass rinser unit:
Connecting the Water Source and Drainage
Before installing the glass rinser unit, it is important to connect the water source and drainage properly. Here’s how:
- Locate the nearest water line and shut off the supply using the shut-off valve.
- Attach a tee fitting to the shut-off valve to create a connection for the glass rinser unit.
- Use a pipe wrench to tighten the fittings securely.
- Connect the water supply hose of the glass rinser unit to the tee fitting.
- Check for any leaks and tighten the connections if necessary.
- Next, you need to connect the drainage system.
- Find a suitable drainage location, preferably near the glass rinser unit.
- Install a P-trap under the sink or bar, ensuring it is properly aligned with the drainage pipe.
- Connect the drain hose of the glass rinser unit to the P-trap.
- Once again, check for any leaks and make adjustments as needed.
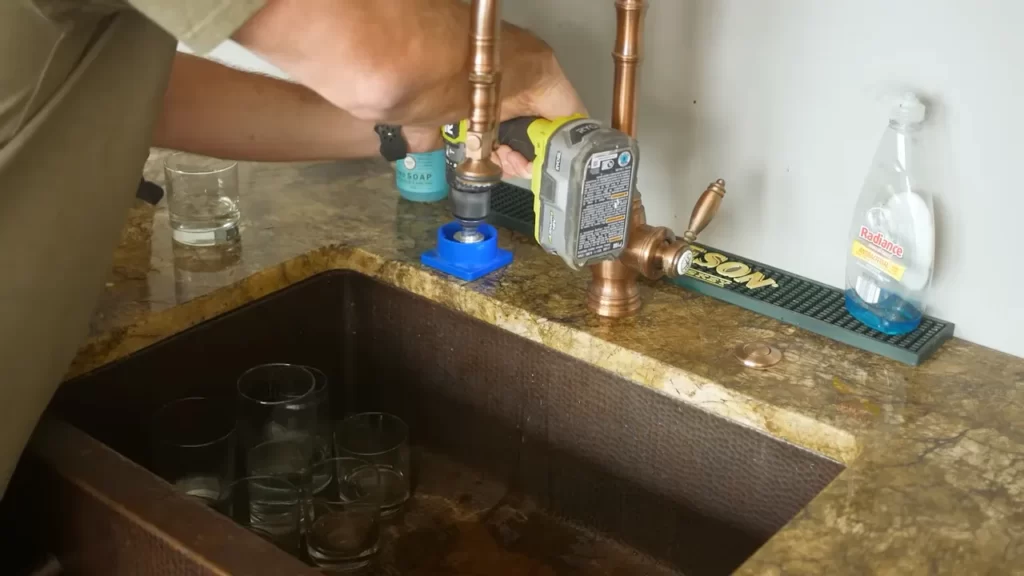
Securing the Rinser to the Countertop or Bar Surface
After connecting the water source and drainage, it’s time to secure the glass rinser unit to the countertop or bar surface. This step helps to ensure stability and prevent any accidental movements during use. Follow these steps:
- Place the glass rinser unit in the desired location on the countertop or bar surface.
- Mark the spot where the mounting holes need to be drilled.
- Use a power drill and the appropriate drill bit to create the pilot holes.
- Secure the glass rinser unit to the countertop or bar surface using screws and a screwdriver.
- Double-check that the unit is firmly attached and make any necessary adjustments.
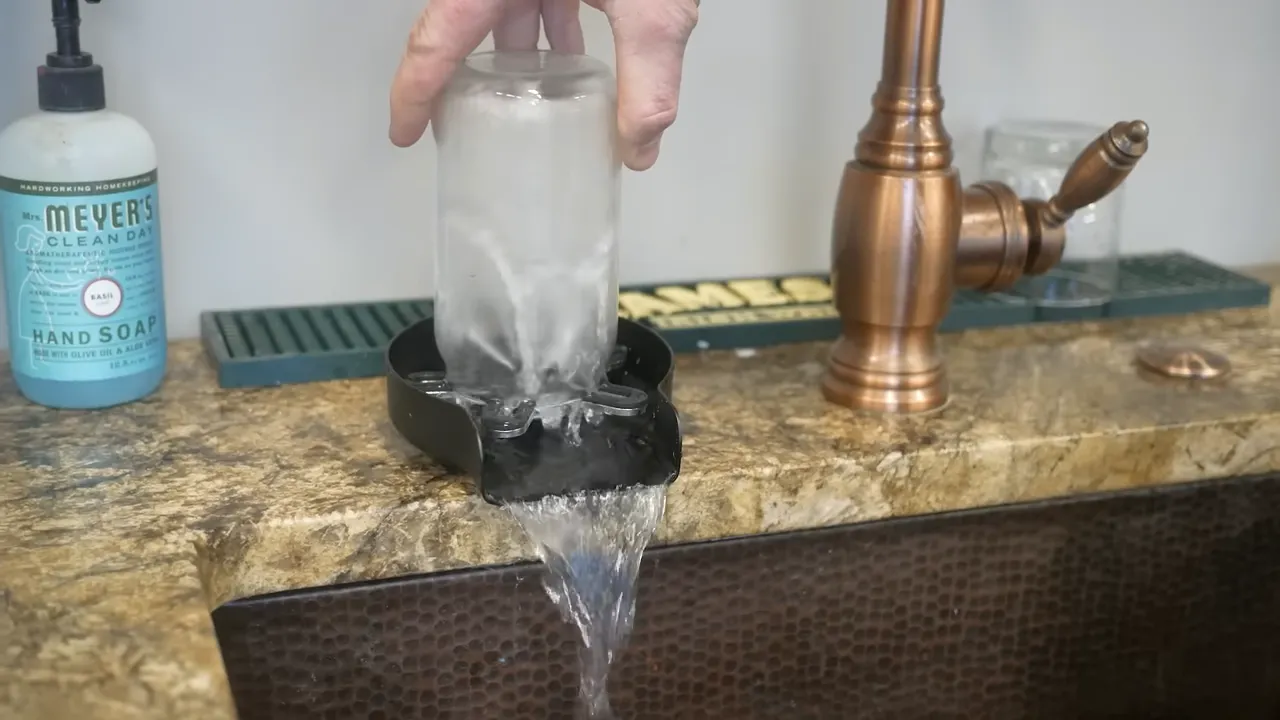
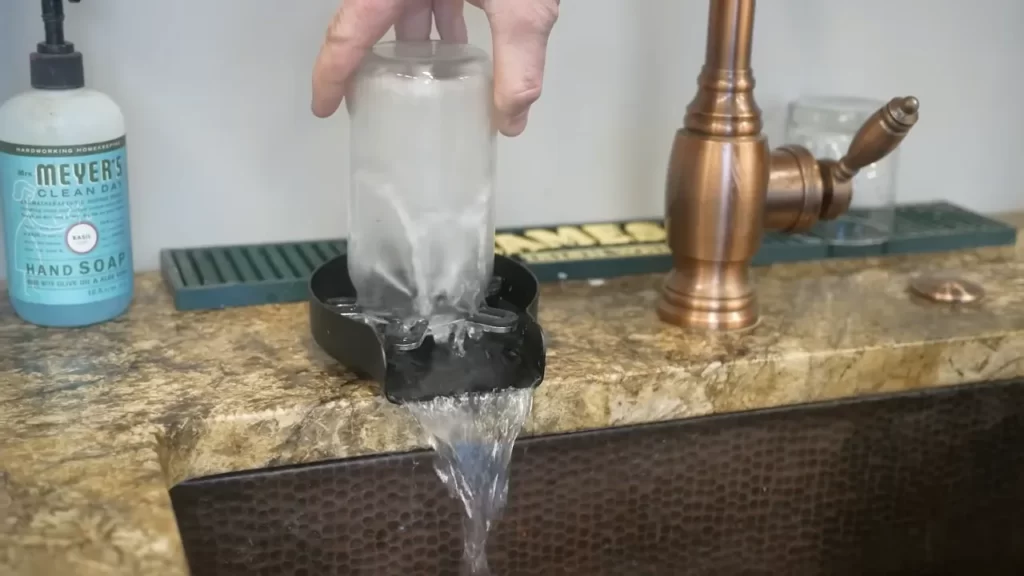
Testing the Functionality and Adjusting as Needed
Once the glass rinser unit is securely installed, it’s time to test its functionality and make any necessary adjustments. Here’s what to do:
- Turn on the water supply and check that water is flowing through the rinser properly.
- Place a glass under the rinser and press down to activate the rinse cycle.
- Observe the water flow and ensure that it effectively rinses the glass.
- If needed, adjust the water pressure or nozzle position to optimize the rinsing process.
- Repeat the test with several glasses to ensure consistent functionality.
By following these simple steps, you can easily install a glass rinser unit and enjoy the convenience and elegance it brings to your space. Cheers!
Additional Considerations For Maintenance And Safety
Proper maintenance and safety measures are essential when it comes to installing a glass rinser. To ensure its optimal functionality and hygiene, there are a few key considerations that you need to keep in mind. In this section, we will cover important aspects such as cleaning and sanitizing, troubleshooting common issues, and ensuring compliance with local health and safety regulations. By following these guidelines, you can prolong the lifespan of your glass rinser and promote a safe environment for both staff and customers. Let’s delve into each of these considerations in more detail:
Cleaning and Sanitizing the Glass Rinser Regularly
To maintain the cleanliness and prevent the buildup of bacteria and other contaminants, regular cleaning and sanitization of the glass rinser is crucial. Here are some steps you can follow:
- Start by disconnecting the glass rinser from the water and power sources.
- Remove any removable parts, such as the rinser grate or nozzle, for easier cleaning.
- Using a mild detergent or a specialized glass rinser cleaner, scrub all the surfaces thoroughly.
- Rinse off the cleaning solution with warm water and make sure to remove any residue.
- Sanitize the rinser by using a food-grade sanitizing solution or a mixture of water and vinegar.
- After sanitizing, reassemble all the components and reconnect the rinser to the water and power sources.
By incorporating these cleaning and sanitizing practices into your regular maintenance routine, you can ensure that your glass rinser remains clean and hygienic.
Troubleshooting Common Issues
From time to time, you may encounter common issues with your glass rinser. Here are a few troubleshooting tips to help you address these problems:
| Issue | Possible Solution |
|---|---|
| The rinser is not spraying water |
|
| The water is not draining properly |
|
| The rinser is leaking |
|
By following these troubleshooting tips, you can resolve common issues with your glass rinser quickly and efficiently.
Ensuring Compliance with Local Health and Safety Regulations
Complying with local health and safety regulations is of utmost importance when installing and operating a glass rinser. Here are a few steps you can take to ensure compliance:
- Familiarize yourself with the specific regulations and guidelines applicable to your location.
- Regularly check and maintain all safety features of the glass rinser, such as emergency shut-off mechanisms and electrical wiring.
- Train your staff on the proper operation and maintenance of the glass rinser, emphasizing safety protocols.
- Keep a record of regular maintenance and inspections for future reference.
- Conduct regular audits to verify compliance and address any potential safety concerns.
By adhering to these steps and staying informed about the regulations in your area, you can ensure the safety of your staff and customers while using the glass rinser.
Proper Glass Handling And Stacking Techniques
When it comes to installing a glass rinser, it is crucial to understand and implement proper glass handling and stacking techniques. By following these guidelines, you can prevent breakage and damage to your glassware while maximizing efficiency in glass rinsing and drying. Let’s explore some important tips for handling and stacking glasses with care.
Preventing Breakage and Damage
Glassware is fragile and requires careful handling to prevent breakage and damage. Follow these guidelines to ensure the safety of your glassware:
- When picking up a glass, always hold it by the base or stem rather than the rim. This prevents the risk of accidentally dropping and breaking it.
- Use caution when stacking glasses to avoid chipping or cracking. Place a protective material such as a silicone mat or soft cloth between each glass to prevent direct contact.
- Avoid overcrowding the glass rinser. Leave enough space between each glass to prevent them from knocking into each other during rinsing or drying.
- Never stack glasses of different sizes or shapes together, as this increases the risk of breakage. Group glasses of similar sizes and shapes for efficient stacking.
- Regularly inspect and maintain your glass rinser to ensure it is in good working condition. Faulty equipment can increase the risk of accidents.
Maximizing Efficiency in Glass Rinsing and Drying
To optimize the glass rinsing and drying process, follow these tips:
- Prioritize cleanliness by ensuring the glass rinser is free from debris and residue. Clean the rinser regularly to maintain its efficiency.
- Adjust the water pressure to an optimal level that effectively removes dirt and residue without subjecting the glasses to excessive force.
- Allow sufficient time for the glasses to air dry or use a soft, lint-free cloth to gently dry them. Avoid using abrasive materials that can scratch the glass surface.
- Invest in a high-quality glass rinser that is designed for efficient rinsing and drying. Consider models with adjustable settings to accommodate various glass sizes and shapes.
- Implement a systematic stacking and organization method to streamline the rinsing and drying process. This can save time and prevent confusion.
By following these proper glass handling and stacking techniques, you can ensure the longevity of your glassware while achieving maximum efficiency in the glass rinsing and drying process. Implement these guidelines in your glass rinser installation to maintain a safe and productive environment for your glasses and staff.
Utilizing The Glass Rinser In Your Bar Operations
Utilizing the Glass Rinser in Your Bar Operations
Incorporating the Rinser into Your Bartending Workflow
Incorporating a glass rinser into your bar operations can drastically enhance the efficiency and cleanliness of your establishment. By seamlessly integrating this innovative tool into your bartending workflow, you can ensure your customers always receive their drinks in perfectly clean glasses, with minimal disruption to their overall experience.
To effectively incorporate the glass rinser into your bartending workflow, here are some essential steps:
- Choose the ideal placement: Select a convenient location near the bartending station to install the glass rinser. This ensures that bartenders can easily access and utilize the rinser without having to move away from their primary workspace. This proximity promotes a seamless workflow, allowing bartenders to rinse glasses swiftly and efficiently.
- Maintain a steady supply of clean glasses: To maximize the benefits of the glass rinser, it is crucial to maintain a steady supply of clean glasses near the rinser. This eliminates any delays or disruptions caused by searching for clean glasses during busy service hours. Additionally, using glass racks or shelving systems near the rinser ensures a continuous flow of clean glasses, further enhancing efficiency.
- Integrate the rinser into drink preparation: Train your bartending staff to incorporate the glass rinser into their drink preparation process. Encourage them to rinse glasses immediately before use, ensuring each drink is served in a pristine, residue-free glass. By making rinsing a routine step in their workflow, your staff can effortlessly maintain high standards of cleanliness and customer satisfaction.
- Streamline rinsing with multiple rinser heads: If your bar experiences high volumes of glassware, consider incorporating a glass rinser with multiple rinsing heads. This allows multiple glasses to be rinsed simultaneously, significantly saving time and further optimizing your bartending workflow. With multiple rinsing heads, you can efficiently handle high-demand periods and ensure quick service without compromising cleanliness.
Training Staff on Efficient Use and Maintenance
To maximize the performance and longevity of your glass rinser, proper training on efficient use and maintenance is crucial. Here are some steps to ensure your staff is well-prepared:
- Thoroughly explain the rinsing process: Provide detailed instructions to your staff on how to effectively use the glass rinser. Show them the correct angle and motion required for optimal rinsing. Emphasize the importance of rinsing all glasses prior to use to maintain high hygiene standards.
- Highlight maintenance guidelines: Educate your staff about the necessary maintenance procedures for the glass rinser. This includes regular cleaning, removing any debris, and checking for any blockages or malfunctioning parts. Encourage them to report any issues to a designated maintenance staff member to ensure swift repairs.
- Offer hands-on practice: Allow your bartenders to practice using the glass rinser under supervision, to reinforce their understanding and improve their proficiency. This practical experience will help them develop the necessary skills to efficiently incorporate the rinser into their daily tasks.
By providing comprehensive training on efficient use and maintenance, you empower your staff to harness the full potential of the glass rinser, resulting in improved customer service and increased productivity.
Enhancing The Customer Experience With A Glass Rinser
Installing a glass rinser in your bar or restaurant can be a game-changer when it comes to enhancing the customer experience. Not only does it make cleaning glasses a breeze for your staff, but it also adds a touch of sophistication to your establishment. In this article, we will delve into how you can communicate the benefits of a glass rinser to your customers, highlighting the hygiene and quality aspects that it brings to the table.
Communicating the benefits to customers
When customers see a glass rinser at your bar or restaurant, they may be curious about its purpose and how it can benefit them. It is essential to effectively communicate these benefits, making them feel confident in their choice of venue. Here are some ways to educate your customers:
- Efficiency: Mention how a glass rinser saves time and ensures quick turnaround between drinks, resulting in faster service for your customers. With a glass rinser, their drinks will be served in pristine glasses without any residual odors or flavors from the previous beverage.
- Consistency: Highlight the fact that a glass rinser helps maintain consistency in the taste of their drinks. By thoroughly rinsing each glass, you eliminate the risk of cross-contamination, ensuring that every beverage tastes exactly as it should.
- Presentation: Emphasize the visual appeal of a sparkling clean glass. By using a glass rinser, you can provide your customers with a visually pleasing drinking experience that adds a touch of elegance to their visit.
Highlighting the hygiene and quality aspects
Hygiene and quality are of utmost importance, especially in the food and beverage industry. A glass rinser offers several advantages in this regard:
- Eliminate bacteria: By rinsing glasses using high-pressure water jets, a glass rinser effectively removes any bacteria or germs that may be present. This ensures that your customers enjoy their drinks in a clean and hygienic environment.
- Prevent residue: A glass rinser helps eliminate residue from previous drinks, ensuring that your customers’ beverages are not tainted with any unwanted flavors or aromas. This attention to detail demonstrates your commitment to quality.
- Enhance flavors: With a glass rinser, you can ensure that each drink is served in a fresh, clean glass, allowing the true flavors to shine through. This enhances the overall drinking experience for your customers.
In conclusion, installing a glass rinser not only streamlines your operations but also enhances the customer experience in multiple ways. By effectively communicating the benefits and highlighting the hygiene and quality aspects, you can make your customers feel confident in their choice of your venue. Invest in a glass rinser today and take your establishment to the next level.
Frequently Asked Questions
Is It Worth Installing Glass Rinser?
Installing a glass rinser is definitely worth it. It ensures quick and efficient cleaning of glasses, saving time and effort. The glass rinser provides a hygienic and convenient solution for rinsing glasses, resulting in spotless and sparkling glassware.
Can You Replace Sink Sprayer With Glass Rinser?
Yes, you can replace a sink sprayer with a glass rinser.
Should I Connect Glass Rinser To Hot Or Cold Water?
Connect your glass rinser to cold water. It ensures that the glass is properly cooled without causing any damage.
What Size Hole Is Needed For Delta Glass Rinser?
The Delta Glass Rinser requires a hole size of approximately [insert size].
Conclusion
Installing a glass rinser is a simple and efficient way to improve your bar or kitchen setup. With its easy installation process and convenient features, such as the ability to quickly rinse glasses, it adds convenience and hygiene to your daily routine.
By following the step-by-step guide provided in this blog post, you can effortlessly install a glass rinser and enhance your beverage serving experience. Cheers to a sparkling clean glassware collection!