To install a freestanding tub drain, you will need to follow a few key steps. Firstly, ensure that the tub is level and stable.
Then, attach the drain assembly to the bottom of the tub, making sure it is properly aligned. Finally, connect the drain pipe to the sewer line, using appropriate fittings and ensuring a secure connection.
Gathering The Necessary Tools And Materials
Before you dive into installing a freestanding tub drain, it’s essential to gather all the necessary tools and materials to ensure a smooth installation process. Having everything on hand will save you time and frustration while you work.
List of tools needed for the installation:
To install a freestanding tub drain, you will require the following tools:
- Adjustable wrench
- Plumber’s putty or silicone caulk
- Thread seal tape
- Ratchet wrench
- Pipe wrench
- Screwdriver
- Plumbing pliers
- Level
- Hacksaw
- Measuring tape
Make sure you have these tools readily accessible before starting the installation process. Having the right tools will make the job easier and help you achieve professional-looking results.
List of materials required for the installation:
Along with the necessary tools, you will need the following materials to install a freestanding tub drain:
- Tub drain assembly kit
- PVC pipe
- PVC fittings
- Teflon tape
- Plumber’s putty or silicone caulk (if not using a gasket)
Ensure you have these materials on hand before you begin the installation process. Double-check the compatibility of the materials with your specific tub and ensure they meet any local building codes and regulations.
With all the necessary tools and materials gathered, you’re ready to proceed to the next steps of installing your freestanding tub drain. The proper preparation will make the installation process much smoother and help you achieve a successful outcome.

Assessing The Plumbing Setup
Understanding the Existing Plumbing System
Assessing the plumbing setup is the first crucial step in the installation process of a freestanding tub drain. To ensure a successful installation, it’s important to have a clear understanding of the existing plumbing system in your bathroom.
Here’s what you need to do:
- Inspect the plumbing pipes: Take a close look at the pipes under your bathtub and determine the type of materials used. Common materials include PVC, copper, or galvanized steel. Understanding the materials will help you plan the installation accordingly.
- Check the water supply: Identify the location of the water supply lines. These lines bring water to your tub faucet. Ensure that they are easily accessible and in good condition. If you notice any leaks or damage, it’s advisable to fix them before proceeding with the drain installation.
- Assess the drain line: Locate the existing drain line that carries wastewater away from your bath. Take note of its position, size, and any additional components such as p-traps or vent pipes. This information is essential when selecting the right drain configuration for your freestanding tub.
Identifying the Type of Drain Configuration
Once you have a clear understanding of your plumbing setup, the next step is to identify the appropriate drain configuration for your freestanding tub. Different tubs require different drain types, so it’s essential to choose the right one to ensure proper functioning and prevent leaks or other plumbing issues.
Here are a few key points to consider:
- Center drain configuration: This type of drain is commonly found in freestanding tubs where the drain is located at the center of the tub. It allows for a sleek and symmetrical look.
- Offset drain configuration: Some freestanding tubs have an offset drain, meaning the drain is positioned to one side rather than centrally. This configuration is often chosen for aesthetic reasons or due to space constraints in the bathroom.
- Flexible drain configuration: In certain cases, the exact drain configuration required may not be readily available. In such situations, a flexible drain system can be used, which allows for customization and adjustment to fit your specific needs.
By understanding the existing plumbing system and identifying the appropriate drain configuration, you can proceed with confidence in your freestanding tub drain installation. This careful assessment will help ensure a seamless installation process and a functional and aesthetically pleasing final result.
Loosening The Drain Flange
Before installing a freestanding tub drain, it’s important to understand how to properly loosen the drain flange. This step-by-step process will ensure that your installation goes smoothly, allowing you to enjoy your new tub without any leaks or complications.
Step-by-step instructions for loosening the drain flange
Follow these simple steps to loosen the drain flange:
- 1. Locate the drain flange: The drain flange is typically located underneath the tub, on the bottom side. It is a circular metal plate that secures the drain to the tub.
- 2. Remove any screws: Some drain flanges are secured with screws. If this is the case, use a screwdriver to remove them carefully.
- 3. Apply lubricant: In some instances, the drain flange may be stuck due to old caulk or debris. Before attempting to loosen it, apply a lubricant such as WD-40 or silicone spray around the edges of the flange.
- 4. Use a drain key or pliers: If the drain flange doesn’t come off easily, you may need to use a drain key or pliers. Insert the drain key or pliers into the crosshairs or notches on the flange and turn counterclockwise to loosen it.
- 5. Apply gradual pressure: If the flange is stubborn, try applying gradual pressure while turning. Be careful not to apply too much force, as it could damage the tub or the flange.
- 6. Clean the area: Once the drain flange is removed, take the time to clean the area underneath it. Remove any old caulk or debris to ensure a clean surface for the new installation.
Tips for dealing with stubborn drain flanges
Dealing with stubborn drain flanges can be frustrating, but with these tips, you’ll be able to overcome the challenge:
- Be patient: It’s important to approach the task with patience. Rushing or using excessive force can cause damage to the tub or the drain flange.
- Use lubricant: Applying a lubricant will help loosen the drain flange by reducing friction. This is especially useful if the flange has become stuck due to old caulk or debris.
- Consider heat: If the drain flange remains stubborn, applying heat can expand the metal slightly, making it easier to turn. You can use a hairdryer or a heat gun on a low setting.
- Seek professional help: If you’ve tried all the above methods and the drain flange still won’t budge, it may be time to call a professional plumber who has the necessary tools and expertise to handle the job safely.
Remember to take your time during the process and follow each step carefully. By loosening the drain flange correctly, you’ll be well on your way to successfully installing your freestanding tub drain.
Disconnecting The Drain Pipes
Overview of the process for disconnecting the drain pipes
Disconnecting the drain pipes is an essential step in installing a freestanding tub, as it allows for proper removal of the old drain and installation of the new one. Here is a brief overview of the process to help you get started:
- Access the drain pipes: Before you begin, make sure you have easy access to the underside of the tub where the drain pipes are located. This may require removing any panels or access doors.
- Turn off the water supply: Locate the main water supply valve and shut it off to prevent any water flow during the disconnection process.
- Prepare the work area: Place a bucket or a towel beneath the drain pipes to catch any water that may spill out during disconnection.
- Remove the trap: Start by loosening the nuts connecting the P-trap, which is the curved pipe under the sink. Carefully detach the trap and set it aside.
- Loosen the slip nuts: Locate the slip nuts connecting the drain pipes to both the tub and the main plumbing line. Loosen these nuts using a pair of pliers or a pipe wrench.
- Separate the drain pipes: Once the slip nuts are loosened, gently pull apart the drain pipes from the tub and the main plumbing line. Be cautious to avoid any damage or leaks.
Important considerations when dealing with different pipe materials
When disconnecting the drain pipes, it is vital to be mindful of the various materials used in their construction. Different materials require specific handling and precautions to prevent any damage. Here are some important considerations:
| Pipe Material | Handling Tips |
|---|---|
| PVC | When dealing with PVC drain pipes, use caution not to apply excessive pressure or force during disconnection. PVC pipes are relatively easy to work with and should be handled carefully to avoid breakage. |
| ABS | Similar to PVC, ABS drain pipes should be handled gently. ABS pipes are known for their durability but can crack under excessive force. Take care not to overtighten slip nuts or use excessive pressure when disconnecting. |
| Cast Iron | Cast iron drain pipes are heavier and more rigid than PVC or ABS. Use extra caution when working with cast iron, as it can be prone to cracking if mishandled. Use the appropriate tools and ensure that the connection points are properly supported. |
By considering these important factors and following the correct procedures, you can successfully disconnect the drain pipes and move on to the next steps of your freestanding tub installation.
Removing The Drain Flange
Removing the drain flange from a freestanding tub may seem like a daunting task, but with the right instructions and tools, it can be a straightforward process. In this section, we will walk you through the steps to remove the drain flange and provide solutions to common challenges you may encounter along the way.
Instructions for Removing the Drain Flange from the Tub
Follow these step-by-step instructions to successfully remove the drain flange from your freestanding tub:
- Start by locating the access panel underneath the tub. This panel allows you to access the drain assembly.
- Use a screwdriver to remove the screws securing the access panel in place. Set the screws aside in a safe place.
- Once the access panel is removed, you will have a clear view of the drain assembly.
- Locate the drain flange, which is the round metal piece that surrounds the drain hole.
- Using a pair of pliers, grip the drain flange firmly and twist counterclockwise to unscrew it from the tub.
- Keep turning the drain flange until it comes loose and can be easily lifted out.
- Once the drain flange is removed, inspect the area to ensure there are no leftover debris or old sealant.
Common Challenges and Potential Solutions
While removing the drain flange is usually a straightforward process, you may encounter some challenges along the way. Here are a few common issues and potential solutions:
| Challenge | Solution |
|---|---|
| The drain flange is stuck and won’t budge. | Apply a penetrating oil to the flange and let it sit for a few minutes to loosen any rust or corrosion. Use a wrench or pliers with a longer handle for added leverage. |
| The drain flange is stripped and cannot be unscrewed. | Use a drain flange removal tool or an extractor set to grip the flange securely and turn it counterclockwise. This tool is specifically designed to remove stubborn or stripped drain flanges. |
| The drain flange is sealed with silicone or plumber’s putty. | Carefully cut through the sealant using a utility knife. Take your time to avoid damaging the tub surface. Once the sealant is cut, you should be able to unscrew the drain flange. |
By following these instructions and having solutions for potential challenges, removing the drain flange from your freestanding tub should be a hassle-free process. Remember to take your time and use the appropriate tools to ensure a successful removal.
Choosing The Right Drain Assembly
When it comes to installing a freestanding tub drain, choosing the right drain assembly is a crucial step. The drain assembly not only ensures the proper functioning of your tub but also adds to its aesthetic appeal. In this section, we will discuss the factors you should consider when selecting a drain assembly and compare different types of drain assemblies available in the market.
Factors to consider when selecting a drain assembly
Before purchasing a drain assembly for your freestanding tub, it is important to consider a few factors that will help you make an informed decision:
- Compatibility: Ensure that the drain assembly is compatible with your tub’s design and size. Take measurements of your tub’s drain outlet to ensure a perfect fit.
- Durable materials: Look for a drain assembly made from high-quality materials such as stainless steel or brass. These materials not only provide durability but also resist corrosion and rust.
- Easy installation: Opt for a drain assembly that is easy to install, even for DIY enthusiasts. Look for user-friendly designs and detailed installation instructions to save yourself from unnecessary hassle.
- Finish options: Consider the finish options available for the drain assembly. Choose a finish that complements your bathroom decor and matches other fixtures.
- Budget: Set a budget range before starting your search for a drain assembly. Consider the quality, features, and brand reputation while comparing prices to find the best value for your money.
A comparison of different types of drain assemblies
Now that you know the factors to consider, let’s take a look at different types of drain assemblies available in the market:
| Drain Assembly Type | Pros | Cons |
|---|---|---|
| Toe Tap Drain | Easy to operate with a simple tap of your foot. Minimal hardware visible. | Requires frequent cleaning as hair and debris can get trapped in the mechanism. |
| Pop-Up Drain | Provides a sleek and seamless look. Easy to clean. | May require additional parts for installation. Limited style options. |
| Rollerball Drain | Smooth operation with a touch of your finger. Minimal maintenance required. | May have a higher price point compared to other drain assemblies. |
| Flip-Top Drain | Convenient to open and close with a simple flip. Wide range of style options. | Exposed hardware may require regular cleaning to maintain its appearance. |
Each type of drain assembly has its own advantages and disadvantages. Consider your personal preferences, maintenance requirements, and budget to make the right choice for your freestanding tub. Choosing the right drain assembly will not only ensure a smooth installation process but also enhance your overall bathing experience.
Preparing The Tub For Installation
Before you can install a freestanding tub drain, you’ll need to prepare the tub itself. This involves cleaning and preparing the tub surface to ensure a proper fit for the drain assembly. By following these steps, you’ll be on your way to a successful installation.
Cleaning and preparing the tub surface
The first step in preparing the tub for installation is to clean the surface thoroughly. Use a mild, non-abrasive cleaner and a soft cloth to remove any dirt, grime, or residue that may be present. Pay close attention to the drain area, ensuring that it is clear of any debris that could obstruct the installation process.
Once the tub surface is clean, it’s important to also ensure that it is dry. Wipe down the entire surface with a dry cloth to remove any remaining moisture. This will help to create a clean and dry surface for the drain assembly to adhere to.
Ensuring a proper fit for the drain assembly
After the tub surface is clean and dry, the next step is to ensure a proper fit for the drain assembly. This involves checking the dimensions of the drain and the opening in the tub. Measure the diameter of the drain to ensure that it matches the size of the opening in the tub.
If the drain and the opening do not match, you may need to make adjustments. This can be done by using a saw or a hole saw to enlarge the opening in the tub, or by using a reducer bushing to adapt the drain to fit the opening. It’s important to ensure a snug fit between the drain assembly and the tub to prevent any leaks or water damage.
Additionally, it’s important to check for any obstructions that may impede the installation process. Inspect the inside of the tub and the drain area for any obstacles, such as screws or other debris, that may need to be removed. Clearing these obstacles now will save you time and frustration during the installation process.
By following these steps to clean the tub surface and ensure a proper fit for the drain assembly, you’ll be well-prepared for the next stage of the installation process. Stay tuned for our next blog post, where we’ll walk you through the steps to successfully install the freestanding tub drain.
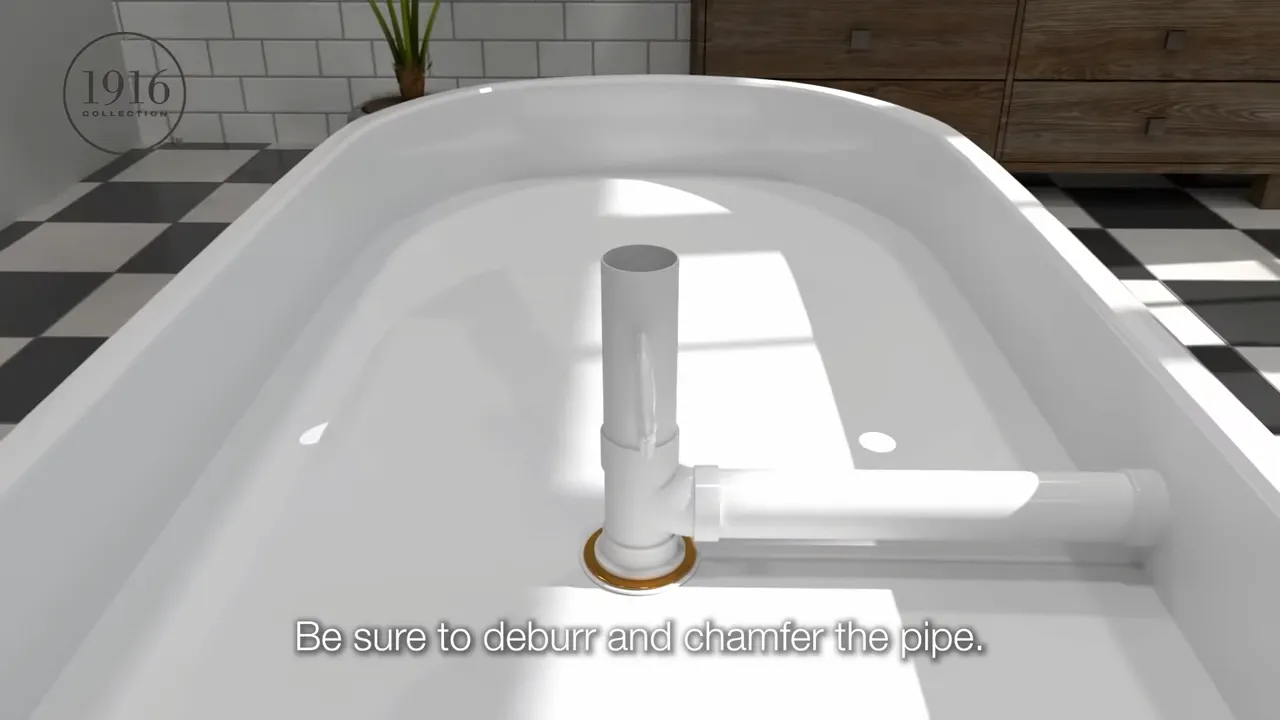
Installing The New Drain Flange
Installing the new drain flange is a crucial step in the process of installing a freestanding tub drain. The drain flange acts as a sealing mechanism, preventing water from leaking out of the tub. In this section, we will provide you with step-by-step instructions on how to install the new drain flange, as well as some valuable tips to ensure a secure and leak-free installation.
Step-by-step instructions for installing the new drain flange
To install the new drain flange, follow these simple steps:
- Start by removing the old drain flange from the tub. This can typically be done by unscrewing the flange counterclockwise.
- Once the old flange is removed, clean the area around the drain hole thoroughly using a mild cleaning solution.
- Apply a thin layer of plumber’s putty around the bottom edge of the new drain flange.
- Insert the new drain flange into the drain hole, making sure it sits flush with the tub surface.
- Tighten the drain flange by turning it clockwise until it is snug.
- Wipe away any excess plumber’s putty that may have squeezed out from beneath the flange.
- Finally, check for any signs of leakage by filling the tub with water and letting it sit for a few minutes. If there are no signs of water leakage, your new drain flange is successfully installed.
Tips for ensuring a secure and leak-free installation
To ensure a secure and leak-free installation of the new drain flange, consider the following tips:
- Make sure to choose a high-quality drain flange that is compatible with your tub model.
- Before installing the new flange, inspect the drain hole for any cracks or damage. If any issues are found, it is recommended to fix them before proceeding with the installation.
- Apply plumber’s putty sparingly and evenly around the bottom edge of the flange to create a proper seal.
- Use a wrench or pliers to tighten the drain flange, but be careful not to over-tighten as it may cause damage to the tub or the flange itself.
- If you notice any signs of leakage after installing the new drain flange, you may need to disassemble and reassemble it, ensuring a tight seal.
By following these step-by-step instructions and implementing our valuable tips, you can confidently install the new drain flange for your freestanding tub, ensuring a secure and leak-free installation. Remember to always consult the manufacturer’s instructions for specific details and guidelines to ensure the best results.
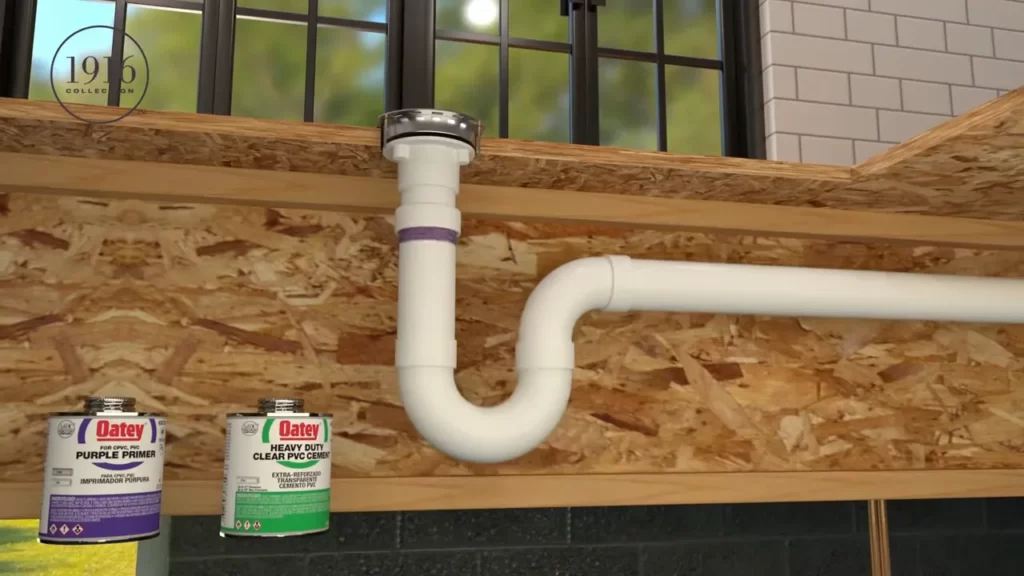
Connecting The Drain Pipe
Connecting the drain pipe is a crucial step in installing a freestanding tub drain. It ensures proper drainage and prevents any potential leaks. In this section, we will discuss how to attach the drain pipe to the drain assembly and the proper sealing techniques to prevent leaks.
Attaching the Drain Pipe to the Drain Assembly
Before connecting the drain pipe, make sure to gather all the necessary tools and materials. You will need a pipe wrench, Teflon tape, plumber’s putty, and the drain assembly components.
To start, position the drain assembly underneath the tub, aligning it with the designated drain hole. Insert the drain pipe into the drain assembly and secure it by tightening the nut with a pipe wrench. Ensure that the drain pipe is properly aligned and straight to prevent any future issues.
Next, attach the flange to the drain assembly by screwing it on tightly. This will create a watertight seal between the tub and the drain assembly, preventing any leaks.
Proper Sealing Techniques to Prevent Leaks
Now that the drain pipe is connected to the drain assembly, it’s important to focus on sealing techniques to prevent leaks. Here are some steps to follow:
1. Apply Teflon tape: Use Teflon tape to wrap around the threaded connections between the drain pipe and the drain assembly. This tape helps create a tight seal and prevents leaks. Wrap the tape clockwise around the threads, ensuring full coverage.
2. Use plumber’s putty: Apply a small amount of plumber’s putty to the underside of the flange. This putty acts as a sealant and helps prevent water from seeping through. Place the flange on top of the drain assembly and press it firmly into place.
3. Tighten connections: Use a pipe wrench to tighten all connections, including the nut between the drain pipe and the drain assembly, as well as the screws securing the flange. Make sure not to overtighten, as it may cause damage. A snug, secure fit is sufficient.
4. Test for leaks: Once everything is securely in place, fill the tub with water. Let it sit for a while and carefully inspect around the drain area for any signs of leakage. If you notice any leaks, tighten the connections accordingly.
By following these steps and ensuring proper sealing techniques, you can successfully connect the drain pipe to the drain assembly of a freestanding tub. This will provide an effective drainage system and prevent any water leaks, giving you peace of mind and a relaxing bathing experience.
Testing The Drain For Leaks
Once you have successfully installed the freestanding tub drain, it is vital to test it for leaks to ensure a properly functioning and watertight setup. Testing the drain will give you peace of mind and prevent potential water damage down the line. In this section, we will discuss the methods for testing the new drain installation, as well as troubleshoot common leak issues you might encounter.
Methods for testing the new drain installation
There are a few methods you can employ to test the newly installed freestanding tub drain. Let’s delve into each of these methods:
- Visual inspection: Start by visually inspecting the drain to check for any obvious signs of leaks. Look for drips, puddles, or water stains around the drain area. Keep a keen eye on joints, seals, and connections for any signs of moisture.
- Water fill test: Performing a water fill test is a simple yet effective way to check for leaks in your drain installation. Begin by filling the tub with water, ensuring it reaches a level above the drain. Leave the water in the tub for a few hours and observe if there are any leaks. Monitor the drain area closely for any water seeping through or around the drain.
- Pressure test: For a more thorough assessment of your drain’s integrity, you can conduct a pressure test. This involves using a pressure gauge or testing device that attaches to the drain. By pressurizing the drain system, any leaks or weaknesses will be readily apparent. Follow the manufacturer’s instructions when conducting a pressure test to ensure accurate results.
Troubleshooting common leak issues
Despite your best efforts, it is possible to encounter some common leak issues during the testing phase. Should you encounter a leak, don’t panic; instead, follow these troubleshooting steps:
- Check for loose connections: Inspect all drain components and connections for any looseness. Tighten any loose connections using the appropriate tools. Ensure that the gaskets and seals are correctly positioned and not damaged.
- Reapply waterproofing: If you notice a leak around the drain area, the waterproofing may not have been applied properly. Use a quality waterproof sealant or plumber’s putty to seal any gaps or openings around the drain.
- Replace faulty parts: In some cases, the leak may be due to a faulty or damaged component. If you identify a particular part as the source of the leak, it may be necessary to replace that specific part with a new one.
By following these testing methods and troubleshooting steps, you can ensure a watertight freestanding tub drain installation. Regularly inspecting and testing your drain will help you catch and address any leaks before they lead to potentially costly damage. Don’t forget to document your installation process and keep a record of any repairs or improvements made for future reference.
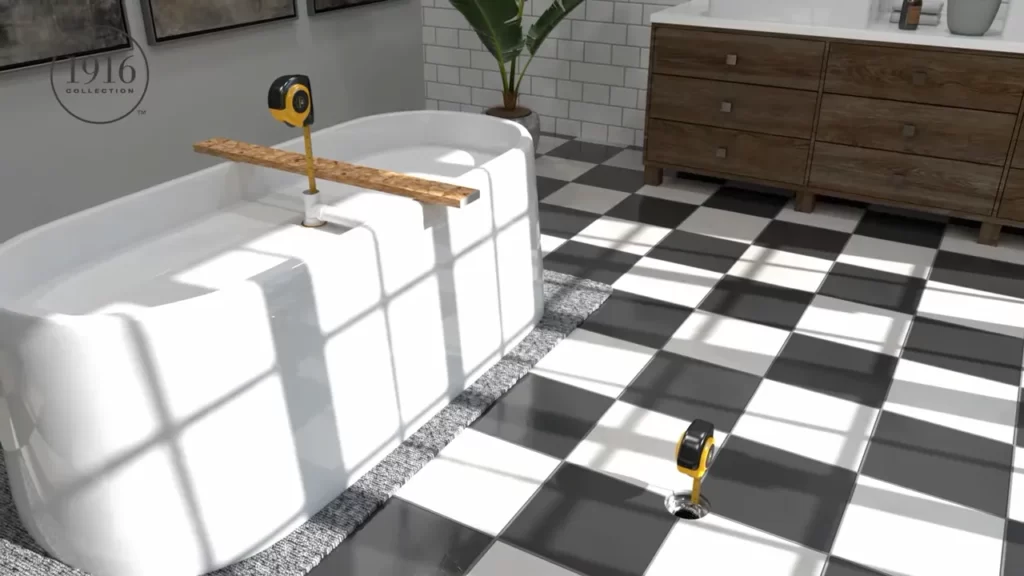
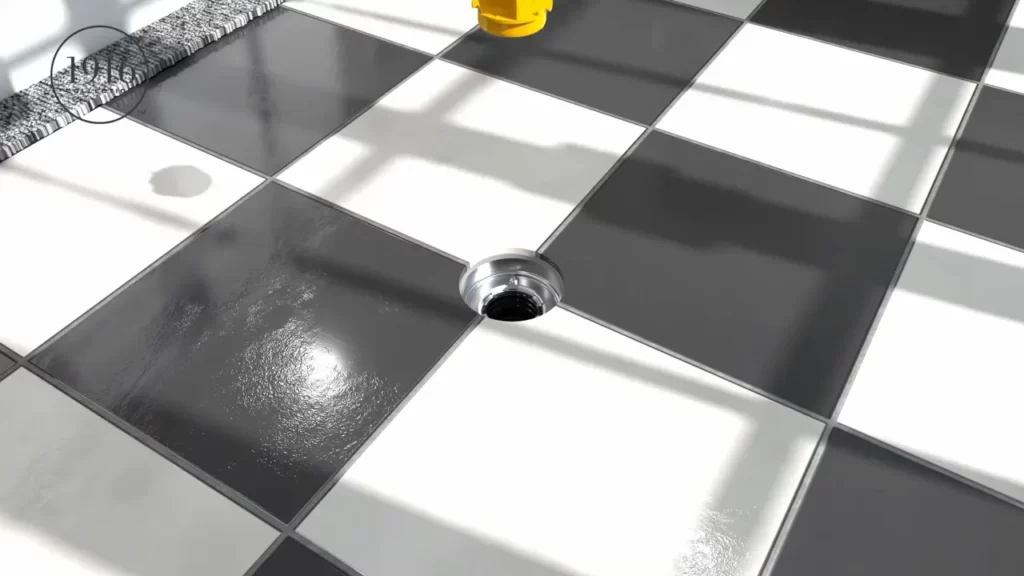
Securing The Drain In Place
After successfully connecting the drain assembly, the next crucial step is to ensure proper alignment and stability. This will prevent any leaks or potential damage to your freestanding tub. Follow these steps to securely fasten the drain in place:
Ensuring proper alignment and stability of the drain assembly
- Start by checking the alignment of the drain hole in the tub with the position of the drain assembly. It is important to make sure that they are properly lined up to ensure a snug fit.
- If necessary, adjust the position of the drain assembly using your hands or the appropriate tool. Take your time to make small adjustments until you achieve the perfect alignment.
- Once you have aligned the drain assembly with the drain hole, it’s time to secure it in place. Apply a bead of silicone adhesive around the drain hole on the tub surface.
- Gently push the drain assembly into the drain hole, ensuring it is centered and aligned.
- Press down firmly to create a watertight seal. Wipe away any excess adhesive using a clean cloth.
- Allow the adhesive to dry according to the manufacturer’s instructions. This will ensure maximum stability and prevent any movement or leaks.
Final adjustments and tightening
Once the adhesive has dried, it’s time to make the final adjustments and ensure a tight fit.
- Check the positioning of the drain assembly to ensure it is still properly aligned.
- Using a wrench or a specialized tool, gently tighten the nut underneath the tub that secures the drain assembly in place.
- Avoid overtightening, as it can cause damage to the tub or the drain assembly. Tighten the nut until it is snug.
- If there is a gasket or rubber washer that came with the drain assembly, ensure it is properly positioned between the tub and the nut. This will create an additional barrier against leaks.
- Double-check all connections and make sure everything is securely tightened.
By following these steps, you can confidently secure your freestanding tub drain in place, ensuring proper alignment and stability. This will help prevent any future issues and create a reliable and functional bathing experience.
Cleaning Up The Work Area
Cleaning up the work area is an essential step after installing a freestanding tub drain. It ensures that your bathroom is left looking tidy and allows you to dispose of any old materials or tools properly. In this section, we will provide you with some valuable tips for effectively cleaning up any mess created during the installation process, as well as guidance on the proper disposal of old materials and tools.
Tips for cleaning up any mess created during the installation process
Installing a freestanding tub drain can be a messy job, but with these tips, you can easily clean up any mess that may arise:
- Lay down protective covers: Before you begin the installation process, consider placing protective covers over any nearby surfaces, such as your bathroom floor or countertops. This will help prevent any accidental spills or damage.
- Use a drop cloth: Place a drop cloth directly under the freestanding tub area. This will catch any debris, dust, or water that may be produced during the installation, making cleanup easier and more efficient.
- Vacuum or sweep: Once the installation is complete, use a vacuum or broom to remove any loose dirt, dust, or debris. Pay special attention to the area around the tub and the surrounding floor.
- Wipe down surfaces: Take a damp cloth or sponge and wipe down any surfaces that may have come into contact with dust or debris. This includes the tub itself, adjacent walls, and the floor. Ensure that all surfaces are clean and dry before proceeding.
Proper disposal of old materials and tools
After completing the freestanding tub drain installation, it’s crucial to dispose of any old materials and tools responsibly. Here’s how you can do it:
- Separate and organize: Sort through the materials and tools used during the installation process. Separate any items that can be reused or recycled from those that cannot.
- Recycle when possible: Check with your local recycling center to see if they accept the materials used in your tub drain installation. Many components, such as metal pipes or plastic fittings, can be recycled rather than ending up in a landfill.
- Follow local disposal guidelines: If the materials or tools are not recyclable, make sure to dispose of them according to your local regulations. This may involve bagging them and placing them in your regular garbage bin or taking them to a designated waste management facility.
By following these tips for cleaning up any mess created during the installation process and properly disposing of old materials and tools, you can ensure that your bathroom remains clean and clutter-free after installing a freestanding tub drain.
Frequently Asked Questions
What Drain Do I Need For A Freestanding Tub?
For a freestanding tub, you will need a floor-mounted drain. This type of drain is installed directly on the floor beneath the tub, allowing water to flow freely. Make sure to select a drain that is compatible with your tub’s specifications to ensure proper functioning.
How Does A Freestanding Tub Stay In Place?
Freestanding tubs stay in place due to their weight and design. They are typically heavier than regular tubs, providing stability. The base may have adjustable feet or a leveling system to ensure a secure installation. Additionally, some models can be secured to the floor for added stability.
Does A Freestanding Tub Need A Trap?
Yes, a freestanding tub requires a trap. A trap prevents sewer gases from entering the bathroom and also helps in preventing clogs by trapping debris. Make sure to install a trap when installing a freestanding tub to ensure proper plumbing functionality.
Do Freestanding Tubs Have An Overflow Drain?
Yes, freestanding tubs can have an overflow drain.
Conclusion
To wrap up, installing a freestanding tub drain can be a straightforward process with the right tools and step-by-step instructions. By following the steps outlined in this guide, you can ensure a secure and efficient installation that will enhance the functionality and aesthetic appeal of your bathroom.
Remember to carefully choose the appropriate drain and consult the manufacturer’s instructions for any specific requirements. With a little patience and attention to detail, you’ll soon be enjoying the benefits of a properly installed freestanding tub drain. Happy DIY-ing!