
To install a Fluidmaster, first turn off the water supply, disconnect the supply line, remove the old fill valve, and clean the toilet tank. Then, position the new Fluidmaster in the tank, align the fill valve, and tighten the lock nut.
Reconnect the supply line and turn the water supply back on. Installing a Fluidmaster can be a straightforward process if you follow a few simple steps. Begin by shutting off the water supply and disconnecting the supply line. Next, remove the old fill valve and thoroughly clean the toilet tank.
Once the tank is cleaned, position the new Fluidmaster in place, ensuring the fill valve is properly aligned. Tightening the lock nut will secure the new fill valve. Lastly, connect the supply line again and turn the water supply back on. By following these steps, you can successfully install a Fluidmaster for efficient and reliable toilet operation.
Gathering The Necessary Tools And Materials
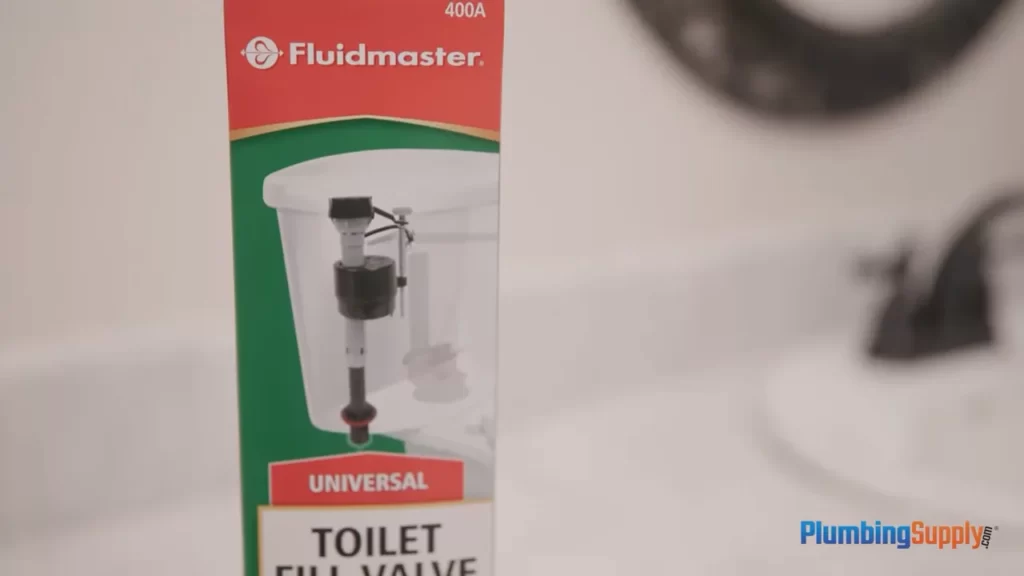
Getting Familiar with the Fluidmaster
Before you embark on the task of installing a Fluidmaster, it’s essential to get acquainted with the product itself. Fluidmaster is a brand that is well-known for its high-quality and innovative toilet repair products. Their products are designed to provide efficient and reliable solutions for plumbing problems, including toilet fill valves and flush valves.
Understanding how the Fluidmaster works and familiarizing yourself with its components will make the installation process smoother and more efficient. Take a moment to study the user manual or online resources provided by Fluidmaster. This will give you a good idea of what to expect and help you gain confidence in tackling the installation.
Gathering the Required Tools and Materials
Now that you have acquired knowledge about the Fluidmaster, it’s time to gather the necessary tools and materials. Having everything ready before you start the installation process is crucial to ensure a seamless experience with no interruptions.
Here’s a comprehensive checklist of the tools and materials you’ll need:
| Tools | Materials |
|---|---|
|
|
Make sure to gather all the tools and materials on the checklist before getting started. It can save you time and frustration, preventing unnecessary trips to the store in the middle of the installation. A well-prepared workspace ensures a successful and efficient installation process.
Understanding the Importance of Having Everything Ready
When it comes to installing a Fluidmaster, preparation is key. Having all the tools and materials ready can significantly expedite the process, allowing you to complete the installation without interruptions or delays.
By gathering the required tools and materials beforehand, you avoid having to pause the installation to search for missing items or make last-minute trips to the store. This not only saves you time, but it also ensures that you can maintain your focus and momentum throughout the installation process.
Moreover, having everything at hand allows you to address any unforeseen complications that may arise during the installation. With the right tools and materials readily available, you’ll be well-equipped to handle any challenges that may arise and troubleshoot effectively.
So, take the time to gather all the tools and materials needed for installing your Fluidmaster. This simple step can make a world of difference in ensuring a smooth and successful installation process.
Removing The Old Fill Valve
Turning off the water supply
If you’re looking to install a Fluidmaster fill valve, the first step is to remove the old fill valve. This is an essential part of the process, as it allows for a smooth and seamless installation of the new valve. Turning off the water supply is the first thing you need to do to embark on this task.
In order to turn off the water supply, locate the shut-off valve usually located on the wall behind the toilet. Turn the valve clockwise until it is fully closed. This will stop the flow of water into the toilet tank and allow you to safely remove the old fill valve.
Emptying the toilet tank
Once the water supply is turned off, the next step is to empty the toilet tank. This is important to prevent any water spillage during the removal process. To empty the tank, simply flush the toilet and hold down the handle until all the water has been flushed out.
Wait for the tank to completely drain out before proceeding with the removal of the old fill valve. You can also use a sponge or a towel to soak up any additional water that may be present in the tank.
Disconnecting the water supply line
After the tank is emptied, the next step is to disconnect the water supply line. The water supply line is the hose that connects the toilet tank to the shut-off valve on the wall. To disconnect the water supply line, use an adjustable wrench to loosen the nut that connects the line to the bottom of the tank.
Once the nut is loosened, carefully remove the water supply line from the fill valve. Make sure to place a bucket or a towel underneath to catch any residual water that may drip out.
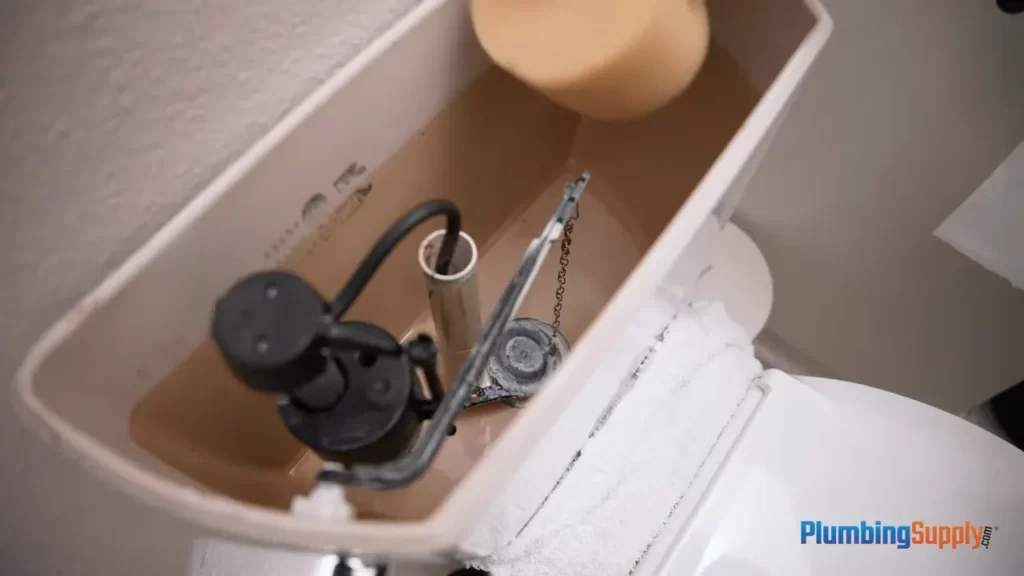
Removing the old fill valve
Finally, it’s time to remove the old fill valve. This is the valve responsible for filling up the tank after each flush. Using an adjustable wrench, locate the nut that secures the fill valve to the bottom of the tank.
With the wrench, turn the nut counterclockwise to loosen it. Once the nut is loose, carefully lift the old fill valve out of the tank, ensuring that no water spills out.
With the old fill valve removed, you’re now ready to proceed with the installation of the new Fluidmaster fill valve. Stay tuned for our next blog post on how to install a Fluidmaster fill valve!
Installing The New Fluidmaster Fill Valve
Installing the New Fluidmaster Fill Valve
When it comes to installing a new Fluidmaster fill valve in your toilet, it’s important to follow the proper steps to ensure a smooth and successful installation. In this section, we will walk you through the process of preparing the new fill valve for installation, positioning it in the tank, connecting the water supply line, and adjusting the height of the fill valve.
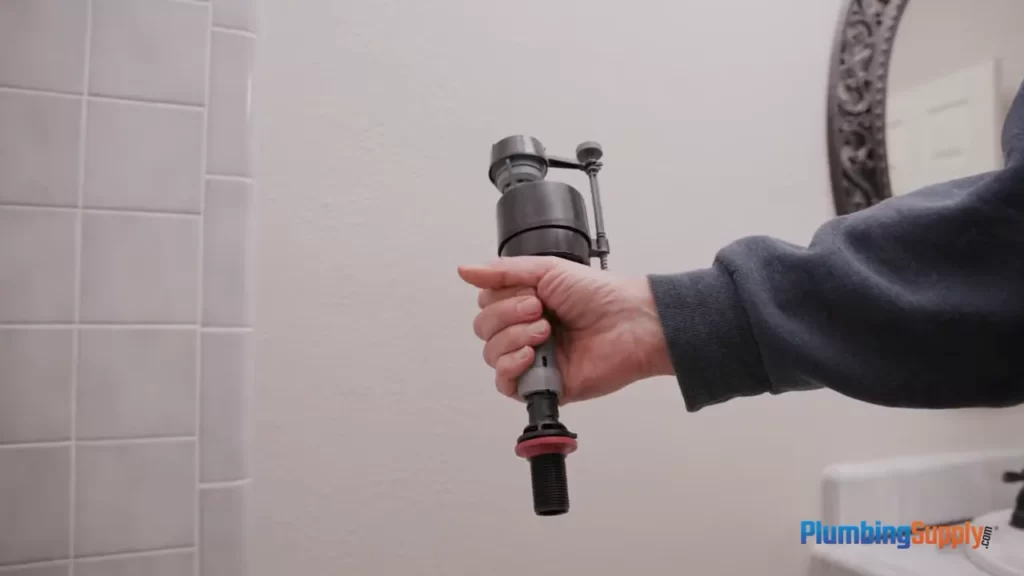
1. Preparing the new Fluidmaster fill valve for installation
Before you begin the installation process, it’s essential to prepare the new Fluidmaster fill valve. Here’s how you can do it:
– Start by gathering all the necessary tools and components, including a wrench, a bucket, and a new fill valve kit.
– Carefully read the instructions provided by Fluidmaster to familiarize yourself with the installation process and any specific requirements for your model.
– Inspect the new fill valve for any damage or defects. If you notice any issues, contact Fluidmaster for support or exchange.
– Remove the old fill valve by turning off the water supply and flushing the toilet to drain the tank. Disconnect the water supply line from the old fill valve and unscrew it from the bottom of the tank.
2. Positioning the new fill valve in the tank
Once you have prepared the new Fluidmaster fill valve, you can now position it in the tank. Follow these steps to ensure proper placement:
– Insert the threaded shank of the new fill valve into the hole at the bottom of the tank, making sure it is aligned properly.
– Tighten the lock nut provided with the fill valve by hand, ensuring a secure fit. Use a wrench to give it an extra turn to ensure it is firmly in place.
– Check that the fill valve is positioned straight and level inside the tank. This will help prevent any leaks or uneven water flow.
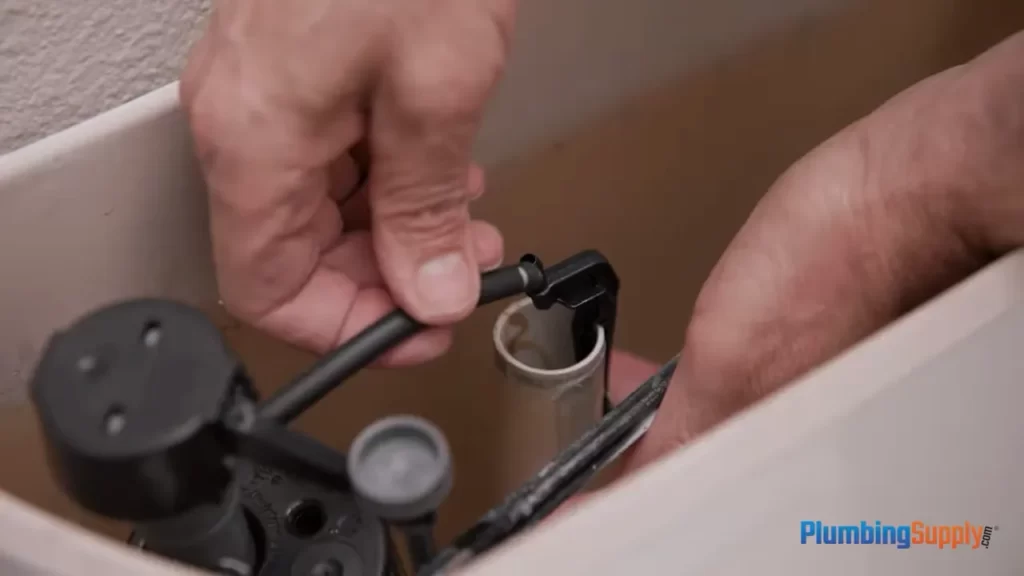
3. Connecting the water supply line to the new fill valve
With the new fill valve securely positioned in the tank, it’s time to connect the water supply line. Follow these steps to complete this task:
– Take the water supply line and screw it onto the threaded shank of the new fill valve. Tighten it with a wrench but be careful not to overtighten, as this could cause damage.
– Ensure that the supply line is straight and not twisted or kinked. A twisted or kinked line can restrict water flow and affect the performance of the fill valve.
4. Adjusting the height of the fill valve
Finally, you need to adjust the height of the new Fluidmaster fill valve to ensure proper functioning. Here’s what you should do:
– Locate the adjustment mechanism on the fill valve. This is typically a sliding cup or a threaded rod that allows you to adjust the height.
– Extend or retract the adjustment mechanism to achieve the desired water level in the tank. Follow the manufacturer’s instructions to determine the correct water level for your toilet.
– Test the fill valve by turning on the water supply. Observe the water level in the tank and make further adjustments if needed until you achieve the desired water level.
In conclusion, installing a new Fluidmaster fill valve is a relatively straightforward process, but it requires careful attention to detail. By preparing the new fill valve, positioning it correctly in the tank, connecting the water supply line, and adjusting the height accordingly, you can ensure smooth operation and efficient water flow in your toilet.
Adjusting The Water Level And Flapper
Adjusting the Water Level
If your toilet bowl is not filling up to the appropriate level or if you notice that it is overflowing, it might be necessary to adjust the water level in the tank. Thankfully, with a Fluidmaster, this is a quick and easy task.
To set the water level, follow these steps:
- Locate the water level adjustment screw on top of the fill valve.
- Turn the screw counterclockwise to lower the water level or clockwise to raise it. Adjust it in small increments until you reach the desired water level. Note: Make sure the water level remains below the top of the overflow tube.
- Flush the toilet and observe the water level to ensure it reaches the preferred height. Adjust the screw if necessary until you achieve the desired water level.
Once you have successfully adjusted the water level, you can move on to checking for leaks.
Checking for Leaks
After installing a Fluidmaster, it is important to check for any potential leaks. Leaks can waste water and increase your utility bills, so it is crucial to address them promptly.
To check for leaks, follow these steps:
- Wait for the tank to fill completely after flushing.
- Inspect the area around the base of the toilet for any signs of water. Look for puddles, dampness, or water stains.
- If you notice any leaks, ensure that all connections are tightened properly. If necessary, you may need to replace the gasket or adjust the fittings.
Once you have confirmed that there are no leaks, you can proceed to adjusting the flapper.
Adjusting the Flapper
The flapper is responsible for sealing the flush valve and preventing water from continuously flowing into the toilet bowl. Over time, it may become misaligned or deteriorate, causing leaks and inefficient flushing.
To adjust the flapper, follow these steps:
- Inspect the flapper to ensure it is not damaged or worn out. If necessary, replace it with a new one.
- Adjust the chain length so that there is minimal slack, but the flapper can fully close without being tugged open.
- Flush the toilet and observe the flapper’s performance. If it doesn’t seal properly or if water continues to leak into the bowl, adjust the chain length accordingly.
By properly adjusting the water level and flapper, you can ensure optimal performance and prevent any issues with your Fluidmaster. Regularly check and maintain these components to keep your toilet functioning efficiently.
Testing And Troubleshooting
Testing and Troubleshooting
Once you have successfully installed your Fluidmaster, it is important to ensure that it is functioning properly. This involves testing the water supply and checking for any common issues that may arise. In this section, we will guide you through the necessary steps to turn on the water supply, check for proper functioning, and troubleshoot any encountered problems.
Turning on the water supply
Before you can test your Fluidmaster, you need to turn on the water supply. To do this, locate the shut-off valve, usually located behind the toilet, and turn it counterclockwise until it is fully open. This will allow water to flow into the tank and start the filling process.
Checking for proper functioning
Once the water supply is turned on, it’s time to check if everything is working as it should. Start by observing the filling process. The tank should fill up within the recommended time specified in the Fluidmaster manual, typically around two minutes. Make sure the float, located on the fill valve, rises as the water level increases, and stops the filling process once it reaches the correct level. Additionally, listen for any unusual noises or vibrations, as these may indicate a problem with the installation.
Troubleshooting common issues
If you encounter any problems during the testing process, here are some common troubleshooting steps to follow:
- Water leakage: Ensure that all connections are tight and properly sealed. If you notice any water leakage, try tightening the nuts and bolts. If the issue persists, you may need to replace the washers or O-rings.
- Incomplete filling: If your Fluidmaster does not fill the tank completely, make sure the water level adjustment is set correctly. Adjust the float or water level control accordingly, using the instructions provided with your Fluidmaster.
- Noise or vibrations: If you hear loud noises or experience vibrations during the filling process, check for any loose parts. Tighten all connections and ensure that the refill tube is properly positioned. Sometimes, noise can also be caused by water pressure issues. In such cases, consider installing a pressure-reducing valve.
By following these steps, you can ensure that your Fluidmaster is installed correctly and functioning as expected. If you encounter any persistent issues or are unsure about the troubleshooting process, it may be best to consult a professional plumber for assistance.
Additional Tips And Considerations
Maintaining the Fluidmaster fill valve
Maintaining the Fluidmaster fill valve is essential to ensure its optimal performance and prolong its lifespan. Here are some tips to help you keep your fill valve in top shape:
- Regularly check for any leaks or drips coming from the fill valve. If you notice any, tighten the connections or replace the faulty parts as needed.
- Inspect the float ball or cup for any signs of damage or deterioration. Replace it if necessary.
- Remove any mineral deposits or debris that may accumulate in the fill valve. You can do this by turning off the water supply, flushing the toilet, and then using a cloth or brush to clean the valve.
- Ensure that the water level in the tank is set correctly. Adjust the height of the fill valve if needed to maintain the recommended water level.
- Periodically test the fill valve by flushing the toilet and checking if it refills promptly and stops at the appropriate water level.
By following these maintenance tips, you can prevent potential issues and ensure the smooth functioning of your Fluidmaster fill valve for years to come.
Understanding the benefits of using Fluidmaster products
There are several reasons why Fluidmaster products are a popular choice among homeowners and plumbing professionals alike. Here are a few key benefits of using Fluidmaster:
- Reliability: Fluidmaster is renowned for its high-quality and durable products that are designed to withstand the test of time.
- Easy installation: Installing a Fluidmaster fill valve is a straightforward process that doesn’t require advanced plumbing skills. The clear instructions and user-friendly design make it a DIY-friendly option.
- Water efficiency: Fluidmaster products incorporate innovative technology to promote water conservation. Their fill valves are designed to ensure efficient toilet flushing and minimize water wastage.
- Quiet operation: Fluidmaster fill valves are engineered to operate silently, providing a peaceful experience without any disruptive noise.
- Warranty protection: Fluidmaster offers warranties on their products, giving you peace of mind knowing that you are covered in case of any manufacturing defects.
With these benefits in mind, choosing Fluidmaster for your toilet repair needs is a smart investment that brings reliability, efficiency, and satisfaction.
Exploring other toilet repair options
While Fluidmaster products are widely popular, it’s essential to consider alternative toilet repair options that may suit your specific needs. Here are a few alternatives to explore:
- Ballcock fill valves: These traditional fill valves are time-tested and reliable, offering a simple and affordable option for toilet repairs.
- Adjustable fill valves: These fill valves provide the convenience of adjusting the water level in the tank, allowing for customization based on your preferences.
- Overflow prevention devices: Installing an overflow prevention device can add an extra layer of protection against potential flooding caused by a faulty fill valve or other plumbing issues.
- Professional assistance: If you are unsure about conducting toilet repairs yourself or dealing with complex plumbing problems, it’s best to seek professional help from a licensed plumber.
Considering these alternative options can help you make an informed decision based on your budget, skill level, and specific requirements.
Frequently Asked Questions
How Do You Install A Fluidmaster Flush Valve Seal?
To install a Fluidmaster flush valve seal, start by shutting off the water supply to the toilet. Remove the tank lid and flush the toilet to empty the tank. Disconnect the flush valve from the refill valve, then remove the old seal.
Install the new seal onto the flush valve and reattach it to the refill valve. Turn the water supply back on and test for any leaks. Done!
What Is The Most Common Problem Associated With The Fluidmaster?
The most common problem with the Fluidmaster is leakage.
Will A Fluidmaster Fit Any Toilet?
Yes, a Fluidmaster can fit most toilets.
How Do You Adjust A Fluidmaster 400A Fill Valve?
To adjust a Fluidmaster 400A fill valve, turn the adjustment screw clockwise to decrease water level, and counterclockwise to increase it.
Conclusion
The installation process of a Fluidmaster is straightforward and can be completed by following the step-by-step guide provided. By properly installing a Fluidmaster, you can ensure optimal performance and efficiency of your toilet’s flushing system. Remember to turn off the water supply and carefully follow all instructions to prevent any leaks or issues.
With a functional Fluidmaster, you can enjoy a reliable and efficient toilet for years to come. Say goodbye to frequent repairs and hello to a hassle-free bathroom experience!