To install a floating countertop, first measure the desired location and mark your studs. Then, attach a ledger board to the wall, level it, and secure it to the studs with screws.
Welcome to the world of stylish and functional floating countertops. Whether you’re planning a kitchen remodel or just want to upgrade your current countertop, a floating countertop can be a great option. This sleek and modern design not only provides a clean and minimalist look but also offers practical benefits like easier cleaning and more flexibility with kitchen layouts.
In this guide, we will walk you through the steps to install a floating countertop seamlessly. So, let’s dive in and learn how to transform your kitchen with this trendy addition!
Considerations For Selecting The Perfect Countertop Material
When it comes to installing a floating countertop, one of the most important decisions you’ll need to make is choosing the right material. The countertop material not only affects the overall aesthetic of your space but also determines its durability and functionality. To help you make an informed choice, let’s explore the pros and cons of different materials, factors to consider when selecting a material, and some popular countertop options.
Pros and Cons of Different Materials
Each countertop material has its own unique advantages and disadvantages. Before making a decision, it’s crucial to weigh these factors to ensure you select a material that fits your needs. Let’s take a closer look at some common countertop materials:
| Material | Pros | Cons |
|---|---|---|
| Granite | • Beautiful natural patterns • Highly durable • Heat-resistant |
• Expensive • Requires regular sealing • Heavy weight may require additional support |
| Quartz | • Wide range of colors and patterns • Non-porous and easy to clean • Resistant to stains and scratches |
• More expensive than some alternatives • Can be susceptible to heat damage |
| Laminate | • Affordable • Easy to install • Variety of colors and patterns |
• Prone to scratches and damage • Not heat-resistant • May not add significant value to your home |
| Marble | • Timeless elegance • Heat-resistant • Adds value to your home |
• Expensive • Requires regular sealing • Can be prone to stains and scratches |
Factors to Consider When Choosing a Material
It’s essential to consider various factors when selecting a countertop material that suits your needs and preferences. Here are a few key factors to keep in mind:
- Budget: Determine how much you are willing to spend on your countertop as prices can vary significantly.
- Lifestyle: Consider your lifestyle and how the countertop material will handle your daily activities. Do you need something that is heat-resistant, stain-resistant, or low-maintenance?
- Aesthetic: Think about the overall look and feel you want to achieve in your space. Do you prefer a natural stone, modern quartz, or a more budget-friendly laminate?
- Maintenance: Evaluate the level of maintenance required for each material. Some materials may require frequent sealing or special cleaning products.
- Durability: Take into account the durability and longevity of the material. Will it withstand normal wear and tear or the demands of a busy kitchen?
Popular Countertop Material Options
Now that you understand the pros and cons, as well as the factors to consider, let’s explore some popular countertop material options:
- Granite: Known for its natural beauty and durability, granite countertops are a popular choice among homeowners.
- Quartz: Engineered quartz offers a wide range of colors and patterns, making it a versatile and low-maintenance option.
- Laminate: Affordable and available in various designs, laminate countertops are a budget-friendly choice for many.
- Marble: With its timeless elegance, marble countertops exude luxury and sophistication.
Remember, choosing the perfect countertop material for your floating countertop installation involves considering your budget, lifestyle, aesthetic preferences, maintenance requirements, and durability. By carefully weighing these factors and exploring different material options, you’ll be well-equipped to make an informed decision that enhances the overall look and functionality of your space.

How To Measure And Prepare The Space For Installation
When it comes to installing a floating countertop, proper measurement and preparation of the space is crucial for a successful installation. Following accurate measuring techniques, evaluating the condition of the existing countertop, and assessing the support structure are essential steps in ensuring a smooth and secure installation process. In this section, we will guide you through each step, providing you with the necessary information to measure and prepare your space effectively.
<h3>Accurate measuring techniques</h3>
Accurate measuring is the foundation of a well-fitted floating countertop. To begin, gather the following tools:
- Tape measure
- Pencil or marker
- Straightedge or level
Here are some tips to help you measure your space accurately:
- Start by measuring the length and width of the area where you intend to install the floating countertop. Use the tape measure to take precise measurements and mark them with a pencil or marker.
- Ensure your measurements account for any cabinets, walls, or appliances adjacent to the installation space. Take note of any irregularities or obstacles that may affect the placement of your countertop.
- Use a straightedge or level to verify that your measurements are straight and even. This step is crucial to ensure a seamless and visually pleasing installation.
By following these accurate measuring techniques, you will have the appropriate dimensions needed for your floating countertop installation.
Evaluating the condition of the existing countertop
Before installing a floating countertop, it’s essential to assess the condition of any existing countertop. Here’s what you should look out for:
- Check for any signs of damage, such as cracks, chips, or water damage. These issues can affect the structural integrity of the countertop and may require repairs or replacement.
- Inspect the surface for unevenness. If the existing countertop is uneven, it may need leveling or additional support to ensure proper installation of the floating countertop.
- Consider the material of the existing countertop. Different materials may have different installation requirements, and you may need to make adjustments accordingly.
By evaluating the condition of the existing countertop, you can address any necessary repairs or modifications before proceeding with the installation.
Assessing the support structure
The support structure is vital for the stability and longevity of your floating countertop. Here’s what you need to consider when assessing the support structure:
- Determine the type of support system required for your countertop. Depending on the material and weight of your countertop, you may need additional support brackets, wall anchors, or other reinforcement.
- Check the condition of the existing support structure. Look for any signs of damage, such as rot, rust, or warping. Address any issues before proceeding with the installation to ensure a secure foundation.
- Consider the weight-bearing capacity of your walls or cabinets. Floating countertops rely on proper support, so it’s important to verify that the surrounding structure can bear the weight.
By thoroughly assessing the support structure, you can make any necessary adjustments or reinforcements to ensure a stable and secure installation.
Step-By-Step Guide: Installing A Floating Countertop
Are you looking to give your kitchen or bathroom a modern and sleek upgrade? Installing a floating countertop can instantly elevate the look of your space. Not only does it create the illusion of more space, but it also adds a touch of elegance. In this step-by-step guide, we will walk you through the process of installing a floating countertop, ensuring that you have all the necessary tools and knowledge to get the job done right.
Preparing the work area and tools
Before you begin the installation process, it is essential to prepare your work area and gather the necessary tools for the job. Here are the steps:
- Clear the area: Start by removing any objects or items that may obstruct your workspace. Ensure that the area is clean and free from debris.
- Gather the tools: You will need the following tools for installing a floating countertop:
- – Measuring tape
- – Pencil
- – Level
- – Drill
- – Screws
- – Screwdriver
- – Countertop brackets
Determining the desired overhang and placement
Once your work area is prepared and the tools are ready, the next step is to determine the desired overhang and placement of your floating countertop. Follow these guidelines:
- Measure the space: Measure the area where you intend to install the floating countertop using a measuring tape. Take into account any appliances, sinks, or other fixtures that will be incorporated into the countertop.
- Decide on the overhang: Consider the desired overhang for your countertop. It is typically recommended to have an overhang of 1-1.5 inches for a floating style.
Installing the support brackets
Now that you have determined the desired overhang and placement, it is time to install the support brackets. Follow these steps:
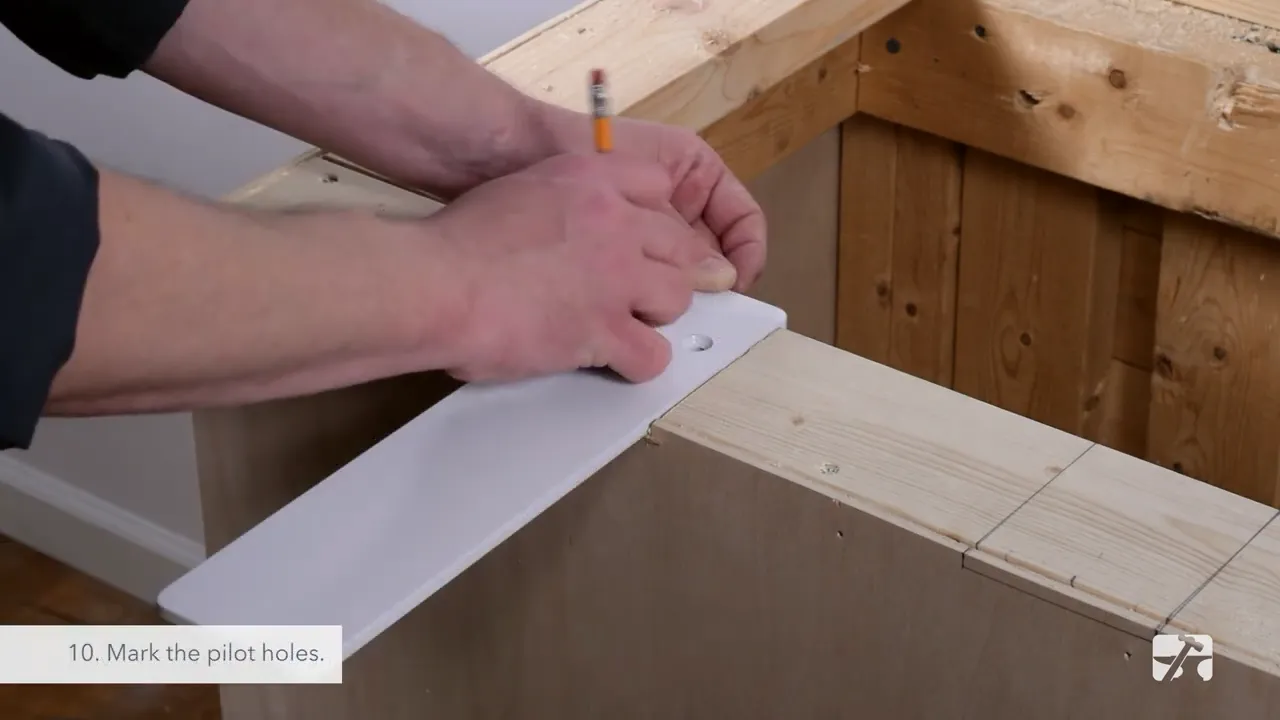
- Mark the placement: Using a pencil, mark the placement of the support brackets on the wall. Make sure to align them with the measurements and overhang you have decided.
- Drill pilot holes: Using a drill, create pilot holes at the marked positions on the wall. Make sure the holes are slightly smaller than the screws you will be using for the brackets.
- Attach the brackets: Secure the support brackets to the wall by using screws and a screwdriver. Ensure that the brackets are level and firmly attached.
- Test for stability: Once the brackets are installed, test the stability by applying some pressure to the countertop. If it feels secure and stable, you are ready to move on to the next step.
Congratulations! You have successfully completed the first few steps of installing a floating countertop. In the next part of this guide, we will discuss how to attach the countertop to the support brackets and provide additional tips for a seamless installation.
Securing The Countertop To The Wall
Securing the countertop to the wall is a crucial step in the installation process of a floating countertop. By properly securing the countertop, you not only ensure its stability but also create a professional and finished look for your kitchen or bathroom. In this section, we will guide you through the necessary steps to secure your countertop to the wall.
Marking the Location of the Brackets on the Wall
The first step in securing the countertop to the wall is to mark the location of the brackets on the wall. This will ensure that the countertop is properly supported and aligned. Before marking the location, make sure to measure and mark the desired height for your countertop. Once you have determined the height, follow these steps:
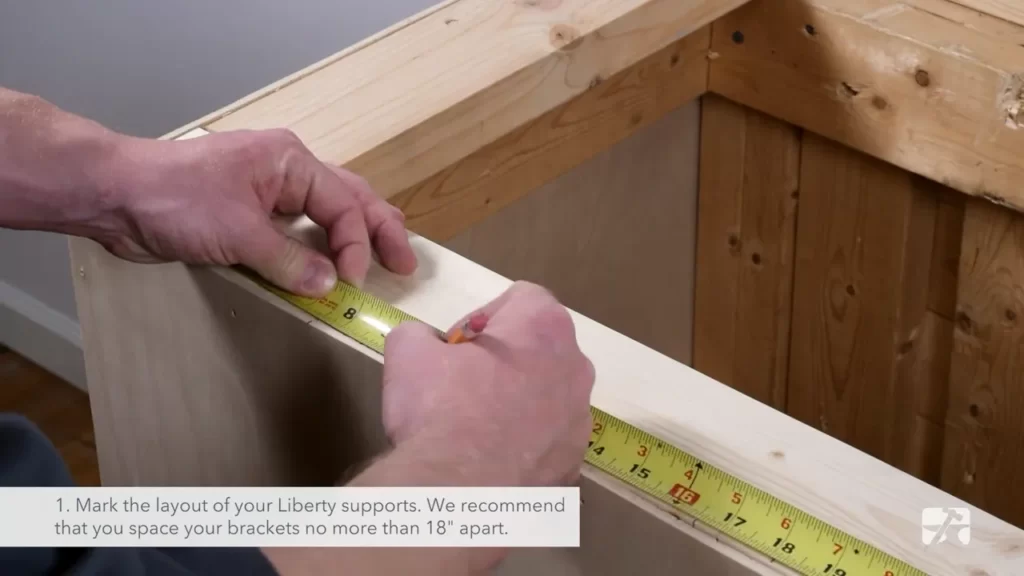
- Use a measuring tape to measure and mark the location of the brackets on the wall. Ensure that the marks are level and aligned with the height of the countertop.
- Double-check the measurements and marks to ensure accuracy. This will help you avoid any future adjustments or issues during the installation process.
Attaching the Brackets Securely
Once you have marked the location of the brackets, it’s time to attach them securely to the wall. The brackets will provide the necessary support for the countertop and ensure its stability. Follow these steps to attach the brackets:
- Using a power drill, drill pilot holes on the marked locations. Ensure that the pilot holes are the appropriate size for the screws that will be used to attach the brackets.
- Align the brackets with the pilot holes and secure them to the wall using screws. Make sure to tighten the screws firmly, but be cautious not to overtighten and damage the wall.
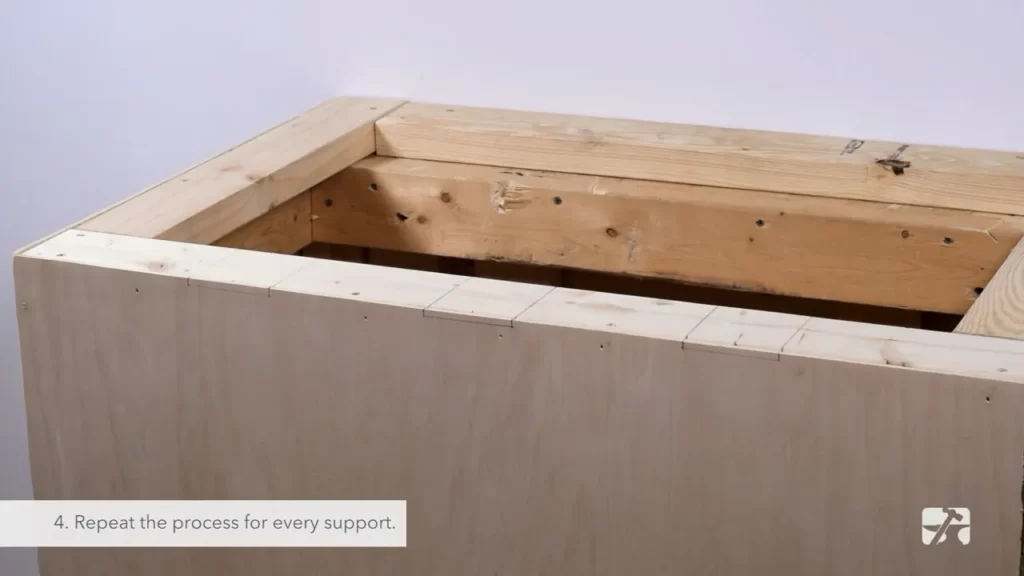
- Double-check the alignment and stability of the brackets. If needed, make any necessary adjustments to ensure that the brackets are securely attached to the wall.
Lifting the Countertop into Place
Now that the brackets are securely attached to the wall, it’s time to lift the countertop into place. This step requires caution and the help of another person to ensure a smooth installation. Follow these steps for lifting the countertop:
- Position the countertop above the brackets and carefully align it with the marked location.
- With the help of a partner, lift the countertop and place it onto the brackets. Ensure that each bracket is securely supporting the weight of the countertop.
- Double-check the alignment and stability of the countertop. Make any necessary adjustments to ensure that the countertop is level and properly positioned.
By following these steps to secure the countertop to the wall, you can ensure a successful installation of your floating countertop. Remember, proper installation is key to achieving both functionality and aesthetics in your kitchen or bathroom.
Ensuring Stability And Support For The Floating Countertop
Proper installation of a floating countertop involves more than just the aesthetic appeal. Ensuring stability and support is crucial to prevent any unwanted accidents and to make sure the countertop lasts for years to come. In this section, we will discuss the key factors to focus on when installing a floating countertop, including proper bracket alignment for maximum stability, securing the countertop to the brackets, and checking for wobbling or unevenness. Let’s dive in!
Proper Bracket Alignment for Maximum Stability
Aligning the brackets accurately is the first step towards ensuring a stable floating countertop. Improper alignment can lead to an imbalance, causing the countertop to sag or wobble. To achieve the maximum stability, follow these simple steps:
- Start by measuring and marking the exact positions where the brackets will be mounted.
- Use a level to ensure the brackets are perfectly horizontal.
- Take into account the weight distribution by spacing the brackets evenly and considering the countertop’s center of gravity.
Securing the Countertop to the Brackets
After aligning the brackets, securing the countertop to them is crucial to prevent any slipping or sliding. The method you choose depends on the type of countertop material, but the following general steps apply:
- Carefully place the countertop atop the brackets, ensuring an even distribution of weight.
- Using screws or bolts, securely attach the countertop to the brackets. Make sure to use appropriate hardware that is suitable for the countertop material.
- Double-check the tightness of the screws or bolts to ensure a strong and secure connection.
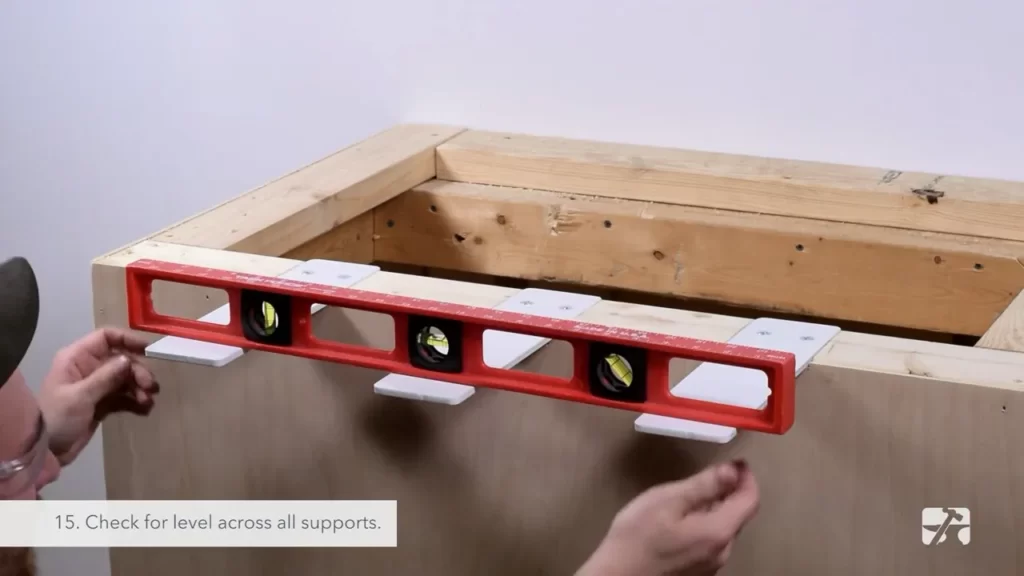
Checking for Wobbling or Unevenness
Once the countertop is affixed to the brackets, it’s essential to check for any signs of wobbling or unevenness. Here’s how:
- Gently apply pressure to different areas of the countertop to test its stability. If you notice any movement or shifting, it might indicate an issue with the bracket placement or countertop installation.
- Use a level to check for any unevenness. If the countertop is not perfectly level, adjustments may be required to achieve optimal stability.
- If wobbling or unevenness is detected, carefully unscrew the countertop from the brackets and re-evaluate the bracket alignment and countertop installation. Make any necessary adjustments before reattaching the countertop.
By following these steps and ensuring proper bracket alignment, secure attachment, and stability checks, you can enjoy a floating countertop that not only enhances the aesthetics of your space but also provides the stability and support it requires.
Finishing Touches And Maintenance Of A Floating Countertop
Sealing the Countertop Edges
One of the crucial steps in installing a floating countertop is ensuring that the edges are properly sealed. Sealing the edges not only enhances the overall appearance of the countertop but also protects it from potential damage caused by moisture and spills. Here are the steps to seal the edges of a floating countertop:
- Start by cleaning the edges of the countertop thoroughly using a mild detergent and water solution. This step removes any dirt, dust, or debris that may interfere with the sealing process.
- Once the edges are clean and dry, apply a thin bead of clear silicone caulk along the exposed edges of the countertop. Be sure to use a caulk color that matches the color of your countertop for a seamless finish.
- Smooth out the caulk using a caulk smoothing tool or a wet finger. This step ensures that the caulk adheres properly and creates a neat, smooth finish.
- Allow the caulk to dry according to the manufacturer’s instructions. This typically takes a few hours or overnight.
Cleaning and Maintaining the Countertop Regularly
Keeping your floating countertop clean and well-maintained not only extends its longevity but also keeps it looking its best. Regular maintenance is key to ensure that your countertop withstands daily wear and tear. Follow these guidelines to clean and maintain your floating countertop:
- Use a soft, non-abrasive cloth or sponge and a gentle, pH-neutral cleanser to wipe down the countertop surface on a daily basis. This helps remove any spills, stains, or debris.
- Avoid using harsh chemicals, abrasive cleaners, or scouring pads as they can scratch or damage the countertop surface.
- For stubborn stains, create a paste using baking soda and water. Apply the paste to the stained area and let it sit for a few minutes before gently scrubbing and rinsing with water.
- Regularly apply a countertop sealant to protect the surface from stains and to maintain its shine. Be sure to follow the manufacturer’s instructions for application and reapplication.
Troubleshooting Common Issues
While floating countertops are generally low-maintenance, occasional issues may arise. Here are some common problems and their solutions:
| Issue | Solution |
|---|---|
| The countertop is sagging in the middle | Reinforce the underside of the countertop with additional support brackets or consult a professional for assistance. |
| Cracks or chips in the countertop surface | Repair small cracks or chips with a countertop repair kit, following the manufacturer’s instructions. For larger damages, consider contacting a professional. |
| Water stains or discoloration | Gently sand the stained area and reapply a countertop sealant to restore the original color and shine. |
By following these finishing touches and maintenance tips, you can keep your floating countertop looking beautiful for years to come. Remember to always consult the manufacturer’s guidelines and seek professional help if needed.
Enhancing The Aesthetics And Functionality Of A Floating Countertop
When it comes to kitchen or bathroom remodeling, installing a floating countertop can be a game-changer. Not only does it add a modern touch to any space, but it also offers the benefit of maximizing storage and creating an illusion of spaciousness in the room. However, simply installing a floating countertop is not enough to achieve the desired impact. To truly enhance the aesthetics and functionality of your floating countertop, consider incorporating a few additional elements and features. In this article, we will explore some creative ideas to elevate the look and feel of your floating countertop.
Adding Decorative Elements and Accessories
One way to elevate the aesthetics of your floating countertop is by adding decorative elements and accessories. This can be achieved by carefully selecting countertop materials, such as natural stone or quartz, in colors and patterns that complement your overall design scheme. Additionally, you can enhance the visual appeal by incorporating stylish hardware, such as drawer pulls and cabinet knobs, that complement the floating design.
Moreover, consider adding decorative elements, such as a backsplash or mosaic tiles, to create a focal point and add visual interest. These small touches can make a big impact and transform your floating countertop into a true centerpiece of your kitchen or bathroom.
Incorporating Lighting Features
Lighting plays a crucial role in enhancing the functionality and ambiance of any space, and a floating countertop is no exception. By incorporating lighting features, you can create a well-lit workspace and highlight the striking beauty of your countertop. One popular option is to install under-cabinet lighting, which provides ample task lighting while adding a touch of elegance.
Additionally, you can consider installing pendant lights or spotlights above the floating countertop to create a warm and inviting atmosphere. These lighting fixtures not only serve a functional purpose but also add a touch of style to your kitchen or bathroom.
Customizing the Countertop Layout to Suit Your Needs
No two kitchens or bathrooms are alike, and the same goes for floating countertop layouts. To truly maximize the functionality of your space, consider customizing the countertop layout to suit your specific needs. This may involve incorporating additional storage solutions, such as open shelves or built-in drawers, to keep your essentials within easy reach.
Furthermore, take into account your usage patterns and lifestyle when planning the layout. If you love entertaining, consider adding a seating area to create a breakfast bar or an inviting spot for casual gatherings. By customizing the countertop layout, you can tailor the design to perfectly suit your lifestyle and make your floating countertop not only visually appealing but highly functional as well.
With these creative ideas, you can take your floating countertop to the next level. By adding decorative elements and accessories, incorporating lighting features, and customizing the layout to suit your needs, you can enhance both the aesthetics and functionality of your floating countertop. So why settle for a standard countertop when you can create a stunning and practical centerpiece for your kitchen or bathroom!
Frequently Asked Questions
How Do You Support A Floating Counter?
To support a floating counter, use CSS properties like “position: fixed” or “position: sticky”. These properties allow the counter to stay in a fixed position while scrolling or floating alongside the content. Ensure proper CSS classes and styling are applied to achieve the desired floating effect.
How Do You Support A Freestanding Countertop?
To support a freestanding countertop, you can use brackets, corbels, or legs. These options provide stability and prevent the countertop from sagging or collapsing. Ensure that the support structure is securely fastened to both the countertop and the wall or base cabinet for maximum stability.
Do You Have To Glue Down Countertops?
No, it is not necessary to glue down countertops.
How Do You Support A Countertop?
Countertops can be supported by using brackets, corbels, or legs. Brackets attach to the wall and provide support from underneath, while corbels are decorative brackets that also offer support. Legs are freestanding supports placed directly under the countertop. Support type depends on the material and weight of the countertop.
Conclusion
Installing a floating countertop can be a simple and cost-effective way to update the look of your kitchen or bathroom. By following the step-by-step instructions outlined in this blog post, you can confidently tackle this project on your own. Remember to measure carefully, secure the countertop properly, and consider the overall design and functionality of your space.
With the right tools and a little bit of patience, you can achieve a beautiful and functional countertop that will enhance your home for years to come.