To install a floating bathroom vanity, first measure the space, locate the wall studs, and mark the positions for the vanity brackets. Then, attach the brackets to the wall, level them, and hang the vanity on the brackets.
Finally, secure the vanity to the wall and connect the plumbing. With these steps, you can easily install a floating bathroom vanity in your space. Are you looking to give your bathroom a sleek, modern upgrade? A floating bathroom vanity might be just what you need.
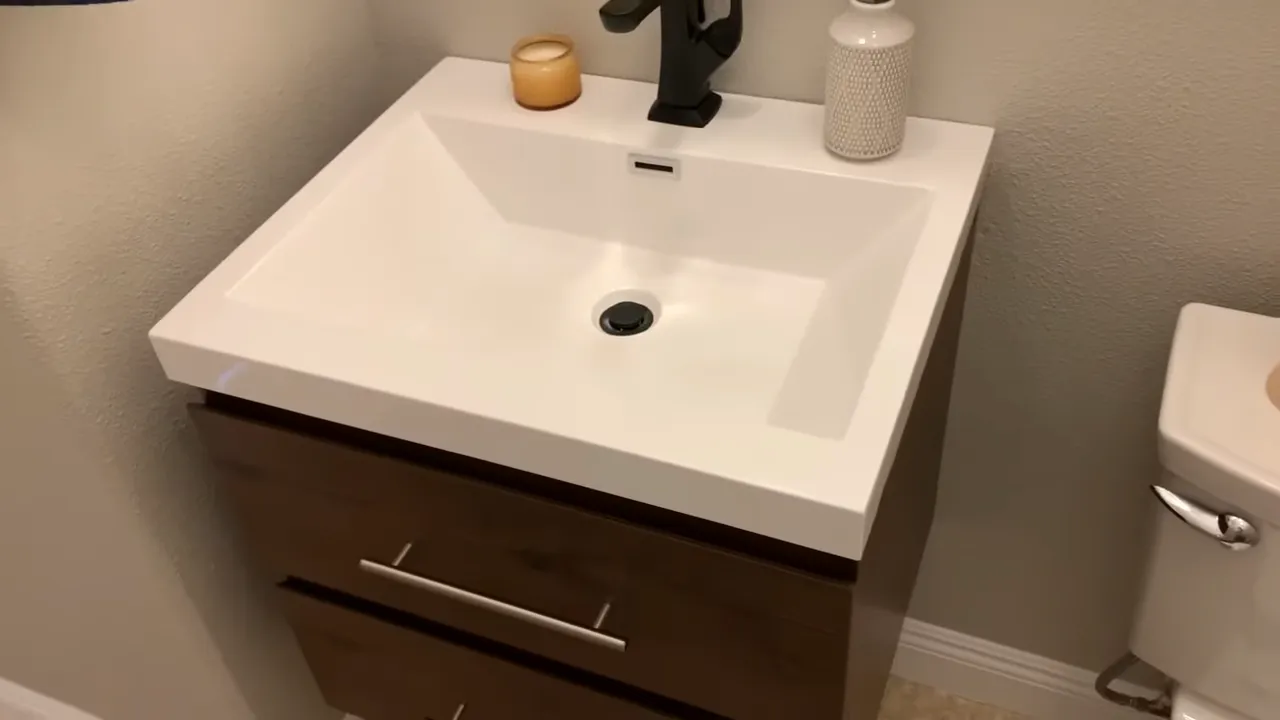
These stylish vanities not only add a contemporary touch to your bathroom, but they also free up valuable floor space, making your bathroom appear more spacious. Installing a floating vanity may seem like a challenging task, but with the right tools and a little know-how, you can do it yourself. In this guide, we will walk you through the step-by-step process of installing a floating bathroom vanity, so you can transform your bathroom into a stylish and functional space. So, let’s dive in and get started on this exciting DIY project.
Gathering The Necessary Tools And Materials
Before you begin installing a floating bathroom vanity, it’s essential to gather all the necessary tools and materials. Having everything you need on hand will make the installation process much smoother and more efficient. Below are the essential tools and required materials you will need for this project.
Essential tools for installation
Having the right tools is crucial to ensure a successful installation. Here are the essential tools you will need:
- Tape measure
- Level
- Drill
- Screwdriver
- Adjustable wrench
- Utility knife
- Pencil
- Safety goggles
These basic tools will help you accurately measure, level, and secure the floating bathroom vanity, ensuring it is installed correctly.
Required materials for the project
Aside from the necessary tools, you will also need specific materials for the installation process. These materials include:
| Materials | Quantity |
|---|---|
| Floating bathroom vanity | 1 |
| Mounting brackets | As required |
| Screws | As required |
| Wall anchors | As required |
| Waterproof sealant | 1 tube |
| Masking tape | As required |
Ensure that you have the correct amount of each material to avoid any delays during the installation process. The mounting brackets, screws, wall anchors, waterproof sealant, and masking tape will be used to secure the floating vanity to the wall and create a stable and water-resistant installation.
Having all the necessary tools and materials ready before starting the installation will save you time and frustration. Once you have everything gathered, you can move on to the next step in installing your new floating bathroom vanity.

Turning Off The Water Supply
One of the first and most important steps in installing a floating bathroom vanity is turning off the water supply. This ensures that you can safely work on your vanity without any leaks or water damage. In this guide, we will walk you through the process of shutting off the water valves and draining the water lines to prepare for the installation.
Shutting off the water valves:
To begin, locate the water shut-off valves. These are typically found underneath the sink or near the water pipes in your bathroom. The shut-off valves will have a lever or handle that you can turn to stop the flow of water. Close the valves by turning them clockwise until they are fully shut. This will prevent any water from flowing into your bathroom fixtures.
Draining the water lines:
After shutting off the water valves, you’ll need to drain the water lines to ensure there is no remaining water in the plumbing system. To do this, open all the faucets in your bathroom, including the sink faucets, showerhead, and bathtub faucet. This will allow any water in the pipes to flow out. It’s also a good idea to flush the toilet to remove any water from the tank and bowl.
Wait a few minutes for the water to fully drain from the lines. Once you no longer hear or see any water running, you can be confident that the plumbing system is empty. This step is important to prevent any leaks or potential damage during the installation process.
By following these steps to turn off the water supply and drain the water lines, you’re now ready to proceed with the installation of your floating bathroom vanity. Taking the time to properly prepare and ensure the water supply is turned off will help you avoid any plumbing mishaps and ensure a successful installation.
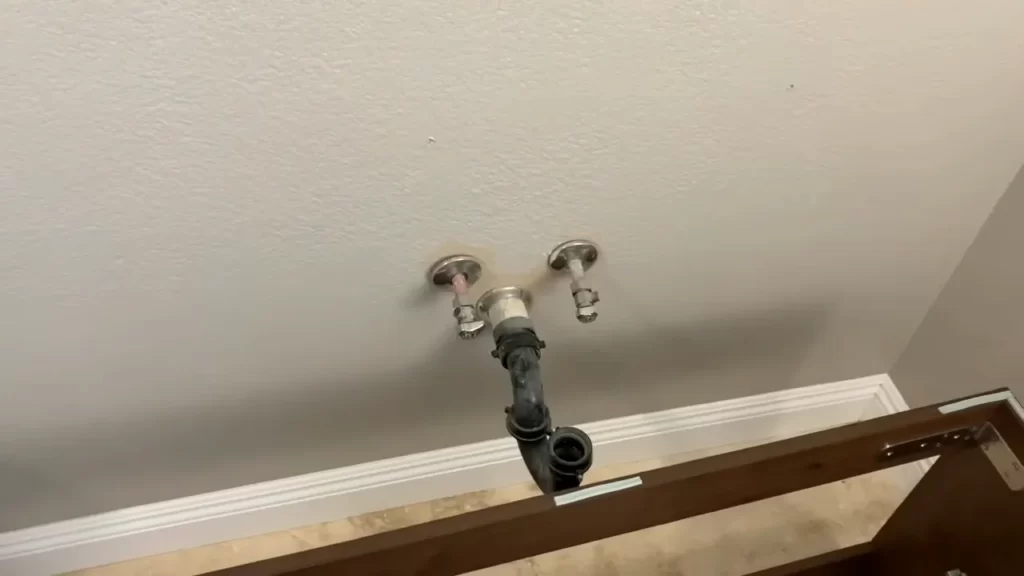
Disconnecting The Plumbing
Disconnecting the plumbing is an essential step when installing a floating bathroom vanity. This process involves removing the P-trap and disconnecting the water supply lines. By following the proper steps, you can successfully disconnect the plumbing and proceed with the installation of your new vanity.
Removing the P-trap
To begin disconnecting the plumbing, the first step is removing the P-trap. The P-trap is a curved pipe that is typically visible underneath the sink. It is responsible for trapping debris and preventing it from clogging the drain.
To remove the P-trap, you will need a wrench or pliers to loosen the connection. Start by placing a bucket or basin beneath the P-trap to catch any water or debris that may come out. Then, use your tool to loosen the nuts that connect the P-trap to the drain pipe and the tailpiece of the sink. Once loosened, carefully remove the P-trap from both ends.
Disconnecting the water supply lines
After removing the P-trap, the next step is disconnecting the water supply lines. These are the pipes that connect the faucet to the hot and cold water supply. To prevent any leakage, it is important to shut off the water supply before proceeding.
Locate the shut-off valves usually found beneath the sink. Turn the handles clockwise to shut off the water supply. Once the water is turned off, use an adjustable wrench or pliers to loosen the nuts that connect the supply lines to the shut-off valves. Be sure to place a towel or bucket beneath the connections to catch any remaining water.
Once the nuts are loosened, carefully remove the water supply lines. It is crucial to wrap a towel around the connections to catch any excess water that may spill out. Take note of which line is connected to the hot water supply and which is connected to the cold water supply for later reconnection.
By following these steps and properly disconnecting the plumbing, you can successfully remove the P-trap and disconnect the water supply lines. This will allow you to proceed with the installation of your floating bathroom vanity efficiently and without any unexpected complications.
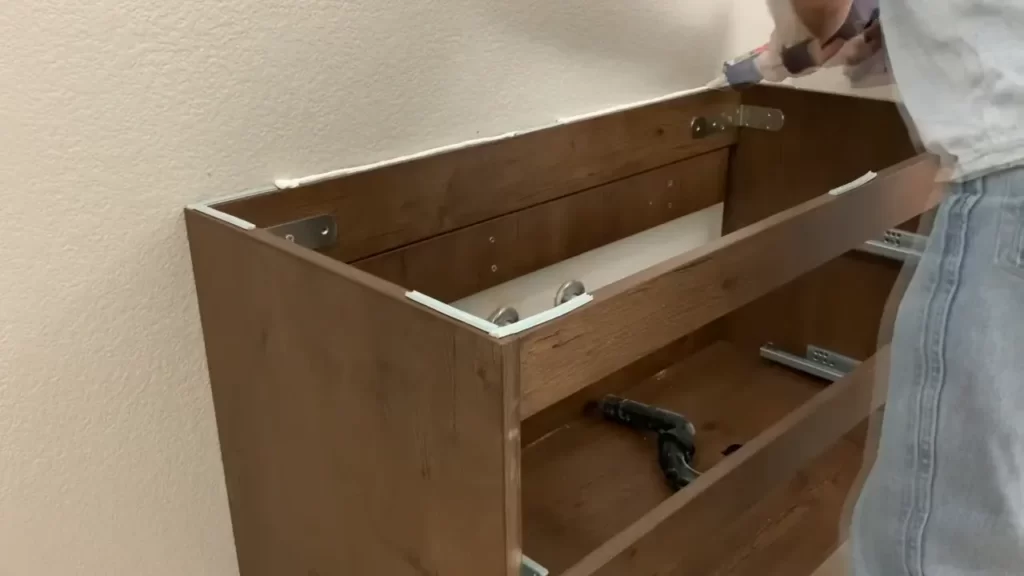
Detaching The Vanity From The Wall
Removing the old bathroom vanity is a crucial step in the installation process of a floating bathroom vanity. Whether you’re updating your bathroom or simply opting for a new look, taking the time to detach the vanity from the wall is essential. In this section, we will guide you through the process, from removing the screws or nails securing the vanity to preparing the area for the new installation.
Removing the Screws or Nails Securing the Vanity
Before beginning the removal process, gather the necessary tools such as a screwdriver, pry bar, or hammer. These will come in handy when dealing with different types of attachments securing the vanity to the wall.
Follow these steps to remove the screws or nails securing the vanity:
- Start by locating the screws or nails that are holding the vanity in place. They are typically found at the back of the vanity, near the top and bottom edges.
- Using a screwdriver, carefully unscrew the screws or use a pry bar or hammer to remove the nails. Make sure to apply steady pressure to avoid damaging the wall or the vanity.
- Once the screws or nails have been removed, gently pull the vanity away from the wall. It may be helpful to have an extra set of hands to assist with this step, especially if the vanity is heavy.
Preparing the Area for the New Installation
Now that the old vanity has been detached from the wall, it’s time to prepare the area for the new installation. Follow these steps to ensure a smooth transition:
- Clean the wall surface to remove any dust, dirt, or adhesive residue left by the previous vanity. A mild cleaning solution and a cloth or sponge should do the trick.
- If you notice any damage to the wall during the removal process, such as holes or cracks, repair them using spackling compound or joint compound. Allow the compound to dry completely and then sand it down until the surface is smooth.
- Measure and mark the desired height and position for your new floating vanity. Use a level to ensure it is perfectly straight.
- If needed, install additional support brackets or blocking inside the wall to provide extra stability for the floating vanity.
By following these steps to detach the vanity from the wall and properly prepare the area, you are laying the foundation for a successful installation of your new floating bathroom vanity. With the old vanity removed and the area prepped, you’re now ready to move on to the next steps of the installation process.
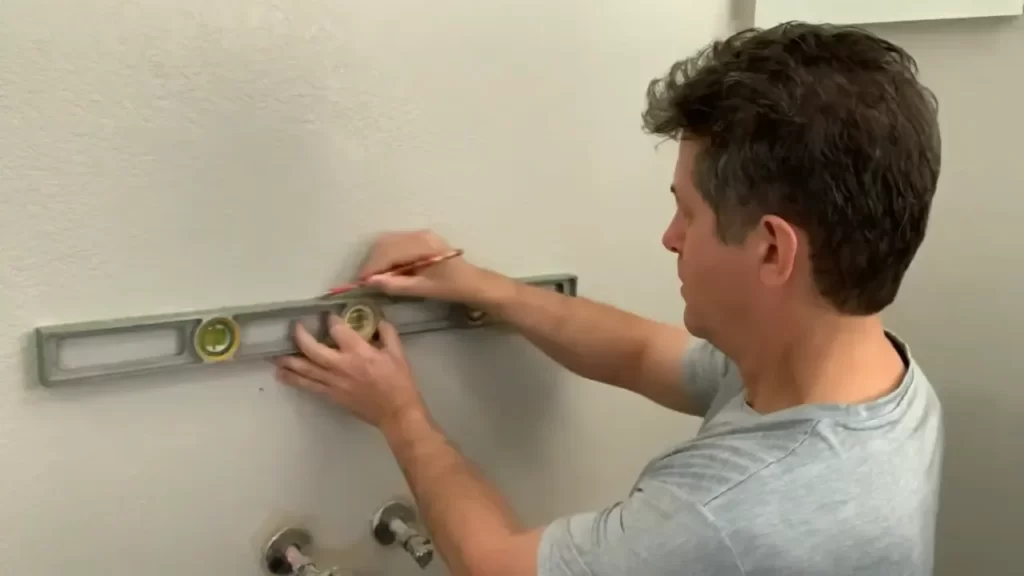
Measuring And Marking The Wall
Before you install a floating bathroom vanity, it’s essential to measure and mark the wall properly. This step ensures that your vanity is installed at the right height and remains level throughout. Here’s a breakdown of the process:
Determining the desired height of the vanity
The first step in measuring and marking the wall for your floating bathroom vanity is determining the desired height. This is an important decision as it can affect the overall aesthetics and functionality of the vanity. To determine the ideal height, consider factors such as the height of the users and any specific needs or preferences.
One popular rule of thumb is to install the vanity so that the top aligns with the average user’s elbow height. This ensures optimal comfort and convenience when using the sink. However, it’s important to consider personal preferences and ensure the height works well with your bathroom’s overall design.
Using a level and tape measure to mark the wall
Once you have determined the desired height for your floating bathroom vanity, it’s time to use a level and tape measure to mark the wall accurately. This step is crucial to ensure that the vanity is installed straight and level, preventing any unevenness or tilting.
Start by locating the centerline of the wall and mark it with a pencil. Use a tape measure to measure the width of the vanity and mark the center point on the centerline. This will serve as a reference point for installation.
Next, use the level to draw a horizontal line on the wall at the desired height of the vanity. Ensure that the line is perfectly level by checking the bubble on the level. This line will guide the installation of your vanity and help you position it accurately.
Additionally, it’s a good idea to mark the locations of any studs on the wall. This information will come in handy later when it’s time to secure the vanity in place.
In conclusion, measuring and marking the wall is a crucial step in installing a floating bathroom vanity. By determining the desired height and using a level and tape measure to mark the wall, you ensure that your vanity will be installed straight, level, and at the perfect height for optimal functionality and aesthetics.
Installing The Wall Mounting Bracket
Installing a floating bathroom vanity is a great way to add a modern touch and maximize space in your bathroom. When it comes to installing the wall mounting bracket, it’s important to ensure proper placement and stability. In this section, we will guide you through the process of attaching the bracket to the wall and ensuring it is level for a secure installation.
Attaching the bracket to the wall
The first step to installing your floating bathroom vanity is attaching the wall mounting bracket. This bracket will provide the necessary support for your vanity to hang on the wall. Here’s a step-by-step guide to help you with the process:
- Start by determining the height at which you want your vanity to be positioned on the wall. Keep in mind factors such as comfort and accessibility.
- Using a measuring tape, mark the desired height on the wall. Consider the length and width of your vanity to ensure proper placement.
- Hold the wall mounting bracket against the wall at the marked area. Make sure it is positioned horizontally and aligned with the marks.
- With a pencil, carefully trace around the screw holes on the bracket onto the wall.
- Next, using a drill, create pilot holes at the marked locations. These will guide the screws into the wall.
- Align the bracket with the pilot holes and secure it to the wall using screws that are suitable for the type of wall you have. Ensure the screws are tightened securely for stability.
By following these steps, you will successfully attach the wall mounting bracket to the wall in preparation for installing your floating bathroom vanity.
Ensuring the bracket is level
Once the bracket is securely attached to the wall, it’s crucial to ensure that it is perfectly level. This will prevent any issues with the vanity’s stability and overall appearance. Here’s how you can ensure the bracket is level:
- Place a level on top of the bracket to gauge its horizontal alignment. Adjust the bracket if needed, making sure it is perfectly level.
- Similarly, check the vertical alignment of the bracket using a level along its sides. Make any necessary adjustments to achieve a level position.
- Double-check the levelness of the bracket in both horizontal and vertical directions to ensure accuracy.
Ensuring that the wall mounting bracket is level will provide a solid foundation for your floating bathroom vanity. This step is important for maintaining the overall aesthetic appeal and functionality of your vanity.
Now that the wall mounting bracket is securely attached and level, you’re one step closer to installing your floating bathroom vanity. In the next section, we will guide you through the process of attaching the vanity to the bracket and completing the installation.
Securing The Vanity To The Bracket
Once you have successfully lifted the vanity onto the bracket and aligned it with the markings on the wall, the next step is to securely fasten the vanity to the bracket. This step is crucial as it ensures the stability and durability of your floating bathroom vanity. Here’s a step-by-step guide on how to secure the vanity to the bracket:
Lifting the vanity onto the bracket
Before securing the vanity to the bracket, make sure you have lifted it onto the bracket properly. This process requires caution and precision to avoid any damage to the vanity or the wall. Here’s how to do it:
- With the help of another person, carefully lift the vanity and position it onto the bracket. Make sure it fits securely and evenly.
- While holding the vanity in place, ensure it is level by using a spirit level. Adjust if necessary.
- Confirm that the vanity is sitting flush against the wall, ensuring there are no gaps between the vanity and the bracket.
Aligning the vanity with the markings on the wall
Once the vanity is lifted onto the bracket, it’s important to align it with the markings on the wall to ensure a level and symmetrical installation. Follow these steps:
- Using a measuring tape, double-check the position of the markings on the wall to ensure accuracy.
- With the help of a friend, gently shift the vanity to align it precisely with the markings.
- Make sure the vanity is centered and even by using the spirit level once again. This ensures a balanced and visually appealing installation.
Aligning the vanity with the markings on the wall is crucial, as it ensures that the vanity is securely attached and properly aligned for a stable installation.
With the vanity properly lifted onto the bracket and aligned with the markings on the wall, it’s time to move on to securing the vanity. This step involves using appropriate fasteners and following the manufacturer’s instructions to ensure a secure and long-lasting installation. Stay tuned for the next section of our guide, where we’ll walk you through the process of securing the vanity to the bracket.
Connecting The Plumbing
Connecting the plumbing is a crucial step in the installation process of a floating bathroom vanity. This step involves reconnecting the water supply lines and reinstalling the P-trap. Following the instructions below will ensure a proper and leak-free installation.
Reconnecting the Water Supply Lines
Begin by connecting the water supply lines to the faucet. These lines are typically provided with the vanity and can be easily attached to the corresponding hot and cold water valves. Make sure to tighten the connections securely using adjustable wrenches to prevent any leaks.
Once the water supply lines are attached to the faucet, ensure that the connections are properly aligned and not kinked or twisted. Straighten any kinks or twists to ensure a smooth water flow.
It is important to mention that if your vanity does not come with pre-installed water supply lines, you will need to purchase flexible water supply lines separately. These can be found at most hardware stores or online retailers and should be connected to the faucet following the manufacturer’s instructions.
Reinstalling the P-Trap
The P-trap is an essential component of the plumbing system that helps prevent sewer gases from entering your bathroom. It is important to reinstall the P-trap properly to ensure the drainage system functions effectively.
To reinstall the P-trap, first, remove the existing P-trap from the drain pipe. Clean the drain pipe and the P-trap thoroughly to remove any debris or residue. Then, apply plumber’s putty or a rubber gasket to the area where the P-trap connects to the drain pipe to create a watertight seal.
Next, attach one end of the P-trap to the drain pipe, aligning the connections properly. Tighten the connection using slip-joint pliers or a wrench, ensuring that it is secure but not over-tightened. Connect the other end of the P-trap to the tailpiece of the sink drain, making sure it is aligned and tightened securely.
Finally, check all the connections in the plumbing system, including the water supply lines and the P-trap, for any signs of leaks. Turn on the water supply and run water through the faucet for a few minutes to test the installation. If any leaks are detected, tighten the connections further or replace any faulty components as necessary.
By following these steps and ensuring proper connection and installation of the plumbing components, you will have successfully connected the plumbing for your floating bathroom vanity. This will not only provide you with a functional and stylish vanity but also ensure a hassle-free and leak-proof experience in your bathroom.
Sealing Gaps And Caulking
After successfully installing your floating bathroom vanity, it is essential to take the extra steps to seal any gaps between the vanity and the wall. Not only does this ensure a clean and finished look, but it also provides added protection against moisture and water damage. The process involves filling any gaps between the vanity and the wall and then applying caulk for a seamless finish. Let’s dive into the steps involved to achieve a professional-looking installation.
Filling any gaps between the vanity and the wall
The first step to sealing gaps between your floating bathroom vanity and the wall is identifying any visible openings. These gaps may result from irregularities in the bathroom walls or imperfect installation. To fill these gaps, you can use a high-quality caulk that matches the color of your vanity or the surrounding walls. Here’s how to go about it:
- Clean the area around the gaps thoroughly to ensure proper adhesion of the caulk.
- Trim the tip of the caulk tube at a 45-degree angle and load it into a caulking gun.
- Apply a smooth and even bead of caulk along the entire length of the gap, ensuring it fills in completely.
- Use a caulk smoothing tool or your finger to smooth the caulk into the gap and remove any excess.
- Wipe away any excess caulk with a damp cloth for a neat finish.
Applying caulk for a clean and finished look
Once you have filled in the gaps between the vanity and the wall, the next step is to apply caulk for a clean and polished appearance. Caulk not only seals the gaps but also prevents water from seeping behind the vanity, reducing the risk of mold and water damage. Follow these steps to achieve a professional finish:
- Clean the area around the filled gaps to ensure there is no debris or caulk residue.
- Load a caulk tube into a caulking gun and trim the tip at a 45-degree angle.
- Squeeze a steady and even bead of caulk along the joint where the vanity meets the wall.
- Smooth the caulk into the joint using a caulk smoothing tool or your finger, creating a neat and uniform line.
- Alternatively, if you prefer a rounded caulk line, use the back of a spoon or a caulk finishing tool to create a beveled edge.
Allow the caulk to dry completely as per the manufacturer’s instructions before using your bathroom vanity. This drying time may vary depending on the caulk type and brand. Once dry, your floating bathroom vanity will have a sealed and polished appearance, elevating the overall aesthetic of your bathroom while ensuring long-lasting durability.
Checking For Proper Functionality
After successfully installing your floating bathroom vanity, it is important to take the time to check for proper functionality. This step ensures that everything is in working order before you start using your new vanity on a daily basis. In this section, we will explore two crucial aspects of functionality: turning on the water supply and testing the functionality of the vanity.
Turning on the Water Supply
Before proceeding to test the functionality of your new floating bathroom vanity, it is essential to turn on the water supply. This step ensures that water will flow without any issues and that you can use the vanity’s plumbing components with ease. Here’s a quick guide on how to turn on the water supply:
- Locate the shut-off valve under your sink. It is typically located near the hot and cold water pipes.
- Turn the shut-off valve in a clockwise direction to open it. This will allow water to flow into the vanity’s plumbing system.
- Check for any leaks or drips around the shut-off valve and pipes. If you notice any, tighten the connections or seek professional assistance if needed.
Once you have turned on the water supply and checked for any leaks, you can move on to testing the functionality of your floating bathroom vanity.
Testing the Functionality of the Vanity
Testing the functionality of your floating bathroom vanity ensures that all the components are working properly. This step allows you to identify any issues or malfunctions that need to be addressed before regular use. Follow these steps to test the functionality of your vanity:
- Start by checking the drainage system. Run water from the faucet and observe how well the sink drains. If the water drains slowly, there may be a clog in the plumbing that needs to be cleared.
- Next, test the hot and cold water controls. Turn on both faucets and make sure the water flows smoothly and evenly. Check for any leaks around the handles or pipes.
- Open and close the vanity drawers and cabinet doors to ensure they operate smoothly. If you notice any sticking or difficulty in opening or closing, adjustments may be necessary.
- Inspect the vanity mirror to ensure it is securely attached and positioned correctly. Make any necessary adjustments to ensure optimal visibility and stability.
- Finally, check the stability of the vanity itself. Apply gentle pressure from different angles to ensure it is securely attached to the wall. If you notice any wobbling or instability, reinforce the mounting or seek assistance if needed.
By thoroughly testing the functionality of your floating bathroom vanity, you can address any issues early on and enjoy a hassle-free experience in your newly renovated bathroom.
Cleaning And Finalizing
Wiping down the vanity and surrounding area
Once you have successfully installed your floating bathroom vanity, it’s time to move on to the final steps of the process: cleaning and finalizing. This is an essential part that ensures your vanity not only looks great but also functions at its best. Let’s dive into the first step, which is wiping down the vanity and surrounding area to remove any dust or debris.
Start by gathering a soft cloth or sponge and a mild cleaning solution. Avoid using abrasive cleaners or anything that may damage the vanity’s surface. Dip the cloth or sponge into the cleaning solution and wring out any excess liquid. Then, gently wipe down the entire surface of the vanity, including the top, sides, and edges. Pay extra attention to any visible dirt or smudges, and make sure to clean the underside of the vanity as well.
If your floating bathroom vanity has any delicate or intricate details, consider using a small brush or cotton swab to clean those areas. This will help you to get into those hard-to-reach spots and achieve a thorough cleaning. Once you have wiped down the vanity, take a clean, damp cloth or sponge and go over the surface again to remove any residue from the cleaning solution. Finally, use a dry cloth to thoroughly dry the vanity and surrounding area.
Double-checking for any loose connections or issues
Now that your floating bathroom vanity is sparkling clean, it’s time to move on to the next step: double-checking for any loose connections or issues. This is an important part of the installation process that ensures the vanity is securely in place and functioning properly. Follow these steps to ensure everything is in order:
- Start by inspecting the connections between the vanity and the wall. Make sure that the vanity is level and securely attached. If you notice any loose screws or brackets, tighten them using a screwdriver or wrench.
- Check the plumbing connections to ensure there are no leaks or drips. Carefully examine the supply lines and drain pipes, tightening any fittings as needed.
- Test the drawers and doors of the vanity, ensuring that they open and close smoothly. If you encounter any sticking or binding, you may need to adjust the hinges or slides.
- If your floating vanity has any additional features, such as electrical outlets or lighting, test them to make sure they are functioning correctly. If you encounter any issues, consult the manufacturer’s instructions or seek professional assistance.
By taking the time to double-check these connections and address any issues, you can ensure that your floating bathroom vanity is securely installed and ready for use.
Frequently Asked Questions
Are Floating Vanities Hard To Install?
Floating vanities are not difficult to install. They come with clear instructions and can be easily mounted on the wall. With basic tools and DIY skills, you can successfully install a floating vanity in your bathroom.
How Are Floating Vanities Supported?
Floating vanities are supported by wall brackets or suspension systems. These provide stability and allow the vanity to appear as if it’s floating. Wall brackets are attached to the wall studs, while suspension systems use cables or rods hung from the ceiling or wall to support the vanity.
What Do You Put Under A Floating Bathroom Vanity?
Floating bathroom vanities are designed to be mounted on the wall, creating an open and airy appearance. You can put a variety of items under a floating vanity, such as a small stool, a decorative basket, or leave the space empty for a clean and minimalist look.
Do Floating Vanities Need Extra Support?
Floating vanities do not require additional support. They are designed to be mounted directly onto the wall, making them sturdy and secure. Installing them properly ensures stability and durability.
Conclusion
Installing a floating bathroom vanity is a straightforward home improvement project that can significantly enhance the aesthetics and functionality of your bathroom. By following the step-by-step guide provided in this blog post, you can achieve a sleek and modern look while maximizing space.
Don’t forget to consider the size, plumbing, and wall support when selecting your floating vanity. With proper installation, your bathroom will become a stylish and organized oasis.