To install a fiberglass tub, first, ensure the area is prepped and level. Then, apply adhesive, set the tub in place, and secure it with screws and nails.
Installing a fiberglass tub can be a straightforward process that adds both style and functionality to your bathroom. Whether you’re replacing an outdated tub or starting from scratch, a fiberglass tub can be a durable and affordable option. By following the right steps, you can successfully install a fiberglass tub without much hassle.
We will outline the necessary steps to help you achieve a seamless installation. So, let’s get started!
Choosing The Right Fiberglass Tub
Installing a fiberglass tub can be a great way to revamp your bathroom and create a sleek, modern look. However, with so many options available on the market, it can be overwhelming to choose the right one for your needs. In this article, we will discuss the factors to consider when selecting a fiberglass tub, how to measure the space for the tub, and the different types of fiberglass tubs available.
Factors to consider when selecting a fiberglass tub
Before you begin your search for the perfect fiberglass tub, it’s important to consider a few factors. These factors will help ensure that you make the right choice for your bathroom. Here are some key things to keep in mind:
- Size: One of the first things to consider is the size of the tub. Measure your bathroom space to determine how much room you have and choose a tub that fits comfortably in the available area.
- Style: Fiberglass tubs come in a variety of styles, including alcove, freestanding, and corner tubs. Consider the overall aesthetic of your bathroom and choose a style that complements it.
- Features and Extras: Think about the features you want in a tub. Do you prefer a tub with jets for a spa-like experience? Or maybe you want a tub with built-in storage space for your bath products? Consider these extras when making your decision.
- Budget: Set a budget for your fiberglass tub and stick to it. While it’s important to invest in a quality tub, there are options available for every price range.
- Maintenance: Fiberglass tubs are known for their durability and low maintenance. However, it’s still worth considering the cleaning and maintenance requirements of different models before making your final choice.
Measuring the space for the tub
Measuring the space in your bathroom is a crucial step in selecting the right fiberglass tub. Follow these steps to ensure accurate measurements:
- Take measurements of the length, width, and height of the area where the tub will be installed.
- Consider any additional space required for faucets, drains, and other fixtures.
- Take note of any obstacles, such as pipes or electrical outlets, that may affect the placement of the tub.
- If possible, create a template of the tub’s footprint using cardboard or paper to get a visual representation of how it will fit in your bathroom.
Understanding the different types of fiberglass tubs available
When it comes to fiberglass tubs, there are several types to choose from. Each type offers its own set of advantages and considerations. Here are the main types of fiberglass tubs:
| Type | Description |
|---|---|
| Alcove Tub | An alcove tub is designed to fit in a three-wall surround, making it a popular choice for smaller bathrooms. |
| Freestanding Tub | Freestanding tubs are standalone units that can be placed anywhere in the bathroom, providing a focal point and adding elegance. |
| Corner Tub | Corner tubs are designed to fit snugly into the corner of a bathroom, making them ideal for maximizing space. |
Consider the layout of your bathroom and your specific needs when choosing the type of fiberglass tub that’s right for you.
By carefully considering the factors mentioned above, measuring the space for the tub accurately, and understanding the different types available, you can confidently choose the right fiberglass tub for your bathroom renovation project.

Preparing The Bathroom For Installation
Before you can install a fiberglass tub in your bathroom, you need to prepare the area to ensure a smooth and successful installation. This involves several important steps, including the removal of the old tub (if applicable), cleaning and preparing the installation area, and ensuring proper drainage and plumbing connections.
Removal of the old tub, if applicable
If you already have an old tub that needs to be removed, this is the first step in preparing your bathroom for installation. This can be a labor-intensive task, so it’s recommended to seek professional help if you’re unsure about doing it yourself. However, if you choose to proceed on your own, here are the basic steps to follow:
- Turn off the water supply to the bathroom.
- Remove any fixtures or accessories attached to the tub, such as faucets and showerheads.
- Disconnect the drain and overflow pipes, ensuring that no water will leak during the removal process.
- With the help of a friend or family member, carefully lift and remove the old tub from its position.
Cleaning and preparing the installation area
Once the old tub is removed, it’s time to clean and prepare the installation area. This step is crucial to ensure a proper and stable placement of the new fiberglass tub. Follow these steps to clean and prepare the area:
- Thoroughly clean the bathtub space, removing any debris, dirt, or remnants from the old tub.
- Inspect the flooring and surrounding walls for any damage or mold. Address any issues before proceeding with the installation.
- If necessary, use a level to check the floor’s evenness. This is important to prevent any tilting or shifting of the new tub.
- Apply a waterproofing membrane to the installation area to provide extra protection against water damage.
Ensuring proper drainage and plumbing connections
Proper drainage and plumbing connections are vital to the functionality of your new fiberglass tub. To ensure that everything is in order, follow these steps:
- Inspect the existing drain and plumbing connections to ensure they are in good condition.
- Replace any worn-out or damaged components to prevent future leaks or issues.
- Ensure that the drain pipe is properly aligned with the new tub’s drain hole.
- Tighten all connections securely to prevent any water leakage.
- Run water through the plumbing system to check for any leaks. Make sure the water flows smoothly and drains properly.
By following these steps and adhering to proper installation practices, you can prepare your bathroom for the installation of a fiberglass tub. With the right preparation, your new tub will provide you with years of comfort and enjoyment.
Installing The Fiberglass Tub
Installing a fiberglass tub in your bathroom is a straightforward process that requires careful attention to detail. From placing the tub in the installation area to securing it in place, each step is crucial for a successful installation. In this section, we will walk you through the process of installing a fiberglass tub, ensuring a sturdy and durable result.
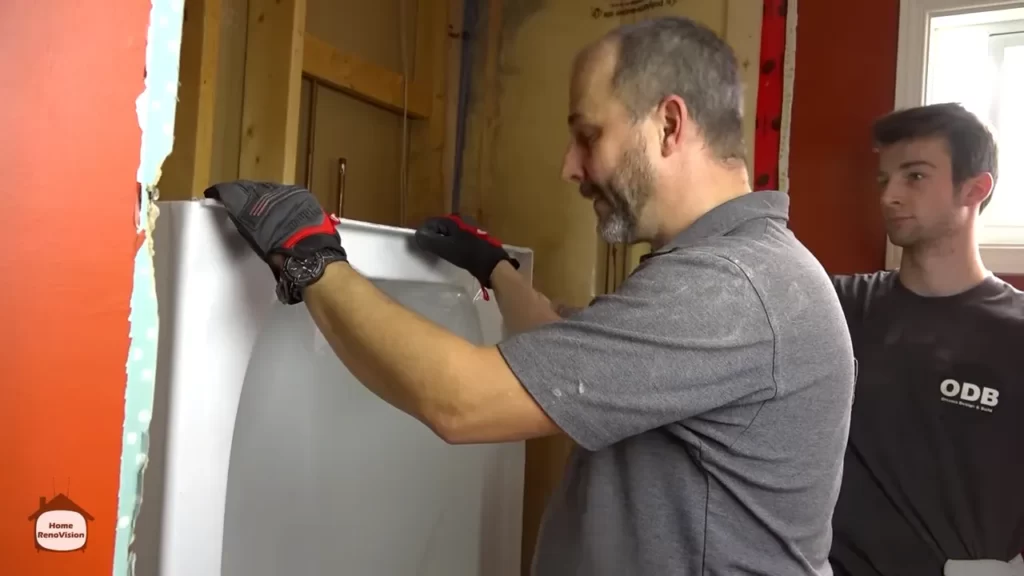
Placing the tub in the installation area
The first step in installing a fiberglass tub is to carefully place it in the designated installation area. Start by measuring the space to ensure a proper fit. Once you have confirmed the dimensions, use a level to check if the floor is even.
If the floor is not level, you may need to make adjustments by using shims or leveling compound. It is essential to have a level tub to prevent any leaks or structural issues in the future. Take your time during this step to ensure a stable foundation for your tub.
Leveling the tub and making adjustments if necessary
After placing the tub in the installation area, it is crucial to level it properly. Use a level to check if the tub is even in all directions. Adjust the leveling if necessary by adding or removing shims to ensure an even base.
Leveling the tub is critical as it prevents any rocking or movement once the tub is in use. A well-leveled tub not only ensures a comfortable bathing experience but also minimizes the risk of leaks or cracks caused by uneven weight distribution.
Securing the tub in place with support and brackets
Once the tub is leveled, the next step is to secure it in place using support and brackets. This step adds stability and ensures that the tub remains securely in place over time. Use appropriate brackets and supports that are specifically designed for fiberglass tub installations.
Attach the support and brackets to the tub following the manufacturer’s instructions. Make sure they are firmly in place for maximum security. This step is crucial in preventing any movement or shifting of the tub, especially during use.
It’s important to note that the specific instructions may vary depending on the manufacturer and model of your fiberglass tub. Therefore, always refer to the installation guide provided by the manufacturer for accurate and detailed instructions.
By following these steps, you can successfully install a fiberglass tub in your bathroom. Remember to take your time, measure accurately, and secure the tub properly for a long-lasting and hassle-free bathing experience.
Connecting The Plumbing
Connecting the plumbing is a crucial step in the installation process of a fiberglass tub. It involves attaching the drain assembly to the tub and connecting the water supply lines. This step ensures a proper flow of water and prevents any potential leaks. By following these simple instructions, you can successfully connect the plumbing of your new fiberglass tub and enjoy a fully functional and leak-free bathing experience.
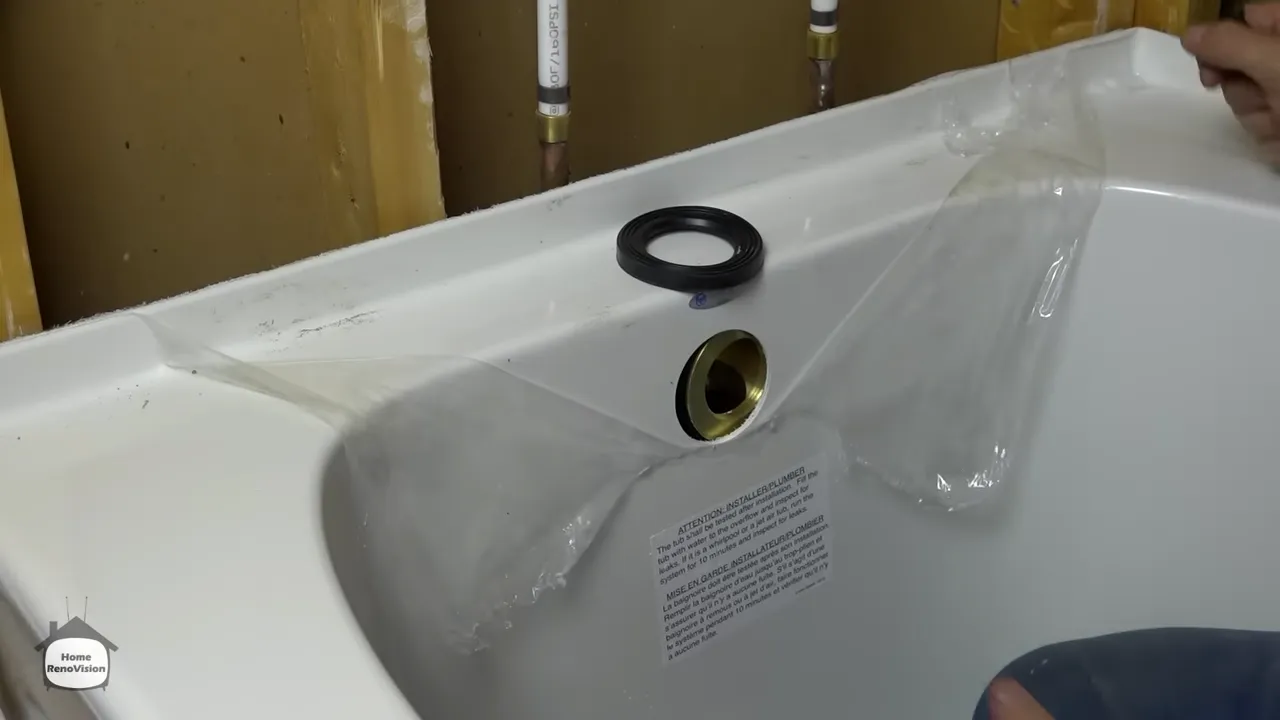
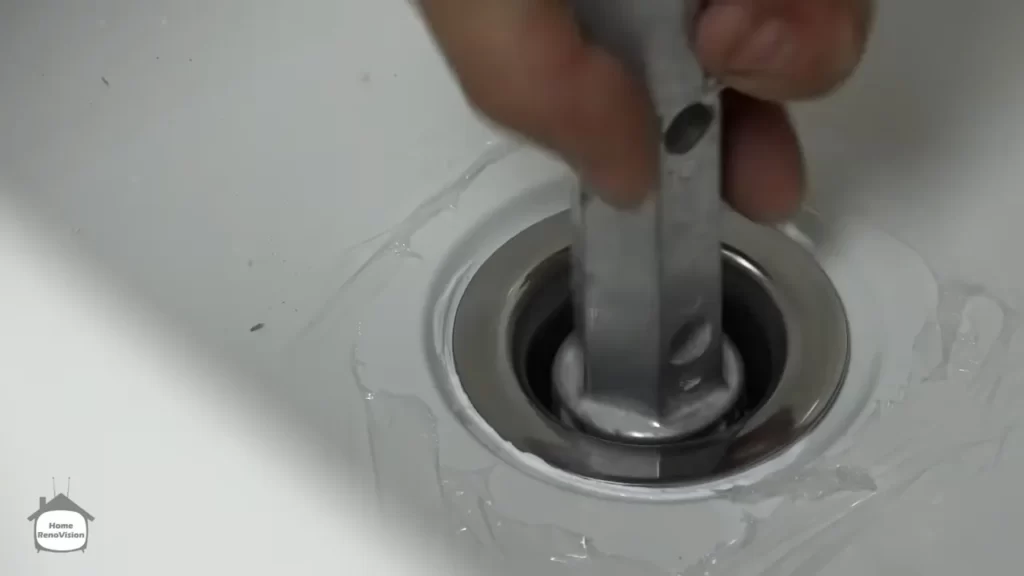
Attaching the drain assembly to the tub
Attaching the drain assembly to the tub involves a few steps to ensure a secure and watertight connection. Here’s how you can do it:
- Position the drain assembly beneath the tub’s drain hole.
- Apply plumber’s putty around the drain hole to create a watertight seal.
- Align the drain assembly with the drain hole, making sure it sits flush against the tub’s surface.
- Tighten the locknut from underneath the tub to secure the drain assembly in place.
- Wipe away any excess putty or debris.
Connecting the water supply lines to the tub
Connecting the water supply lines to the tub ensures a steady flow of water for a relaxing bathing experience. Follow these steps to connect the water supply lines:
- Locate the water supply valve and shut it off.
- Measure and cut the necessary lengths of flexible water supply lines.
- Attach one end of each supply line to the water supply valves.
- Connect the other end of the supply lines to the corresponding hot and cold water inlets on the tub.
- Tighten the connections using an adjustable wrench, making sure they are secure.
Checking for leaks and ensuring proper functionality
After connecting the plumbing, it is important to check for leaks to ensure proper functionality of the fiberglass tub. Here’s how you can do it:
- Turn on the water supply valves and let the water flow into the tub.
- Inspect all the connections for any signs of leakage.
- If you notice any leaks, tighten the connections further.
- Once you’ve confirmed that there are no leaks, test the functionality of the tub by filling it with water and draining it completely.
- Ensure that the water flow is smooth and the drain is working efficiently.
Sealing And Finishing The Installation
Applying Sealant around the Edges of the Tub
Once you have successfully installed your fiberglass tub, the next crucial step is to apply sealant around the edges of the tub. This step is essential to prevent any water leakage or damage to the surrounding walls and floor.
To begin, you will need a high-quality silicone sealant specifically designed for use in bathrooms. Make sure the area around the tub is clean and dry before you start. Using a caulking gun, carefully apply a thin and even line of sealant along the joint between the tub and the wall or floor.
Take your time during this step to ensure that the sealant is applied evenly and completely covers the joint. Smooth out the sealant using a caulking tool or your finger, removing any excess. This will help create a neat and professional finish.
Installing Any Necessary Accessories, such as a Showerhead or Faucet
With the sealant applied and dried, it’s time to turn your attention to installing any necessary accessories, such as a showerhead or faucet. This step may vary depending on the specific accessories you have chosen, so it’s important to carefully follow the manufacturer’s instructions.
Before beginning the installation, gather all the necessary tools and equipment, including a wrench, pliers, and Teflon tape. Start by properly attaching the water supply lines to the showerhead or faucet, ensuring tight connections by using the appropriate tools.
If the accessory requires a separate mounting bracket, carefully mount it onto the wall or tub using screws and anchors. Make sure it is securely fastened and level. Finally, connect the showerhead or faucet to the water supply lines, ensuring that all connections are watertight.
Cleaning Up the Installation Area and Checking for Any Remaining Issues
With the sealant applied and accessories installed, it’s time to clean up the installation area and check for any remaining issues to ensure a flawless finish. Start by carefully removing any excess sealant or residue from the tub surface, using a damp cloth or sponge.
Next, check the joint where the tub meets the wall or floor for any gaps or areas that may require additional sealant. If necessary, apply a small amount of sealant to ensure a watertight seal.
Finally, check all the connections and fittings to ensure there are no leaks. Test the water flow from the showerhead or faucet and inspect for any signs of water escaping or dripping. If any issues are detected, take the necessary steps to address and resolve them before considering the installation complete.
Frequently Asked Questions
Do You Screw A Fiberglass Tub To The Wall?
Yes, you can screw a fiberglass tub to the wall for added stability and support.
Do You Screw Tub To Studs?
Yes, we screw tubs to studs for secure installation.
What Do You Put Under A Bathtub For Support?
For support, you can place a mortar bed or a foam base under a bathtub. These provide stability and prevent cracking or sagging.
Do You Have To Set A Tub In Mortar?
Yes, you should set a tub in mortar. By using mortar, you provide a solid and stable base for the tub, ensuring proper support and preventing damage. It also helps to prevent leaks and provides a level surface for installation.
Setting a tub in mortar is recommended for a secure and long-lasting installation.
Conclusion
Installing a fiberglass tub can be a straightforward and rewarding project. By following the steps outlined in this blog post, you can achieve a professional-looking installation. Remember to prepare the area, carefully measure and level the tub, and secure it properly.
With the right tools and a systematic approach, you can enjoy a beautiful and durable fiberglass tub in your bathroom.