
To install a dual flush toilet, follow these steps: Shut off the water supply, remove the old toilet, install the new toilet bowl and tank, connect the water supply, and adjust the flush settings according to the manufacturer’s instructions. Dual flush toilets are becoming increasingly popular due to their water-saving benefits and efficient flushing capabilities.
Whether you are replacing your old toilet or installing a new one, the process can be straightforward if you follow the right steps. In this guide, we will outline the necessary steps to help you install a dual flush toilet easily and efficiently.
By the end of this article, you will have a clear understanding of how to install a dual flush toilet and enjoy its many advantages.
Choosing The Right Dual Flush Toilet
When it comes to saving water and reducing your carbon footprint, installing a dual flush toilet is a smart choice. These innovative toilets provide two flushing options – a partial flush for liquid waste and a full flush for solid waste. Not only do they help conserve water, but they can also save you money on your water bill. However, with so many options available in the market, it’s important to consider a few factors when selecting the right dual flush toilet for your bathroom.
Factors to consider when selecting a dual flush toilet
Bowl Shape: Dual flush toilets come in different bowl shapes, including elongated and round. The elongated bowl shape offers more comfort, especially for adults, while the round bowl is more suitable for small bathrooms with limited space.
Flush Performance: Look for a dual flush toilet that offers powerful flushing performance. This ensures that both the liquid and solid waste are effectively removed with each flush, minimizing the chances of clogs or multiple flushes. Check customer reviews or ask for recommendations to gauge the flush efficiency of the toilet you are considering.
Water Efficiency: One of the main reasons for opting for a dual flush toilet is to save water. Therefore, it is crucial to choose a toilet that meets the Environmental Protection Agency’s (EPA) WaterSense certification. This certification guarantees that the toilet uses no more than 1.28 gallons of water per flush, which is significantly less than older models.
Size and Space: Measure the available space in your bathroom before purchasing a dual flush toilet. Consider the rough-in measurement, which refers to the distance from the wall to the center of the drainpipe. This measurement varies in different bathrooms, typically ranging from 10 to 14 inches. Ensuring the toilet’s rough-in size matches the existing plumbing will save you from any costly modifications.
Design and Style: Besides functionality, the design and style of your dual flush toilet also matter. Choose a toilet that aligns with your bathroom’s aesthetics. Whether you prefer a sleek modern look or a classic design, there are plenty of options to complement your bathroom decor.
Installation: Make sure to consider the ease of installation when selecting a dual flush toilet. Some models may require professional installation, while others come with detailed instructions for a DIY installation. Additionally, consider if the toilet comes with all the necessary parts and accessories, such as a wax ring and bolts.
Understanding the water-saving benefits of a dual flush toilet
Installing a dual flush toilet not only helps conserve water but also reduces your water bill. Traditional toilets use around 1.6 gallons of water per flush, which can add up to thousands of gallons of water every year. In contrast, a dual flush toilet’s partial flush option uses only around 0.8 gallons for liquid waste, resulting in significant water savings. The full flush option, typically using 1.6 gallons, is still more water-efficient than older toilets.
This water-saving aspect of dual flush toilets is important for both environmental and economic reasons. By conserving water, you contribute to the overall sustainability of our planet. Moreover, with reduced water usage, you can expect to see a noticeable decrease in your monthly water bill. So, installing a dual flush toilet is not only a responsible choice but also a cost-effective one in the long run.
Gathering The Necessary Tools And Materials
Installing a dual flush toilet can be a cost-effective and eco-friendly upgrade for your bathroom. However, before you dive into the installation process, it is crucial to gather all the necessary tools and materials. This will help ensure a smooth and successful installation. In this section, we will discuss the essential tools and materials you will need to install a dual flush toilet.
Essential tools for installing a dual flush toilet
Before you begin the installation, make sure you have the following tools on hand:
- Adjustable wrench
- Hacksaw
- Screwdriver (both flathead and Phillips)
- Teflon tape
- Plunger
- Bucket
- Level
- Plumbers’ putty
These tools will enable you to tackle any challenges that may arise during the installation process. Having them readily available can save you time and frustration.
Materials required for a successful installation
In addition to the tools, you will also need the following materials:
| Materials | Quantity |
|---|---|
| Dual flush toilet kit | 1 |
| Wax ring | 1 |
| Water supply line | 1 |
| Flush valve gasket | 1 |
| Tank bolts and washers | 2 sets |
It’s important to ensure that you have all the necessary materials in the correct quantities to complete the installation. The dual flush toilet kit contains the necessary components for the toilet itself, while the other materials, such as the wax ring and water supply line, are essential for connecting the toilet to the plumbing system.
By gathering the essential tools and materials beforehand, you’ll be well-prepared to embark on the installation process. This proactive approach can help you save time and complete the installation successfully, resulting in a fully functional dual flush toilet.
Removing The Old Toilet
Step-by-step guide to removing an old toilet
Removing an old toilet may seem like a daunting task, but with the right tools and step-by-step guide, you can handle it easily. Whether you’re upgrading to a more efficient dual flush toilet or simply replacing a worn-out fixture, here’s how you can remove the old toilet swiftly:
- Turn off the water supply: The first step in removing an old toilet is to shut off the water supply. Locate the shut-off valve, typically positioned behind the toilet on the wall. Rotate the valve clockwise until it’s fully closed. This will prevent any accidental leaks when detaching the water supply line.
- Drain the tank: Before you can remove the toilet, you need to empty the tank. To do this, locate the toilet handle and flush it. Keep the handle down to drain the tank completely. You can also use a sponge or towels to soak up any remaining water.
- Disconnect the water supply: Use an adjustable wrench to loosen the nut connecting the water supply line to the bottom of the toilet tank. Once loose, carefully unscrew it by hand. Place a small container beneath the valve to catch any drips.
- Remove the nuts: Using a wrench, loosen and remove the nuts securing the toilet to the floor bolts. There are usually two nuts, one on each side of the toilet base. Keep one hand on the toilet as you do this, as it may shift or become unbalanced.
- Lift and remove the toilet: With the nuts removed, it’s time to remove the toilet. Place your hands on both sides of the toilet bowl and gently lift it straight up. Be cautious as toilets can be heavy, so it’s better to have a second person for assistance. Once lifted, move the toilet carefully to a safe area away from the bathroom.
Tips for ensuring a smooth and clean removal process:
- Use gloves and protective gear: It’s always a good idea to wear gloves when handling an old toilet. Additionally, wearing protective eyewear and clothing can protect you from any debris or bacteria.
- Clear the area: Before you start removing the toilet, clear the surrounding area of any rugs, bathroom accessories, or other obstacles. This will provide you with more space and reduce the risk of accidents or damage.
- Inspect the floor bolts: Take a moment to inspect the floor bolts that held the old toilet in place. If they are rusted or damaged, it’s advisable to replace them before installing the new toilet. This will ensure a secure and long-lasting installation.
- Seal the drainpipe: Once the old toilet is removed, it’s vital to seal the open drainpipe to prevent any unpleasant odors or sewer gases from entering your bathroom. A temporary plug or rag can be used until the new toilet is ready for installation.
- Proper disposal: When it comes to disposing of the old toilet, check your local regulations. Some waste management facilities accept old toilets, while others may require you to make arrangements for disposal. Follow the proper disposal guidelines to protect the environment and comply with local laws.
With these step-by-step instructions and helpful tips, you’re now equipped to tackle the task of removing an old toilet. Take your time, follow the steps carefully, and soon enough, you’ll have a clean slate to install your new dual flush toilet.
Preparing The Installation Area
Before you begin the installation of your dual flush toilet, it’s essential to prepare the installation area properly. This will help ensure a smooth and successful installation process. In this section, we will cover two crucial steps to help you prepare the installation area: ensuring the floor and subfloor are in good condition and measuring and marking the placement of the new toilet.
Ensuring the floor and subfloor are in good condition
Before installing your new dual flush toilet, it’s crucial to check the condition of your floor and subfloor. This step is essential to prevent any issues that may arise from a weak or damaged base. Here’s a simple step-by-step guide to ensure your floor and subfloor are in good condition:
- Check for any visible signs of damage: Inspect your floor for any cracks, water damage, or other visible signs of wear and tear. If you notice any issues, it’s important to address them before proceeding with the installation.
- Ensure the floor is level: Place a leveling tool, such as a spirit level, on various spots of the floor to ensure it is level. If you find any uneven areas, you may need to make adjustments to ensure a stable installation.
- Inspect the subfloor: If possible, access the area beneath the floor to examine the subfloor for any signs of water damage, rot, or structural issues. If you notice any problems, it’s crucial to fix them before installing your new dual flush toilet.
Measuring and marking the placement of the new toilet
Accurate measurement and marking of the placement of your new dual flush toilet is essential to ensure proper alignment and functionality. Follow these simple steps to measure and mark the placement:
- Measure the distance between the wall and the toilet flange: Use a measuring tape to determine the distance between the wall and the center of the toilet flange. This measurement will help you ensure the toilet sits in the correct position.
- Mark the centerline of the toilet: Use a pencil or marker to mark the centerline of the toilet based on the measurement you took in the previous step. This will provide a visual guide for aligning the toilet during installation.
- Measure the rough-in distance: The rough-in distance refers to the distance between the toilet flange and the finished wall. Measure this distance to ensure the toilet fits properly in the available space.
- Mark the rough-in distance: Use the measurement you took in the previous step to mark the rough-in distance on the floor. This mark will guide the placement of the toilet flange.
By ensuring the floor and subfloor are in good condition and accurately measuring and marking the placement of your new toilet, you are laying the foundation for a successful installation. Taking these steps will help ensure a sturdy and functional dual flush toilet that will save water and enhance your bathroom experience.
Installing The Dual Flush Toilet
Installing a dual flush toilet can be an excellent way to conserve water and reduce your household utility bills. With its ability to provide two flushing options, the dual flush toilet allows you to choose between a lighter flush for liquid waste and a heavier flush for solid waste. If you are ready to make the switch to a dual flush toilet, follow these simple steps to ensure a successful installation.
Connecting the water supply line
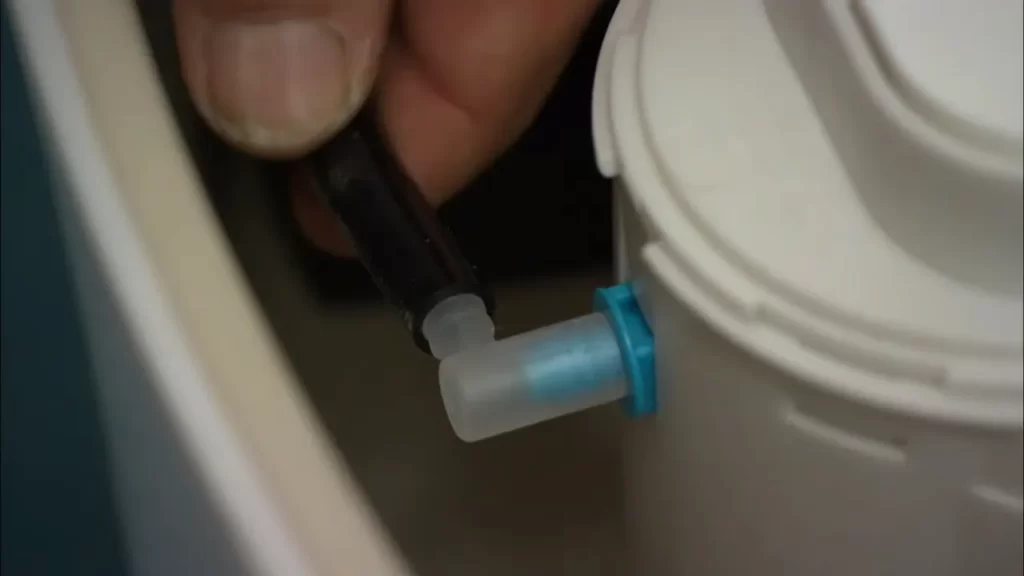
The first step in the installation process is to connect the water supply line. This can usually be found near the bottom of the toilet tank. Begin by turning off the water supply using the shut-off valve. Once the water is turned off, take the flexible water supply line and attach it to the toilet tank. Make sure to use a wrench to tighten the connection securely. Remember to check for any leaks by turning the water supply back on momentarily and inspecting for any drips or moisture around the connection.
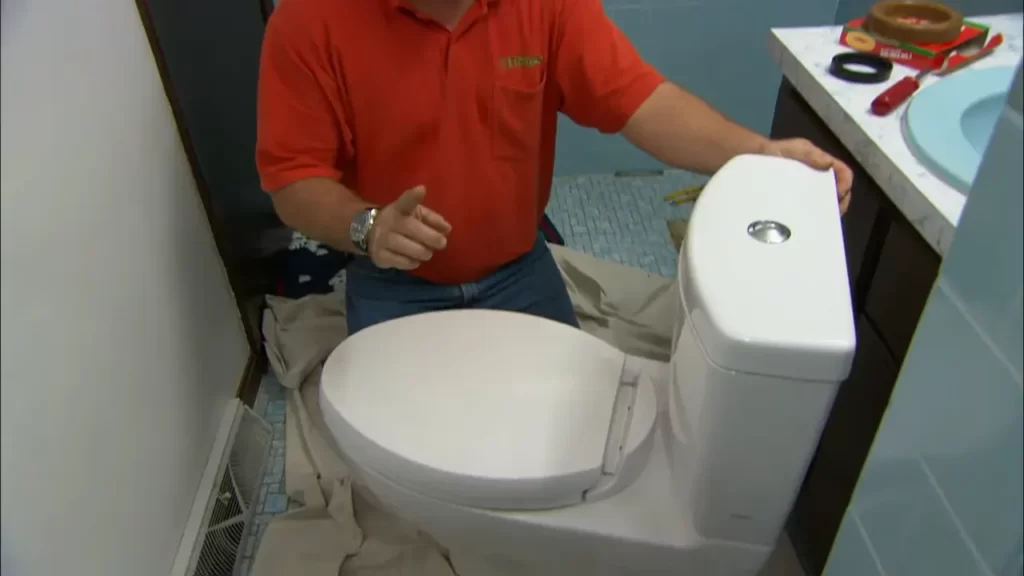
Attaching the toilet tank and bowl
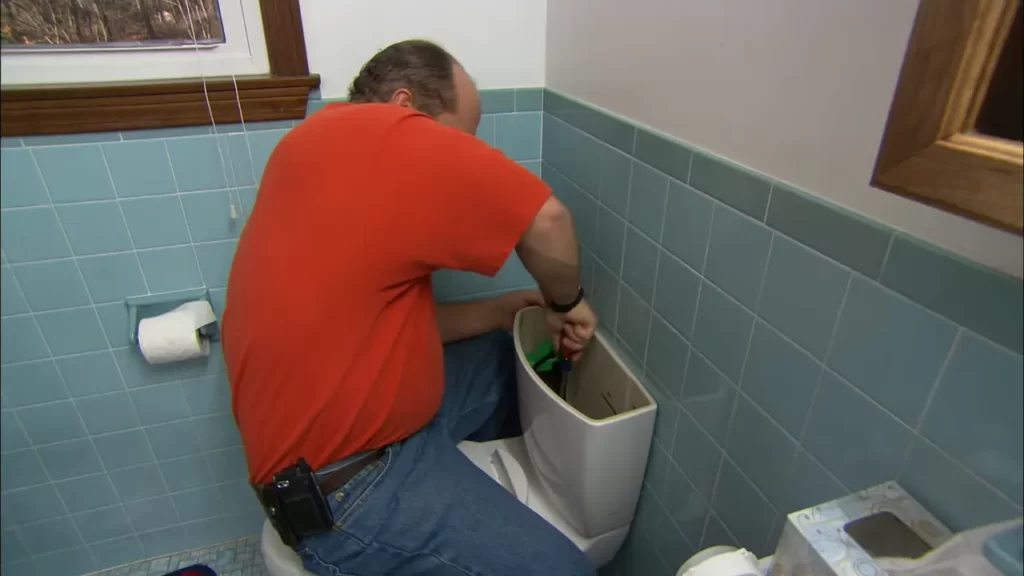
After successfully connecting the water supply line, it’s time to attach the toilet tank and bowl. Start by placing the rubber gasket on the bottom of the tank. Align the tank with the bowl, ensuring that the mounting holes on both pieces line up. Once aligned, insert the bolts through the mounting holes and tighten the nuts by hand. Use an adjustable wrench to secure the nuts further without overtightening, as this could cause damage to the porcelain. Finally, attach the flush valve and fill valve to the tank according to the manufacturer’s instructions.
Securing The Toilet In Place
Properly securing the toilet is crucial to prevent leaks and ensure a sturdy installation. Here are two key steps to follow during this process: properly tightening the bolts to prevent leaks and adjusting the positioning of the toilet for comfort.
Properly tightening the bolts to prevent leaks
One of the most common reasons for toilet leaks is loose bolts. To prevent this, it is essential to tighten the bolts correctly during the installation process. Follow these steps to ensure a tight and leak-free connection:
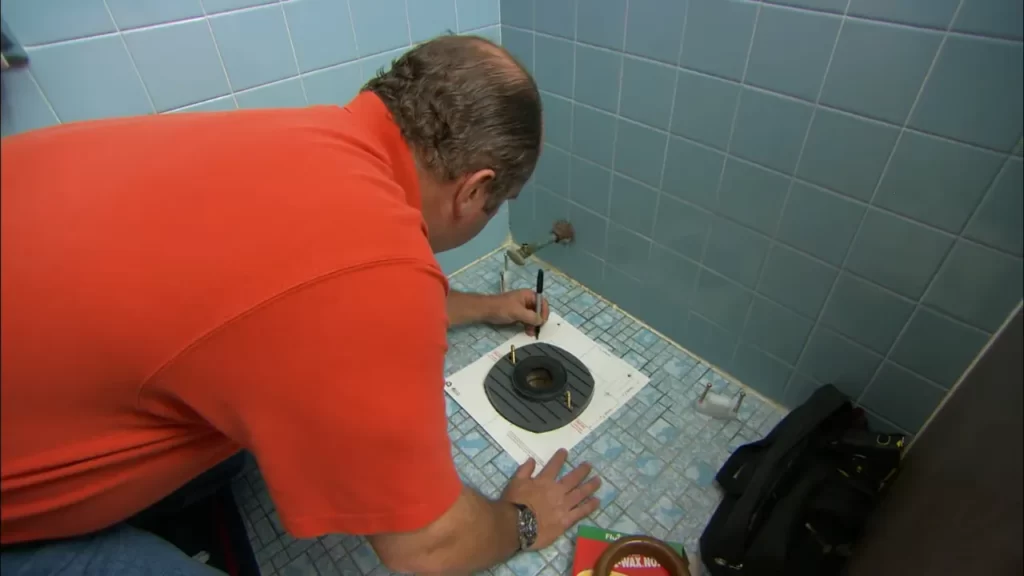
- Position the toilet: Carefully position the toilet bowl over the wax ring, ensuring it lines up with the bolts on the floor flange.
- Insert the bolts: Place the bolts through the holes in the base of the toilet bowl and thread them into the floor flange.
- Tighten the nuts: Using an adjustable wrench, tighten the nuts on the bolts just enough to secure the toilet in place. Be careful not to overtighten, as this can crack the porcelain.
- Check for stability: Gently rock the toilet from side to side to ensure it feels stable. If it wobbles, tighten the nuts a bit more until it feels securely in place. Avoid overtightening to prevent damage to the toilet or the wax ring.
Adjusting the positioning of the toilet for comfort
Once the toilet is secured, it’s important to adjust its position to ensure maximum comfort during use. Follow these steps to find the ideal position:
- Sit on the toilet: Sit on the toilet to get a feel for its positioning. Take note of any discomfort or awkwardness.
- Make adjustments: If necessary, slightly shift the toilet’s position to improve comfort. You can do this by loosening the nuts and repositioning the toilet slightly. Retighten the nuts once you have found the optimal position.
- Consider accessibility: Keep in mind any specific accessibility needs you or others using the toilet may have. Ensure there is enough space around the toilet for easy access and maneuverability.
By properly securing the toilet and adjusting its position, you can ensure a leak-free installation and optimal comfort during use. Following these steps will help you achieve a successful dual flush toilet installation.
Testing And Troubleshooting
After successfully installing your new dual flush toilet, it’s important to thoroughly test it for leaks and proper flushing. This will ensure that everything is working as it should, and any issues can be identified and resolved promptly. In this section, we will guide you on how to test for leaks and proper flushing and provide common issues and solutions for a dual flush toilet.
How to test for leaks and proper flushing
Testing for leaks is an essential step to avoid any water wastage and prevent potential damage to your bathroom. Follow these steps to test your dual flush toilet for leaks:
- Remove the tank lid and place it in a safe location.
- Make sure the toilet bowl is empty.
- Add a few drops of food coloring or a leak detection dye tablet into the tank.
- Wait for about 15 minutes without flushing the toilet.
- Inspect the toilet bowl. If you notice any colored water seeping into the bowl, you have a leak.
- If there is a leak, check the toilet tank components, such as the flush valve and flapper, for any defects or misalignments.
- Adjust or replace any faulty components to fix the leak.
Once you have ensured that your dual flush toilet is leak-free, it’s time to test its flushing mechanism. Follow these steps to ensure proper flushing:
- Flush the toilet with the full flush mode, which is typically represented by a larger button or lever.
- Observe the flow of water into the bowl. It should be strong and consistent.
- If the flush is weak or incomplete, there may be an issue with the water supply or the flush valve.
- Check the water supply valve to ensure it is fully open and that the toilet is receiving sufficient water pressure.
- If the issue persists, inspect the flush valve and flapper for any blockages or defects.
- Clean or replace any faulty components to restore proper flushing performance.
Common issues and solutions for a dual flush toilet
While dual flush toilets are generally reliable and efficient, they can encounter a few common issues. Here are some of the most frequently encountered problems and their solutions:
| Issue | Solution |
|---|---|
| The toilet won’t flush or water drains slowly | Check for clogs in the waste pipe using a plunger or a plumbing snake. If necessary, use a chemical drain cleaner or call a professional plumber. |
| Water continues to run after flushing | Inspect the flush valve and flapper for proper alignment or potential damage. Adjust or replace the faulty components as needed. |
| The flush buttons or levers are not responding | Ensure that the buttons or levers are securely connected to the flushing mechanism. If necessary, tighten or adjust the connections. |
| Noisy filling or flushing | Check the water pressure and adjust it if necessary. Additionally, inspect the fill valve for any obstructions or defects and replace it if needed. |
By following these testing and troubleshooting steps, you can ensure that your dual flush toilet operates efficiently and remains free from any common issues. Regular maintenance and prompt repairs will help keep your bathroom fixtures in top condition.
Maintaining Your Dual Flush Toilet
Proper maintenance is essential to ensure that your dual flush toilet continues to function efficiently. By regularly cleaning and disinfecting the toilet, you can keep it looking spotless and eliminate any potential odors. Additionally, following some simple tips for preventing clogs and maintaining optimal performance can help extend the life of your toilet.
Cleaning and Disinfecting the Toilet Regularly
To keep your dual flush toilet in top condition, regular cleaning and disinfecting are crucial. Here are some steps to follow:
- Start by wearing gloves and gathering the necessary cleaning supplies, such as a toilet brush, disinfecting cleaner, and paper towels.
- First, flush the toilet to moisten the bowl and make it easier to clean.
- Apply the disinfecting cleaner to the inside of the bowl, focusing on the rim, under the rim, and the inside walls of the bowl.
- Using the toilet brush, scrub the bowl thoroughly, paying special attention to any stains or residue.
- Once you have thoroughly cleaned the bowl, flush again to rinse away any remaining cleaner.
- To clean the exterior of the toilet, use a clean cloth or paper towel dampened with disinfecting cleaner. Wipe down the tank, lid, and seat.
- Finally, dispose of the gloves and wash your hands thoroughly.
Regular cleaning and disinfecting not only keep your dual flush toilet looking fresh, but it also helps maintain proper hygiene in your bathroom.
Tips for Preventing Clogs and Maintaining Optimal Performance
To prevent clogs and maintain optimal performance of your dual flush toilet, consider the following tips:
- Use toilet paper that is designed to dissolve easily in water to reduce the risk of clogs.
- Avoid flushing large amounts of toilet paper or other non-flushable items down the toilet.
- Encourage everyone in your household to flush only when necessary to prevent overflow.
- Periodically check the water level in the tank to ensure it is neither too high nor too low. Adjust if necessary.
- If you notice any leaks or signs of damage, have them repaired promptly to prevent further issues.
- Consider using a toilet bowl cleaner specifically formulated for dual flush toilets to reduce buildup and maintain performance.
By following these simple tips, you can keep your dual flush toilet free from clogs and functioning optimally for years to come.
Frequently Asked Questions
Are Dual Flush Toilets Harder To Install?
Installing a dual flush toilet is not harder than installing a regular toilet. Just follow the manufacturer’s instructions and use basic plumbing tools.
How Do You Install A Dual Flush Toilet Mechanism?
To install a dual flush toilet mechanism, follow these steps: 1. Turn off the water supply. 2. Remove the old flush mechanism. 3. Install the new dual flush mechanism, following the manufacturer’s instructions. 4. Connect the water supply line to the new mechanism.
5. Turn on the water supply and test the toilet’s flushing capabilities.
Can You Convert A Single Flush Toilet To A Dual Flush?
Yes, you can convert a single flush toilet to a dual flush. This allows you to choose between a full flush for solid waste and a half flush for liquid waste, saving water in the process. It’s an eco-friendly and cost-effective option for reducing water usage.
What Are The Pros And Cons Of A Dual Flush Toilet?
Dual flush toilets provide two options for flushing, allowing you to conserve water. The half-flush option is ideal for liquid waste, while the full-flush option handles solid waste efficiently. This reduces water usage, saving money and benefiting the environment. However, dual flush toilets can be more expensive to install and may require occasional maintenance.
Conclusion
Installing a dual flush toilet is a practical and eco-friendly solution for reducing water consumption in your home. By following the step-by-step guide provided in this blog post, you can easily upgrade your bathroom fixtures and contribute to a more sustainable future.
With the potential for significant water savings and improved functionality, it’s a worthwhile investment that benefits both your wallet and the environment. Take the plunge and make the switch today!