
To install a drop-in tub in an alcove, measure the space, remove any existing fixtures, position the tub, connect the drain and water supply, and securely attach the tub to the wall. Are you looking to enhance your bathroom with a drop-in tub?
Installing a drop-in tub in an alcove can be a straightforward process if you follow the right steps. In this guide, we will take you through the process of installing a drop-in tub in an alcove, from measuring the space to connecting the drain and water supply.
By the end, you’ll have the knowledge and confidence to embark on this DIY project and enjoy a luxurious bathing experience in your own home. So let’s jump right in and get started!
Planning And Preparation
Before beginning the installation of a drop-in tub in an alcove, it is important to carefully plan and prepare. This will ensure that the process goes smoothly and the end result is a functional and visually appealing addition to your bathroom.
Firstly, it is crucial to research and gather information about the different types of drop-in tubs available on the market. There are various options, each with its own unique features and dimensions. Some popular types include acrylic, cast iron, and fiberglass drop-in tubs.
Take the time to explore the pros and cons of each type, as well as their aesthetic and functional qualities. This will enable you to make an informed decision that aligns with your preferences and the overall design of your bathroom.
Accurate measurements of the alcove where the drop-in tub will be installed are essential for ensuring a proper fit. Use a tape measure to measure the length, width, and height of the alcove. This will give you the necessary dimensions for selecting a tub that fits perfectly.
Take note of any obstructions such as pipes or electrical outlets that may affect the placement of the tub. It is important to make allowances for these and ensure that they will not interfere with the installation process.
Another crucial step in the planning and preparation stage is to determine the plumbing and electrical requirements for the installation of the drop-in tub. This will help avoid any surprises or delays during the installation process.
Consult a professional plumber and electrician who can provide guidance on the specific requirements for your chosen tub and alcove. They can help with identifying the necessary connections and ensuring that the plumbing and electrical systems are compatible and up to code.
By thoroughly researching the different types of drop-in tubs, measuring the alcove accurately, and determining the plumbing and electrical requirements, you are setting the foundation for a successful and hassle-free installation. Proper planning and preparation will save you time, effort, and potential headaches down the line, allowing you to enjoy your new drop-in tub in your alcove in no time.
Researching The Different Types Of Drop-In Tubs
Before embarking on the exciting process of installing a drop-in tub in your alcove, it’s essential to research the different types of drop-in tubs available in the market. This research will not only ensure that you make an informed decision but also help you find the perfect drop-in tub that meets your specific needs and preferences.
Exploring Different Materials and Styles
One of the first factors to consider when researching drop-in tubs is the material and style. Drop-in tubs come in a variety of materials, each with its unique benefits and visual appeal. Some popular materials include:
- Acrylic: Acrylic drop-in tubs are lightweight, durable, and offer excellent heat retention, making them a popular choice among homeowners. They are also available in a range of colors and finishes, allowing you to find the perfect match for your bathroom decor.
- Cast Iron: Known for their timeless elegance and durability, cast iron drop-in tubs are a classic choice. They are exceptionally sturdy and retain heat well, providing a luxurious bathing experience. However, they are heavier and may require additional support during installation.
- Fiberglass: Fiberglass drop-in tubs are affordable and easy to maintain. They are also lightweight and suitable for installations in areas with limited structural support. However, they may not offer the same level of durability as other materials.
- Composite: Composite materials, such as cultured marble or granite, can add a touch of luxury to your bathroom. They are durable, resistant to stains and scratches, and offer a wide range of color options.
When exploring different materials, also consider the style of the drop-in tub. From sleek and modern designs to traditional and vintage-inspired options, there is a style to suit every bathroom aesthetic.
Considering the Size and Depth Options
Another crucial aspect to research when choosing a drop-in tub is the size and depth options available. Drop-in tubs come in various sizes, allowing you to find one that fits perfectly within your alcove space. Measure your alcove accurately, considering any obstructions or additional features like windows or alcove shelving.
Additionally, think about the depth of the tub. Deeper tubs provide a more immersive bathing experience, allowing you to enjoy a relaxing soak. Consider your personal preferences and the needs of your household when deciding on the depth of your drop-in tub.
| Size | Dimensions (Length x Width) |
|---|---|
| Small | 60″ x 32″ |
| Medium | 66″ x 32″ |
| Large | 72″ x 36″ |
Remember that it’s essential to select a drop-in tub that fits comfortably within your alcove without compromising on accessibility or functionality.
In conclusion, thorough research into the different types of drop-in tubs is crucial to finding the perfect addition to your bathroom. By exploring different materials and styles, as well as considering the size and depth options, you will be able to make an informed decision that suits your unique needs and enhances the overall aesthetic of your bathroom.

Measuring The Alcove For Proper Fit
Before you start installing a drop-in tub in your alcove, it’s crucial to measure the space accurately to ensure a proper fit. Taking precise measurements will save you time and effort in the long run, as it ensures that the tub fits snugly and securely in the alcove. In this section, we will take you through the step-by-step process of measuring the length, width, and height of the alcove, as well as checking for any obstructions or hindrances that might impact the installation.
Measuring the Length, Width, and Height of the Alcove
When it comes to measuring the alcove, accuracy is key. Start by measuring the length of the alcove, using a measuring tape to determine the distance between the two walls. Be sure to measure from the back wall to the front edge of the alcove. Write down this measurement so that you can refer to it later.
Next, measure the width of the alcove. Extend the measuring tape from one side wall to the other, ensuring that it is parallel to the back wall. Again, write down this measurement for future reference.
Now, it’s time to measure the height of the alcove. Place the measuring tape vertically against the back wall, starting from the base to the top. This will give you an accurate height measurement. Note this down as well.
Checking for Any Obstructions or Hindrances
Before proceeding with the installation, it’s important to identify any potential obstructions or hindrances that might interfere with the installation process. Inspect the alcove carefully for any pipes, electrical outlets, or any other obstacles that could obstruct the tub from fitting correctly.
Additionally, check for any uneven or sloping surfaces within the alcove, as this might affect the stability of the tub. If you notice any irregularities, it’s recommended to level the floor or make necessary adjustments before proceeding with the installation.
By taking precise measurements and identifying any potential obstructions, you can ensure a seamless installation of your drop-in tub in the alcove. Now that you have measured the length, width, and height of the alcove, as well as checked for any obstacles, you are ready to move on to the next step in the installation process.
Determining Plumbing And Electrical Requirements
Installing a drop-in tub in an alcove requires careful planning and consideration of the plumbing and electrical requirements. Before starting the installation process, it is crucial to assess the existing plumbing and electrical connections to ensure they are compatible with your new tub. This will help you determine if any modifications or installations are necessary. In this section, we will discuss how to assess your existing plumbing and electrical connections and understand the necessary modifications and installations.
Assessing Existing Plumbing and Electrical Connections
One of the first steps in determining the plumbing and electrical requirements for installing a drop-in tub in an alcove is to assess your existing connections. Follow these steps to evaluate your current setup:
- Locate the main water supply and shut-off valve. It is important to know the location of the shut-off valve in case of emergencies or repairs.
- Inspect the drain and make note of its location. Ensure that it aligns with the drain opening of the new tub.
- Examine the hot and cold water supply lines. Determine if they are accessible and if they require any modifications.
- Check the electrical outlet or circuit breaker that powers the existing bathtub. Make sure it can handle the electrical requirements of the new tub.
By assessing your existing plumbing and electrical connections, you will have a clear understanding of what needs to be modified or installed for the successful installation of your drop-in tub.
Understanding Necessary Modifications and Installations
Once you have assessed your existing plumbing and electrical connections, you can determine the necessary modifications and installations. Here are some considerations to keep in mind:
- If your existing drain does not align with the drain opening of the new tub, you may need to adjust the drain location. This can involve relocating the drain or using an extension kit to ensure a proper fit.
- If your current hot and cold water supply lines are not accessible or do not reach the desired location of the new tub, you may need to extend or reroute the pipes.
- If the electrical outlet or circuit breaker does not meet the electrical requirements of the new tub, it may be necessary to upgrade the electrical wiring or consult a professional electrician to ensure proper installation.
Understanding and addressing these necessary modifications and installations will help prevent potential issues and ensure a smooth installation process.
In conclusion, determining the plumbing and electrical requirements for installing a drop-in tub in an alcove is essential for a successful installation. By assessing your existing connections and understanding the necessary modifications and installations, you can make the necessary adjustments and ensure a seamless integration of your new tub into your bathroom space.
Gathering Materials And Tools
Gathering the necessary materials and tools is the first step towards installing a drop-in tub in an alcove. It’s essential to gather everything you need before starting the installation process to ensure a smooth and efficient project. In this section, we will discuss the materials and tools you’ll need and the safety precautions you should take.
Before you begin, make sure you have the following materials and tools:
Materials:
- A drop-in tub
- Plywood or cement board for reinforcement
- Bathtub surround or tile for finishing
- Caulk and adhesive
- Plumbing materials such as pipes, fittings, and valves
- Waterproofing membrane or sheeting
- Waterproofing compound or sealant
- Electrical supplies (if needed)
Tools:
- Tape measure
- Pencil or marker
- Level
- Power drill
- Screwdriver
- Adjustable wrench
- Utility knife
- Tile cutter (if using tile)
- Notched trowel
- Bucket and mixing paddle
- Grout float
Prior to starting the installation, it’s crucial to take certain safety precautions:
- Wear appropriate safety gear, including gloves, goggles, and a dust mask, especially when working with adhesives, sealants, and construction materials.
- Turn off the main water supply before beginning any plumbing work to avoid accidents or water damage.
- If you need to work with electrical connections, ensure the power is turned off at the circuit breaker and use appropriate caution when handling electrical components.
- Read and follow all manufacturer’s instructions for the materials and tools you are using.
- Keep the work area well-ventilated to minimize exposure to fumes and ensure proper air circulation.
By gathering all the necessary materials and tools and taking the necessary safety precautions, you’ll be well-prepared to install a drop-in tub in an alcove.
Compiling The Necessary Materials And Tools
When it comes to installing a drop-in tub in an alcove, it is important to have all the necessary materials and tools ready beforehand. Compiling the necessary materials and tools ensures a smooth installation process and saves time and effort. In this section, we will go over the list of materials required as well as the tools needed for the installation process.
List of Materials Required
Before beginning the installation, it is crucial to gather all the required materials. Here is a list of materials you will need:
| Materials | Quantity |
|---|---|
| Drop-in tub | 1 |
| Alcove framing | As required |
| Mortar or cement | As required |
| Plumbing hardware | As required |
| Waterproofing membrane | As required |
| Tile and grout | As required |
| Silicone caulk | As required |
Tools Needed for the Installation Process
In addition to the materials, you will also need specific tools to carry out the installation. Here are the tools you should have:
- Measuring tape
- Level
- Power drill
- Screwdriver set
- Trowel or putty knife
- Tile saw
- Grout float
- Plumbing wrench
Having these tools on hand will ensure that you have everything you need to successfully install a drop-in tub in an alcove. It is important to double-check the list of materials and tools to ensure that you have everything before starting the installation process. With the necessary materials and tools ready, you can proceed to the next steps of the installation process with confidence.
Ensuring Safety Precautions
When it comes to installing a drop-in tub in an alcove, taking safety precautions is of utmost importance. Not only does it ensure your own safety, but it also protects the tub from any damage during the installation process. In this section, we will discuss two crucial safety aspects to consider: following electrical safety guidelines and taking necessary precautions to protect the tub and yourself.
Following Electrical Safety Guidelines
When dealing with any electrical connections during the installation of a drop-in tub, it is crucial to adhere to the necessary safety guidelines. Failure to do so can result in serious injuries or damage to your home’s electrical system. Here are some key points to keep in mind:
- Before starting the installation process, make sure to turn off the power supply to the bathroom or the specific circuit you are working on. This can be done by flipping off the corresponding circuit breaker in your electrical panel.
- Always use a reliable voltage tester to double-check that the power is indeed turned off before proceeding with any electrical work. This simple step can prevent any accidental electric shocks.
- Ensure that all electrical connections are securely insulated and protected from moisture. This includes waterproofing any exposed wiring or junction boxes near the tub.
- If you are unsure about any electrical aspects of the installation, it is highly recommended to consult a licensed electrician to ensure everything is done correctly and safely.
Taking Necessary Precautions to Protect the Tub and Yourself
In addition to electrical safety, it is essential to take necessary precautions to protect both the tub and yourself during the installation process. Here are some key measures you should consider:
- Before starting the installation, ensure that the floor and surrounding area are clean and free from any debris. This will prevent any potential accidents due to slipping or tripping.
- Use protective covers or blankets to prevent any scratches or damages to the tub’s surface while moving it into the alcove.
- Make sure to have a sturdy and reliable support system in place to hold the tub securely during the installation. This can include using adjustable legs or a secure framework to prevent any shifting or instability.
- Wear appropriate safety gear such as gloves and safety goggles to protect yourself from any potential injuries or accidents during the installation process.
By following these safety guidelines and taking necessary precautions, you can ensure a smooth and safe installation of a drop-in tub in an alcove. Remember, it is better to take your time and prioritize safety rather than rush through the process and risk accidents or damages.
Removal Of Existing Tub (If Applicable)
If you’re looking to upgrade your bathroom and install a drop-in tub in an alcove, the first step is to remove the existing tub. Don’t worry, with a little know-how and some basic tools, it’s a task you can tackle yourself. In this article, we’ll guide you through the process, starting with disconnecting the plumbing and electrical connections, before moving on to removing the old tub.
Before you start removing the tub, it’s important to disconnect any plumbing and electrical connections. Follow these steps to ensure a smooth and safe removal process:
- Turn off the water supply. Locate the shutoff valves near the tub and turn them clockwise until they are fully closed. This will prevent any leaks or water damage during the removal process.
- Next, disconnect the drain assembly. Using a pair of pliers, loosen the nut connecting the drain pipe to the main plumbing. Once loosened, carefully remove the drain assembly.
- If your tub has any electrical connections, such as jets or a built-in heater, ensure that the power is turned off at the circuit breaker before moving forward. This will prevent any electrical accidents during the removal process.
- Once the power is turned off, carefully disconnect any electrical connections. This may involve unscrewing wire nuts or unplugging electrical cords, depending on the setup of your tub.
With the plumbing and electrical connections safely disconnected, it’s time to remove the old tub from the alcove. Follow these steps to ensure a successful removal:
- Start by removing any fixtures or trim around the tub. This may include faucets, handles, or spouts. Use a screwdriver or wrench to remove any screws or nuts holding these fixtures in place.
- Next, inspect the tub for any caulking or adhesive. Using a utility knife or scraper, carefully cut through the caulk or adhesive to loosen the tub from the surrounding walls.
- Once the caulk or adhesive is loosened, enlist the help of a friend or family member to assist with the physical removal of the tub. Start by lifting one side of the tub and carefully sliding it out of the alcove.
- As you remove the old tub, be mindful of any surrounding fixtures or delicate surfaces, such as tile or flooring. Use caution to avoid causing damage during the removal process.
- Once the old tub is removed, clean and prepare the alcove for the installation of the new drop-in tub. This may involve removing any remaining caulk or adhesive, as well as ensuring the area is clean and free of debris.
With the old tub successfully removed, you’re now ready to move on to the exciting part – installing your new drop-in tub in the alcove. Stay tuned for our next article, where we’ll guide you through the installation process step by step.
Disconnecting The Plumbing And Electrical Connections
Disconnecting the Plumbing and Electrical Connections
Before installing a drop-in tub in an alcove, it is crucial to disconnect the plumbing and electrical connections properly. This step ensures a smooth and hassle-free installation process. In this section, we will guide you through the necessary steps to shut off the water and electricity and detach the pipes and wiring carefully.
Shutting Off Water and Electricity
- Locate your main water shut off valve: It is usually found near the water meter or where the main water line enters your home. Shutting off the water supply is essential to prevent any water leakages or accidents during the installation process.
- Turn off the main water supply: Use a wrench or pliers to turn the valve clockwise until it is fully closed. This shuts off the water supply to the entire house, ensuring that no water flows to the alcove where the drop-in tub will be installed.
- Switch off the circuit breaker: Locate the circuit breaker that controls the electricity supply to the bathroom. Flip the corresponding breaker switch to the off position. This step guarantees your safety while working with electrical connections.
Detaching Pipes and Wiring Carefully
Once the water and electricity are safely shut off, it’s time to disconnect the pipes and wiring from the existing bathtub. Follow these steps to complete this process with caution:
- Put on protective gloves and goggles: Before you commence any disconnection, ensure your hands are protected with gloves, and your eyes are shielded with goggles to prevent any injuries.
- Remove the access panels: Depending on your bathroom setup, you might have access panels that cover the plumbing and electrical connections. Unscrew or detach these panels carefully to expose the pipes and wiring connected to the existing tub.
- Disconnect the plumbing connections: Use a wrench to loosen the nuts connecting the pipes to the bathtub. Turn the nuts counterclockwise until they are completely detached. Place a bucket or towel beneath the pipes to catch any residual water.
- Detach the electrical wiring: If your existing tub has electrical components, such as jets or a heater, ensure the electricity is completely switched off. Safely disconnect the wiring by following the manufacturer’s instructions. Keep in mind that electrical connections are delicate, so handle them with care.
By effectively disconnecting the plumbing and electrical connections, you are one step closer to installing your desired drop-in tub in the alcove. Ensure you follow the next steps meticulously to successfully complete the installation process.
Removing The Old Tub
Once you’ve decided to install a drop-in tub in your alcove, the first step is to remove the old tub. This can be a bit tricky, but with the right tools and techniques, you can accomplish it without much difficulty.
Cutting and Removing Surrounding Caulk
The first thing you’ll want to do is cut and remove any caulk that is sealing the old tub to the surrounding walls. This is an important step, as it will allow you to remove the tub without causing any damage to the walls.
- Begin by using a utility knife or a caulk removal tool to carefully cut through the caulk around the perimeter of the tub.
- Make sure to cut all the way through the caulk and separate it from the walls and the tub.
- Once the caulk is cut, use a putty knife or a scraper to carefully remove the caulk from both the walls and the tub.
- Be gentle while removing the caulk to avoid any scratches or damages to the tub or the walls.
- It’s also a good idea to clean the area thoroughly after removing the caulk to ensure a clean surface for the installation of the new tub.
Loosening and Removing Fasteners or Nails
Next, you’ll need to loosen and remove any fasteners or nails that are holding the old tub in place. These can usually be found near the top edge of the tub or along the sides.
- Start by using a screwdriver or a pry bar to loosen any screws or nails that are visible.
- Make sure to remove all the fasteners completely before attempting to lift the tub.
- If you’re unable to locate any visible fasteners, it’s possible that they are hidden behind a lip or edge of the tub.
- In this case, you may need to use a flashlight and a small mirror to locate and remove them.
- Once all the fasteners are removed, you can carefully lift the tub up and out of the alcove.
By following these steps, you’ll be able to successfully remove the old tub from your alcove, making way for the installation of your new drop-in tub. Remember to take your time and be cautious to avoid any unnecessary damages.
Preparing The Alcove For Installation
Before you can install a drop-in tub in an alcove, it’s important to properly prepare the space. This involves ensuring proper support and leveling as well as making necessary adjustments for drainage. In this section, we will go over each step in detail to help you successfully prepare your alcove for installation.
A drop-in tub needs to be properly supported and leveled to ensure stability and prevent any issues down the line. Here’s how you can accomplish this:
- Inspect the alcove floor to make sure it is sturdy enough to support the weight of the tub. If there are any weak spots or structural issues, they should be addressed before proceeding.
- Use a level to check the floor for any unevenness. This step is crucial as an uneven floor can lead to a lopsided installation. Use shims or leveling compound to correct any unevenness and create a level surface for the tub to sit on.
By taking the time to ensure proper support and leveling, you can greatly improve the longevity and performance of your drop-in tub.
Proper drainage is essential for the functionality of your drop-in tub. To ensure that water effectively drains away, follow these steps:
- Determine the location of the tub drain in relation to the alcove floor and make note of it.
- Check the slope of the alcove floor to ensure that water will flow towards the drain. Use a level or a straight edge to measure the slope of the floor and make necessary adjustments.
- If the slope is insufficient, you may need to build up the floor using a mortar mix or self-leveling compound to create the proper slope for drainage.
Remember that proper drainage is crucial for preventing water damage and maintaining the integrity of your drop-in tub installation.
In conclusion, preparing the alcove for installation is an important step in ensuring a successful and long-lasting drop-in tub. By following the steps outlined above, you can create a stable and level surface for your tub and ensure proper drainage for optimal performance. Take the time to properly prepare your alcove, and you’ll be rewarded with a beautiful and functional addition to your bathroom.
Ensuring Proper Support And Leveling
Reinforcing the Alcove Structure if Needed
Ensuring proper support and leveling is crucial when installing a drop-in tub in an alcove. Before you begin the installation process, it’s essential to inspect the alcove structure for any signs of weakness or damage. If you notice any issues, reinforcing the alcove structure beforehand will give you added stability and peace of mind.
Start by examining the walls surrounding the alcove. Look for any cracks, moisture damage, or rot. These can indicate structural problems that need to be addressed before proceeding. You might need to consult with a professional or contractor to assess the condition of the alcove and determine if reinforcement is necessary.
Checking for Levelness Using a Bubble Level
Once you’ve assessed the alcove structure and reinforced it if needed, the next step is to ensure that the installation surface is level. A level surface is essential for proper functioning and longevity of your drop-in tub.
To check for levelness, you can use a handy tool called a bubble level. This tool has a glass tube filled with liquid and an air bubble. Place the level on the alcove surface, making sure it’s completely flat. Check the position of the air bubble inside the glass tube. If the bubble is centered between the marked lines, congratulations! Your surface is level. If not, adjustments need to be made for ensuring a level installation.
Take note of any areas that require adjustment and mark them for later reference. These adjustments can include shimming certain areas or using leveling compounds to even out the surface. Ensuring that the alcove surface is perfectly level will prevent any future issues such as leaks, cracks, or improper drainage.
Making Necessary Adjustments For Drainage
When installing a drop-in tub in an alcove, it is important to make necessary adjustments for proper water drainage. This ensures that your tub functions efficiently and prevents any potential water damage in your bathroom. In this article, we will explore two essential steps to achieving optimal drainage: creating a slope for proper water drainage and installing a drain pan or waterproof membrane. Let’s dive in!
Creating a Slope for Proper Water Drainage
One of the first steps you need to take when installing a drop-in tub in an alcove is to create a slope for proper water drainage. This involves ensuring that the area where the tub will be placed is slightly inclined towards the drainage location. Here’s how you can achieve this:
By creating a slope for proper water drainage, you can prevent any stagnant water from accumulating and ensure smooth and efficient drainage during use.
Installing a Drain Pan or Waterproof Membrane
In addition to creating a slope, it is crucial to install a drain pan or waterproof membrane to protect your bathroom from potential water damage. Here’s how you can do it:
Installing a drain pan or waterproof membrane adds an extra layer of protection, preventing any water from seeping into the floor or walls and causing potential damage over time.
By following these steps and making necessary adjustments for drainage, you can ensure a successful installation of a drop-in tub in an alcove and enjoy a worry-free bathing experience.
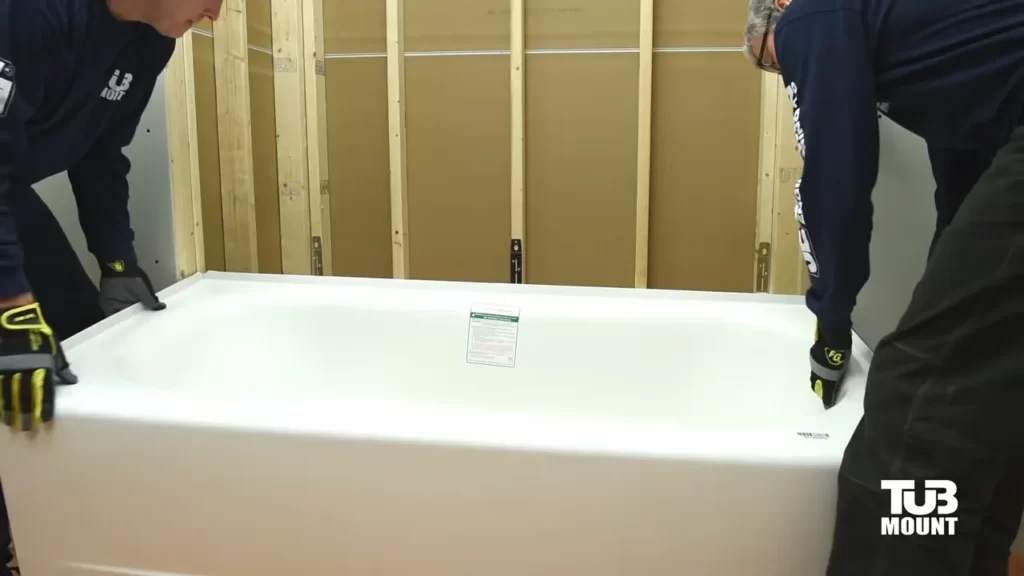
Placing And Securing The Drop-In Tub
If you’re looking to transform your bathroom into a spa-like oasis, installing a drop-in tub in an alcove can be the perfect solution. With its sleek design and seamless integration into your existing space, a drop-in tub offers both style and functionality. In this section, we will guide you through the process of positioning and securing the drop-in tub in your alcove. Let’s get started!
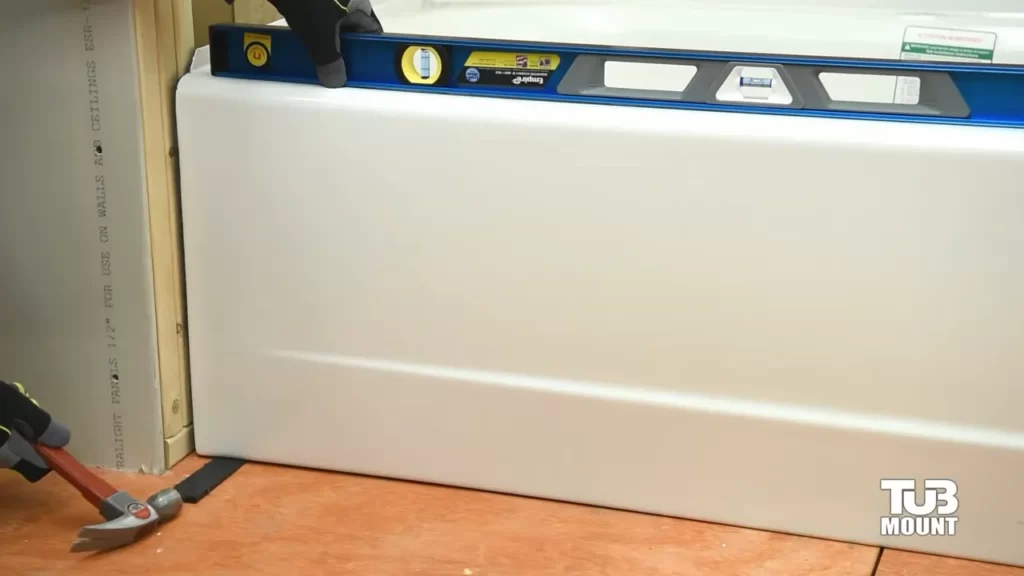
Before securing the tub, it’s crucial to ensure it’s properly positioned in the alcove. Here’s a step-by-step guide to help you get it right:
- Measure the dimensions of your alcove and compare them to the tub’s measurements. Ensure there’s enough space for the tub to fit comfortably.
- Place the tub in the alcove and align it with the walls. Use a level to make sure it’s perfectly horizontal. Adjust as necessary.
- Check the distance between the tub and the surrounding walls. Make sure it’s even on all sides for a symmetrical look.
By meticulously positioning the tub, you’ll create a visually pleasing setup that enhances the overall aesthetic of your bathroom. Now that the tub is in place, let’s move on to securing it.
Securing the drop-in tub ensures it stays in place, providing stability and preventing any unwanted movement. Follow these steps to complete this crucial step:
- Apply a bead of adhesive along the top edge of the tub’s flange, ensuring even distribution.
- Place the tub back into its designated spot and press it firmly against the alcove walls.
- Use screws or nails to secure the tub’s flange to the surrounding wall studs, ensuring it’s secure and stable.
- Check for any gaps between the tub and the walls. Fill them with waterproof caulking to prevent water leakage.
With the tub securely in place, you can look forward to enjoying many relaxing soak sessions. Just remember to allow the adhesive and caulking to dry completely before using the tub. Congratulations! You’ve successfully installed a drop-in tub in your alcove.
Positioning The Tub In The Alcove
Installing a drop-in tub in an alcove requires careful positioning to ensure a proper fit and a seamless look in your bathroom. In this section, we will guide you through the steps of sliding the tub into the alcove and adjusting its position for the perfect installation.
Sliding the Tub into the Alcove
Before you begin, gather your tools, including a level, measuring tape, and assistance from a friend or family member. Sliding the tub into the alcove requires precision and teamwork to avoid any damage or misalignment.
To start, measure the width and depth of the alcove to ensure your drop-in tub will fit correctly. Take into account any obstructions such as pipes or electrical outlets that may need to be accounted for during installation. With these measurements in mind, carefully maneuver the tub towards the alcove opening, taking care not to damage the walls or surrounding surfaces. Use furniture sliders or a dolly to make the process smoother if your tub is heavy.
Adjusting the Tub’s Position for Proper Fit
Once you have successfully slid the tub into the alcove, it’s time to fine-tune its position to achieve a proper fit. Begin by verifying that the edges of the tub align with the edges of the alcove to ensure a seamless appearance. Use a level to check that the tub is evenly aligned from front to back, as well as side to side.
If adjustments are necessary, carefully shift the tub within the alcove until it is perfectly aligned. This may require a slight nudge or repositioning. Use your level as a guide throughout the process to ensure accuracy.
Additionally, check the height of the tub in relation to the surrounding flooring. The tub should be level with or slightly above the floor to allow for proper drainage. If needed, make any necessary adjustments utilizing shims or additional support to achieve the desired height.
Once you are satisfied with the tub’s positioning, secure it in place according to the manufacturer’s instructions. This may involve using adhesive or brackets provided with the tub, ensuring a secure and stable installation.
In conclusion, positioning the drop-in tub in the alcove requires meticulous attention to detail and precision. By following these steps and adjusting the tub’s position for proper fit, you can achieve a seamless and visually appealing installation that will enhance your bathroom for years to come.
Securing The Tub In Place
Once you have successfully positioned your drop-in tub in the alcove, the next crucial step is to secure it in place. This will ensure stability and prevent any unwanted movement during use. In this section, we will discuss two important aspects of securing the tub: installing supports or brackets and ensuring stability to prevent movement. Let’s dive in!
Installing Supports or Brackets to Secure the Tub
Installing supports or brackets is an essential step in securing your drop-in tub in the alcove. These supports or brackets provide additional stability and prevent the tub from shifting or sagging over time. Here’s how you can do it:
- First, measure the distance between the bottom of the tub and the floor. This will help you determine the height of the supports or brackets you will need.
- Using a stud finder, locate the studs in the wall behind the tub. Mark these locations with a pencil for easy reference.
- Next, attach the supports or brackets to the studs using screws. Make sure they are level and secure.
- Once the supports or brackets are in place, carefully lower the tub into the alcove, ensuring it rests securely on the supports.
Ensuring Stability and Preventing Movement
In addition to installing supports or brackets, it is crucial to take some extra steps to ensure overall stability and prevent any movement of the tub. Here are some tips to help you achieve this:
- Apply a bead of waterproof silicone caulk along the edges of the tub where it meets the walls. This will create a watertight seal and prevent any water from seeping behind the tub.
- Consider using shims to level the tub and ensure it is sitting evenly.
- When connecting the water supply and drain pipes, use flexible connectors to allow for movement without putting stress on the pipes.
- Finally, check for any gaps or loose fittings and tighten them if necessary.
By following these steps, you can securely install your drop-in tub in the alcove, providing a stable and enjoyable bathing experience. Now that you have secured the tub in place, you can move on to the next stages of your bathroom renovation project!
Connecting Plumbing And Electrical Systems
Connecting Plumbing and Electrical Systems
When it comes to installing a drop-in tub in an alcove, connecting the plumbing and electrical systems is a critical step. Properly reconnecting plumbing pipes and fixtures, as well as ensuring proper electrical wiring and connections, will ensure that your drop-in tub functions properly and safely. In this section, we will discuss the steps involved in reconnecting plumbing pipes and fixtures, as well as ensuring the correct electrical wiring and connections.
Reconnecting Plumbing Pipes and Fixtures
To reconnect the plumbing pipes and fixtures for your drop-in tub, follow these steps:
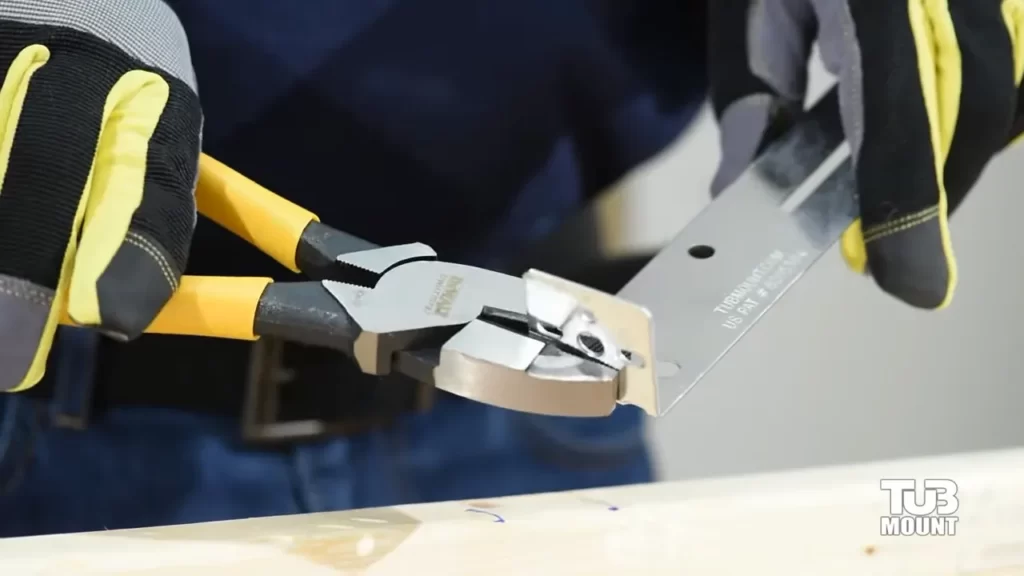
1. Measure and cut the PVC pipes to fit the new location of the tub drain and water supply lines. Ensure that the pipes are the correct length and angle to connect to the tub.
2. Attach the PVC pipes to the tub drain and water supply lines using PVC primer and cement. Follow the manufacturer’s instructions for applying the primer and cement.
3. Connect the tub drain to the main drain pipe using a P-trap. Make sure the P-trap is properly aligned and tightened to prevent any leaks.
4. Install the hot and cold water supply lines to the tub faucet. Use Teflon tape to ensure a tight seal on the threaded connections.
5. Check all connections and pipes for any leaks. If you find any leaks, make the necessary adjustments and retest.
Ensuring Proper Electrical Wiring and Connections
When it comes to the electrical wiring and connections for your drop-in tub, safety is key. Follow these steps to ensure proper electrical wiring and connections:
1. Turn off the power to the bathroom circuit at your home’s main electrical panel. This will prevent any electrical accidents while working on the wiring.
2. Remove the access panel near the tub to expose the electrical connections. Take caution and make sure to wear gloves and use non-conductive tools.
3. Check the electrical wiring to ensure it is in good condition and not damaged. If you find any damaged wires, they will need to be repaired or replaced before proceeding.
4. Connect the electrical wires from the tub to the corresponding wires in the wall. Use wire connectors to secure the connections and prevent any loose or exposed wires.
5. Reinstall the access panel and make sure it is securely fastened. This will protect the electrical connections and prevent any accidental damage.
6. Restore the power at the main electrical panel and test the tub’s electrical components to ensure everything is functioning properly.
In conclusion, connecting the plumbing and electrical systems when installing a drop-in tub in an alcove is an important task that should be done with care. By following the steps outlined above for reconnecting plumbing pipes and fixtures, as well as ensuring proper electrical wiring and connections, you can ensure that your drop-in tub works safely and efficiently for years to come.
Reconnecting Plumbing Pipes And Fixtures
After successfully installing your drop-in tub in the alcove, the next important step is to reconnect the plumbing pipes and fixtures. This crucial task ensures that your tub functions properly, allowing you to enjoy a relaxing bath without any plumbing issues. In this section, we will guide you through the process of installing and connecting drain pipes, as well as attaching water supply lines and faucets.
Installing and Connecting Drain Pipes
The drain pipes play a vital role in removing wastewater from your drop-in tub. To install and connect these pipes correctly, follow these steps:
- Begin by applying plumber’s putty to the underside of the flange, which is the circular piece that fits into the bottom of the tub drain.
- Position the flange centrally within the drain hole, ensuring a tight fit.
- From underneath the tub, secure the flange with the provided screws, tightening them snugly.
- Next, connect the drain pipe assembly to the flange. This assembly typically includes a horizontal pipe that extends from the flange and a vertical pipe that connects to the main drain line.
- Attach the horizontal pipe to the flange, ensuring a watertight seal by applying plumber’s tape or pipe joint compound to the threaded fittings.
- Connect the vertical pipe to the main drain line, securing it tightly.
- Double-check all connections to make sure they are secure and no leaks are present.
Attaching Water Supply Lines and Faucets
Now that your drain pipes are properly connected, it’s time to focus on attaching the water supply lines and faucets. Follow these steps to ensure a hassle-free installation:
- Determine the appropriate type of water supply lines for your installation. This may include flexible braided hoses or copper pipes.
- If using flexible braided hoses, connect one end to the hot water valve and the other end to the corresponding hot water inlet on the faucet. Repeat the same process for cold water.
- If using copper pipes, measure and cut the pipes to the appropriate length, ensuring a secure fit. Use compression fittings or soldering techniques to attach the pipes to the water supply valves and faucet, respectively.
- Tighten all connections using adjustable wrenches or the appropriate tools, ensuring a snug fit without overtightening.
- Turn on the water supply and check for any leaks. If leaks are detected, tighten the connections further or make necessary adjustments.
- Once all connections are secure and leak-free, test the functionality of the faucets by turning them on and off to confirm proper water flow.
By following these steps, you can successfully reconnect the plumbing pipes and fixtures when installing a drop-in tub in an alcove. Remember to always refer to the manufacturer’s instructions and consult a professional plumber if needed. Now that your drop-in tub is fully installed and connected, you can look forward to enjoying a luxurious and rejuvenating bathing experience!
Ensuring Proper Electrical Wiring And Connections
One of the crucial steps in installing a drop-in tub in an alcove is ensuring proper electrical wiring and connections. This ensures the safe and efficient operation of the tub, as well as compliance with electrical codes. In this section, we will explore the necessary steps to install and connect electrical components and test the connections and safety features.
Installing and Connecting Electrical Components
To begin the process of installing and connecting electrical components, it is important to first consult the manufacturer’s instructions and any applicable electrical codes. These guidelines will provide specific information on wiring requirements and the necessary components for the electrical installation.
To start, locate the electrical access panel near the tub or in the adjacent wall. This panel allows easy access to the electrical components and connections. Open the access panel and assess the existing wiring. Ensure there is a dedicated circuit for the tub, separate from other household circuits.
If there is no dedicated circuit, it is crucial to hire a licensed electrician to install one. This will ensure the tub operates safely and efficiently without overloading the existing electrical system. The dedicated circuit should be properly sized to handle the electrical demand of the tub.
Next, carefully connect the electrical components according to the manufacturer’s instructions. This may include wiring connections for the motor, pumps, lights, and any additional features. Pay close attention to the color-coded wiring and secure all connections tightly.
Additionally, consider using wire connectors or electrical tape to safeguard the connections from moisture and potential damage. This extra precaution will further protect against electrical hazards and ensure the longevity of the electrical system.
Testing Electrical Connections and Safety Features
After the electrical components have been installed and connected, it is essential to test the connections and safety features. This step ensures that everything is functioning properly and that there are no defects or faults that could pose a risk.
First, turn off the tub’s circuit breaker in the main electrical panel to prevent any accidental electrical shocks during the testing process. Then, turn on the tub and observe if all the electrical components are operating as intended. Check for any abnormal noises, fluctuations in power, or visible signs of malfunction.
As an additional safety measure, test the ground fault circuit interrupter (GFCI) associated with the tub. This device is designed to protect against electrical shocks by quickly interrupting the electrical circuit if it detects a fault. Press the “test” button on the GFCI to ensure it properly shuts off the power supply to the tub.
Lastly, have a qualified electrician inspect the electrical connections and safety features before using the tub. They can perform a thorough inspection to ensure everything is up to code and operating safely.
By following these steps and ensuring proper electrical wiring and connections, you can enjoy a safe and relaxing experience in your newly installed drop-in tub. Remember to prioritize safety and consult professionals when in doubt, as electrical work can be complex and requires expertise.
Finishing Touches And Testing
In order to ensure a watertight seal and prevent any leaks, it is crucial to apply sealant and caulk around the edges of the drop-in tub. This step is essential in maintaining the structural integrity of the tub installation and prolonging its lifespan.
Before applying sealant and caulk, make sure the surface of the alcove is clean and dry. Remove any debris or loose particles to create a smooth surface for the sealant to adhere to. Applying a primer can also help to ensure a stronger bond between the alcove and the sealant.
Next, carefully apply a bead of silicone sealant along the edges of the tub where it meets the alcove. Use a caulk gun for precise application and ensure that the sealant covers any gaps or spaces between the tub and the alcove. Be generous with the amount of sealant applied, but avoid overdoing it to prevent any excess from oozing out.
Once the sealant is in place, use a caulk smoothing tool or a gloved finger to smooth and shape the sealant. This will not only improve its appearance but also ensure a more effective seal. Lastly, allow the sealant to cure according to the manufacturer’s instructions before moving on to the next step.
After completing the installation and applying the necessary sealant and caulk, it is imperative to thoroughly test the drop-in tub for any potential leaks or functional issues. This step will give you the peace of mind knowing that your tub is properly installed and ready to be used.
Start by filling the tub with water, ensuring that the water level is above the jets (if applicable). While the tub is being filled, carefully inspect the surrounding areas for any signs of leakage. Pay close attention to the corners, edges, and seams where the tub meets the alcove. If you spot any leaks, identify the source and address it immediately.
Once filled, let the water sit in the tub for a period of time, preferably around 15-30 minutes. During this time, check for any noticeable changes in the water level. If there is a significant drop in water level, this may indicate a leak. Additionally, inspect the area around the drain and overflow to ensure proper drainage.
In addition to checking for leaks, test the tub’s functionality. Turn on the jets (if applicable) and observe their performance. Make sure they are operating smoothly and efficiently without any unusual noises or vibrations. Test the hot and cold water knobs, the drain stopper, and any other accessories or features your tub may have.
If everything appears to be in good working order and no leaks are detected, congratulations! You have successfully installed a drop-in tub in your alcove. Clean up any excess water and enjoy the luxurious relaxation that your new tub provides.
Applying Sealant And Caulk
When it comes to installing a drop-in tub in an alcove, one crucial step you can’t overlook is applying sealant and caulk. This process ensures that your tub and its surrounding materials are properly sealed, preventing any water seepage that could lead to damage or moisture issues.
Selecting the Right Sealant for the Tub and Surrounding Materials
Before you begin applying sealant, it’s important to select the right type of sealant for your specific tub and surrounding materials. Different materials may require different sealants, so take the time to research and choose one that is compatible and suitable.
For the tub itself, an adhesive or silicone sealant is typically recommended. These types of sealants are known for their waterproof properties and ability to bond well with various bathtub materials like acrylic, fiberglass, or enamel.
When it comes to the surround, which might be made of tile or another material, a sealant designed for those specific materials is necessary. Be sure to read the manufacturer’s instructions and choose a sealant that is recommended for both the tub and the surround materials.
Note: Always check the label on the sealant product for any specific instructions or recommendations from the manufacturer.
Applying Caulk to Prevent Water Seepage
After selecting the appropriate sealant, you’ll need to apply caulk to further enhance the waterproofing and prevent water seepage. Caulk acts as an additional barrier, filling in any gaps or joints between the tub and the surround to create a tight seal.
Follow these steps to apply caulk:
- Clean the area thoroughly: Before applying caulk, ensure that the tub and surrounding area are clean and free of any dust, debris, or old caulk. Use a mild cleanser and a sponge or cloth to wipe down the surfaces.
- Prepare the caulk and caulk gun: Cut the tip of the caulk tube at a 45-degree angle, then insert it into the caulk gun. Squeeze a small test bead onto a scrap piece of cardboard to ensure the caulk flows smoothly.
- Apply the caulk: Start at one corner or joint and hold the caulk gun at a 45-degree angle. Gradually squeeze the trigger to release a steady bead of caulk, moving along the joint or gap in a continuous motion. Apply firm pressure to ensure the caulk adheres properly.
- Smooth the caulk: After applying the caulk, use a caulk smoothing tool or your finger (using a disposable glove or caulk smoother) to smooth and shape the caulk line. This helps create a neat finish and further seal any potential entry points for water.
- Allow the caulk to cure: Follow the manufacturer’s instructions regarding the drying and curing time for the caulk. Typically, it is recommended to wait at least 24 hours before using the tub or exposing it to water.
By following these steps and ensuring the proper application of sealant and caulk, you can effectively prevent water seepage and ensure a watertight installation for your drop-in tub in an alcove.
Testing The Tub For Leaks And Proper Functionality
After successfully installing a drop-in tub in your alcove, it is crucial to test it thoroughly for leaks and proper functionality. This will ensure that your new tub provides you with a relaxing and enjoyable bathing experience. In this section, we will go over the steps to fill the tub with water and check for leaks, as well as test the tub’s drainage and jets (if applicable). Let’s get started!
Filling the Tub with Water and Checking for Leaks
The first step in testing the tub is to fill it with water and check for any leaks. Follow these simple steps:
- Close all drain valves and faucets to prevent any water from escaping the tub.
- Using a bucket or a hose, fill the tub with water until it reaches a desirable level. Be mindful of the maximum fill line indicated by the manufacturer.
- Observe the tub closely for any signs of leakage. Pay close attention to the drain area, faucet connections, and any visible pipes.
- If you notice any leaks, try tightening the connections or valves. If the leaks persist, it may be necessary to seek professional help to resolve the issue.
- Once you are satisfied that there are no leaks, let the water sit in the tub for at least 15 minutes to ensure there are no hidden leaks that may take longer to appear.
Testing the Tub’s Drainage and Jets (if applicable)
Testing the drainage and jets of your tub is an essential part of ensuring its proper functionality. Here’s how to do it:
If your tub comes with jets, ensure that the power supply is connected and turned on. Activate the jets and observe if they are functioning correctly. Check for any irregularities or weak water pressure. If you notice any issues, consult the tub’s manual for troubleshooting tips or contact the manufacturer for assistance.
To test the tub’s drainage:
- Open the drain valves and let the water flow out. Observe how quickly the water drains and ensure that there are no blockages or slow drainage.
- If the water drains too slowly or there are any obstructions, check the drain fittings and pipes for any debris or clogs. Use a plunger or a drain snake to remove any blockages.
- Repeat the draining process a few times to ensure consistent and efficient drainage.
By following these steps to test your new drop-in tub for leaks and proper functionality, you can rest assured that you will have a seamlessly functioning and leak-free bathing experience. Enjoy your new tub!
Frequently Asked Questions
Can You Put A Drop In Tub In An Alcove?
Yes, you can install a drop-in tub in an alcove. It is a suitable option for creating a clean and seamless look in your bathroom.
How Are Drop In Tubs Installed?
Drop-in tubs are installed by placing them into a prepared opening in the bathroom floor or platform. Ensure the area is clean and level, then slide the tub into place. Connect the plumbing and secure the tub with screws or adhesive.
Finally, seal the edges for a finished look.
What Does A Drop In Tub Sit On?
A drop-in tub sits on a framed platform or deck built specifically for the tub.
What Is The Difference Between Alcove And Drop In Tubs?
Alcove tubs are installed against three walls, while drop-in tubs are placed into a deck or platform. Alcove tubs save space and are typically more affordable, while drop-in tubs offer more design options and are easier to clean.
Conclusion
In sum, installing a drop-in tub in an alcove may seem daunting, but with the right guidance, it can be accomplished efficiently. By following the steps outlined you can ensure a successful installation without the need for professional assistance.
Remember to measure properly, prepare the alcove adequately, and secure the tub securely, and you’ll soon be enjoying your luxurious new addition to the bathroom.